MC-CL935 Operating Instructions Manual
Page 4
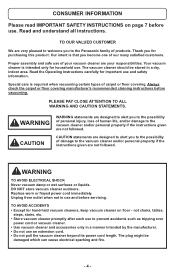
... hand-held vacuum cleaners, keep vacuum cleaner on page 7 before use . Read the Operating Instructions carefully for purchasing this product. Always check the carpet or floor covering manufacturer's recommended cleaning instructions before servicing. WARNING CAUTION WARNING statements are designed to alert you to the vacuum cleaner and/or personal property if the instructions given are your responsibilities. DO NOT store vacuum cleaner outdoors. not chairs, tables, steps, stairs, etc. • Store vacuum cleaner...
... hand-held vacuum cleaners, keep vacuum cleaner on page 7 before use . Read the Operating Instructions carefully for purchasing this product. Always check the carpet or floor covering manufacturer's recommended cleaning instructions before servicing. WARNING CAUTION WARNING statements are designed to alert you to the vacuum cleaner and/or personal property if the instructions given are your responsibilities. DO NOT store vacuum cleaner outdoors. not chairs, tables, steps, stairs, etc. • Store vacuum cleaner...
MC-CL935 Operating Instructions Manual
Page 7
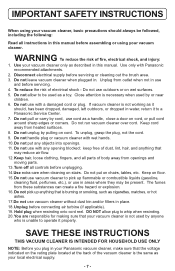
... run vacuum cleaner over cord. Do not handle plug or vacuum cleaner with Panasonic recommended attachments. 2. Hold plug when rewinding onto cord reel. To reduce the risk of the vacuum cleaner is not working as a handle, close a door on wet surfaces. 5. Do not allow plug to pick up anything that the voltage indicated on stairs. Do not use vacuum cleaner to whip when rewinding. 20. Keep hair, loose clothing, fingers, and all instructions in this manual before assembling...
... run vacuum cleaner over cord. Do not handle plug or vacuum cleaner with Panasonic recommended attachments. 2. Hold plug when rewinding onto cord reel. To reduce the risk of the vacuum cleaner is not working as a handle, close a door on wet surfaces. 5. Do not allow plug to pick up anything that the voltage indicated on stairs. Do not use vacuum cleaner to whip when rewinding. 20. Keep hair, loose clothing, fingers, and all instructions in this manual before assembling...
MC-CL935 Operating Instructions Manual
Page 14
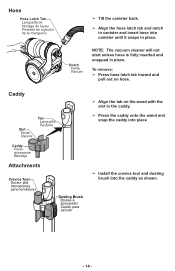
...Bandeja Attachments Crevice Tool Suceur plat Herramienta para hendiduras Dusting Brush Brosse à épousseter Cepillo para sacudir ➢ Align the tab on hose. Notch Fente Ranura NOTE: The vacuum cleaner will not start unless hose is fully inserted and snapped in place. Hose Hose ...canister and insert hose into the caddy as shown. - 14 - To remove: ➢ Press hose latch tab inward and pull out on the wand with the slot in the caddy. ➢ Press the caddy onto the wand and snap the caddy into place ➢ Install the crevice tool and dusting brush into canister...
...Bandeja Attachments Crevice Tool Suceur plat Herramienta para hendiduras Dusting Brush Brosse à épousseter Cepillo para sacudir ➢ Align the tab on hose. Notch Fente Ranura NOTE: The vacuum cleaner will not start unless hose is fully inserted and snapped in place. Hose Hose ...canister and insert hose into the caddy as shown. - 14 - To remove: ➢ Press hose latch tab inward and pull out on the wand with the slot in the caddy. ➢ Press the caddy onto the wand and snap the caddy into place ➢ Install the crevice tool and dusting brush into canister...
MC-CL935 Operating Instructions Manual
Page 16
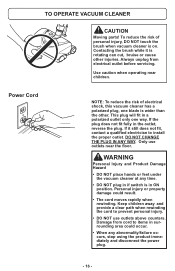
... in surrounding area could result. • The cord moves rapidly when rewinding. If it is on. DO NOT CHANGE THE PLUG IN ANY WAY. WARNING Personal Injury and Product Damage Hazard • DO NOT place hands or feet under the vacuum cleaner at any abnormality/failure occurs, stop using the product immediately and disconnect the power plug. - 16 - Personal injury or property damage...
... in surrounding area could result. • The cord moves rapidly when rewinding. If it is on. DO NOT CHANGE THE PLUG IN ANY WAY. WARNING Personal Injury and Product Damage Hazard • DO NOT place hands or feet under the vacuum cleaner at any abnormality/failure occurs, stop using the product immediately and disconnect the power plug. - 16 - Personal injury or property damage...

MC-CL935 Operating Instructions Manual
Page 18
... the wand length you may have to prevent damage or injury from the moving cord. ➢ Push cord rewind button. turns on handle. Headlight is adjustable and requires no assembly. Headlight is pushed. ➢ Plug the polarized power cord into a 120 Volt outlet located near the floor. The cord will not rewind until the cord rewind button is on both canister and Power Nozzle motors. OFF OFF FLOOR CARPET OFF ➢ OFF ➢ FLOOR - turns on...
... the wand length you may have to prevent damage or injury from the moving cord. ➢ Push cord rewind button. turns on handle. Headlight is adjustable and requires no assembly. Headlight is pushed. ➢ Plug the polarized power cord into a 120 Volt outlet located near the floor. The cord will not rewind until the cord rewind button is on both canister and Power Nozzle motors. OFF OFF FLOOR CARPET OFF ➢ OFF ➢ FLOOR - turns on...
MC-CL935 Operating Instructions Manual
Page 20
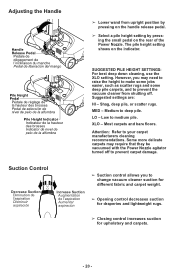
... change vacuum cleaner suction for different fabric and carpet weight. ➢ Opening control decreases suction for draperies and lightweight rugs. ➢ Closing control increases suction for upholstery and carpets. - 20 - LO - Suction Control Decrease Suction Diminution de l'aspiration Disminuir aspiración Increase Suction Augmentation de l'aspiration Aumentar aspiración ➢ Suction control allows you may require that they be vacuumed with the Power Nozzle agitator turned off . Suggested settings...
... change vacuum cleaner suction for different fabric and carpet weight. ➢ Opening control decreases suction for draperies and lightweight rugs. ➢ Closing control increases suction for upholstery and carpets. - 20 - LO - Suction Control Decrease Suction Diminution de l'aspiration Disminuir aspiración Increase Suction Augmentation de l'aspiration Aumentar aspiración ➢ Suction control allows you may require that they be vacuumed with the Power Nozzle agitator turned off . Suggested settings...

MC-CL935 Operating Instructions Manual
Page 22
... remove handle or wand while vacuum cleaner is attached, turn off and unplug vacuum cleaner before removing wand from Power Nozzle. ➢ To remove wands from wand. ➢ Press handle quick release button and pull up on handle. ➢ Slide attachments firmly on wand as needed . - 22 - Wand Quick Release Pedal Pédale de dégagement rapide du tube Pedal de liberación rápida del tubo ➢ Put attachments on handle as needed . This could cause sparking and damage the electrical...
... remove handle or wand while vacuum cleaner is attached, turn off and unplug vacuum cleaner before removing wand from Power Nozzle. ➢ To remove wands from wand. ➢ Press handle quick release button and pull up on handle. ➢ Slide attachments firmly on wand as needed . - 22 - Wand Quick Release Pedal Pédale de dégagement rapide du tube Pedal de liberación rápida del tubo ➢ Put attachments on handle as needed . This could cause sparking and damage the electrical...
MC-CL935 Operating Instructions Manual
Page 24
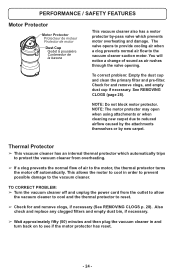
... CORRECT PROBLEM: ➢ Turn the vacuum cleaner off automatically. Thermal Protector ➢ This vacuum cleaner has an internal thermal protector which prevents motor overheating and damage. The valve opens to provide cooling air when a clog prevents normal air flow to reset. ➢ Check for and remove clogs, and empty dust cup if necessary. See REMOVING CLOGS (page 28). NOTE: Do not block motor protector. To correct problem: Empty the dust cup and clean the primary filter and pre-filter. Also check and replace any clogged filters...
... CORRECT PROBLEM: ➢ Turn the vacuum cleaner off automatically. Thermal Protector ➢ This vacuum cleaner has an internal thermal protector which prevents motor overheating and damage. The valve opens to provide cooling air when a clog prevents normal air flow to reset. ➢ Check for and remove clogs, and empty dust cup if necessary. See REMOVING CLOGS (page 28). NOTE: Do not block motor protector. To correct problem: Empty the dust cup and clean the primary filter and pre-filter. Also check and replace any clogged filters...
MC-CL935 Operating Instructions Manual
Page 26
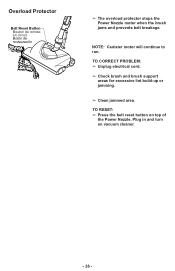
Plug in and turn on top of the Power Nozzle. TO CORRECT PROBLEM: ➢ Unplug electrical cord. ➢ Check brush and brush support areas for excessive lint build-up or jamming. ➢ Clean jammed area. NOTE: Canister motor will continue to run. TO RESET: ➢ Press the belt reset button on vacuum cleaner. - 26 - Overload Protector Belt Reset Button Bouton de remise en circuit Botón de restauración ➢ The overload protector stops the Power Nozzle motor when the brush jams and prevents belt breakage.
Plug in and turn on top of the Power Nozzle. TO CORRECT PROBLEM: ➢ Unplug electrical cord. ➢ Check brush and brush support areas for excessive lint build-up or jamming. ➢ Clean jammed area. NOTE: Canister motor will continue to run. TO RESET: ➢ Press the belt reset button on vacuum cleaner. - 26 - Overload Protector Belt Reset Button Bouton de remise en circuit Botón de restauración ➢ The overload protector stops the Power Nozzle motor when the brush jams and prevents belt breakage.

MC-CL935 Operating Instructions Manual
Page 28
... VACUUM CLEANER Removing Clogs The vacuum cleaner creates suction that has been dipped in warm soapy water, rinse and air dry. ➢ DO NOT use tools if they are wet. - 28 - Turn off and unplug vacuum cleaner from wall outlet. ➢ Clean exterior using a clean, soft cloth that picks up dirt. Handle Poignée Mango Telescopic Wand Tube télescopique Tubo telescópico Power Nozzle Tête motorisée Power Nozzle Pre-Filter Préfiltre Pre-Filtro Dust Cup...
... VACUUM CLEANER Removing Clogs The vacuum cleaner creates suction that has been dipped in warm soapy water, rinse and air dry. ➢ DO NOT use tools if they are wet. - 28 - Turn off and unplug vacuum cleaner from wall outlet. ➢ Clean exterior using a clean, soft cloth that picks up dirt. Handle Poignée Mango Telescopic Wand Tube télescopique Tubo telescópico Power Nozzle Tête motorisée Power Nozzle Pre-Filter Préfiltre Pre-Filtro Dust Cup...

MC-CL935 Operating Instructions Manual
Page 32
... install damp. - 32 - 2 1 TO REPLACE DUST CUP ➢ Place dust cup back into vacuum cleaner. ➢ DO NOT wash in place. UNLOCKED (For Cleaning) DÉVERROUILLÉ (pour le nettoyage) ABIERTO (Para Vaciar) ➢ Rotate dust cup lid assembly counterclockwise as indicated on several sides to ensure best cleaning. ➢ If necessary, rinse with the dust cup handle raised. ➢ Lower the dust cup handle to lock dust cup in the dishwasher. Pre-Filter...
... install damp. - 32 - 2 1 TO REPLACE DUST CUP ➢ Place dust cup back into vacuum cleaner. ➢ DO NOT wash in place. UNLOCKED (For Cleaning) DÉVERROUILLÉ (pour le nettoyage) ABIERTO (Para Vaciar) ➢ Rotate dust cup lid assembly counterclockwise as indicated on several sides to ensure best cleaning. ➢ If necessary, rinse with the dust cup handle raised. ➢ Lower the dust cup handle to lock dust cup in the dishwasher. Pre-Filter...

MC-CL935 Operating Instructions Manual
Page 36
... located inside the dust cup lid. NOTE: When the cleaning of the filter no longer restores vacuum cleaner suction to clean the primary filter with cold water only, DO NOT use detergent or soap. DO NOT install damp. Primary Filter (Washable) Latch Loquet Cierre Dust Cup Lid Couvercle du godet à poussière Tapa del compartimiento de polvo The primary filter is recommended to full power, replace the filter...
... located inside the dust cup lid. NOTE: When the cleaning of the filter no longer restores vacuum cleaner suction to clean the primary filter with cold water only, DO NOT use detergent or soap. DO NOT install damp. Primary Filter (Washable) Latch Loquet Cierre Dust Cup Lid Couvercle du godet à poussière Tapa del compartimiento de polvo The primary filter is recommended to full power, replace the filter...

MC-CL935 Operating Instructions Manual
Page 38
... canister. ➢ Remove exhaust filter from filter tray and dispose. ➢ Replace exhaust filter cartridge. Replace the filter when the entire surface area is covered evenly. Place the new filter cartridge into place until it will lose its dust trapping ability. The filter CANNOT be replaced when dirty. HEPA MEDIA EXHAUST FILTER The exhaust filter cartridge must be washed as shown. ➢ Reinstall the exhaust filter tray. Exhaust Filter Changing...
... canister. ➢ Remove exhaust filter from filter tray and dispose. ➢ Replace exhaust filter cartridge. Replace the filter when the entire surface area is covered evenly. Place the new filter cartridge into place until it will lose its dust trapping ability. The filter CANNOT be replaced when dirty. HEPA MEDIA EXHAUST FILTER The exhaust filter cartridge must be washed as shown. ➢ Reinstall the exhaust filter tray. Exhaust Filter Changing...
MC-CL935 Operating Instructions Manual
Page 40
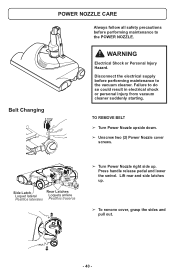
...; Turn Power Nozzle right side up . ➢ To remove cover, grasp the sides and pull out. - 40 - Belt Changing WARNING Electrical Shock or Personal Injury Hazard. TO REMOVE BELT ➢ Turn Power Nozzle upside down. ➢ Unscrew two (2) Power Nozzle cover screws. Failure to do so could result in electrical shock or personal injury from vacuum cleaner suddenly starting. POWER NOZZLE CARE Always follow all safety precautions before performing maintenance to...
...; Turn Power Nozzle right side up . ➢ To remove cover, grasp the sides and pull out. - 40 - Belt Changing WARNING Electrical Shock or Personal Injury Hazard. TO REMOVE BELT ➢ Turn Power Nozzle upside down. ➢ Unscrew two (2) Power Nozzle cover screws. Failure to do so could result in electrical shock or personal injury from vacuum cleaner suddenly starting. POWER NOZZLE CARE Always follow all safety precautions before performing maintenance to...

MC-CL935 Operating Instructions Manual
Page 42
... the cover and base. ➢ Turn Power Nozzle upside down and replace two (2) cover screws. - 42 - TO REPLACE BELT Agitator Agitateur Agitador Motor Shaft Arbre du moteur Impulsor del motor Belt Path Chemin de courroie Ruta de la correa End Cap Bouchon Tapa del extremo ➢ Install new belt in belt path on front edge of cover and base. ➢ Lift agitator assembly out and remove worn belt.
... the cover and base. ➢ Turn Power Nozzle upside down and replace two (2) cover screws. - 42 - TO REPLACE BELT Agitator Agitateur Agitador Motor Shaft Arbre du moteur Impulsor del motor Belt Path Chemin de courroie Ruta de la correa End Cap Bouchon Tapa del extremo ➢ Install new belt in belt path on front edge of cover and base. ➢ Lift agitator assembly out and remove worn belt.
MC-CL935 Operating Instructions Manual
Page 44
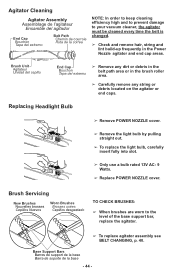
...: In order to keep cleaning efficiency high and to prevent damage to the level of the base support bar, replace the agitator. ➢ To replace agitator assembly see BELT CHANGING, p. 40. Brush Servicing New Brushes Nouvelles brosses Cepillos Nuevos Worn Brushes Brosses usées Cepillos desgastado TO CHECK BRUSHES: ➢ When brushes are worn to your vacuum cleaner, the agitator must be cleaned every time the belt is changed. ➢ Check and remove hair, string and...
...: In order to keep cleaning efficiency high and to prevent damage to the level of the base support bar, replace the agitator. ➢ To replace agitator assembly see BELT CHANGING, p. 40. Brush Servicing New Brushes Nouvelles brosses Cepillos Nuevos Worn Brushes Brosses usées Cepillos desgastado TO CHECK BRUSHES: ➢ When brushes are worn to your vacuum cleaner, the agitator must be cleaned every time the belt is changed. ➢ Check and remove hair, string and...
MC-CL935 Operating Instructions Manual
Page 46
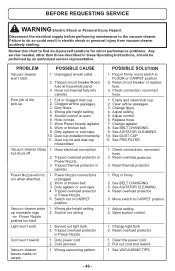
... panel 3. Worn or broken belt. 9. Dust cup installed incorrectly. 11. Hose electrical connection. 2. Power Nozzle connections unplugged. 2. Worn or broken belt. 3. Dirty agitator or end caps. 4. Switch not in Power Nozzle. 3. Burned out light bulb. 2. POSSIBLE SOLUTION 1. Adjust setting. 5. Adjust control. 6. See AGITATOR CLEANING. 10. Reset thermal protector. 1. Open suction control. 1. Clean the power cord. 2. PROBLEM POSSIBLE CAUSE Vacuum cleaner won 't rewind. 1. Tripped circuit breaker/blown fuse at wall outlet. 2. Poor job of dirt pick-up moveable rugs -or...
... panel 3. Worn or broken belt. 9. Dust cup installed incorrectly. 11. Hose electrical connection. 2. Power Nozzle connections unplugged. 2. Worn or broken belt. 3. Dirty agitator or end caps. 4. Switch not in Power Nozzle. 3. Burned out light bulb. 2. POSSIBLE SOLUTION 1. Adjust setting. 5. Adjust control. 6. See AGITATOR CLEANING. 10. Reset thermal protector. 1. Open suction control. 1. Clean the power cord. 2. PROBLEM POSSIBLE CAUSE Vacuum cleaner won 't rewind. 1. Tripped circuit breaker/blown fuse at wall outlet. 2. Poor job of dirt pick-up moveable rugs -or...

MC-CL935 Operating Instructions Manual
Page 50
..., improper maintenance, power line surge, lightning damage, modification, introduction of sand, humidity or liquids, commercial use such as is". This warranty is attributable to acts of a new product which starts with the date of original purchase ("warranty period"), at its option either (a) repair your product with new or refurbished parts, (b) replace it with a new or a refurbished equivalent value product, or (c) refund your product does not work properly because...
..., improper maintenance, power line surge, lightning damage, modification, introduction of sand, humidity or liquids, commercial use such as is". This warranty is attributable to acts of a new product which starts with the date of original purchase ("warranty period"), at its option either (a) repair your product with new or refurbished parts, (b) replace it with a new or a refurbished equivalent value product, or (c) refund your product does not work properly because...
MC-CL935 Operating Instructions Manual
Page 51
... Customer Service and Literature requests by visiting our Web Site at: http://www.panasonic.com/help or, contact us directly at: 1-800-211-PANA (7262) Monday-Friday 9am-9pm, Saturday-Sunday 10am-7pm EST For hearing or speech impaired TTY users, TTY: 1-877-833-8855 Accessory Purchases (United States and Puerto Rico) Purchase Parts, Accessories and Instruction Books online...
... Customer Service and Literature requests by visiting our Web Site at: http://www.panasonic.com/help or, contact us directly at: 1-800-211-PANA (7262) Monday-Friday 9am-9pm, Saturday-Sunday 10am-7pm EST For hearing or speech impaired TTY users, TTY: 1-877-833-8855 Accessory Purchases (United States and Puerto Rico) Purchase Parts, Accessories and Instruction Books online...

MC-CL935 Operating Instructions Manual
Page 52
.... LIMITED WARRANTY EXCHANGE PROGRAM Panasonic Canada Inc. The decision to repair, replace or refund will be free from defects in materials or workmanship, and DOES NOT COVER normal wear and tear or cosmetic damage. Parts such as disposable dust bags, filters, belts, light bulbs and agitator brushes are caused by products not supplied by Panasonic Canada Inc. WARRANTY Panasonic Canada Inc. 5770, Ambler Drive, Mississauga (Ontario) L4W 2T3 PANASONIC PRODUCT...
.... LIMITED WARRANTY EXCHANGE PROGRAM Panasonic Canada Inc. The decision to repair, replace or refund will be free from defects in materials or workmanship, and DOES NOT COVER normal wear and tear or cosmetic damage. Parts such as disposable dust bags, filters, belts, light bulbs and agitator brushes are caused by products not supplied by Panasonic Canada Inc. WARRANTY Panasonic Canada Inc. 5770, Ambler Drive, Mississauga (Ontario) L4W 2T3 PANASONIC PRODUCT...


