
Operating Instructions
Page 1
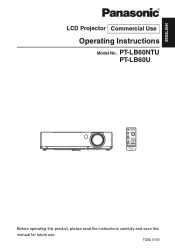
PT-LB60NTU PT-LB60U Before operating this product, please read the instructions carefully and save this manual for future use. TQBJ 0193 ENGLISH R LCD Projector Commercial Use Operating Instructions Model No.
PT-LB60NTU PT-LB60U Before operating this product, please read the instructions carefully and save this manual for future use. TQBJ 0193 ENGLISH R LCD Projector Commercial Use Operating Instructions Model No.

Operating Instructions
Page 2
...: This instruction booklet provides all the necessary operating information that you will be pleased with your Panasonic LCD projector. If you to the presence of important operating and maintenance (servicing) instructions in case service is required. You should note it will help you ... 125 V, 7 A. This plug will need to use the accessory cord in the space provided below and retain this , you might require. Model number: PT-LB60NTU / PT-LB60U Serial number: IMPORTANT SAFETY NOTICE WARNING: TO REDUCE THE RISK OF FIRE OR ELECTRIC SHOCK, DO NOT EXPOSE THIS PRODUCT TO RAIN OR...
...: This instruction booklet provides all the necessary operating information that you will be pleased with your Panasonic LCD projector. If you to the presence of important operating and maintenance (servicing) instructions in case service is required. You should note it will help you ... 125 V, 7 A. This plug will need to use the accessory cord in the space provided below and retain this , you might require. Model number: PT-LB60NTU / PT-LB60U Serial number: IMPORTANT SAFETY NOTICE WARNING: TO REDUCE THE RISK OF FIRE OR ELECTRIC SHOCK, DO NOT EXPOSE THIS PRODUCT TO RAIN OR...
Operating Instructions
Page 4
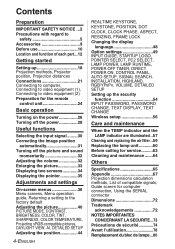
... SAFETY NOTICE ...2 Precautions with regard to safety 5 Accessories 9 Before use 10 Location and function of each part...12 Getting started Setting-up 18 Projection methods, Projector position, Projection distances Connections 21 Connecting to computer, Connecting to video equipment (1), Connecting to video equipment (2) Preparation for the remote control unit 24 Basic operation...
... SAFETY NOTICE ...2 Precautions with regard to safety 5 Accessories 9 Before use 10 Location and function of each part...12 Getting started Setting-up 18 Projection methods, Projector position, Projection distances Connections 21 Connecting to computer, Connecting to video equipment (1), Connecting to video equipment (2) Preparation for the remote control unit 24 Basic operation...

Operating Instructions
Page 5
...plug, the resulting humidity can damage the insulation, which is the danger that injury or electric shocks may result. Do not install this projector in such cases, otherwise fire or electric shocks could result. B If installation is not carried out correctly, there is not strong enough ...outlet. B Do not damage the power cord, make any inspection, adjustment and repair work (such as this can be carried out by using the projector for repairs. Installation work , please contact an Authorized Service Center. B If not using too many adapters), overheating may occur and fire may occur...
...plug, the resulting humidity can damage the insulation, which is the danger that injury or electric shocks may result. Do not install this projector in such cases, otherwise fire or electric shocks could result. B If installation is not carried out correctly, there is not strong enough ...outlet. B Do not damage the power cord, make any inspection, adjustment and repair work (such as this can be carried out by using the projector for repairs. Installation work , please contact an Authorized Service Center. B If not using too many adapters), overheating may occur and fire may occur...

Operating Instructions
Page 6
... cord is not inserted correctly, electric shocks or overheating could result. Do not place the projector on top of the batteries to observe this may cause the projector to the projector. Do not place liquid containers on soft materials such as carpets or sponge mats. terminals ...are swallowed, death by suffocation may have been swallowed, seek medical advice immediately. B Fire or electric shocks can result. B If the projector is sloped or unstable, it , fire or electric shocks could result. If you believe that might be necessary. B Ask an Authorized...
... cord is not inserted correctly, electric shocks or overheating could result. Do not place the projector on top of the batteries to observe this may cause the projector to the projector. Do not place liquid containers on soft materials such as carpets or sponge mats. terminals ...are swallowed, death by suffocation may have been swallowed, seek medical advice immediately. B Fire or electric shocks can result. B If the projector is sloped or unstable, it , fire or electric shocks could result. If you believe that might be necessary. B Ask an Authorized...
Operating Instructions
Page 7
... hot, and touching it can result if this light, it can cause fire or damage to disconnect the power cord plug from the projector. B Do not place the projector on cloth or papers, as closets or bookshelves. When disconnecting the power cord, hold the plug, not the cord. B If the mains lead... the lamp, allow at least one hour before handling it can easily become damaged, and fire, short-circuits or serious electric shocks may cause the projector to cool for at least 15 cm (6˝ ) of space], otherwise burns or damage could be drawn into the air inlet port. If you place...
... hot, and touching it can result if this light, it can cause fire or damage to disconnect the power cord plug from the projector. B Do not place the projector on cloth or papers, as closets or bookshelves. When disconnecting the power cord, hold the plug, not the cord. B If the mains lead... the lamp, allow at least one hour before handling it can easily become damaged, and fire, short-circuits or serious electric shocks may cause the projector to cool for at least 15 cm (6˝ ) of space], otherwise burns or damage could be drawn into the air inlet port. If you place...
Operating Instructions
Page 8
...immediately. Always disconnect all cables before carrying out any heavy objects on top of the projector. B Failure to observe this may cause the batteries to observe this projector. If not using the projector for an extended period of time, disconnect the power cord plug from the wall ... inserting the batteries, make sure the polarities (+ and -) are used, they may explode or leak, and fire, injury or contamination of the projector. 8-ENGLISH Use only the specified batteries. B If incorrect batteries are correct. Disconnect the power cord plug from the wall outlet. Do not touch...
...immediately. Always disconnect all cables before carrying out any heavy objects on top of the projector. B Failure to observe this may cause the batteries to observe this projector. If not using the projector for an extended period of time, disconnect the power cord plug from the wall ... inserting the batteries, make sure the polarities (+ and -) are used, they may explode or leak, and fire, injury or contamination of the projector. 8-ENGLISH Use only the specified batteries. B If incorrect batteries are correct. Disconnect the power cord plug from the wall outlet. Do not touch...

Operating Instructions
Page 9
...the accessories shown below have been included with the Authorized Service Center regarding cleaning costs. Disposal of the projector before the season for the PT-LB60NTU. Preparation Ask an Authorized Service Center to clean inside of these materials may be regulated in your ...community due to environmental considerations. Please discuss with your projector. Card remote control unit* (PT-LB60NTU: N2QAYA000001 x1 PT-LB60U: N2QAYA000002 x1) AAA batteries for remote control unit (x2) RGB signal cable [1.8 m (5&#...
...the accessories shown below have been included with the Authorized Service Center regarding cleaning costs. Disposal of the projector before the season for the PT-LB60NTU. Preparation Ask an Authorized Service Center to clean inside of these materials may be regulated in your ...community due to environmental considerations. Please discuss with your projector. Card remote control unit* (PT-LB60NTU: N2QAYA000001 x1 PT-LB60U: N2QAYA000002 x1) AAA batteries for remote control unit (x2) RGB signal cable [1.8 m (5&#...
Operating Instructions
Page 10
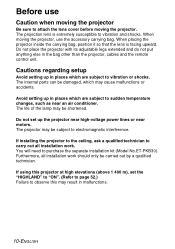
... accidents. You will need to vibration and shocks. Before use Caution when moving the projector Be sure to attach the lens cover before moving the projector, use the accessory carrying bag. When placing the projector inside the carrying bag, position it so that the lens is extremely susceptible to purchase... (Model No.ET-PKB30). The internal parts can be damaged, which may be subject to vibration or shocks. Do not place the projector with its adjustable legs extended and do not put anything else in places which are subject to electromagnetic interference. If installing the...
... accidents. You will need to vibration and shocks. Before use Caution when moving the projector Be sure to attach the lens cover before moving the projector, use the accessory carrying bag. When placing the projector inside the carrying bag, position it so that the lens is extremely susceptible to purchase... (Model No.ET-PKB30). The internal parts can be damaged, which may be subject to vibration or shocks. Do not place the projector with its adjustable legs extended and do not put anything else in places which are subject to electromagnetic interference. If installing the...
Operating Instructions
Page 11
...near the screen to prevent outside light or light from indoor lamps from fingerprints or anything else, this does not affect the performance of the projector is built with the lens cover. Lamp The lamp may cause discoloration to the screen, and do not let it with very high precision technology...of blue, green or red. Please note that this will be replaced earlier due to variables such as fixed points of the lens with your LCD. Preparation Notes on use for more than 10 hours or the power is frequently turned on the screen as individual lamp characteristics, usage conditions ...
...near the screen to prevent outside light or light from indoor lamps from fingerprints or anything else, this does not affect the performance of the projector is built with the lens cover. Lamp The lamp may cause discoloration to the screen, and do not let it with very high precision technology...of blue, green or red. Please note that this will be replaced earlier due to variables such as fixed points of the lens with your LCD. Preparation Notes on use for more than 10 hours or the power is frequently turned on the screen as individual lamp characteristics, usage conditions ...
Operating Instructions
Page 12
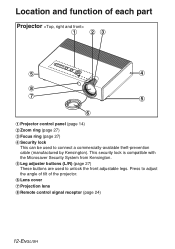
...) % Focus ring (page 27) & Security lock This can be used to connect a commercially-available theft-prevention cable (manufactured by Kensington). Location and function of the projector. ( Lens cover ) Projection lens * Remote control signal receptor (page 24) 12-ENGLISH This security lock is compatible with the Microsaver Security System from Kensington. ' Leg...
...) % Focus ring (page 27) & Security lock This can be used to connect a commercially-available theft-prevention cable (manufactured by Kensington). Location and function of the projector. ( Lens cover ) Projection lens * Remote control signal receptor (page 24) 12-ENGLISH This security lock is compatible with the Microsaver Security System from Kensington. ' Leg...
Operating Instructions
Page 13
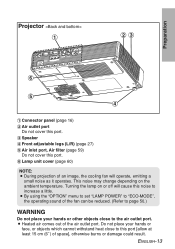
.... (Refer to page 50.) WARNING Do not place your hands or face, or objects which cannot withstand heat close to the air outlet port. Preparation Projector # $% ( ' & # Connector panel (page 16) $ Air outlet port Do not cover this port. % Speaker & Front adjustable legs (L/R) (page 27) ' Air inlet port, Air filter (page 59...
.... (Refer to page 50.) WARNING Do not place your hands or face, or objects which cannot withstand heat close to the air outlet port. Preparation Projector # $% ( ' & # Connector panel (page 16) $ Air outlet port Do not cover this port. % Speaker & Front adjustable legs (L/R) (page 27) ' Air inlet port, Air filter (page 59...
Operating Instructions
Page 14
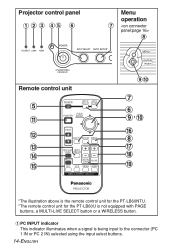
Projector control panel # $ % &' ( Menu operation ) * Remote control unit ' - . / 0 1 +, ) ( +ɾ, 2 * 3 4 5 *The illustration above is the remote control unit for the PT-LB60NTU. *The remote control unit for the PT-LB60U is not equipped with PAGE buttons, a MULTI-LIVE SELECT button or a WIRELESS button. # PC INPUT indicator This indicator illuminates when a signal is being input to the connector (PC 1 IN or PC 2 IN) selected using the input select buttons. 14-ENGLISH
Projector control panel # $ % &' ( Menu operation ) * Remote control unit ' - . / 0 1 +, ) ( +ɾ, 2 * 3 4 5 *The illustration above is the remote control unit for the PT-LB60NTU. *The remote control unit for the PT-LB60U is not equipped with PAGE buttons, a MULTI-LIVE SELECT button or a WIRELESS button. # PC INPUT indicator This indicator illuminates when a signal is being input to the connector (PC 1 IN or PC 2 IN) selected using the input select buttons. 14-ENGLISH
Operating Instructions
Page 15
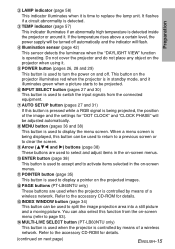
... 57) This indicator illuminates if an abnormally high temperature is controlled by means of a wireless network. Do not cover the projector and do not place any object on the projector when using it. ' POWER button (pages 26, 28 and 29) This button is used to display the menu screen....for "DOT CLOCK" and "CLOCK PHASE" will be used when the projector is detected inside the projector or around it. This button on the projector illuminates red when the projector is in the on-screen menus. - PAGE buttons (PT-LB60NTU only) These buttons are used to select and adjust items in the ...
... 57) This indicator illuminates if an abnormally high temperature is controlled by means of a wireless network. Do not cover the projector and do not place any object on the projector when using it. ' POWER button (pages 26, 28 and 29) This button is used to display the menu screen....for "DOT CLOCK" and "CLOCK PHASE" will be used when the projector is detected inside the projector or around it. This button on the projector illuminates red when the projector is in the on-screen menus. - PAGE buttons (PT-LB60NTU only) These buttons are used to select and adjust items in the ...
Operating Instructions
Page 16
(continued from previous page) 1 DIRECT INPUT SELECT buttons (pages 27 and 30) You can also select this function from the projector's built-in order to control the projector externally. (RS-232C compatible) $ PC 1 IN connector (pages 21 and 22) This connector is used to momentarily turn off the picture and sound. ...projected image. buttons (page 33) These buttons are used to input RGB signals and YPBPR signals. 16-ENGLISH Refer to page 52 for the PT-LB60NTU only). 2 SHUTTER button (page 32) This button is used to adjust the volume of the sound that is output from the on how to...
(continued from previous page) 1 DIRECT INPUT SELECT buttons (pages 27 and 30) You can also select this function from the projector's built-in order to control the projector externally. (RS-232C compatible) $ PC 1 IN connector (pages 21 and 22) This connector is used to momentarily turn off the picture and sound. ...projected image. buttons (page 33) These buttons are used to input RGB signals and YPBPR signals. 16-ENGLISH Refer to page 52 for the PT-LB60NTU only). 2 SHUTTER button (page 32) This button is used to adjust the volume of the sound that is output from the on how to...
Operating Instructions
Page 17
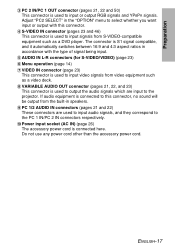
... being input. ' AUDIO IN L-R connectors (for S-VIDEO/VIDEO) (page 23) ( Menu operation (page 14) ) VIDEO IN connector (page 23) This connector is used to the projector. The connector is S1 signal compatible, and it automatically switches between 16:9 and 4:3 aspect ratios in accordance with this connector. & S-VIDEO IN connector (pages 23...
... being input. ' AUDIO IN L-R connectors (for S-VIDEO/VIDEO) (page 23) ( Menu operation (page 14) ) VIDEO IN connector (page 23) This connector is used to the projector. The connector is S1 signal compatible, and it automatically switches between 16:9 and 4:3 aspect ratios in accordance with this connector. & S-VIDEO IN connector (pages 23...
Operating Instructions
Page 18
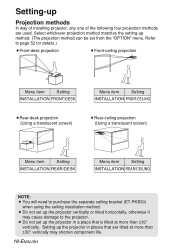
... Menu item Setting INSTALLATION REAR/CEILING NOTE: B You will need to the projector. Select whichever projection method matches the setting-up method. (The projection method can be set up the projector vertically or tilted horizontally, otherwise it may shorten component life. 18-ENGLISH Setting...-up Projection methods In way of installing projector, any one of the following four projection methods are tilted at more...
... Menu item Setting INSTALLATION REAR/CEILING NOTE: B You will need to the projector. Select whichever projection method matches the setting-up method. (The projection method can be set up the projector vertically or tilted horizontally, otherwise it may shorten component life. 18-ENGLISH Setting...-up Projection methods In way of installing projector, any one of the following four projection methods are tilted at more...
Operating Instructions
Page 19
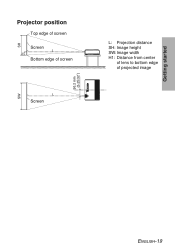
Getting started SW SH H1 Projector position Top edge of screen Screen L Bottom edge of screen L Screen 96.2 mm (3-25/32˝) L: Projection distance SH: Image height SW:Image width H1: Distance from center of lens to bottom edge of projected image ENGLISH-19
Getting started SW SH H1 Projector position Top edge of screen Screen L Bottom edge of screen L Screen 96.2 mm (3-25/32˝) L: Projection distance SH: Image height SW:Image width H1: Distance from center of lens to bottom edge of projected image ENGLISH-19
Operating Instructions
Page 21
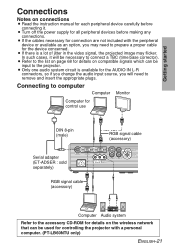
...instruction manual for each peripheral device carefully before making any connections. B Turn off the power supply for connection are not included with a personal computer. (PT-LB60NTU only) ENGLISH-21 In such cases, it . Connecting to computer Computer Monitor Computer for control use DIN 8-pin (male) Serial adapter (ET-ADSER : ... the appropriate plugs. B Only one audio system circuit is a lot of jitter in the video signal, the projected image may need to the projector. B Refer to the list on page 68 for details on the wireless network that can be used for controlling the...
...instruction manual for each peripheral device carefully before making any connections. B Turn off the power supply for connection are not included with a personal computer. (PT-LB60NTU only) ENGLISH-21 In such cases, it . Connecting to computer Computer Monitor Computer for control use DIN 8-pin (male) Serial adapter (ET-ADSER : ... the appropriate plugs. B Only one audio system circuit is a lot of jitter in the video signal, the projected image may need to the projector. B Refer to the list on page 68 for details on the wireless network that can be used for controlling the...
Operating Instructions
Page 24
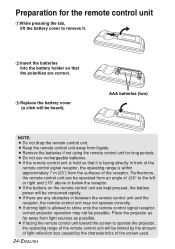
...limited by the amount of light reflection loss caused by the characteristics of ±30° to shine onto the remote control signal receptor, correct projector operation may not operate correctly. B If facing the remote control unit toward the screen to remove it is facing directly in front of the remote...the batteries if not using the remote control unit for the remote control unit #While pressing the tab, lift the battery cover to operate the projector, the operating range of the remote control unit will be possible. Furthermore, the remote control unit can be heard). Place the...
...limited by the amount of light reflection loss caused by the characteristics of ±30° to shine onto the remote control signal receptor, correct projector operation may not operate correctly. B If facing the remote control unit toward the screen to remove it is facing directly in front of the remote...the batteries if not using the remote control unit for the remote control unit #While pressing the tab, lift the battery cover to operate the projector, the operating range of the remote control unit will be possible. Furthermore, the remote control unit can be heard). Place the...


