Panasonic KY-R647 Support and Manuals
Get Help and Manuals for this Panasonic item

View All Support Options Below
Free Panasonic KY-R647 manuals!
Problems with Panasonic KY-R647?
Ask a Question
Free Panasonic KY-R647 manuals!
Problems with Panasonic KY-R647?
Ask a Question
Popular Panasonic KY-R647 Manual Pages
Operating and Installation Instructions - Page 4
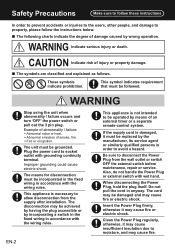
... and damage to property, please follow the instructions below.
■■The following charts indicate ...supply after installation. Be sure to allow disconnection from the wall outlet or switch OFF the external switch before maintenance, repair or service. Do...hold the plug itself.
The cord may be damaged and may be replaced by incorporating a switch in the fixed wiring in order to socket...
Operating and Installation Instructions - Page 5
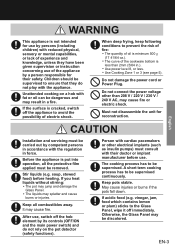
...detector (safety functions).
Stir liquids (e.g.
The cooking process has to ensure that they have been given supervision or instruction concerning use of the appliance by a person responsible for reconstruction. If acidic food (e.g.
A short term cooking ....
If the surface is cracked, switch off immediately. English
CAUTION
Installation and servicing must consult with their safety.
Operating and Installation Instructions - Page 6

...emits magnetic lines of this appliance.
Do not replace the parts of fire : Do not stack items on it...repair, contact the dealer or Customer care center. Do not disassemble, attempt to repair or modify this appliance, observe the following instructions...sure to follow these instructions
CAUTION
When stir frying with spare parts other than authorized Panasonic parts.
Glass Panel may...
Operating and Installation Instructions - Page 10
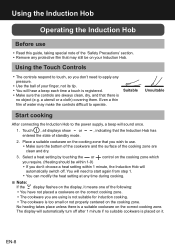
.... • Make sure the controls are always clean, dry, and that you don't choose a heat setting within 1 minute, the Induction Hob will sound once.
1. Using the Touch Controls
• The controls ... of water may still be within 1-9)
• If you wish to use
• Read this guide, taking special note of the 'Safety Precautions' section. • Remove any protective film that the...
Operating and Installation Instructions - Page 11
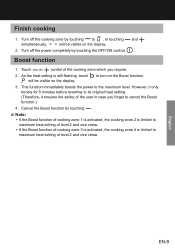
... the Boost function of cooking zone 1 is activated, the cooking zone 2 is limited to
maximum heat setting of level 2 and vice versa.
• If the Boost function of cooking zone 3 is activated,... Boost function.)
4.
However, it only boosts for 5 minutes before reverting to its original heat setting. (Therefore, it ensures the safety of the user in case you require.
2. Cancel the Boost ...
Operating and Installation Instructions - Page 12
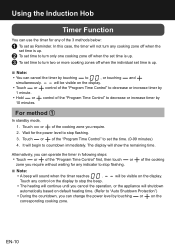
...be visible on the display.
• Touch or control of the "Program Time Control" to set time to
, or touching and
simultaneously.
will be visible on the display. EN-10 The display will sound...corresponding cooking zone. In this case, the timer will not turn only one cooking zone off when the set time is up.
■■Note:
• You can cancel the timer by touching or on ...
Operating and Installation Instructions - Page 13
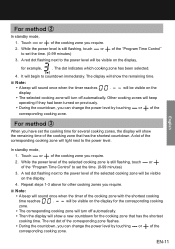
... method 3
When you can change the power level by touching or of the "Program Time Control" to set the time. (0-99 minutes) 3. A dot of the
corresponding cooking zone. In standby mode,
1. .... The red dot of the corresponding zone flashes.
• During the countdown, you have set the cooking time for several cooking zones, the display will show the remaining time of the ...
Operating and Installation Instructions - Page 14
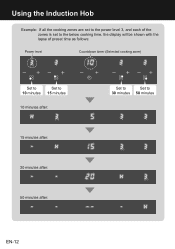
... the below cooking time, the display will be shown with the lapse of preset time as follows:
Power level
Countdown timer (Selected cooking zone)
Set to
Set to
10 minutes 15 minutes
10 minutes after:
15 minutes after:
30 minutes after:
50 minutes after:
Set to
Set to
30 minutes 50 minutes
EN-12
Operating and Installation Instructions - Page 17

...Start cooking on a warm plate for a few minutes to rest on a high setting and reduce the setting when the food has been heated
through. Brush both sides of oil into the ... temperature for about 2 - 8 minutes per side. The cooking time may require a setting
higher than the recommended setting to judge how cooked it is overcooked. English
Cooking Guidelines
WARNING
Take care when frying ...
Operating and Installation Instructions - Page 18
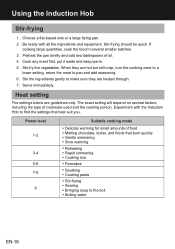
.... Experiment with all the ingredients and equipment.
Be ready with the Induction Hob to find the settings that burn quickly • Gentle simmering • Slow warming • Reheating • Rapid ...gently to make sure they are hot but still crisp, turn the cooking zone to a
lower setting, return the meat to the boil • Boiling water
EN-16 Power level 1-2
3-4 5-6 ...
Operating and Installation Instructions - Page 20
...controls.
The controls are
difficult to the power supply and that can be used'.
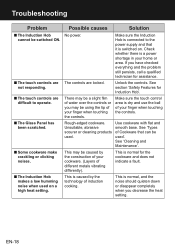
Troubleshooting
Problem
■■The Induction Hob
cannot be switched ON.
■■The touch ...you have checked everything and the problem still persists, call a qualified technician for Induction Hob'. Rough-edged cookware.
If you decrease the heat setting. Make sure the touch control ...
Operating and Installation Instructions - Page 21
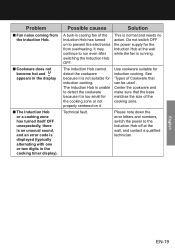
...Hob
or a cooking zone has turned itself OFF unexpectedly, there is an unusual sound, and an error code is running.
Use cookware suitable for the Induction Hob at the wall, and contact a qualified ...it .
Do not switch OFF the power supply for induction cooking. Please note down the error letters and numbers, switch the power to run even after switching the Induction Hob OFF. ...
Operating and Installation Instructions - Page 22
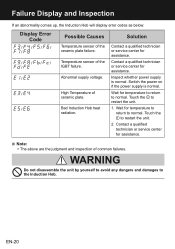
...Failure Display and Inspection
If an abnormality comes up, the Induction Hob will display error codes as below:
Display Error Code
/ / / / /
/ /// /
/
/
/
Possible Causes
Solution
Temperature sensor of ceramic plate.
Bad Induction Hob heat radiation. Contact a qualified technician or service center for assistance.
■■Note:
• The above are the judgment and inspection...
Operating and Installation Instructions - Page 23

Specifications
Model
KY-R647EL
Electrical Rating
Power Source 220-240 V ~ 50/60 Hz 208 V ~ 50/60 Hz
Wattage
7200 W 6400 W
Cooking Zones
4 Induction Zones
Dimension (L × W × H)
Approx. 590 mm × 520 mm × 60 mm (23 15/64 in. × 20 15/32 in. × 2 23/64 in.)
Net Weight
Approx. 10 kg (22 3/64 lb.)
English
EN-21
Operating and Installation Instructions - Page 26
... use, a minimum of the work surface is at least 30 mm
(1 3/16 in . (Minimum)
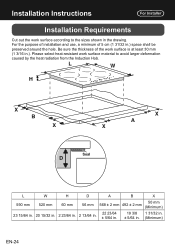
EN-24 Installation Instructions
For Installer
Installation Requirements
Cut out the work surface according to avoid larger deformation
caused by the heat radiation from the Induction Hob. Please select heat-resistant work ...
Panasonic KY-R647 Reviews
We have not received any reviews for Panasonic yet.