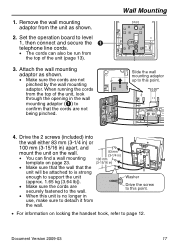
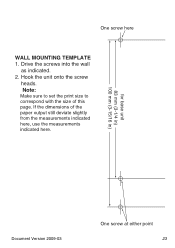
KXDT333 Template - Panasonic DIGITAL PROPRIETARY TELEPHONE
KXDT333 Template

Related Manual Pages
Similar Questions

Is There A Downloadable Phone Template For The Overlay On Kx-t7731?
We have tried everything to make a template for the phone extension overlays so we can type them up ...
We have tried everything to make a template for the phone extension overlays so we can type them up ...
(Posted by melissa61013 7 years ago)

Extension Label Template
Is there a free extension label template I can download for our telephones? We have thePanasonic KX-...
Is there a free extension label template I can download for our telephones? We have thePanasonic KX-...
(Posted by darladooley 10 years ago)

Can Blank Templates For The Kx-t7135 Be Downloaded?
can blank templates for the KX-T7135 be downloaded?
can blank templates for the KX-T7135 be downloaded?
(Posted by Anonymous-66829 11 years ago)