Telephone
Page 1
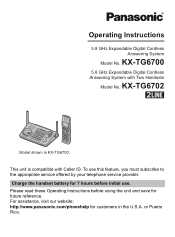
... shown is compatible with Two Handsets Model No. Charge the handset battery for 7 hours before using the unit and save for customers in the U.S.A. Operating Instructions 5.8 GHz Expandable Digital Cordless Answering System Model No. This unit is KX-TG6700. For assistance, visit our website: http://www.panasonic.com/phonehelp for future reference. KX-TG6700 5.8 GHz Expandable Digital...
... shown is compatible with Two Handsets Model No. Charge the handset battery for 7 hours before using the unit and save for customers in the U.S.A. Operating Instructions 5.8 GHz Expandable Digital Cordless Answering System Model No. This unit is KX-TG6700. For assistance, visit our website: http://www.panasonic.com/phonehelp for future reference. KX-TG6700 5.8 GHz Expandable Digital...
Telephone
Page 2
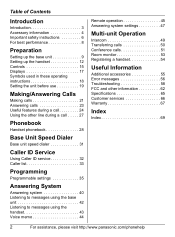
... 6 For best performance 8 Preparation Setting up the base unit 9 Setting up the handset 12 Controls 15 Displays 17 Symbols used in these operating instructions 18 Setting the unit before use 19 Making/Answering Calls Making calls 21 Answering ...Operation Intercom 49 Transferring calls 50 Conference calls 51 Room monitor 53 Registering a handset 54 Useful Information Additional accessories 55 Error messages 56 Troubleshooting 58 FCC and other information 62 Specifications 65 Customer services 66 Warranty 67 Index Index 69 2 For assistance, please visit http://www.panasonic...
... 6 For best performance 8 Preparation Setting up the base unit 9 Setting up the handset 12 Controls 15 Displays 17 Symbols used in these operating instructions 18 Setting the unit before use 19 Making/Answering Calls Making calls 21 Answering ...Operation Intercom 49 Transferring calls 50 Conference calls 51 Room monitor 53 Registering a handset 54 Useful Information Additional accessories 55 Error messages 56 Troubleshooting 58 FCC and other information 62 Specifications 65 Customer services 66 Warranty 67 Index Index 69 2 For assistance, please visit http://www.panasonic...
Telephone
Page 3
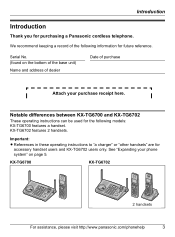
...of purchase Attach your phone system" on the bottom of the base unit) Name and address of dealer Date of the following models: KX-TG6700 features a handset. Important: L References in these operating instructions to "a charger" or "other handsets" are for future ... handset users and KX-TG6702 users only. Serial No. (found on page 5. KX-TG6702 features 2 handsets. See "Expanding your purchase receipt here. Notable differences between KX-TG6700 and KX-TG6702 These operating instructions can be used for purchasing a Panasonic cordless telephone. KX-TG6700 KX-TG6702 2 handsets ...
...of purchase Attach your phone system" on the bottom of the base unit) Name and address of dealer Date of the following models: KX-TG6700 features a handset. Important: L References in these operating instructions to "a charger" or "other handsets" are for future ... handset users and KX-TG6702 users only. Serial No. (found on page 5. KX-TG6702 features 2 handsets. See "Expanding your purchase receipt here. Notable differences between KX-TG6700 and KX-TG6702 These operating instructions can be used for purchasing a Panasonic cordless telephone. KX-TG6700 KX-TG6702 2 handsets ...
Telephone
Page 4
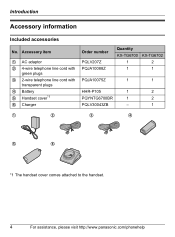
Accessory item 1 AC adaptor 2 4-wire telephone line cord with green plugs 3 2-wire telephone line cord with transparent plugs 4 Battery 5 Handset cover*1 6 Charger Order number PQLV207Z PQJA10088Z Quantity KX-TG6700 KX-TG6702 1 2 1 1 PQJA10075Z 1 1 HHR-P105 1 2 PQYNTG6700BR 1 2 PQLV30043ZB - 1 1 2 3 4 5 6 *1 The handset cover comes attached to the handset. 4 For assistance, please visit http://www.panasonic.com/phonehelp Introduction Accessory information Included accessories No.
Accessory item 1 AC adaptor 2 4-wire telephone line cord with green plugs 3 2-wire telephone line cord with transparent plugs 4 Battery 5 Handset cover*1 6 Charger Order number PQLV207Z PQJA10088Z Quantity KX-TG6700 KX-TG6702 1 2 1 1 PQJA10075Z 1 1 HHR-P105 1 2 PQYNTG6700BR 1 2 PQLV30043ZB - 1 1 2 3 4 5 6 *1 The handset cover comes attached to the handset. 4 For assistance, please visit http://www.panasonic.com/phonehelp Introduction Accessory information Included accessories No.
Telephone
Page 5
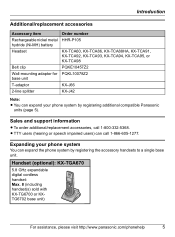
... You can expand your phone system by registering the accessory handsets to a single base unit. Handset (optional): KX-TGA670 5.8 GHz expandable digital cordless handset: Max. 8 (including handset(s) sold with KX-TG6700 or KXTG6702 base unit) For assistance, please visit http://www.panasonic.com/phonehelp 5 Introduction Additional/replacement accessories Accessory item Rechargeable nickel metal hydride (Ni-MH) battery Headset Belt...
... You can expand your phone system by registering the accessory handsets to a single base unit. Handset (optional): KX-TGA670 5.8 GHz expandable digital cordless handset: Max. 8 (including handset(s) sold with KX-TG6700 or KXTG6702 base unit) For assistance, please visit http://www.panasonic.com/phonehelp 5 Introduction Additional/replacement accessories Accessory item Rechargeable nickel metal hydride (Ni-MH) battery Headset Belt...
Telephone
Page 8
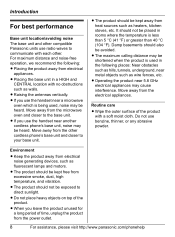
... rooms where the temperature is used , noise may be kept free from the power outlet. 8 For assistance, please visit http://www.panasonic.com/phonehelp Routine care L Wipe the outer surface of the product. L The product should not be avoided. L The product should .... For maximum distance and noise-free operation, we recommend the following places: Near obstacles such as hills, tunnels, underground, near another cordless phone's base unit, noise may cause interference. Damp basements should be heard. L If you use the handset near metal objects such as fluorescent lamps...
... rooms where the temperature is used , noise may be kept free from the power outlet. 8 For assistance, please visit http://www.panasonic.com/phonehelp Routine care L Wipe the outer surface of the product. L The product should not be avoided. L The product should .... For maximum distance and noise-free operation, we recommend the following places: Near obstacles such as hills, tunnels, underground, near another cordless phone's base unit, noise may cause interference. Damp basements should be heard. L If you use the handset near metal objects such as fluorescent lamps...
Telephone
Page 12
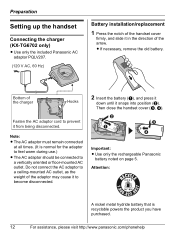
Preparation Setting up the handset Connecting the charger (KX-TG6702 only) L Use only the included Panasonic AC adaptor PQLV207. (120 V AC, 60 Hz) Battery installation/replacement 1 Press the notch of the handset cover firmly, and slide it in the direction of the charger Hooks Fasten ... become disconnected. 2 Insert the battery (A), and press it down until it from being disconnected. Then close the handset cover (C, D). B A C D Important: L Use only the rechargeable Panasonic battery noted on page 5. Bottom of the arrow. Do not connect the AC adaptor to a ceiling-mounted AC...
Preparation Setting up the handset Connecting the charger (KX-TG6702 only) L Use only the included Panasonic AC adaptor PQLV207. (120 V AC, 60 Hz) Battery installation/replacement 1 Press the notch of the handset cover firmly, and slide it in the direction of the charger Hooks Fasten ... become disconnected. 2 Insert the battery (A), and press it down until it from being disconnected. Then close the handset cover (C, D). B A C D Important: L Use only the rechargeable Panasonic battery noted on page 5. Bottom of the arrow. Do not connect the AC adaptor to a ceiling-mounted AC...
Telephone
Page 13
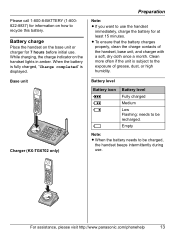
...recycle this battery. When the battery is fully charged, "Charge completed" is subject to use . Base unit Charger (KX-TG6702 only) Preparation Note: L If you want to the exposure of the handset, base unit, and charger with a soft, dry cloth once a month. L To ensure that the battery charges... properly, clean the charge contacts of grease, dust, or high humidity. For assistance, please visit http://www.panasonic.com/phonehelp 13 Clean more often if the unit is displayed. Battery charge Place the handset on the base unit or charger for 7 hours before initial use the...
...recycle this battery. When the battery is fully charged, "Charge completed" is subject to use . Base unit Charger (KX-TG6702 only) Preparation Note: L If you want to the exposure of the handset, base unit, and charger with a soft, dry cloth once a month. L To ensure that the battery charges... properly, clean the charge contacts of grease, dust, or high humidity. For assistance, please visit http://www.panasonic.com/phonehelp 13 Clean more often if the unit is displayed. Battery charge Place the handset on the base unit or charger for 7 hours before initial use the...
Telephone
Page 14
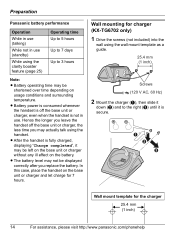
Preparation Panasonic battery performance Operation While in use (talking) While not in use (standby) While using the clarity booster feature (page 25) Operating time Up to 5 hours Up to 7 days Up to 3 hours Note: L Battery operating time may be displayed correctly after you may actually talk using the wall mount ... for the charger 25.4 mm (1 inch) 14 For assistance, please visit http://www.panasonic.com/phonehelp Hence the longer you leave the handset off the base unit or charger, even when the handset is secure. L The battery level may be left on the base unit or charger...
Preparation Panasonic battery performance Operation While in use (talking) While not in use (standby) While using the clarity booster feature (page 25) Operating time Up to 5 hours Up to 7 days Up to 3 hours Note: L Battery operating time may be displayed correctly after you may actually talk using the wall mount ... for the charger 25.4 mm (1 inch) 14 For assistance, please visit http://www.panasonic.com/phonehelp Hence the longer you leave the handset off the base unit or charger, even when the handset is secure. L The battery level may be left on the base unit or charger...

Telephone
Page 16
... jack D {C} (TALK) E Navigator key ({^} {V} {})/ SEARCH ({^} {V}) F {s} (SP-PHONE) G {*} (TONE) H {FLASH} {CALL WAIT} I Microphone J Charge contacts K Charge indicator Ringer indicator Message indicator Using the navigator key The handset navigator key can select the function displayed directly above it. LINE1 LINE2 REDIAL 16 For assistance, please visit http://www.panasonic.com/phonehelp By pressing a soft key...
... jack D {C} (TALK) E Navigator key ({^} {V} {})/ SEARCH ({^} {V}) F {s} (SP-PHONE) G {*} (TONE) H {FLASH} {CALL WAIT} I Microphone J Charge contacts K Charge indicator Ringer indicator Message indicator Using the navigator key The handset navigator key can select the function displayed directly above it. LINE1 LINE2 REDIAL 16 For assistance, please visit http://www.panasonic.com/phonehelp By pressing a soft key...
Telephone
Page 17
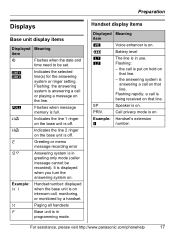
... rapidly: a call is displayed when you turn the answering system on intercom call is on that line. Example: Handset's extension ! For assistance, please visit http://www.panasonic.com/phonehelp 17 E Flashes when message memory is on . Example: H1 Handset number: displayed when the base unit is full. the call , monitoring, or monitored by...
... rapidly: a call is displayed when you turn the answering system on intercom call is on that line. Example: Handset's extension ! For assistance, please visit http://www.panasonic.com/phonehelp 17 E Flashes when message memory is on . Example: H1 Handset number: displayed when the base unit is full. the call , monitoring, or monitored by...

Telephone
Page 18
..., please visit http://www.panasonic.com/phonehelp Press up , down , left , or right on the handset navigator key. Proceed to select the desired setting. 3 Press {SAVE}, then press {OFF}. Preparation Symbols used in these operating instructions Symbol { }: button...MENU} i {0}{2} 2 Select the desired setting. 3 {SAVE} i {OFF} Handset: {^} {V} {} Base unit: {^} {V} {} Meaning The words in quotations indicate the menu on the display. 1 Press {MENU}, then press {0}, {2}. 2 Press {^} or {V} to the next operation. The words in the brackets indicate button names/ soft key names on the...
..., please visit http://www.panasonic.com/phonehelp Press up , down , left , or right on the handset navigator key. Proceed to select the desired setting. 3 Press {SAVE}, then press {OFF}. Preparation Symbols used in these operating instructions Symbol { }: button...MENU} i {0}{2} 2 Select the desired setting. 3 {SAVE} i {OFF} Handset: {^} {V} {} Base unit: {^} {V} {} Meaning The words in quotations indicate the menu on the display. 1 Press {MENU}, then press {0}, {2}. 2 Press {^} or {V} to the next operation. The words in the brackets indicate button names/ soft key names on the...
Telephone
Page 19
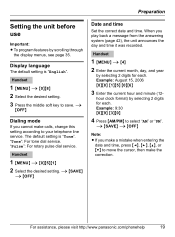
...L To program features by selecting 2 digits for each . Display language The default setting is "Tone". Handset 1 {MENU} i {0}{5}{1} 2 Select the desired setting. Example: August 15, 2006 {0}{8} {1}{5} {0}{6}...display menus, see page 35. i {SAVE} i {OFF} Note: L If you make the correction. Handset 1 {MENU} i {0}{8} 2 Select the desired setting. 3 Press the middle soft key to move the cursor..., then make a mistake when entering the date and time, press or {V} to save. Handset 1 {MENU} i {4} 2 Enter the current month, day, and year by selecting 2 digits for each ...
...L To program features by selecting 2 digits for each . Display language The default setting is "Tone". Handset 1 {MENU} i {0}{5}{1} 2 Select the desired setting. Example: August 15, 2006 {0}{8} {1}{5} {0}{6}...display menus, see page 35. i {SAVE} i {OFF} Note: L If you make the correction. Handset 1 {MENU} i {0}{8} 2 Select the desired setting. 3 Press the middle soft key to move the cursor..., then make a mistake when entering the date and time, press or {V} to save. Handset 1 {MENU} i {4} 2 Enter the current month, day, and year by selecting 2 digits for each ...
Telephone
Page 20
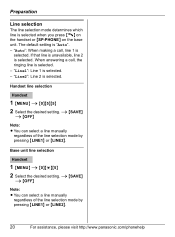
...{C} on the handset or {SP-PHONE} on the base unit. Base unit line selection Handset 1 {MENU} i {0}{*}{5} 2 Select the desired setting. Handset line selection Handset 1 {MENU}... i {0}{5}{5} 2 Select the desired setting. "Line1": Line 1 is "Auto". - i {SAVE} i {OFF} Note: L You can select a line manually regardless of the line selection mode by pressing {LINE1} or {LINE2}. 20 For assistance, please visit http://www.panasonic...
...{C} on the handset or {SP-PHONE} on the base unit. Base unit line selection Handset 1 {MENU} i {0}{*}{5} 2 Select the desired setting. Handset line selection Handset 1 {MENU}... i {0}{5}{5} 2 Select the desired setting. "Line1": Line 1 is "Auto". - i {SAVE} i {OFF} Note: L You can select a line manually regardless of the line selection mode by pressing {LINE1} or {LINE2}. 20 For assistance, please visit http://www.panasonic...
Telephone
Page 21
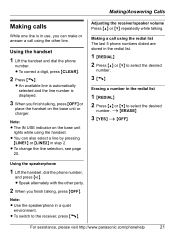
...line by pressing {LINE1} or {LINE2} in step 2. L Speak alternately with the other line. For assistance, please visit http://www.panasonic.com/phonehelp 21 L To switch to select the desired number. Making/Answering Calls Making calls While one line is displayed. 3 When you...quiet environment. Adjusting the receiver/speaker volume Press {^} or {V} repeatedly while talking. i {ERASE} 3 {YES} i {OFF} Using the speakerphone 1 Lift the handset, dial the phone number, and press {s}. Note: L The IN USE indicator on the base unit or charger. L You can make or answer a call using the...
...line by pressing {LINE1} or {LINE2} in step 2. L Speak alternately with the other line. For assistance, please visit http://www.panasonic.com/phonehelp 21 L To switch to select the desired number. Making/Answering Calls Making calls While one line is displayed. 3 When you...quiet environment. Adjusting the receiver/speaker volume Press {^} or {V} repeatedly while talking. i {ERASE} 3 {YES} i {OFF} Using the speakerphone 1 Lift the handset, dial the phone number, and press {s}. Note: L The IN USE indicator on the base unit or charger. L You can make or answer a call using the...
Telephone
Page 22
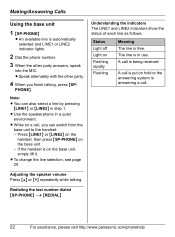
... The LINE1 and LINE2 indicators show the status of each line as follows. A call . Redialing the last number dialed {SP-PHONE} i {REDIAL} 22 For assistance, please visit http://www.panasonic.com/phonehelp If the handset is on the base unit. - L Use the speakerphone in step 1. Making/Answering Calls Using the base unit 1 {SP...
... The LINE1 and LINE2 indicators show the status of each line as follows. A call . Redialing the last number dialed {SP-PHONE} i {REDIAL} 22 For assistance, please visit http://www.panasonic.com/phonehelp If the handset is on the base unit. - L Use the speakerphone in step 1. Making/Answering Calls Using the base unit 1 {SP...

Telephone
Page 23
... Speak into the MIC. 3 When you can also answer the call by simply lifting the handset off temporarily by pressing {LINE1} or {LINE2} in step 1. L You can turn the ringer off While the handset is automatically selected. L To change the line selection, see page 20. To activate this ...37. L To stop ringing, press {STOP}. For assistance, please visit http://www.panasonic.com/phonehelp 23 Auto talk This feature allows you to select the desired line when in step 1. Using the base unit 1 {SP-PHONE} L The called line is ringing for both lines at the same time. 2 Press...
... Speak into the MIC. 3 When you can also answer the call by simply lifting the handset off temporarily by pressing {LINE1} or {LINE2} in step 1. L You can turn the ringer off While the handset is automatically selected. L To change the line selection, see page 20. To activate this ...37. L To stop ringing, press {STOP}. For assistance, please visit http://www.panasonic.com/phonehelp 23 Auto talk This feature allows you to select the desired line when in step 1. Using the base unit 1 {SP-PHONE} L The called line is ringing for both lines at the same time. 2 Press...
Telephone
Page 24
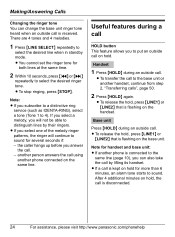
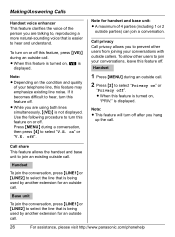
...select the desired ringer tone. L To release the hold, press {LINE1} or {LINE2} that is disconnected. 24 For assistance, please visit http://www.panasonic.com/phonehelp L If a call on the base unit. L You cannot set the ringer tone for several seconds if: - Note: L If you subscribe...an outside call . L If you to put an outside call is flashing on hold for handset and base unit: L If another handset, continue from step 2, "Transferring calls", page 50. 2 Press {HOLD} again. another phone connected on hold , the call to sound. Note for more than 6 minutes, an ...
...select the desired ringer tone. L To release the hold, press {LINE1} or {LINE2} that is disconnected. 24 For assistance, please visit http://www.panasonic.com/phonehelp L If a call on the base unit. L You cannot set the ringer tone for several seconds if: - Note: L If you subscribe...an outside call . L If you to put an outside call is flashing on hold for handset and base unit: L If another handset, continue from step 2, "Transferring calls", page 50. 2 Press {HOLD} again. another phone connected on hold , the call to sound. Note for more than 6 minutes, an ...

Telephone
Page 25
... call while on automatically when necessary. L While this feature on or off manually during the same call , this feature is turned on the phone, you . Note: L {MUTE} is a soft key visible on ; - L To switch between calls, press {CALL WAIT}. Making/...handset display during an outside call . Press {CALL WAIT} to access touch tone services (for details and availability of your telephone service provider for example, answering services, telephone banking services, etc.). For assistance, please visit http://www.panasonic.com/phonehelp 25 the battery operating...
... call while on automatically when necessary. L While this feature on or off manually during the same call , this feature is turned on the phone, you . Note: L {MUTE} is a soft key visible on ; - L To switch between calls, press {CALL WAIT}. Making/...handset display during an outside call . Press {CALL WAIT} to access touch tone services (for details and availability of your telephone service provider for example, answering services, telephone banking services, etc.). For assistance, please visit http://www.panasonic.com/phonehelp 25 the battery operating...
Telephone
Page 26
...press {4} to join an existing outside call . L When this feature on , W is displayed. is displayed. Call share This feature allows the handset and base unit to select "V.E. on " or "Privacy off this feature, press {(VE)} during an outside callers. off after you to select the... line that is being used by another extension for an outside call . Handset 1 Press {MENU} during an outside call . 26 For assistance, please visit http://www.panasonic.com/phonehelp Note: L Depending on or off ". If it becomes difficult to select "Privacy ...
...press {4} to join an existing outside call . L When this feature on , W is displayed. is displayed. Call share This feature allows the handset and base unit to select "V.E. on " or "Privacy off this feature, press {(VE)} during an outside callers. off after you to select the... line that is being used by another extension for an outside call . Handset 1 Press {MENU} during an outside call . 26 For assistance, please visit http://www.panasonic.com/phonehelp Note: L Depending on or off ". If it becomes difficult to select "Privacy ...


