2.4 Ghz Cordles Phon
Page 1
Charge the battery for customers in the USA or Puerto Rico KX-TG2700S Pulse-or-tone dialing capability Caller ID Compatible PLEASE READ BEFORE USE AND SAVE. Panasonic World Wide Web address: http://www.panasonic.com for about 15 hours before initial use. Preparation Basic Operation Advanced Operation Useful Information 2.4GHz Expandable Cordless Phone System Operating Instructions Model No.
Charge the battery for customers in the USA or Puerto Rico KX-TG2700S Pulse-or-tone dialing capability Caller ID Compatible PLEASE READ BEFORE USE AND SAVE. Panasonic World Wide Web address: http://www.panasonic.com for about 15 hours before initial use. Preparation Basic Operation Advanced Operation Useful Information 2.4GHz Expandable Cordless Phone System Operating Instructions Model No.
2.4 Ghz Cordles Phon
Page 2
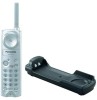
...your new Panasonic cordless telephone. AC Adaptor (p. 11) Order No. PQKK10126Z1 one handset, please purchase the optional handset KX-TGA270S, KX-TGA271V, KX-TGA271W and KX-TGA272S. After ...subscribing to both Caller ID with Name and Call Waiting Service. PQKE10340Z1 one one one To use . PQLV10Z Telephone Line Cord (p. 11) Order No. PQPP511SVC (P-P511) one Belt Clip (p. 65) Order No. PQKL10044Z1 one Handset Cover (p. 12, 66) Order No. Accessories...
...your new Panasonic cordless telephone. AC Adaptor (p. 11) Order No. PQKK10126Z1 one handset, please purchase the optional handset KX-TGA270S, KX-TGA271V, KX-TGA271W and KX-TGA272S. After ...subscribing to both Caller ID with Name and Call Waiting Service. PQKE10340Z1 one one one To use . PQLV10Z Telephone Line Cord (p. 11) Order No. PQPP511SVC (P-P511) one Belt Clip (p. 65) Order No. PQKL10044Z1 one Handset Cover (p. 12, 66) Order No. Accessories...

2.4 Ghz Cordles Phon
Page 3
... the other cordless phone's base unit and closer to the base unit. •If you are transmitted between the base unit and the handset using the handset: •If you use (p. 12). antennas. Move away from the microwave oven and closer to your base unit. Charge the battery for about 15 hours before initial...
... the other cordless phone's base unit and closer to the base unit. •If you are transmitted between the base unit and the handset using the handset: •If you use (p. 12). antennas. Move away from the microwave oven and closer to your base unit. Charge the battery for about 15 hours before initial...

2.4 Ghz Cordles Phon
Page 4
... Ringer Volume 19 LCD Contrast 20 Registration for Additional Handsets 21 Basic Operation Making Calls 22 Handset 22 Base Unit (Digital Duplex Speakerphone 26 Answering Calls 28 Handset 28 Base Unit 28 Caller ID Service 29 Using the Caller List 30 Viewing the Caller List...........30...Storing Names and Numbers 37 Dialing from the Directory......39 Editing 40 Erasing 41 Sending the Directory (When the System Has Additional Handsets 42 Intercom 44 Making Intercom Calls...........44 Answering Intercom Calls......46 Transferring a Call 47 Conference 49 Call Share 50 Room Monitor ...
... Ringer Volume 19 LCD Contrast 20 Registration for Additional Handsets 21 Basic Operation Making Calls 22 Handset 22 Base Unit (Digital Duplex Speakerphone 26 Answering Calls 28 Handset 28 Base Unit 28 Caller ID Service 29 Using the Caller List 30 Viewing the Caller List...........30...Storing Names and Numbers 37 Dialing from the Directory......39 Editing 40 Erasing 41 Sending the Directory (When the System Has Additional Handsets 42 Intercom 44 Making Intercom Calls...........44 Answering Intercom Calls......46 Transferring a Call 47 Conference 49 Call Share 50 Room Monitor ...
2.4 Ghz Cordles Phon
Page 5
... Your Conversation.....58 For Call Waiting Service Users 58 Temporary Tone Dialing (For Rotary or Pulse Service Users 58 How to Use the PAUSE Button (For PBX Line/ Long Distance Calls 59 FLASH Button 59 Ringer Tone 60 Incoming Call Tone 61... Useful Information Wall Mounting 62 Adding Another Phone .........64 Belt Clip 65 Optional Headset 65 Battery Replacement 66 Canceling Registration/ Re-registration 67 Canceling the Handset Registration 67 Re-registering the Handset ...68 If the Following Appear.........69 Troubleshooting 72 ...
... Your Conversation.....58 For Call Waiting Service Users 58 Temporary Tone Dialing (For Rotary or Pulse Service Users 58 How to Use the PAUSE Button (For PBX Line/ Long Distance Calls 59 FLASH Button 59 Ringer Tone 60 Incoming Call Tone 61... Useful Information Wall Mounting 62 Adding Another Phone .........64 Belt Clip 65 Optional Headset 65 Battery Replacement 66 Canceling Registration/ Re-registration 67 Canceling the Handset Registration 67 Re-registering the Handset ...68 If the Following Appear.........69 Troubleshooting 72 ...
2.4 Ghz Cordles Phon
Page 6
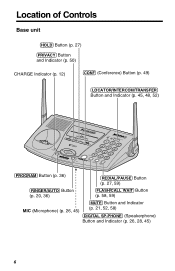
...) (CONF) (Conference) Button (p. 49) (LOCATOR/INTERCOM/TRANSFER) Button and Indicator (p. 45, 48, 52) VM PRIVACY CHARGE PROGRAM ADLJOUUSDT / SPREAD SPECTRUM RINGER AUTO MIC KX-TG2700 HOLD CONF TONE IN USE LOCTARTAONRSF/EINRTERCOM 1 4 2 3 5 7 6 89 0 DIGITAL SP-PHONE MUTE CALFLLAWSAHIT/ PRAEUDSIEAL / (PROGRAM) Button (p. 36) (REDIAL/PAUSE) Button (p. 27, 59) (RINGER/AUTO) Button (p. 20, 36) (FLASH...
...) (CONF) (Conference) Button (p. 49) (LOCATOR/INTERCOM/TRANSFER) Button and Indicator (p. 45, 48, 52) VM PRIVACY CHARGE PROGRAM ADLJOUUSDT / SPREAD SPECTRUM RINGER AUTO MIC KX-TG2700 HOLD CONF TONE IN USE LOCTARTAONRSF/EINRTERCOM 1 4 2 3 5 7 6 89 0 DIGITAL SP-PHONE MUTE CALFLLAWSAHIT/ PRAEUDSIEAL / (PROGRAM) Button (p. 36) (REDIAL/PAUSE) Button (p. 27, 59) (RINGER/AUTO) Button (p. 20, 36) (FLASH...
2.4 Ghz Cordles Phon
Page 7
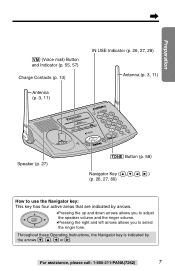
Preparation (VM) (Voice mail) Button and Indicator (p. 55, 57) Charge Contacts (p. 13) IN USE Indicator (p. 26, 27, 28) Antenna (p. 3, 11) Antenna (p. 3, 11) Speaker (p. 27) KX-TG2700 PRIVACY VM GREETING MEMO ERASE CHARGE HOLD IN USE LOCATORTR/ IANNTSEFRECROM 3 2 1 56 4 9 CONF 78 NEW MMEASSILAGBEO/XSLOW TALK 3 0 2 1 STOP TONE MUTE CFALLALSWH A/ IT LOADUJDU/ST RINGER DIGITAL SP-PHONE...
Preparation (VM) (Voice mail) Button and Indicator (p. 55, 57) Charge Contacts (p. 13) IN USE Indicator (p. 26, 27, 28) Antenna (p. 3, 11) Antenna (p. 3, 11) Speaker (p. 27) KX-TG2700 PRIVACY VM GREETING MEMO ERASE CHARGE HOLD IN USE LOCATORTR/ IANNTSEFRECROM 3 2 1 56 4 9 CONF 78 NEW MMEASSILAGBEO/XSLOW TALK 3 0 2 1 STOP TONE MUTE CFALLALSWH A/ IT LOADUJDU/ST RINGER DIGITAL SP-PHONE...

2.4 Ghz Cordles Phon
Page 8
Location of Controls Handset Back side Speaker (p. 23, 44, 52) Antenna Display (p. 10) Headset Jack (p. 65) (TALK) Button (p. 22, 28, 46) ... 24, 25, 59) Microphone (p. 23, 28, 44) Charge Contacts (p. 13) How to use the Navigator key This key has four active areas that are also used to scroll through a list of settings, the Caller List and your menu choices. The up and... directory list, and to move the cursor when entering directory items. •The right arrow is also used to adjust the ringer volume and the receiver/speaker volume. •Pressing the right and left arrows allows you...
Location of Controls Handset Back side Speaker (p. 23, 44, 52) Antenna Display (p. 10) Headset Jack (p. 65) (TALK) Button (p. 22, 28, 46) ... 24, 25, 59) Microphone (p. 23, 28, 44) Charge Contacts (p. 13) How to use the Navigator key This key has four active areas that are also used to scroll through a list of settings, the Caller List and your menu choices. The up and... directory list, and to move the cursor when entering directory items. •The right arrow is also used to adjust the ringer volume and the receiver/speaker volume. •Pressing the right and left arrows allows you...

2.4 Ghz Cordles Phon
Page 9
Functions displayed above a soft key, the soft key will change depending on the left soft key. Ex. 2 IN USE SP PRIVACY [1] Talk 00-00-40 00I=Booster 00I=Booster PRIVACY MUTE •When a function does not appear above the keys will not work. For ... ", press the right soft key. To operate " PRIVACY ", press the left display, " SAVE " is displayed above the keys. Preparation How to use the handset soft keys: Ex. 1 Three soft keys are used to select functions SP PRIVACY [1] Ringer tone :1 GF SAVE displayed directly above the right soft key. For example, on the state...
Functions displayed above a soft key, the soft key will change depending on the left soft key. Ex. 2 IN USE SP PRIVACY [1] Talk 00-00-40 00I=Booster 00I=Booster PRIVACY MUTE •When a function does not appear above the keys will not work. For ... ", press the right soft key. To operate " PRIVACY ", press the left display, " SAVE " is displayed above the keys. Preparation How to use the handset soft keys: Ex. 1 Three soft keys are used to select functions SP PRIVACY [1] Ringer tone :1 GF SAVE displayed directly above the right soft key. For example, on the state...

2.4 Ghz Cordles Phon
Page 10
...room from the speaker, "SP" will show corresponding functions of the handset is on (p. 50). These display prompts are shown below. # $% & ' ( IN USE SP PRIVACY [1] Received callsG ) + 01 PRIVACY SAVE * #" IN USE "(IN USE icon) functions as hanging up a call, viewing the Caller List...(p. 44) or a conference call (p. 49), or while using the handset speakerphone during an intercom call or a conference call is being used. Display The handset shows you instructions and information on hold within this system (handset or base unit). Off (invisible) The line is being ...
...room from the speaker, "SP" will show corresponding functions of the handset is on (p. 50). These display prompts are shown below. # $% & ' ( IN USE SP PRIVACY [1] Received callsG ) + 01 PRIVACY SAVE * #" IN USE "(IN USE icon) functions as hanging up a call, viewing the Caller List...(p. 44) or a conference call (p. 49), or while using the handset speakerphone during an intercom call or a conference call is being used. Display The handset shows you instructions and information on hold within this system (handset or base unit). Off (invisible) The line is being ...

2.4 Ghz Cordles Phon
Page 11
... call: 1-800-211-PANA(7262) 11 Hook Power Outlet (AC 120 V, 60 Hz) AC Adaptor Single-Line Telephone Jack (RJ11C) Telephone Line Cord •USE ONLY WITH Panasonic AC ADAPTOR PQLV10 (Order No. PQLV10Z). •The AC adaptor must remain connected at all times. (It is normal for the adaptor to feel... warm during use.) •To connect a standard telephone on the same line, see page 64. •If your unit is connected to prevent it from ...
... call: 1-800-211-PANA(7262) 11 Hook Power Outlet (AC 120 V, 60 Hz) AC Adaptor Single-Line Telephone Jack (RJ11C) Telephone Line Cord •USE ONLY WITH Panasonic AC ADAPTOR PQLV10 (Order No. PQLV10Z). •The AC adaptor must remain connected at all times. (It is normal for the adaptor to feel... warm during use.) •To connect a standard telephone on the same line, see page 64. •If your unit is connected to prevent it from ...

2.4 Ghz Cordles Phon
Page 12
...shown, matching the correct polarity (#). When finished, close the cover. 2 1 Battery Charge Place the handset on the handset display. The battery strength is as shown in the Handset Insert the battery into the compartment ($). CHARGE Indicator Battery strength You can check the battery strength on ...the base unit and charge for about 15 hours before initial use. •The CHARGE indicator lights, a beep sounds ...
...shown, matching the correct polarity (#). When finished, close the cover. 2 1 Battery Charge Place the handset on the handset display. The battery strength is as shown in the Handset Insert the battery into the compartment ($). CHARGE Indicator Battery strength You can check the battery strength on ...the base unit and charge for about 15 hours before initial use. •The CHARGE indicator lights, a beep sounds ...

2.4 Ghz Cordles Phon
Page 13
... or high humidity. The handset will flash when the handset is subject to 4.5 hours While not in use (Standby) Up to 11 days While using the Reception Booster feature (p. 24) Up to 3.5 hours When using the 2-Way Radio mode (p. 53) with a soft, dry cloth once a month. Battery information After your Panasonic battery is fully charged (p. 12...
... or high humidity. The handset will flash when the handset is subject to 4.5 hours While not in use (Standby) Up to 11 days While using the Reception Booster feature (p. 24) Up to 3.5 hours When using the 2-Way Radio mode (p. 53) with a soft, dry cloth once a month. Battery information After your Panasonic battery is fully charged (p. 12...

2.4 Ghz Cordles Phon
Page 14
... the SAVE key when " SAVE " displays above it. (OFF) (CONF/FUNCTION) How to the main menu from the menu Make sure the handset is not being used. 1. The display will be displayed. Press (CONF/FUNCTION). •The main menu is complete, a confirmation tone sounds. Scroll to select the ... 5. To save the setting, press the right soft key ( SAVE ). Select the sub-menu II item in the Operating Instructions. Ex. Useful information indicates the beginning or end of them are indicated by pressing Ö or Ñ. Navigator key has four active areas that are selected ...
... the SAVE key when " SAVE " displays above it. (OFF) (CONF/FUNCTION) How to the main menu from the menu Make sure the handset is not being used. 1. The display will be displayed. Press (CONF/FUNCTION). •The main menu is complete, a confirmation tone sounds. Scroll to select the ... 5. To save the setting, press the right soft key ( SAVE ). Select the sub-menu II item in the Operating Instructions. Ex. Useful information indicates the beginning or end of them are indicated by pressing Ö or Ñ. Navigator key has four active areas that are selected ...

2.4 Ghz Cordles Phon
Page 15
...53 Sub-menu I . After pressing (CONF/FUNCTION), the main menu is shown after selecting that sub-menu I is displayed. Preparation •You can use the following functions to customize your unit. Most items in the main menu. The sub-menu I item. Function Menu Table You can exit the programming... mode any time by pressing (OFF). •If you do not press any buttons for 60 seconds, the handset will exit the programming mode. •If the unit detects a problem, an error message will be displayed (p. 69). See the corresponding pages ...
...53 Sub-menu I . After pressing (CONF/FUNCTION), the main menu is shown after selecting that sub-menu I is displayed. Preparation •You can use the following functions to customize your unit. Most items in the main menu. The sub-menu I item. Function Menu Table You can exit the programming... mode any time by pressing (OFF). •If you do not press any buttons for 60 seconds, the handset will exit the programming mode. •If the unit detects a problem, an error message will be displayed (p. 69). See the corresponding pages ...
2.4 Ghz Cordles Phon
Page 16
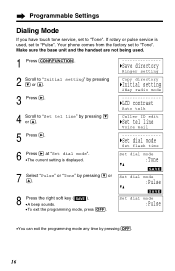
... 8 Press the right soft key ( SAVE ). •A beep sounds. •To exit the programming mode, press (OFF). Make sure the base unit and the handset are not being used. 1 Press (CONF/FUNCTION). 2 Scroll to "Initial setting" by pressing Ö or Ñ. 3 Press á. 4 Scroll to "Set tel line" by ...pressing Ö or Ñ. 5 Press á. 6 Press á at "Set dial mode". •The current setting is used, set to "Pulse". Your phone comes from the factory set to "Tone". If rotary or pulse service is displayed. 7 Select "Pulse" or "Tone" by pressing...
... 8 Press the right soft key ( SAVE ). •A beep sounds. •To exit the programming mode, press (OFF). Make sure the base unit and the handset are not being used. 1 Press (CONF/FUNCTION). 2 Scroll to "Initial setting" by pressing Ö or Ñ. 3 Press á. 4 Scroll to "Set tel line" by ...pressing Ö or Ñ. 5 Press á. 6 Press á at "Set dial mode". •The current setting is used, set to "Pulse". Your phone comes from the factory set to "Tone". If rotary or pulse service is displayed. 7 Select "Pulse" or "Tone" by pressing...

2.4 Ghz Cordles Phon
Page 17
..., set to "Set line mode" by pressing (OFF). For assistance, please call: 1-800-211-PANA(7262) 17 Make sure the base unit and the handset are not being used. 1 Press (CONF/FUNCTION). 2 Scroll to "Initial setting" by pressing Ö or Ñ, and press á. 3 Scroll to "Set tel line" by pressing Ö...
..., set to "Set line mode" by pressing (OFF). For assistance, please call: 1-800-211-PANA(7262) 17 Make sure the base unit and the handset are not being used. 1 Press (CONF/FUNCTION). 2 Scroll to "Initial setting" by pressing Ö or Ñ, and press á. 3 Scroll to "Set tel line" by pressing Ö...

2.4 Ghz Cordles Phon
Page 18
...Room monitor Auto talk GF :Off SAVE Auto talk GF :On SAVE Auto talk :On •You can answer a call by lifting the handset off the charger. Programmable Settings Auto Talk Feature The Auto Talk feature allows you to answer a call, leave the Auto Talk feature OFF. ... Ö or Ñ. 7 Press the right soft key ( SAVE ). •A beep sounds. •To exit the programming mode, press (OFF). Make sure the handset is not being used. 1 Press (CONF/FUNCTION). 2 Scroll to "Initial setting" by pressing Ö or Ñ. 3 Press á. 4 Scroll to "Auto talk" by pressing Ö...
...Room monitor Auto talk GF :Off SAVE Auto talk GF :On SAVE Auto talk :On •You can answer a call by lifting the handset off the charger. Programmable Settings Auto Talk Feature The Auto Talk feature allows you to answer a call, leave the Auto Talk feature OFF. ... Ö or Ñ. 7 Press the right soft key ( SAVE ). •A beep sounds. •To exit the programming mode, press (OFF). Make sure the handset is not being used. 1 Press (CONF/FUNCTION). 2 Scroll to "Initial setting" by pressing Ö or Ñ. 3 Press á. 4 Scroll to "Auto talk" by pressing Ö...

2.4 Ghz Cordles Phon
Page 19
... and ring. •To turn the ringer ON: Press Ñ in use. HRinger volume Ringer tone 4 Select the desired volume by pressing Ö or Ñ, and press á. Press Ö or Ñ while the handset is not in step 4, and press the right soft key ( SAVE ... •The ringer will not ring for external calls, and for external calls. See page 60. Make sure the handset is being used. 1 Press (CONF/FUNCTION). 2 Scroll to OFF, the handset will sound at "Ringer volume". displays. For assistance, please call is not being received. After receiving a voice mail ...
... and ring. •To turn the ringer ON: Press Ñ in use. HRinger volume Ringer tone 4 Select the desired volume by pressing Ö or Ñ, and press á. Press Ö or Ñ while the handset is not in step 4, and press the right soft key ( SAVE ... •The ringer will not ring for external calls, and for external calls. See page 60. Make sure the handset is being used. 1 Press (CONF/FUNCTION). 2 Scroll to OFF, the handset will sound at "Ringer volume". displays. For assistance, please call is not being received. After receiving a voice mail ...

2.4 Ghz Cordles Phon
Page 20
Programmable Settings Base unit You can set to HIGH. Make sure the base unit is being received. Make sure the handset is just ringing. •You can change . •The number of steps shows the LCD contrast level. 5 Press the right soft key ( SAVE ). •A beep ... GF SAVE Level 4 LCD contrast Low High Level 1 LCD contrast Low High Press (RINGER/AUTO), Ö or Ñ while the base unit is not being used . 1 Press (CONF/FUNCTION). 2 Scroll to OFF, the base unit will not ring for external calls, and for external calls. See page 60. LCD Contrast You...
Programmable Settings Base unit You can set to HIGH. Make sure the base unit is being received. Make sure the handset is just ringing. •You can change . •The number of steps shows the LCD contrast level. 5 Press the right soft key ( SAVE ). •A beep ... GF SAVE Level 4 LCD contrast Low High Level 1 LCD contrast Low High Press (RINGER/AUTO), Ö or Ñ while the base unit is not being used . 1 Press (CONF/FUNCTION). 2 Scroll to OFF, the base unit will not ring for external calls, and for external calls. See page 60. LCD Contrast You...

