
Installation Manual
Page 7
...Manual describes how users can do, as well as an overall technical reference for Panasonic Advanced Hybrid System, KX-TA824. Section 3 Guide for installing the PBX, optional service cards, and peripheral equipment. About the Other Manuals The following sections: Section 1 ...It explains how to program the PBX using KX-TA Maintenance Console. Screen shots reprinted with their respective owners. Programming Manual The Programming Manual explains how to install the hardware and program this PBX using Panasonic proprietary telephones (PTs) or the KX-TA Maintenance Console....
...Manual describes how users can do, as well as an overall technical reference for Panasonic Advanced Hybrid System, KX-TA824. Section 3 Guide for installing the PBX, optional service cards, and peripheral equipment. About the Other Manuals The following sections: Section 1 ...It explains how to program the PBX using KX-TA Maintenance Console. Screen shots reprinted with their respective owners. Programming Manual The Programming Manual explains how to install the hardware and program this PBX using Panasonic proprietary telephones (PTs) or the KX-TA Maintenance Console....
Installation Manual
Page 9
... which can radiate radio frequency energy and, if not installed and used in accordance with the instructions, may cause harmful interference to emergency numbers: 1. When programming emergency numbers and/or making test calls to radio communications. Installation Manual 9 These limits are designed to the dispatcher the reason for compliance could void...
... which can radiate radio frequency energy and, if not installed and used in accordance with the instructions, may cause harmful interference to emergency numbers: 1. When programming emergency numbers and/or making test calls to radio communications. Installation Manual 9 These limits are designed to the dispatcher the reason for compliance could void...
Installation Manual
Page 14
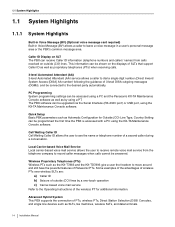
...Highlights 1.1 System Highlights 1.1.1 System Highlights Built-in Voice Message (BV) (Optional voice message card required) Built-in Voice Message (BV) allows a caller to record caller messages when calls cannot be programmed the first time the PBX is accessed with a PC using the KX-TA Maintenance Console software. Some examples of the ... for additional information. Quick Setup Basic PBX parameters such as the KX-T7885 and the KX-TD7895 give a user the freedom to see the name or telephone number of Panasonic PTs. Call Waiting Caller ID Call Waiting Caller ID allows the user...
...Highlights 1.1 System Highlights 1.1.1 System Highlights Built-in Voice Message (BV) (Optional voice message card required) Built-in Voice Message (BV) allows a caller to record caller messages when calls cannot be programmed the first time the PBX is accessed with a PC using the KX-TA Maintenance Console software. Some examples of the ... for additional information. Quick Setup Basic PBX parameters such as the KX-T7885 and the KX-TD7895 give a user the freedom to see the name or telephone number of Panasonic PTs. Call Waiting Caller ID Call Waiting Caller ID allows the user...

Installation Manual
Page 48
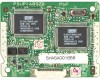
... . (Do not touch the circuit board of the card during the operation.) Programming Manual References [599] Clear All OGMs of the arrow to release it . 2.3 Installing Optional Service Cards 2.3.7 Message Expansion Card for DISA OGMs (KX-TA82491) Function When an optional message expansion card for DISA OGMs is added, up to 2 messages can be played simultaneously for callers and the total...
... . (Do not touch the circuit board of the card during the operation.) Programming Manual References [599] Clear All OGMs of the arrow to release it . 2.3 Installing Optional Service Cards 2.3.7 Message Expansion Card for DISA OGMs (KX-TA82491) Function When an optional message expansion card for DISA OGMs is added, up to 2 messages can be played simultaneously for callers and the total...
Installation Manual
Page 51
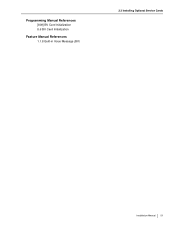
Programming Manual References [808] BV Card Initialization 8.6 BV Card Initialization Feature Manual References 1.1.8 Built-in Voice Message (BV) 2.3 Installing Optional Service Cards Installation Manual 51
Programming Manual References [808] BV Card Initialization 8.6 BV Card Initialization Feature Manual References 1.1.8 Built-in Voice Message (BV) 2.3 Installing Optional Service Cards Installation Manual 51
Installation Manual
Page 62
... damage the connections and cause the audio to cut in diameter). • Output impedance: 600 Ω CAUTION The External Paging Jack is determined by system programming. Use an EIAJ RC-6701 A plug (2-conductor, 3.5 mm [1/8 in] in and out. • The MOH port is an SELV port and should only be connected...
... damage the connections and cause the audio to cut in diameter). • Output impedance: 600 Ω CAUTION The External Paging Jack is determined by system programming. Use an EIAJ RC-6701 A plug (2-conductor, 3.5 mm [1/8 in] in and out. • The MOH port is an SELV port and should only be connected...

Installation Manual
Page 63
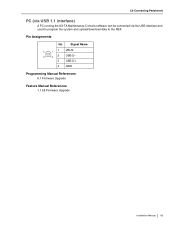
...-232C) A PC can also be connected via an RS-232C cable (user-supplied). Pin Assignments No. A printer can be connected, to print call records, and program the PBX. Connect the PC or printer via the RS-232C interface and used to the FCC Rules.
...-232C) A PC can also be connected via an RS-232C cable (user-supplied). Pin Assignments No. A printer can be connected, to print call records, and program the PBX. Connect the PC or printer via the RS-232C interface and used to the FCC Rules.
Installation Manual
Page 65
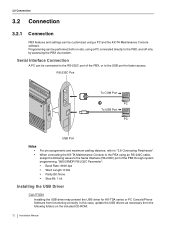
Pin Assignments No. Signal Name 2 1 1 VBUS 2 USB D- 3 4 3 USB D+ 4 GND Programming Manual References 8.1 Firmware Upgrade Feature Manual References 1.1.58 Firmware Upgrade Installation Manual 65 2.8 Connecting Peripherals PC (via USB 1.1 interface) A PC running the KX-TA Maintenance Console software can be connected via the USB interface and used to program the system and upload/download data to the PBX.
Pin Assignments No. Signal Name 2 1 1 VBUS 2 USB D- 3 4 3 USB D+ 4 GND Programming Manual References 8.1 Firmware Upgrade Feature Manual References 1.1.58 Firmware Upgrade Installation Manual 65 2.8 Connecting Peripherals PC (via USB 1.1 interface) A PC running the KX-TA Maintenance Console software can be connected via the USB interface and used to program the system and upload/download data to the PBX.
Installation Manual
Page 67
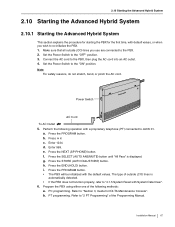
...the "ON" position. Enter 1234. Press the NEXT (SP-PHONE) button. The type of outside (CO) lines you wish to "2 PT Programming" of the following operation with a proprietary telephone (PT) connected to the "OFF" position. 3. b. 2.10 Starting the Advanced Hybrid System 2....Hybrid System This section explains the procedure for starting the PBX for KX-TA Maintenance Console". d. g. Press the END (HOLD) button. Press the PROGRAM button. • The PBX will be initialized with System Data Clear". 6. PT programming. b. f. Note For safety reasons, do not stretch, bend...
...the "ON" position. Enter 1234. Press the NEXT (SP-PHONE) button. The type of outside (CO) lines you wish to "2 PT Programming" of the following operation with a proprietary telephone (PT) connected to the "OFF" position. 3. b. 2.10 Starting the Advanced Hybrid System 2....Hybrid System This section explains the procedure for starting the PBX for KX-TA Maintenance Console". d. g. Press the END (HOLD) button. Press the PROGRAM button. • The PBX will be initialized with System Data Clear". 6. PT programming. b. f. Note For safety reasons, do not stretch, bend...
Installation Manual
Page 68
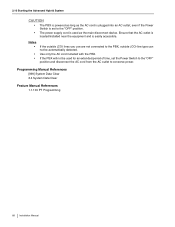
... an extended period of time, set to the "OFF" position. • The power supply cord is easily accessible. Programming Manual References [999] System Data Clear 8.4 System Data Clear Feature Manual References 1.1.103 PT Programming 68 Installation Manual Notes • • • If the outside (CO) lines you use are not connected to...
... an extended period of time, set to the "OFF" position. • The power supply cord is easily accessible. Programming Manual References [999] System Data Clear 8.4 System Data Clear Feature Manual References 1.1.103 PT Programming 68 Installation Manual Notes • • • If the outside (CO) lines you use are not connected to...
Installation Manual
Page 70
...7 digits. 4. For this reason, the password can be changed by selecting the Help menu during PC programming. 3.1 Installing KX-TA Maintenance Console 3.1 Installing KX-TA Maintenance Console 3.1.1 Installing KX-TA Maintenance Console on -line help that you change the password periodically. 5. If a system password is... started for user files. When KX-TA Maintenance Console is forgotten, it can consist of the system data. We strongly recommend that appears by either PT programming or PC programming. Note This PBX has only one system password.
...7 digits. 4. For this reason, the password can be changed by selecting the Help menu during PC programming. 3.1 Installing KX-TA Maintenance Console 3.1 Installing KX-TA Maintenance Console 3.1.1 Installing KX-TA Maintenance Console on -line help that you change the password periodically. 5. If a system password is... started for user files. When KX-TA Maintenance Console is forgotten, it can consist of the system data. We strongly recommend that appears by either PT programming or PC programming. Note This PBX has only one system password.
Installation Manual
Page 71
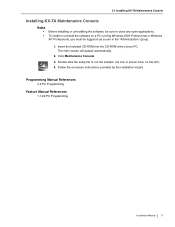
Insert the included CD-ROM into the CD-ROM drive of your PC. Programming Manual References 3.2 PC Programming Feature Manual References 1.1.99 PC Programming Installation Manual 71 3.1 Installing KX-TA Maintenance Console Installing KX-TA Maintenance Console Notes • • Before installing or uninstalling the software, be logged in as a user in the "Administrators" group. 1. Double...
Insert the included CD-ROM into the CD-ROM drive of your PC. Programming Manual References 3.2 PC Programming Feature Manual References 1.1.99 PC Programming Installation Manual 71 3.1 Installing KX-TA Maintenance Console Installing KX-TA Maintenance Console Notes • • Before installing or uninstalling the software, be logged in as a user in the "Administrators" group. 1. Double...
Installation Manual
Page 72
...Port PC To USB Port PC USB Port Notes • • For pin assignments and maximum cabling distance, refer to the USB port for KX-TDA series or PC Console/Phone Software from the following values to the Serial Interface (RS-232C) port of the PBX, or to "2.8 ...Connecting Peripherals". In this case, update the USB drivers as necessary from functioning correctly. When connecting the KX-TA Maintenance Console to the RS-232C port of the PBX through system programming, "[800] SMDR RS-232C Parameter": • Baud Rate: 9600 bps • Word Length: 8 bits • Parity...
...Port PC To USB Port PC USB Port Notes • • For pin assignments and maximum cabling distance, refer to the USB port for KX-TDA series or PC Console/Phone Software from the following values to the Serial Interface (RS-232C) port of the PBX, or to "2.8 ...Connecting Peripherals". In this case, update the USB drivers as necessary from functioning correctly. When connecting the KX-TA Maintenance Console to the RS-232C port of the PBX through system programming, "[800] SMDR RS-232C Parameter": • Baud Rate: 9600 bps • Word Length: 8 bits • Parity...
Installation Manual
Page 74
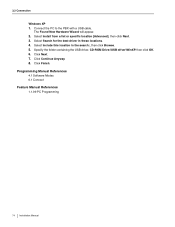
... folder containing the USB driver, CD-ROM Drive:\USB driver\WinXP, then click OK. 6. Select Install from a list or specific location [Advanced], then click Next. 3. Programming Manual References 4.1 Software Modes 6.1 Connect Feature Manual References 1.1.99 PC...
... folder containing the USB driver, CD-ROM Drive:\USB driver\WinXP, then click OK. 6. Select Install from a list or specific location [Advanced], then click Next. 3. Programming Manual References 4.1 Software Modes 6.1 Connect Feature Manual References 1.1.99 PC...
Installation Manual
Page 75
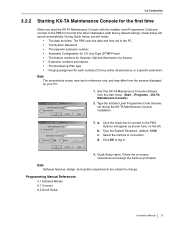
... Modes 6.1 Connect 8.2 Quick Setup Installation Manual 75 During Quick Setup, you start menu. (Start →Programs →KX-TA Maintenance Console) 2. d. 3.2 Connection 3.2.2 Starting KX-TA Maintenance Console for the first time When you will launch automatically. Start the KX-TA Maintenance Console software from the screens displayed on -screen instructions and assign the items...
... Modes 6.1 Connect 8.2 Quick Setup Installation Manual 75 During Quick Setup, you start menu. (Start →Programs →KX-TA Maintenance Console) 2. d. 3.2 Connection 3.2.2 Starting KX-TA Maintenance Console for the first time When you will launch automatically. Start the KX-TA Maintenance Console software from the screens displayed on -screen instructions and assign the items...
Installation Manual
Page 76
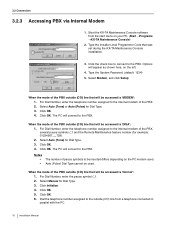
... 1. The PC will be used . When the mode of the PBX outside (CO) line from the start menu on your PC. (Start →Programs →KX-TA Maintenance Console) 2. When the mode of the PBX outside (CO) line that will connect to the PBX. Click OK. 4. Notes • ...to the internal modem of pause symbols to be accessed is 'Normal': 1. Click OK. 3.2 Connection 3.2.3 Accessing PBX via Internal Modem 1. Start the KX-TA Maintenance Console software from a telephone connected in parallel with the PC. 76 Installation Manual Type the System Password. (default: 1234) 5. The ...
... 1. The PC will be used . When the mode of the PBX outside (CO) line from the start menu on your PC. (Start →Programs →KX-TA Maintenance Console) 2. When the mode of the PBX outside (CO) line that will connect to the PBX. Click OK. 4. Notes • ...to the internal modem of pause symbols to be accessed is 'Normal': 1. Click OK. 3.2 Connection 3.2.3 Accessing PBX via Internal Modem 1. Start the KX-TA Maintenance Console software from a telephone connected in parallel with the PC. 76 Installation Manual Type the System Password. (default: 1234) 5. The ...
Installation Manual
Page 77
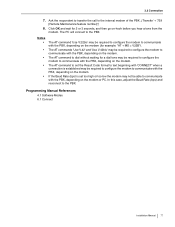
... (bps) is established may be required to configure the modem to communicate with the PBX, depending on -hook before you hear a tone from the modem. Programming Manual References 4.1 Software Modes 6.1 Connect Installation Manual 77 The PC will connect to the PBX. The AT command to set the Result Code format to...
... (bps) is established may be required to configure the modem to communicate with the PBX, depending on -hook before you hear a tone from the modem. Programming Manual References 4.1 Software Modes 6.1 Connect Installation Manual 77 The PC will connect to the PBX. The AT command to set the Result Code format to...
Installation Manual
Page 80
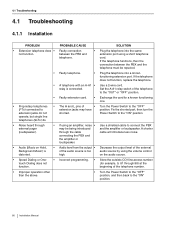
...8226; Decrease the output level of the external of the telephone to the "OUT" or "OFF" position. • Faulty extension card. • Exchange the card for example, 9, 81 through external pager (loudspeaker). • If using an amplifier, noise • Use a shielded cable to ...amplifier or loudspeaker. • Audio (Music on the audio source. • Speed Dialing or Onetouch Dialing does not function. • Incorrect programming. • Store the outside (CO) line access number (for a known functioning one. • Proprietary telephones (PTs) connected to extension ...
...8226; Decrease the output level of the external of the telephone to the "OUT" or "OFF" position. • Faulty extension card. • Exchange the card for example, 9, 81 through external pager (loudspeaker). • If using an amplifier, noise • Use a shielded cable to ...amplifier or loudspeaker. • Audio (Music on the audio source. • Speed Dialing or Onetouch Dialing does not function. • Incorrect programming. • Store the outside (CO) line access number (for a known functioning one. • Proprietary telephones (PTs) connected to extension ...

Installation Manual
Page 82
...be made, go to step 5. 5. off. • During a power failure, PTs connected to "HIGH" or "LOW". (PT) does not ring. system programming, "[107] DTMF Receiver Check". 2. Try DTMF receiver 2. If you cannot make the call , the problem may have been caused by DTMF receiver 2. Check ...caused by DTMF receiver 1. Refer to the "HEADSET" "HANDSET" position. If you cannot make another call using the speakerphone on the PT • Program the CO buttons. Select "Disable" for DTMF receiver 1 and "Enable" for DTMF receiver 2 through calls. Try to make wrong with a PT...
...be made, go to step 5. 5. off. • During a power failure, PTs connected to "HIGH" or "LOW". (PT) does not ring. system programming, "[107] DTMF Receiver Check". 2. Try DTMF receiver 2. If you cannot make the call , the problem may have been caused by DTMF receiver 2. Check ...caused by DTMF receiver 1. Refer to the "HEADSET" "HANDSET" position. If you cannot make another call using the speakerphone on the PT • Program the CO buttons. Select "Disable" for DTMF receiver 1 and "Enable" for DTMF receiver 2 through calls. Try to make wrong with a PT...
Installation Manual
Page 84
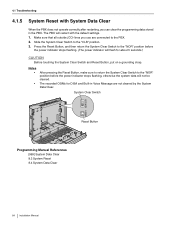
... References [999] System Data Clear 8.3 System Reset 8.4 System Data Clear 84 Installation Manual Make sure that all outside (CO) lines you can clear the programming data stored in Voice Message are connected to the "CLR" position. 3. Slide the System Clear Switch to the PBX. 2. The PBX will not be cleared. 4.1 Troubleshooting 4.1.5 System Reset...
... References [999] System Data Clear 8.3 System Reset 8.4 System Data Clear 84 Installation Manual Make sure that all outside (CO) lines you can clear the programming data stored in Voice Message are connected to the "CLR" position. 3. Slide the System Clear Switch to the PBX. 2. The PBX will not be cleared. 4.1 Troubleshooting 4.1.5 System Reset...

