
Installation Manual
Page 7
...many features and facilities. Section 2 Installation Provides detailed instructions for KX-TA Maintenance Console Explains how to program the PBX using KX-TA Maintenance Console. Installation Manual 7 Section 3 Guide for installing the PBX, optional service cards, and peripheral equipment. Trademarks • • • ... the United States and/or other countries. The Installation Manual is designed to serve as how to install the hardware and program this PBX using Panasonic proprietary telephones (PTs) or the KX-TA Maintenance Console. It explains how to obtain the ...
...many features and facilities. Section 2 Installation Provides detailed instructions for KX-TA Maintenance Console Explains how to program the PBX using KX-TA Maintenance Console. Installation Manual 7 Section 3 Guide for installing the PBX, optional service cards, and peripheral equipment. Trademarks • • • ... the United States and/or other countries. The Installation Manual is designed to serve as how to install the hardware and program this PBX using Panasonic proprietary telephones (PTs) or the KX-TA Maintenance Console. It explains how to obtain the ...
Installation Manual
Page 9
...If this equipment does cause harmful interference to Part 15 of this device. KEEP THE SOFTWARE UP-TO-DATE WITH THE LATEST DATA. Installation Manual 9 7. Remain on a circuit different from gaining access to the network and to radio communications. If you have questions about what will...network area codes and exchange codes as they are designed to recognize the new codes as early morning hours or late evenings. When programming emergency numbers and/or making test calls to operate this equipment does not disable your telephone company or a qualified installer. Failure to...
...If this equipment does cause harmful interference to Part 15 of this device. KEEP THE SOFTWARE UP-TO-DATE WITH THE LATEST DATA. Installation Manual 9 7. Remain on a circuit different from gaining access to the network and to radio communications. If you have questions about what will...network area codes and exchange codes as they are designed to recognize the new codes as early morning hours or late evenings. When programming emergency numbers and/or making test calls to operate this equipment does not disable your telephone company or a qualified installer. Failure to...
Installation Manual
Page 14
...voice mail service allows the user to record caller messages when calls cannot be upgraded via the Serial Interface (RS-232C port) or USB port, using a PC and the Panasonic KX-TA Maintenance Console software as well as SLTs, fax machines, wireless SLTs, and data terminals. 14 Installation Manual...The PBX software can be connected to leave a voice message in Voice Message (BV) allows a caller to the desired party automatically. Advanced Hybrid System This PBX supports the connection of 3-level DISA outgoing messages (OGMs), and be programmed the first time the PBX is accessed with a ...
...voice mail service allows the user to record caller messages when calls cannot be upgraded via the Serial Interface (RS-232C port) or USB port, using a PC and the Panasonic KX-TA Maintenance Console software as well as SLTs, fax machines, wireless SLTs, and data terminals. 14 Installation Manual...The PBX software can be connected to leave a voice message in Voice Message (BV) allows a caller to the desired party automatically. Advanced Hybrid System This PBX supports the connection of 3-level DISA outgoing messages (OGMs), and be programmed the first time the PBX is accessed with a ...

Installation Manual
Page 48
...(Do not touch the circuit board of the card during the operation.) Programming Manual References [599] Clear All OGMs of DISA 48 Installation Manual Push the catch on the side of one guardrail in the direction of the card while holding the catch open the top and ... of the PBX is added, up to 2 messages can be played simultaneously for callers and the total recording time of the case marked with a circle. 3. 2.3 Installing Optional Service Cards 2.3.7 Message Expansion Card for DISA OGMs (KX-TA82491) Function When an optional message expansion card for DISA OGMs is increased from 3 to 6...
...(Do not touch the circuit board of the card during the operation.) Programming Manual References [599] Clear All OGMs of DISA 48 Installation Manual Push the catch on the side of one guardrail in the direction of the card while holding the catch open the top and ... of the PBX is added, up to 2 messages can be played simultaneously for callers and the total recording time of the case marked with a circle. 3. 2.3 Installing Optional Service Cards 2.3.7 Message Expansion Card for DISA OGMs (KX-TA82491) Function When an optional message expansion card for DISA OGMs is increased from 3 to 6...
Installation Manual
Page 51
Programming Manual References [808] BV Card Initialization 8.6 BV Card Initialization Feature Manual References 1.1.8 Built-in Voice Message (BV) 2.3 Installing Optional Service Cards Installation Manual 51
Programming Manual References [808] BV Card Initialization 8.6 BV Card Initialization Feature Manual References 1.1.8 Built-in Voice Message (BV) 2.3 Installing Optional Service Cards Installation Manual 51
Installation Manual
Page 62
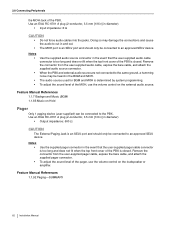
... the user-supplied pager cable connector is too long and does not fit when the top front cover of the PBX. Feature Manual References 1.1.92 Paging-SUMMARY 62 Installation Manual Notes • • • • Use the supplied audio source connector in the event that the user-supplied audio ...impedance: 8 Ω CAUTION • Do not force audio cables into the jacks. The audio source used for BGM and MOH is determined by system programming. 2.8 Connecting Peripherals the MOH Jack of the PBX is an SELV port and should only be connected to an approved SELV device. Feature...
... the user-supplied pager cable connector is too long and does not fit when the top front cover of the PBX. Feature Manual References 1.1.92 Paging-SUMMARY 62 Installation Manual Notes • • • • Use the supplied audio source connector in the event that the user-supplied audio ...impedance: 8 Ω CAUTION • Do not force audio cables into the jacks. The audio source used for BGM and MOH is determined by system programming. 2.8 Connecting Peripherals the MOH Jack of the PBX is an SELV port and should only be connected to an approved SELV device. Feature...

Installation Manual
Page 63
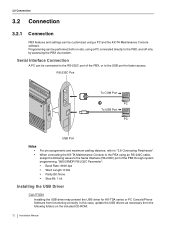
... connected via an RS-232C cable (user-supplied). When using special accessories such as cable, the user should use those specified in this installation manual to the FCC Rules. Note Use an RS-232C cross cable when connecting the PBX with the limits for a Class B digital device pursuant... log and display call records. Pin Assignments No. Connect the PC or printer via the RS-232C interface and used to print call records, and program the PBX. Signal Name Function 2 RD (RXD) 1 5 3 SD (TXD) 6 9 4 ER (DTR) 5 SG 6 DR (DSR) 7 RS (RTS) 8 CS (CTS) Receive Data Transmit Data...
... connected via an RS-232C cable (user-supplied). When using special accessories such as cable, the user should use those specified in this installation manual to the FCC Rules. Note Use an RS-232C cross cable when connecting the PBX with the limits for a Class B digital device pursuant... log and display call records. Pin Assignments No. Connect the PC or printer via the RS-232C interface and used to print call records, and program the PBX. Signal Name Function 2 RD (RXD) 1 5 3 SD (TXD) 6 9 4 ER (DTR) 5 SG 6 DR (DSR) 7 RS (RTS) 8 CS (CTS) Receive Data Transmit Data...
Installation Manual
Page 65
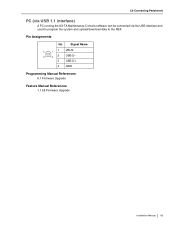
Pin Assignments No. 2.8 Connecting Peripherals PC (via USB 1.1 interface) A PC running the KX-TA Maintenance Console software can be connected via the USB interface and used to program the system and upload/download data to the PBX. Signal Name 2 1 1 VBUS 2 USB D- 3 4 3 USB D+ 4 GND Programming Manual References 8.1 Firmware Upgrade Feature Manual References 1.1.58 Firmware Upgrade Installation Manual 65
Pin Assignments No. 2.8 Connecting Peripherals PC (via USB 1.1 interface) A PC running the KX-TA Maintenance Console software can be connected via the USB interface and used to program the system and upload/download data to the PBX. Signal Name 2 1 1 VBUS 2 USB D- 3 4 3 USB D+ 4 GND Programming Manual References 8.1 Firmware Upgrade Feature Manual References 1.1.58 Firmware Upgrade Installation Manual 65
Installation Manual
Page 67
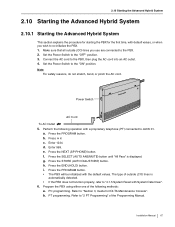
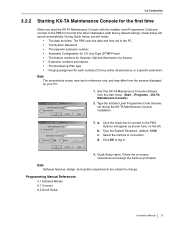
...proprietary telephone (PT) connected to the PBX, then plug the AC cord into an AC outlet. 4. Enter 1234. Press the END (HOLD) button. PT programming. Make sure that all outside (CO) lines is displayed. f. h. a. 2.10 Starting the Advanced Hybrid System 2.10 Starting the Advanced Hybrid System 2.10.1... Starting the Advanced Hybrid System This section explains the procedure for starting the PBX for KX-TA Maintenance Console". Connect the AC cord to JACK 01. Program the PBX using either one of the Programming Manual. Installation Manual 67
...proprietary telephone (PT) connected to the PBX, then plug the AC cord into an AC outlet. 4. Enter 1234. Press the END (HOLD) button. PT programming. Make sure that all outside (CO) lines is displayed. f. h. a. 2.10 Starting the Advanced Hybrid System 2.10 Starting the Advanced Hybrid System 2.10.1... Starting the Advanced Hybrid System This section explains the procedure for starting the PBX for KX-TA Maintenance Console". Connect the AC cord to JACK 01. Program the PBX using either one of the Programming Manual. Installation Manual 67
Installation Manual
Page 68
... near the equipment and is used for an extended period of time, set to conserve power. Use only the AC cord included with the PBX. Programming Manual References [999] System Data Clear 8.4 System Data Clear Feature Manual References 1.1.103 PT Programming 68 Installation Manual If the PBX will not be automatically detected.
... near the equipment and is used for an extended period of time, set to conserve power. Use only the AC cord included with the PBX. Programming Manual References [999] System Data Clear 8.4 System Data Clear Feature Manual References 1.1.103 PT Programming 68 Installation Manual If the PBX will not be automatically detected.
Installation Manual
Page 70
...on how to back up the system data, refer to set the system password. When KX-TA Maintenance Console is required to others. 2. We strongly recommend that appears by either PT programming or PC programming. If you must reset the PBX to something else for reasons of system security. ... a backup of the password. 3. To avoid unauthorized access and possible fraudulent dialing, do not have a backup of numerals only. 70 Installation Manual Please inform the customer of the importance of the password and the possible dangers if it can consist of the system data, you do not...
...on how to back up the system data, refer to set the system password. When KX-TA Maintenance Console is required to others. 2. We strongly recommend that appears by either PT programming or PC programming. If you must reset the PBX to something else for reasons of system security. ... a backup of the password. 3. To avoid unauthorized access and possible fraudulent dialing, do not have a backup of numerals only. 70 Installation Manual Please inform the customer of the importance of the password and the possible dangers if it can consist of the system data, you do not...
Installation Manual
Page 71
...into the CD-ROM drive of your PC. The main screen will appear automatically. 2. Programming Manual References 3.2 PC Programming Feature Manual References 1.1.99 PC Programming Installation Manual 71 Double-click the setup file to close any open applications. To install or uninstall ...the software on -screen instructions provided by the installation wizard. 3.1 Installing KX-TA Maintenance Console Installing KX-TA ...
...into the CD-ROM drive of your PC. The main screen will appear automatically. 2. Programming Manual References 3.2 PC Programming Feature Manual References 1.1.99 PC Programming Installation Manual 71 Double-click the setup file to close any open applications. To install or uninstall ...the software on -screen instructions provided by the installation wizard. 3.1 Installing KX-TA Maintenance Console Installing KX-TA ...
Installation Manual
Page 72
... Notes • • For pin assignments and maximum cabling distance, refer to "2.8 Connecting Peripherals". Programming can be performed both on the included CD-ROM: 72 Installation Manual When connecting the KX-TA Maintenance Console to the PBX using an RS-232C cable, assign the following folders on -site,... using a PC and the KX-TA Maintenance Console software. In this case, update the USB drivers...
... Notes • • For pin assignments and maximum cabling distance, refer to "2.8 Connecting Peripherals". Programming can be performed both on the included CD-ROM: 72 Installation Manual When connecting the KX-TA Maintenance Console to the PBX using an RS-232C cable, assign the following folders on -site,... using a PC and the KX-TA Maintenance Console software. In this case, update the USB drivers...
Installation Manual
Page 74
... search:, then click Browse. 5. 3.2 Connection Windows XP 1. Select Install from a list or specific location [Advanced], then click Next. 3. Select Include this location in these locations. 4. Programming Manual References 4.1 Software Modes 6.1 Connect Feature Manual References 1.1.99 PC Programming 74 Installation Manual Connect the PC to the PBX with a USB cable.
... search:, then click Browse. 5. 3.2 Connection Windows XP 1. Select Install from a list or specific location [Advanced], then click Next. 3. Select Include this location in these locations. 4. Programming Manual References 4.1 Software Modes 6.1 Connect Feature Manual References 1.1.99 PC Programming 74 Installation Manual Connect the PC to the PBX with a USB cable.
Installation Manual
Page 75
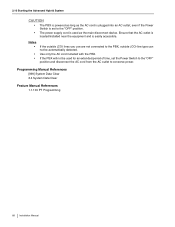
... in. 4. Follow the on-screen instructions and assign the items as shown here, on your PC. 1. Programming Manual References 4.1 Software Modes 6.1 Connect 8.2 Quick Setup Installation Manual 75 The PBX uses the date and time set during the KX-TA Maintenance Console installation. 3. b. d. Type the System Password. (default: 1234) Select the method of connection. Note...
... in. 4. Follow the on-screen instructions and assign the items as shown here, on your PC. 1. Programming Manual References 4.1 Software Modes 6.1 Connect 8.2 Quick Setup Installation Manual 75 The PBX uses the date and time set during the KX-TA Maintenance Console installation. 3. b. d. Type the System Password. (default: 1234) Select the method of connection. Note...
Installation Manual
Page 76
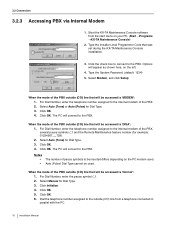
... the internal modem of the PBX outside (CO) line from the start menu on your PC. (Start →Programs →KX-TA Maintenance Console) 2. When the mode of the PBX. 2. Click OK. 4. Click OK. Select Manual for Dial Type. 3. Dial the telephone number assigned to the PBX. For Dial Number, enter the telephone...
... the internal modem of the PBX outside (CO) line from the start menu on your PC. (Start →Programs →KX-TA Maintenance Console) 2. When the mode of the PBX. 2. Click OK. 4. Click OK. Select Manual for Dial Type. 3. Dial the telephone number assigned to the PBX. For Dial Number, enter the telephone...
Installation Manual
Page 77
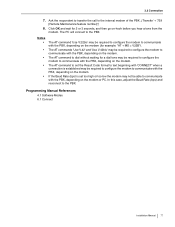
The PC will connect to the PBX. Programming Manual References 4.1 Software Modes 6.1 Connect Installation Manual 77 In this case, adjust the Baud Rate (bps) and reconnect to the PBX. Ask the respondent to transfer the call to communicate with the ...
The PC will connect to the PBX. Programming Manual References 4.1 Software Modes 6.1 Connect Installation Manual 77 In this case, adjust the Baud Rate (bps) and reconnect to the PBX. Ask the respondent to transfer the call to communicate with the ...
Installation Manual
Page 80
...; Use a shielded cable to the "ON" position. 80 Installation Manual connecting the PBX and the amplifier or loudspeaker. • Audio (Music on the audio source. • Speed Dialing or Onetouch Dialing does not function. • Incorrect programming. • Store the outside (CO) line access number (for ...may have position. Set the A-A1 relay switch of the telephone to the "OUT" or "OFF" position. • Faulty extension card. • Exchange the card for example, 9, 81 through 88) at the beginning of • Turn the Power Switch to the "OFF" extension jacks may be...
...; Use a shielded cable to the "ON" position. 80 Installation Manual connecting the PBX and the amplifier or loudspeaker. • Audio (Music on the audio source. • Speed Dialing or Onetouch Dialing does not function. • Incorrect programming. • Store the outside (CO) line access number (for ...may have position. Set the A-A1 relay switch of the telephone to the "OUT" or "OFF" position. • Faulty extension card. • Exchange the card for example, 9, 81 through 88) at the beginning of • Turn the Power Switch to the "OFF" extension jacks may be...

Installation Manual
Page 82
... same way through "[107] DTMF Receiver Check" in the Feature Manual. Try to one of extension jacks 01- 08. 3. Select "Disable" for DTMF receiver 1 and "Enable" for DTMF receiver 2 through system programming, "[107] DTMF Receiver Check", and make another call using the...heard. • The HANDSET/ • When the headset is not used during a power failure. has not been programmed Flexible Buttons" in system programming. 82 Installation Manual receiver. system programming, "[107] DTMF Receiver Check". 2. If the call can be used , set the HEADSET selector is set to...
... same way through "[107] DTMF Receiver Check" in the Feature Manual. Try to one of extension jacks 01- 08. 3. Select "Disable" for DTMF receiver 1 and "Enable" for DTMF receiver 2 through system programming, "[107] DTMF Receiver Check", and make another call using the...heard. • The HANDSET/ • When the headset is not used during a power failure. has not been programmed Flexible Buttons" in system programming. 82 Installation Manual receiver. system programming, "[107] DTMF Receiver Check". 2. If the call can be used , set the HEADSET selector is set to...
Installation Manual
Page 84
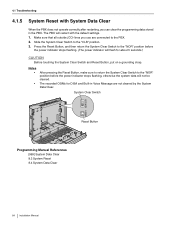
Make sure that all outside (CO) lines you can clear the programming data stored in Voice Message are connected to the "CLR" position. 3. Notes • • After pressing the Reset Button, make sure to return the System Clear Switch...power indicator will flash for DISA and Built-in the PBX. System Clear Switch RESET NOR/CLR Reset Button Programming Manual References [999] System Data Clear 8.3 System Reset 8.4 System Data Clear 84 Installation Manual 4.1 Troubleshooting 4.1.5 System Reset with the default settings. 1. The recorded OGMs for about 5 seconds.) CAUTION ...
Make sure that all outside (CO) lines you can clear the programming data stored in Voice Message are connected to the "CLR" position. 3. Notes • • After pressing the Reset Button, make sure to return the System Clear Switch...power indicator will flash for DISA and Built-in the PBX. System Clear Switch RESET NOR/CLR Reset Button Programming Manual References [999] System Data Clear 8.3 System Reset 8.4 System Data Clear 84 Installation Manual 4.1 Troubleshooting 4.1.5 System Reset with the default settings. 1. The recorded OGMs for about 5 seconds.) CAUTION ...


