Operating Instructions
Page 2
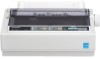
... change the factory settings. Introduction Introduction Thank you for purchasing the Panasonic KX-P1131E Impact Dot Matrix Printer. In most popular software packages. Installation Manual (printed documentation) The Installation Manual explains installation procedures. 2 Operating Instructions Operating Instructions (this manual) The Operating Instructions explain part names, installation, operations, maintenance and specifications of your office. This printer is a versatile...
... change the factory settings. Introduction Introduction Thank you for purchasing the Panasonic KX-P1131E Impact Dot Matrix Printer. In most popular software packages. Installation Manual (printed documentation) The Installation Manual explains installation procedures. 2 Operating Instructions Operating Instructions (this manual) The Operating Instructions explain part names, installation, operations, maintenance and specifications of your office. This printer is a versatile...
Operating Instructions
Page 4
... reseller from FCC local regional offices helpful. However, there is no guarantee that interference will not occur in a residential installation. Also, any interference received, including interference that to which the receiver is operational during East Coast business hours (9:00 ... only) If you are designed to provide reasonable protection against harmful interference in a particular installation. FCC Declaration of Conformity Trade Name: Panasonic Model Number: KX-P1131E Responsible Party: Panasonic Corporation of the FCC Rules. You may cause undesired operation.
... reseller from FCC local regional offices helpful. However, there is no guarantee that interference will not occur in a residential installation. Also, any interference received, including interference that to which the receiver is operational during East Coast business hours (9:00 ... only) If you are designed to provide reasonable protection against harmful interference in a particular installation. FCC Declaration of Conformity Trade Name: Panasonic Model Number: KX-P1131E Responsible Party: Panasonic Corporation of the FCC Rules. You may cause undesired operation.
Operating Instructions
Page 5
... ...10 Before You Start 11 Unpacking ...11 Removing the Protective Paper 11 Installing the Platen Knob 11 Parts of the Printer ...12 Setup ...15 Installing the Software ...15 System Requirements ...15 Software Installation ...15 Connecting to a Computer 16 Power Supply ...17 Installing the Ribbon Cassette 18 Mounting the Ribbon Cassette 18 Handling Paper ...20...
... ...10 Before You Start 11 Unpacking ...11 Removing the Protective Paper 11 Installing the Platen Knob 11 Parts of the Printer ...12 Setup ...15 Installing the Software ...15 System Requirements ...15 Software Installation ...15 Connecting to a Computer 16 Power Supply ...17 Installing the Ribbon Cassette 18 Mounting the Ribbon Cassette 18 Handling Paper ...20...

Operating Instructions
Page 7
... carefully. Denotes a potential WARNING hazard that must be performed. If the plug cannot be emphasized in this manual. Operating Instructions 7 CAUTION Denotes hazards that the installation is listed on the nameplate. Safety Information Safety Information For Your Safety To prevent severe injury and loss of life, read this section carefully before...
... carefully. Denotes a potential WARNING hazard that must be performed. If the plug cannot be emphasized in this manual. Operating Instructions 7 CAUTION Denotes hazards that the installation is listed on the nameplate. Safety Information Safety Information For Your Safety To prevent severe injury and loss of life, read this section carefully before...

Operating Instructions
Page 9
... the power cord. Do not place any type of moisture. Do not block the air vents. When moving parts, including fingers, hair, jewelry, neckties, etc. Installation and Relocation Do not position the unit in a location where it becomes hot, even when not printing. Otherwise, it may result in fire. Accidental spillage...
... the power cord. Do not place any type of moisture. Do not block the air vents. When moving parts, including fingers, hair, jewelry, neckties, etc. Installation and Relocation Do not position the unit in a location where it becomes hot, even when not printing. Otherwise, it may result in fire. Accidental spillage...
Operating Instructions
Page 10
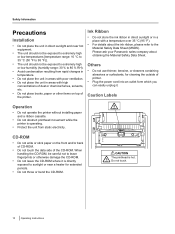
Please ask your Panasonic sales company about the ink ribbon, please refer to the Material Safety Data Sheet (MSDS). Caution Labels Operation • Do not operate the printer without installing paper and a ribbon cassette. • Do not obstruct printhead movement while the printer is operating. •...-ROM • Do not write or stick paper on top of the printer. Do not touch. 10 Operating Instructions Safety Information Precautions Installation • Do not place the unit in direct sunlight and near a heater for cleaning the outside of printer. • Plug the...
Please ask your Panasonic sales company about the ink ribbon, please refer to the Material Safety Data Sheet (MSDS). Caution Labels Operation • Do not operate the printer without installing paper and a ribbon cassette. • Do not obstruct printhead movement while the printer is operating. •...-ROM • Do not write or stick paper on top of the printer. Do not touch. 10 Operating Instructions Safety Information Precautions Installation • Do not place the unit in direct sunlight and near a heater for cleaning the outside of printer. • Plug the...
Operating Instructions
Page 11
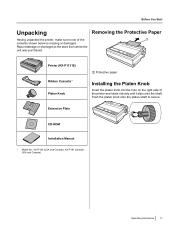
... which the unit was purchased. Report damage or shortages to secure. CD-ROM Installation Manual *1 Model No.: KX-P180 (USA and Canada), KX-P181 (Outside USA and Canada) Operating Instructions 11 Printer (KX-P1131E) Ribbon Cassette*1 Platen Knob Extension Plate A Protective paper Installing the Platen Knob Insert the platen knob into the hole on the right...
... which the unit was purchased. Report damage or shortages to secure. CD-ROM Installation Manual *1 Model No.: KX-P180 (USA and Canada), KX-P181 (Outside USA and Canada) Operating Instructions 11 Printer (KX-P1131E) Ribbon Cassette*1 Platen Knob Extension Plate A Protective paper Installing the Platen Knob Insert the platen knob into the hole on the right...
Operating Instructions
Page 14
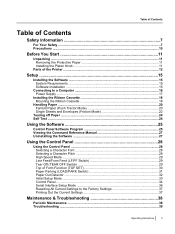
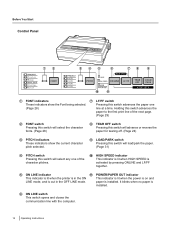
... pitches. I J K A FONT indicators G LF/FF switch These indicators show the current character pitch selected. J HIGH SPEED indicator This indicator is lit when HIGH SPEED is installed. F ON LINE switch This switch opens and closes the communication line with the computer. 14 Operating Instructions Before You Start Control Panel AB CDE F GH... show the Font being selected. paper is out in the ON This indicator is lit when the power is on and LINE mode, and is installed.
... pitches. I J K A FONT indicators G LF/FF switch These indicators show the current character pitch selected. J HIGH SPEED indicator This indicator is lit when HIGH SPEED is installed. F ON LINE switch This switch opens and closes the communication line with the computer. 14 Operating Instructions Before You Start Control Panel AB CDE F GH... show the Font being selected. paper is out in the ON This indicator is lit when the power is on and LINE mode, and is installed.
Operating Instructions
Page 15
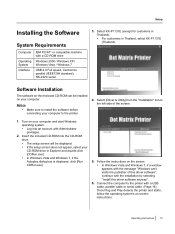
... and start Windows operating system. • Log into the CD-ROM drive. • The setup screen will be installed on the left side of this driver software anyway". 6. Operating Instructions 15 Select KX-P1131E (except for customers in Thailand). • For customers in Explorer and double-click [CDRun.exe]. • In ... click [Run CDRun.exe]. 5. Turn on the enclosed CD-ROM can 't verify the publisher of the screen. 1. Follow the instructions on -screen instructions. Software Installation The software on your CD-ROM drive in Thailand, select KX-P1131E (Thailand).
... and start Windows operating system. • Log into the CD-ROM drive. • The setup screen will be installed on the left side of this driver software anyway". 6. Operating Instructions 15 Select KX-P1131E (except for customers in Thailand). • For customers in Explorer and double-click [CDRun.exe]. • In ... click [Run CDRun.exe]. 5. Turn on the enclosed CD-ROM can 't verify the publisher of the screen. 1. Follow the instructions on -screen instructions. Software Installation The software on your CD-ROM drive in Thailand, select KX-P1131E (Thailand).
Operating Instructions
Page 16
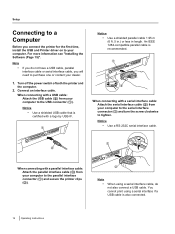
...interface cable, do not have a USB cable, parallel interface cable or serial interface cable, you connect the printer for the first time, install the USB and Printer driver on to your computer to the serial interface connector (A) and turn the screw clockwise to the parallel interface ...connector (A) and secure the printer clips (B). For more information see "Installing the Software (Page 15)". Turn off the power switch of both the printer and the computer. 2. Notice • Use a RS-232C serial ...
...interface cable, do not have a USB cable, parallel interface cable or serial interface cable, you connect the printer for the first time, install the USB and Printer driver on to your computer to the serial interface connector (A) and turn the screw clockwise to the parallel interface ...connector (A) and secure the printer clips (B). For more information see "Installing the Software (Page 15)". Turn off the power switch of both the printer and the computer. 2. Notice • Use a RS-232C serial ...
Operating Instructions
Page 18
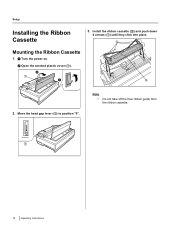
HEAD GAP A 18 Operating Instructions A Mounting the Ribbon Cassette 1. B A A B 2. B Open the smoked plastic cover (A). Move the head gap lever (A) to position "6". Install the ribbon cassette (B) and push down 4 arrows (A) until they click into place. Setup Installing the Ribbon Cassette 3. A Turn the power on. Note • Do not take off the blue ribbon guide from the ribbon cassette.
HEAD GAP A 18 Operating Instructions A Mounting the Ribbon Cassette 1. B A A B 2. B Open the smoked plastic cover (A). Move the head gap lever (A) to position "6". Install the ribbon cassette (B) and push down 4 arrows (A) until they click into place. Setup Installing the Ribbon Cassette 3. A Turn the power on. Note • Do not take off the blue ribbon guide from the ribbon cassette.
Operating Instructions
Page 20
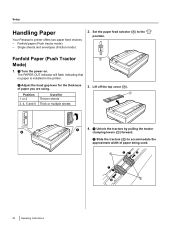
.... B Slide the tractors (B) to the " " position. Fanfold paper (Push tractor mode) - Setup Handling Paper Your Panasonic printer offers two paper feed choices: - A HEAD GAP B A 4. The PAPER OUT indicator will flash indicating that no paper is installed in the printer. B Adjust the head gap lever for Thinner sheets Thick or multiple sheets 3. Single...
.... B Slide the tractors (B) to the " " position. Fanfold paper (Push tractor mode) - Setup Handling Paper Your Panasonic printer offers two paper feed choices: - A HEAD GAP B A 4. The PAPER OUT indicator will flash indicating that no paper is installed in the printer. B Adjust the head gap lever for Thinner sheets Thick or multiple sheets 3. Single...
Operating Instructions
Page 22
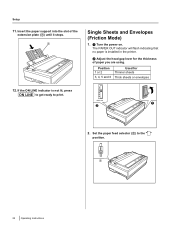
... indicator will flash indicating that no paper is not lit, press ON LINE to get ready to the " " position. If the ON LINE indicator is installed in the printer. Set the paper feed selector (A) to print. HEAD GAP A B 2. A 22 Operating Instructions Setup 11. A Turn the power on. Position 1 or 2 3, 4, 5 and 6 Used...
... indicator will flash indicating that no paper is not lit, press ON LINE to get ready to the " " position. If the ON LINE indicator is installed in the printer. Set the paper feed selector (A) to print. HEAD GAP A B 2. A 22 Operating Instructions Setup 11. A Turn the power on. Position 1 or 2 3, 4, 5 and 6 Used...
Operating Instructions
Page 23
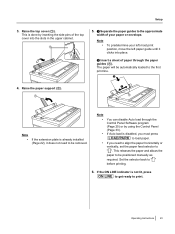
..., set the paper feed selector to load paper. This releases the paper and allows the paper to print. If the ON LINE indicator is already installed (Page 22), it clicks into the slots in the upper cabinet. A Separate the paper guides to " " before printing. 6. Note • • • You can disable...
..., set the paper feed selector to load paper. This releases the paper and allows the paper to print. If the ON LINE indicator is already installed (Page 22), it clicks into the slots in the upper cabinet. A Separate the paper guides to " " before printing. 6. Note • • • You can disable...
Operating Instructions
Page 24
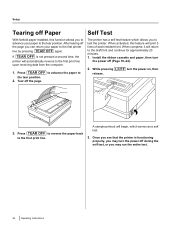
... reverse the paper back to the tear position. 2. Setup Tearing off Paper Self Test With fanfold paper installed, this feature will automatically reverse to the first print line upon receiving data from the computer. 1. Install the ribbon cassette and paper, then turn the power off the page. Once you see that the...
... reverse the paper back to the tear position. 2. Setup Tearing off Paper Self Test With fanfold paper installed, this feature will automatically reverse to the first print line upon receiving data from the computer. 1. Install the ribbon cassette and paper, then turn the power off the page. Once you see that the...
Operating Instructions
Page 25
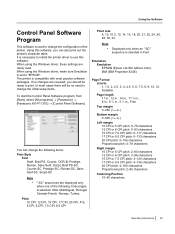
..." sequence is necessary to install the printer driver to use this software, you should be no changes are required, you can change the following Code pages is set to change the initial setup items. To start the Control Panel Software program, from [Start], select [All programs] ® [Panasonic] ® [Panasonic KX-P1131E] ® [Control Panel...
..." sequence is necessary to install the printer driver to use this software, you should be no changes are required, you can change the following Code pages is set to change the initial setup items. To start the Control Panel Software program, from [Start], select [All programs] ® [Panasonic] ® [Panasonic KX-P1131E] ® [Control Panel...
Operating Instructions
Page 26
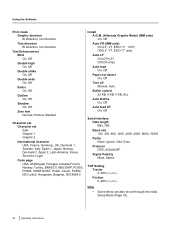
..., Legal Code page USA, Multilingual, Portugal, Canada-French, Norway, Turkey, BRASCII, ABICOMP, PC855, PC866, USSR GOST, Polish, Czech, PC852, ISO Latin2, Hungarian, Bulgaria, ISO 8859-2 Install A.G.M. (Alternate Graphic Mode) (IBM only) On, Off Auto CR (IBM only) On (LF, VT, ESC+"J" +CR) Off (LF, VT, ESC+"J" only) Auto LF On (CR...
..., Legal Code page USA, Multilingual, Portugal, Canada-French, Norway, Turkey, BRASCII, ABICOMP, PC855, PC866, USSR GOST, Polish, Czech, PC852, ISO Latin2, Hungarian, Bulgaria, ISO 8859-2 Install A.G.M. (Alternate Graphic Mode) (IBM only) On, Off Auto CR (IBM only) On (LF, VT, ESC+"J" +CR) Off (LF, VT, ESC+"J" only) Auto LF On (CR...
Operating Instructions
Page 27
... [Command Reference Manual] from the second time, the screen to select your computer, follow the procedure below to remove the software that is installed on the screen. Operating Instructions 27 After pressing this button, the screen to select the emulation and character table is displayed. In Control Panel...table of the software. About Displays the version of the built-in font in Windows Vista and Windows 7, select [Uninstall a program]. 2. Select [Panasonic KX-P1131 Series] to select your country is displayed. Note • The screen to uninstall. 3.
... [Command Reference Manual] from the second time, the screen to select your computer, follow the procedure below to remove the software that is installed on the screen. Operating Instructions 27 After pressing this button, the screen to select the emulation and character table is displayed. In Control Panel...table of the software. About Displays the version of the built-in font in Windows Vista and Windows 7, select [Uninstall a program]. 2. Select [Panasonic KX-P1131 Series] to select your country is displayed. Note • The screen to uninstall. 3.
Operating Instructions
Page 29
... Switch) You can adjust the paper position by using the front panel switches when the printer is in the ON LINE mode. • With paper installed, pressing LF/FF once advances the paper one of the 120 dpi, 180 dpi or 360 dpi of the next page. Tear Off (TEAR OFF... or when the printer is determined by the current setting for doubling the print speed only when LQ Font and one line. • With paper installed, holding LF/FF moves the printhead to the center and advances the paper to the top of 24-pin bit image are selected. Turning off...
... Switch) You can adjust the paper position by using the front panel switches when the printer is in the ON LINE mode. • With paper installed, pressing LF/FF once advances the paper one of the 120 dpi, 180 dpi or 360 dpi of the next page. Tear Off (TEAR OFF... or when the printer is determined by the current setting for doubling the print speed only when LQ Font and one line. • With paper installed, holding LF/FF moves the printhead to the center and advances the paper to the top of 24-pin bit image are selected. Turning off...
Operating Instructions
Page 39
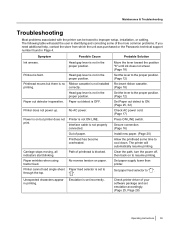
.... Path of the more common problems. If you need additional help, contact the store from which the unit was purchased or the Panasonic technical support number found in identifying and correcting some time to " ". Check printer driver of paper. Symptom Possible Cause Probable Solution Ink... be traced to resume printing. The following table will automatically resume printing. Ribbon cassette is set incorrectly. Paper feed selector is not installed correctly. Clear the path, turn the power off, then back on paper. Unexpected characters appear Emulation is set to cool down....
.... Path of the more common problems. If you need additional help, contact the store from which the unit was purchased or the Panasonic technical support number found in identifying and correcting some time to " ". Check printer driver of paper. Symptom Possible Cause Probable Solution Ink... be traced to resume printing. The following table will automatically resume printing. Ribbon cassette is set incorrectly. Paper feed selector is not installed correctly. Clear the path, turn the power off, then back on paper. Unexpected characters appear Emulation is set to cool down....

