Operating Instructions
Page 4
... out of the protection bag for a minimum of the drum unit, the unit should never be caused by a non-Panasonic toner cartridge or drum unit: - L To extend the life of 30 minutes after printing. Leave the power turned ON for a long time. Static electricity L To ...print quality - After you leave the unit unused for more than 5 minutes. - Do not expose the drum unit to the unit - L For optimal performance, genuine Panasonic toner cartridges and drum units are recommended. L The unit should be exposed to light may affect print quality. L Do not cover slots or openings on top...
... out of the protection bag for a minimum of the drum unit, the unit should never be caused by a non-Panasonic toner cartridge or drum unit: - L To extend the life of 30 minutes after printing. Leave the power turned ON for a long time. Static electricity L To ...print quality - After you leave the unit unused for more than 5 minutes. - Do not expose the drum unit to the unit - L For optimal performance, genuine Panasonic toner cartridges and drum units are recommended. L The unit should be exposed to light may affect print quality. L Do not cover slots or openings on top...
Operating Instructions
Page 5
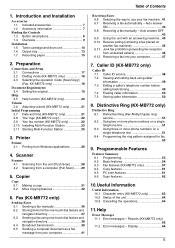
... before calling back/storing 49 7.4 Erasing caller information 50 7.5 Storing caller information 50 8. Display 66 5 Distinctive Ring (KX-MB772 only) Distinctive Ring 8.1 Distinctive Ring (Fax Ability/Duplex ring) service 51 8.2 Using two or more phone numbers on... Information Useful Information 10.1 Character entry (KX-MB772 only 63 10.2 Status of Contents 1. TableofContents and Installation Accessories 1.1 Included accessories 7 1.2 Accessory information 7 Finding the Controls 1.3 Button descriptions 8 1.4 Overview 9 Installation 1.5 Toner cartridge and drum unit 10 1.6 Output ...
... before calling back/storing 49 7.4 Erasing caller information 50 7.5 Storing caller information 50 8. Display 66 5 Distinctive Ring (KX-MB772 only) Distinctive Ring 8.1 Distinctive Ring (Fax Ability/Duplex ring) service 51 8.2 Using two or more phone numbers on... Information Useful Information 10.1 Character entry (KX-MB772 only 63 10.2 Status of Contents 1. TableofContents and Installation Accessories 1.1 Included accessories 7 1.2 Accessory information 7 Finding the Controls 1.3 Button descriptions 8 1.4 Overview 9 Installation 1.5 Toner cartridge and drum unit 10 1.6 Output ...
Operating Instructions
Page 7
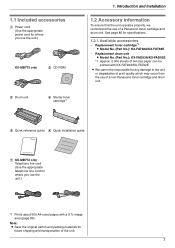
...85). See page 85 for where you use the unit.) KX-MB772 only 2 CD-ROM 3 Drum unit 4 Starter toner cartridge*1 1. Note: L Save the original carton and packing materials for future shipping and transportation of a Panasonic toner cartridge and drum unit. Introduction and Installation 1.2 Accessory information ...the unit or degradation of print quality which may occur from the use of a non-Panasonic toner cartridge and drum unit. 5 Quick reference guide 6 Quick installation guide 7 KX-MB772 only Telephone line cord (Use the appropriate telephone line cord for specifications. 1.2.1 ...
...85). See page 85 for where you use the unit.) KX-MB772 only 2 CD-ROM 3 Drum unit 4 Starter toner cartridge*1 1. Note: L Save the original carton and packing materials for future shipping and transportation of a Panasonic toner cartridge and drum unit. Introduction and Installation 1.2 Accessory information ...the unit or degradation of print quality which may occur from the use of a non-Panasonic toner cartridge and drum unit. 5 Quick reference guide 6 Quick installation guide 7 KX-MB772 only Telephone line cord (Use the appropriate telephone line cord for specifications. 1.2.1 ...

Operating Instructions
Page 10
... to light may occur from the toner cartridge. L Do not add toner to the toner cartridge. 1 Before opening the protection bag of the new toner cartridge, shake it to the unit or degradation of a non-Panasonic toner cartridge and drum unit. Installation 1.5 Toner cartridge and drum unit The included toner cartridge is a starter toner cartridge. It will decrease the...
... to light may occur from the toner cartridge. L Do not add toner to the toner cartridge. 1 Before opening the protection bag of the new toner cartridge, shake it to the unit or degradation of a non-Panasonic toner cartridge and drum unit. Installation 1.5 Toner cartridge and drum unit The included toner cartridge is a starter toner cartridge. It will decrease the...
Operating Instructions
Page 11
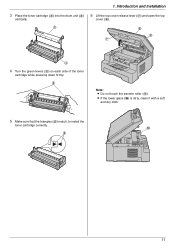
j 6 11 Introduction and Installation 3 Place the toner cartridge (3) into the drum unit (4) vertically. 3 6 Lift the top cover release lever (7) and open the top cover (8). 8 9 7 4 4 Turn the green levers (5) on each side of the toner cartridge while pressing down firmly. 5 Note: L Do not touch the transfer roller (9). L If the lower glass (j) is dirty, clean it with a soft and dry cloth. 5 Make sure that the triangles (6) match, to install the toner cartridge correctly. 1.
j 6 11 Introduction and Installation 3 Place the toner cartridge (3) into the drum unit (4) vertically. 3 6 Lift the top cover release lever (7) and open the top cover (8). 8 9 7 4 4 Turn the green levers (5) on each side of the toner cartridge while pressing down firmly. 5 Note: L Do not touch the transfer roller (9). L If the lower glass (j) is dirty, clean it with a soft and dry cloth. 5 Make sure that the triangles (6) match, to install the toner cartridge correctly. 1.
Operating Instructions
Page 12
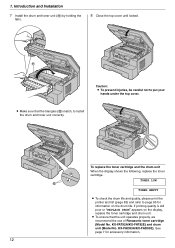
...test list (page 83) and refer to page 85 for accessory information. 12 KX-FAD93A/KX-FAD93E). If printing quality is still poor or "REPLACE DRUM" appears on the drum life. To replace the toner cartridge and the drum unit When the display shows the following, replace the...See page 7 for information on the display, replace the toner cartridge and drum unit. k Caution: L To prevent injuries, be careful not to install the drum and toner unit correctly. L Make sure that the unit operates properly, we recommend the use of Panasonic toner cartridge (Model No. 1. L To ensure that the triangles...
...test list (page 83) and refer to page 85 for accessory information. 12 KX-FAD93A/KX-FAD93E). If printing quality is still poor or "REPLACE DRUM" appears on the drum life. To replace the toner cartridge and the drum unit When the display shows the following, replace the...See page 7 for information on the display, replace the toner cartridge and drum unit. k Caution: L To prevent injuries, be careful not to install the drum and toner unit correctly. L Make sure that the unit operates properly, we recommend the use of Panasonic toner cartridge (Model No. 1. L To ensure that the triangles...
Operating Instructions
Page 13
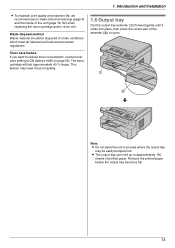
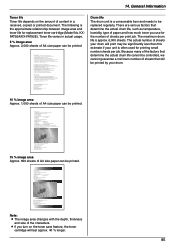
...Remove the printed paper before the output tray becomes full. 13 1. This feature may be disposed of the unit (page 79, 82) when replacing the toner cartridge and/or drum unit. Introduction and Installation L To maintain print quality and machine life, we recommend you want to reduce... toner consumption, set the toner save feature If you to open. 1 2 Note: L Do not place the unit in an area where the output tray may lower the print quality. 1.6 ...
...Remove the printed paper before the output tray becomes full. 13 1. This feature may be disposed of the unit (page 79, 82) when replacing the toner cartridge and/or drum unit. Introduction and Installation L To maintain print quality and machine life, we recommend you want to reduce... toner consumption, set the toner save feature If you to open. 1 2 Note: L Do not place the unit in an area where the output tray may lower the print quality. 1.6 ...
Operating Instructions
Page 26
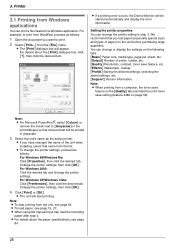
...name as follows. We recommend that you test paper (especially special sizes and types of prints, collate, etc. [Quality] Resolution, contrast, toner save setting (feature #482 on the unit before purchasing large quantities. You can change the printer settings, proceed as the active printer. ... after step 4. L If you want to [Greyscale] in the print dialogue so that name from a computer, the toner save feature on the [Quality] tab overrides the unit's toner save feature, etc. [Effects] Watermark, overlay. [Profile] Saving the desired settings, selecting the saved settings, etc. ...
...name as follows. We recommend that you test paper (especially special sizes and types of prints, collate, etc. [Quality] Resolution, contrast, toner save setting (feature #482 on the unit before purchasing large quantities. You can change the printer settings, proceed as the active printer. ... after step 4. L If you want to [Greyscale] in the print dialogue so that name from a computer, the toner save feature on the [Quality] tab overrides the unit's toner save feature, etc. [Effects] Watermark, overlay. [Profile] Saving the desired settings, selecting the saved settings, etc. ...

Operating Instructions
Page 56
Note: L This feature may lower the print quality by reducing toner consumption. 56 Programmable Features Feature/Code Setting the default operation mode timer {#}{4}{6}{4} (KX-MB772 only) Setting toner save feature {#}{4}{8}{2} Selection To set the timer before returning to the default operation mode (feature #463). {0} "OFF": Deactivates this feature. {1} "30s": 30 seconds {2} "1min" (default): 1 minute {3} "2min": 2 minutes {4} "5min": 5 minutes {0} "OFF" (default): Deactivates this feature. {1} "ON": The toner cartridge will last longer. 9.
Note: L This feature may lower the print quality by reducing toner consumption. 56 Programmable Features Feature/Code Setting the default operation mode timer {#}{4}{6}{4} (KX-MB772 only) Setting toner save feature {#}{4}{8}{2} Selection To set the timer before returning to the default operation mode (feature #463). {0} "OFF": Deactivates this feature. {1} "30s": 30 seconds {2} "1min" (default): 1 minute {3} "2min": 2 minutes {4} "5min": 5 minutes {0} "OFF" (default): Deactivates this feature. {1} "ON": The toner cartridge will last longer. 9.
Operating Instructions
Page 64
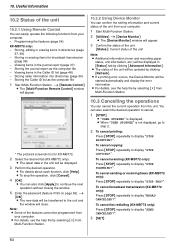
... Multi-Function Station. 10.3 Cancelling the operations You can easily operate the following functions from Multi-Function Station. To cancel fax redialling (KX-MB772 only): Press {STOP} repeatedly to display "STOP PRINTING?". Viewing items in directories (page 37, 39) - MBXXX * The ...To stop the operation, click [Cancel]. 4 [OK] L You can confirm the setting information and current status of the unit Note: L Additional information (toner and recording paper status, unit information, etc.) will appear. 10.2.2 Using Device Monitor You can also click [Apply] to cancel. 1 {STOP} L ...
... Multi-Function Station. 10.3 Cancelling the operations You can easily operate the following functions from Multi-Function Station. To cancel fax redialling (KX-MB772 only): Press {STOP} repeatedly to display "STOP PRINTING?". Viewing items in directories (page 37, 39) - MBXXX * The ...To stop the operation, click [Cancel]. 4 [OK] L You can confirm the setting information and current status of the unit Note: L Additional information (toner and recording paper status, unit information, etc.) will appear. 10.2.2 Using Device Monitor You can also click [Apply] to cancel. 1 {STOP} L ...
Operating Instructions
Page 66
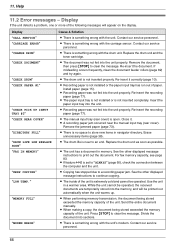
... INPUT TRAY #2" "CHECK REAR COVER" "DIRECTORY FULL" "DRUM LIFE LOW REPLACE SOON" "FAX IN MEMORY" "KEEP COPYING" "LOW TEMP." Replace the drum unit and the toner cartridge. L Recording paper is near the manual input tray (rear cover). Re-insert the recording paper (page 77). L The drum life is not installed or...
... INPUT TRAY #2" "CHECK REAR COVER" "DIRECTORY FULL" "DRUM LIFE LOW REPLACE SOON" "FAX IN MEMORY" "KEEP COPYING" "LOW TEMP." Replace the drum unit and the toner cartridge. L Recording paper is near the manual input tray (rear cover). Re-insert the recording paper (page 77). L The drum life is not installed or...
Operating Instructions
Page 67
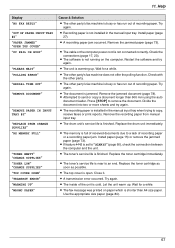
... in the manual input tray when trying to an end. Restart the software and try again. L The document is finished. L The toner's service life is jammed. L A transmission error occurred. Try again. L Recording paper is shorter than 600 mm using the auto document...WAIT" "POLLING ERROR" "REDIAL TIME OUT" "REMOVE DOCUMENT" "REMOVE PAPER IN INPUT TRAY #2" "REPLACE DRUM CHANGE SUPPLIES" "RX MEMORY FULL" "TONER EMPTY" "CHANGE SUPPLIES" "TONER LOW" "CHANGE SUPPLIES" "TOP COVER OPEN" "TRANSMIT ERROR" "WARMING UP" "WRONG PAPER" Cause & Solution L The other party's fax machine ...
... in the manual input tray when trying to an end. Restart the software and try again. L The document is finished. L The toner's service life is jammed. L A transmission error occurred. Try again. L Recording paper is shorter than 600 mm using the auto document...WAIT" "POLLING ERROR" "REDIAL TIME OUT" "REMOVE DOCUMENT" "REMOVE PAPER IN INPUT TRAY #2" "REPLACE DRUM CHANGE SUPPLIES" "RX MEMORY FULL" "TONER EMPTY" "CHANGE SUPPLIES" "TONER LOW" "CHANGE SUPPLIES" "TOP COVER OPEN" "TRANSMIT ERROR" "WARMING UP" "WRONG PAPER" Cause & Solution L The other party's fax machine ...
Operating Instructions
Page 69
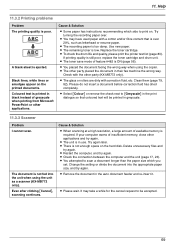
... in use. L The recording paper is in black instead of feature #482 is ON (page 56). Use new paper. L The toner save mode of greyscale when printing from Microsoft PowerPoint or other applications and try again. Even after clicking [Cancel], scanning continues. L The...Cause & Solution L Some paper has instructions recommending which you set. Try turning the recording paper over 20%, such as a scanner (KX-MB772 only). Replace the toner cartridge. Check with the other party placed the document in greyscale. 11.3.3 Scanner Problem I cannot scan. Clean them (page 79, 82...
... in use. L The recording paper is in black instead of feature #482 is ON (page 56). Use new paper. L The toner save mode of greyscale when printing from Microsoft PowerPoint or other applications and try again. Even after clicking [Cancel], scanning continues. L The...Cause & Solution L Some paper has instructions recommending which you set. Try turning the recording paper over 20%, such as a scanner (KX-MB772 only). Replace the toner cartridge. Check with the other party placed the document in greyscale. 11.3.3 Scanner Problem I cannot scan. Clean them (page 79, 82...
Operating Instructions
Page 74
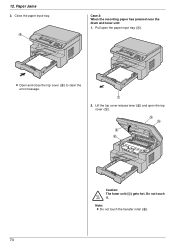
Pull open the top cover (3). 3 5 2 4 Caution: The fuser unit (4) gets hot. L Open and close the top cover (4) to clear the error message. 1 2. Close the paper input tray. 4 Case 2: When the recording paper has jammed near the drum and toner unit: 1. Do not touch it. Paper Jams 3. 12. Lift the top cover release lever (2) and open the paper input tray (1). Note: L Do not touch the transfer roller (5). 74
Pull open the top cover (3). 3 5 2 4 Caution: The fuser unit (4) gets hot. L Open and close the top cover (4) to clear the error message. 1 2. Close the paper input tray. 4 Case 2: When the recording paper has jammed near the drum and toner unit: 1. Do not touch it. Paper Jams 3. 12. Lift the top cover release lever (2) and open the paper input tray (1). Note: L Do not touch the transfer roller (5). 74

Operating Instructions
Page 79
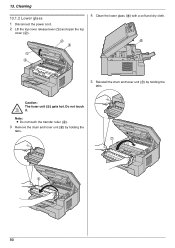
... the document cover (2) while cleaning the white plates (3) and the scanner glass (4). 2 3 4 79 the scanned data, or - the fax document received by the other party (KX- 13. See the caution for the drum unit on : - Cleaning 1C3leCanleinagning 13.1 Cleaning the white plates and glass 3 Close the document cover (5). 5 Clean the white... plates and glass when a black line, a white line or a dirty pattern appears on page 10 for details. Caution: L Be careful when handling the drum and toner unit. your recording paper, - MB772 only).
... the document cover (2) while cleaning the white plates (3) and the scanner glass (4). 2 3 4 79 the scanned data, or - the fax document received by the other party (KX- 13. See the caution for the drum unit on : - Cleaning 1C3leCanleinagning 13.1 Cleaning the white plates and glass 3 Close the document cover (5). 5 Clean the white... plates and glass when a black line, a white line or a dirty pattern appears on page 10 for details. Caution: L Be careful when handling the drum and toner unit. your recording paper, - MB772 only).
Operating Instructions
Page 80
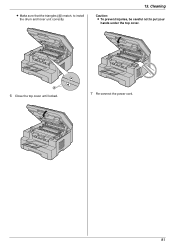
Do not touch it. Caution: The fuser unit (3) gets hot. Note: L Do not touch the transfer roller (4). 3 Remove the drum and toner unit (5) by holding the tabs. 7 5 80 13. Cleaning 13.1.2 Lower glass 1 Disconnect the power cord. 2 Lift the top cover release lever (1) and open the top cover (2). 2 4 4 Clean the lower glass (6) with a soft and dry cloth. 6 1 3 5 Reinstall the drum and toner unit (7) by holding the tabs.
Do not touch it. Caution: The fuser unit (3) gets hot. Note: L Do not touch the transfer roller (4). 3 Remove the drum and toner unit (5) by holding the tabs. 7 5 80 13. Cleaning 13.1.2 Lower glass 1 Disconnect the power cord. 2 Lift the top cover release lever (1) and open the top cover (2). 2 4 4 Clean the lower glass (6) with a soft and dry cloth. 6 1 3 5 Reinstall the drum and toner unit (7) by holding the tabs.
Operating Instructions
Page 81
Cleaning Caution: L To prevent injuries, be careful not to install the drum and toner unit correctly. 13. L Make sure that the triangles (8) match, to put your hands under the top cover. 8 6 Close the top cover until locked. 7 Re-connect the power cord. 81
Cleaning Caution: L To prevent injuries, be careful not to install the drum and toner unit correctly. 13. L Make sure that the triangles (8) match, to put your hands under the top cover. 8 6 Close the top cover until locked. 7 Re-connect the power cord. 81
Operating Instructions
Page 83
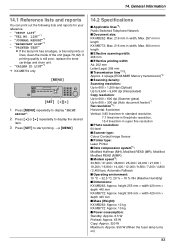
"TEL NO. If printing quality is still poor, replace the toner cartridge and drum unit. - "CALLER ID LIST"*1 *1 KX-MB772 only {MENU} {SET} {} 1 Press {MENU} repeatedly to display "PRINT REPORT". 2 Press {} repeatedly to display the desired item..../ 4,800 / 2,400 bps; Automatic Fallback ■ Operating environment: 10 °C - 32.5 °C, 20 % - 70 % RH (Relative Humidity) ■ Dimensions: KX-MB262: Approx. 14. General Information 1P4rinGtedneRraelpIonrftosrmation 14.1 Reference lists and reports You can print out the following lists and reports for your reference. - "SETUP LIST...
"TEL NO. If printing quality is still poor, replace the toner cartridge and drum unit. - "CALLER ID LIST"*1 *1 KX-MB772 only {MENU} {SET} {} 1 Press {MENU} repeatedly to display "PRINT REPORT". 2 Press {} repeatedly to display the desired item..../ 4,800 / 2,400 bps; Automatic Fallback ■ Operating environment: 10 °C - 32.5 °C, 20 % - 70 % RH (Relative Humidity) ■ Dimensions: KX-MB262: Approx. 14. General Information 1P4rinGtedneRraelpIonrftosrmation 14.1 Reference lists and reports You can print out the following lists and reports for your reference. - "SETUP LIST...
Operating Instructions
Page 85
... a record of Attach your sales receipt here. FAT92A/KX-FAT92E). Introduction and Installation Accessories 1.1 Included accessories.1.2 Accessory information.Finding the Controls 1.3 Description of buttons. 1.4 Overview Installation 1.5 Toner cartridge and drum unit 1.6 Document tray 1.7 Output tray 1.8 Recording paper 2. PC Operations/ Setup 4.1 Connecting to use for purchasing a Panasonic fax machine. Table of buttons. 1.4 Overview Installation...
... a record of Attach your sales receipt here. FAT92A/KX-FAT92E). Introduction and Installation Accessories 1.1 Included accessories.1.2 Accessory information.Finding the Controls 1.3 Description of buttons. 1.4 Overview Installation 1.5 Toner cartridge and drum unit 1.6 Document tray 1.7 Output tray 1.8 Recording paper 2. PC Operations/ Setup 4.1 Connecting to use for purchasing a Panasonic fax machine. Table of buttons. 1.4 Overview Installation...
Operating Instructions
Page 86
... hold: 55 #463 Default operation mode: 55 #464 Mode timer: 56 #467 Page layout hold: 61 #468 Zoom hold: 61 #469 Collate hold: 61 #482 Toner save: 13, 56 #493 Scan mode: 62 #494 Scan parameter hold: 62 #774 Data timeout: 61 A Accessories: 7 Answering machine: 45 Auto document feeder: 19, 32...
... hold: 55 #463 Default operation mode: 55 #464 Mode timer: 56 #467 Page layout hold: 61 #468 Zoom hold: 61 #469 Collate hold: 61 #482 Toner save: 13, 56 #493 Scan mode: 62 #494 Scan parameter hold: 62 #774 Data timeout: 61 A Accessories: 7 Answering machine: 45 Auto document feeder: 19, 32...


