Digital Proprietary Telephone
Page 1
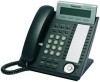
Quick Reference Guide Digital Proprietary Telephone Model No. KX-DT333/KX-DT343/KX-DT346 Thank you for future use. Please read this manual carefully before using this product and save this manual for purchasing a Digital Proprietary Telephone (DPT). Accessories (included)*1 Handset: 1 Handset Cord: 1 Wall Mounting Adaptor*2: 1 Screws for wall: 2 Telephone Line Cord: 1 *1 For extra orders for the... wall mounting adaptor already attached. For more details, please refer to step 1 on page 17. To remove the adaptor, refer to the manuals of the PBX. Document Version 2009-03
Quick Reference Guide Digital Proprietary Telephone Model No. KX-DT333/KX-DT343/KX-DT346 Thank you for future use. Please read this manual carefully before using this product and save this manual for purchasing a Digital Proprietary Telephone (DPT). Accessories (included)*1 Handset: 1 Handset Cord: 1 Wall Mounting Adaptor*2: 1 Screws for wall: 2 Telephone Line Cord: 1 *1 For extra orders for the... wall mounting adaptor already attached. For more details, please refer to step 1 on page 17. To remove the adaptor, refer to the manuals of the PBX. Document Version 2009-03
Digital Proprietary Telephone
Page 2
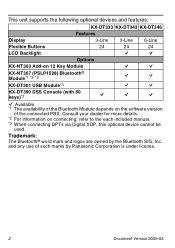
...® Module*1 *2 *3 Q Q KX-DT301 USB Module*3 Q Q KX-DT390 DSS Console (with 60 keys)*2 Q Q Q Q: Available *1 The availability of the Bluetooth Module depends on connecting, refer to the each included manual. *3 When connecting DPTs via Digital XDP, this optional device cannot be used. Trademark: The Bluetooth® word mark and logos are owned by Panasonic Corporation is...
...® Module*1 *2 *3 Q Q KX-DT301 USB Module*3 Q Q KX-DT390 DSS Console (with 60 keys)*2 Q Q Q Q: Available *1 The availability of the Bluetooth Module depends on connecting, refer to the each included manual. *3 When connecting DPTs via Digital XDP, this optional device cannot be used. Trademark: The Bluetooth® word mark and logos are owned by Panasonic Corporation is...
Digital Proprietary Telephone
Page 16
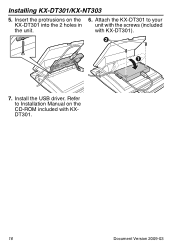
Insert the protrusions on the CD-ROM included with KXDT301. 16 Document Version 2009-03 Attach the KX-DT301 to Installation Manual on the 6. Install the USB driver. with the screws (included the unit. Installing KX-DT301/KX-NT303 5. Refer to your KX-DT301 into the 2 holes in unit with KX-DT301). 7.
Insert the protrusions on the CD-ROM included with KXDT301. 16 Document Version 2009-03 Attach the KX-DT301 to Installation Manual on the 6. Install the USB driver. with the screws (included the unit. Installing KX-DT301/KX-NT303 5. Refer to your KX-DT301 into the 2 holes in unit with KX-DT301). 7.


