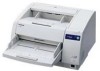
Scanner
Page 3
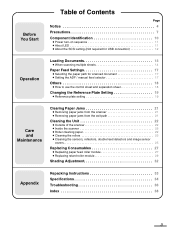
...≥ About the SCSI setting (Not required for USB connection 12 Operation Loading Documents 13 ≥ When scanning multiple sheets 14 Paper Feed Settings 17 ≥ Selecting the paper path for scanned document 17 ≥ Setting the ADF / manual feed selector 17 Others 18 ≥... Removing paper jams from the exit path 21 Cleaning the Unit 22 ≥ Outside of the scanner 22 ≥ Inside the scanner 22 ≥ Roller cleaning paper 22 ≥ Cleaning the rollers 23 ≥ Cleaning the sensors, reflectors, double feed detectors and image sensor covers 25 Replacing ...
...≥ About the SCSI setting (Not required for USB connection 12 Operation Loading Documents 13 ≥ When scanning multiple sheets 14 Paper Feed Settings 17 ≥ Selecting the paper path for scanned document 17 ≥ Setting the ADF / manual feed selector 17 Others 18 ≥... Removing paper jams from the exit path 21 Cleaning the Unit 22 ≥ Outside of the scanner 22 ≥ Inside the scanner 22 ≥ Roller cleaning paper 22 ≥ Cleaning the rollers 23 ≥ Cleaning the sensors, reflectors, double feed detectors and image sensor covers 25 Replacing ...
Scanner
Page 4
...be required to the Material Safety Data Sheet (MSDS). • Please ask your Panasonic sales company about obtaining the Material Safety Data Sheet. Roller cleaning paper precautions Before using the roller cleaning paper, please read these instructions for a Class A digital device, pursuant to ...supply cord has to be harmful to radio communications. WARNING • Do not drink or inhale the roller cleaning paper fluid including isopropyl alcohol. • The roller cleaning paper may cause harmful interference to sensitive skin. Also, any unauthorized changes or modifications to this...
...be required to the Material Safety Data Sheet (MSDS). • Please ask your Panasonic sales company about obtaining the Material Safety Data Sheet. Roller cleaning paper precautions Before using the roller cleaning paper, please read these instructions for a Class A digital device, pursuant to ...supply cord has to be harmful to radio communications. WARNING • Do not drink or inhale the roller cleaning paper fluid including isopropyl alcohol. • The roller cleaning paper may cause harmful interference to sensitive skin. Also, any unauthorized changes or modifications to this...
Scanner
Page 8
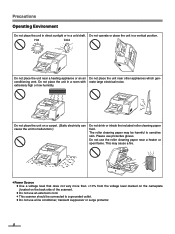
... appliance or an air Do not place the unit near a heater or open flame. Do not place the unit on the back side of the scanner). ≥ Do not use a line conditioner, transient suppressor or surge protector. 8 Do not place the unit in a vertical position. Do not ...skin. This may be connected to a grounded outlet. ≥ Do not use an extension cord. ≥ This scanner should be harmful to malfunction.) Do not drink or inhale the included roller cleaning paper fluid. Precautions Operating Environment Do not place the unit in direct sunlight or in a cold draft.
... appliance or an air Do not place the unit near a heater or open flame. Do not place the unit on the back side of the scanner). ≥ Do not use a line conditioner, transient suppressor or surge protector. 8 Do not place the unit in a vertical position. Do not ...skin. This may be connected to a grounded outlet. ≥ Do not use an extension cord. ≥ This scanner should be harmful to malfunction.) Do not drink or inhale the included roller cleaning paper fluid. Precautions Operating Environment Do not place the unit in direct sunlight or in a cold draft.
Scanner
Page 11
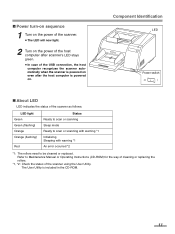
... warning *1 Initializing Sleeping with warning *1 An error occurred *2 *1: The rollers need to Maintenance Manual or Operating Instructions (CD-ROM) for the way of cleaning or replacing the rollers. *1, *2: Check the status of the USB connection, the host computer recognizes the scanner automatically when the scanner is powered on even after the host computer is...
... warning *1 Initializing Sleeping with warning *1 An error occurred *2 *1: The rollers need to Maintenance Manual or Operating Instructions (CD-ROM) for the way of cleaning or replacing the rollers. *1, *2: Check the status of the USB connection, the host computer recognizes the scanner automatically when the scanner is powered on even after the host computer is...

Scanner
Page 13
... textured ≥ Paper with wet ink ≥ Thick or irregular documents such as tabs, staples, paste, etc. ≥ Documents with carbon ≥ Carbonless paper If a paper jam or double feeding occurs, clean the rollers. Recommendable paper: Plain paper The following types of documents may cause frequent jams and double feeding. ≥ Extremely smooth or...
... textured ≥ Paper with wet ink ≥ Thick or irregular documents such as tabs, staples, paste, etc. ≥ Documents with carbon ≥ Carbonless paper If a paper jam or double feeding occurs, clean the rollers. Recommendable paper: Plain paper The following types of documents may cause frequent jams and double feeding. ≥ Extremely smooth or...
Scanner
Page 17
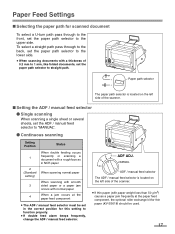
... paper path selector to the upper side. MANUAL ADF / manual feed selector The ADF / manual feed selector is located on the left side of the scanner. ∫ Setting the ADF / manual feed selector ¥ Single scanning When scanning a single sheet or several sheets, set the ADF / manual feed ... paper jam occurs with normal paper 4 When a jam occurs at the paper feed component, the optional roller exchange kit for thin paper (KV-SS018) should be set in the correct position for scanned document To select a U-turn path pass through to the back, set the paper path selector to the lower ...
... paper path selector to the upper side. MANUAL ADF / manual feed selector The ADF / manual feed selector is located on the left side of the scanner. ∫ Setting the ADF / manual feed selector ¥ Single scanning When scanning a single sheet or several sheets, set the ADF / manual feed ... paper jam occurs with normal paper 4 When a jam occurs at the paper feed component, the optional roller exchange kit for thin paper (KV-SS018) should be set in the correct position for scanned document To select a U-turn path pass through to the back, set the paper path selector to the lower ...
Scanner
Page 22
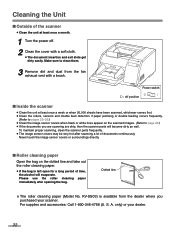
... ± : off . 2 Clean the cover with a brush. To maintain proper scanning, clean the scanner parts frequently. ≥ The image sensor covers may be very hot after opening the bag. S. KV-SS03) is left open for a long period of time, the alcohol will become dirty as well. For... paper (Model No. Make sure to page 26.) ≥ If the documents you purchased your dealer. 22 Please use the roller cleaning paper immediately after scanning a lot of documents continuously. Cleaning the Unit ∫ Outside of the scanner ≥ Clean the unit at least once a month. 1 Turn the power off...
... ± : off . 2 Clean the cover with a brush. To maintain proper scanning, clean the scanner parts frequently. ≥ The image sensor covers may be very hot after opening the bag. S. KV-SS03) is left open for a long period of time, the alcohol will become dirty as well. For... paper (Model No. Make sure to page 26.) ≥ If the documents you purchased your dealer. 22 Please use the roller cleaning paper immediately after scanning a lot of documents continuously. Cleaning the Unit ∫ Outside of the scanner ≥ Clean the unit at least once a month. 1 Turn the power off...

Scanner
Page 23
Front door 2 Cleaning the Unit 2 1 Front door release (Inside the front door.) 23 ∫ Cleaning the rollers 1 Turn the power off. 2 Use your hand to pull the front door release towards you (1). Then open the front door completely (2).
Front door 2 Cleaning the Unit 2 1 Front door release (Inside the front door.) 23 ∫ Cleaning the rollers 1 Turn the power off. 2 Use your hand to pull the front door release towards you (1). Then open the front door completely (2).

Scanner
Page 24
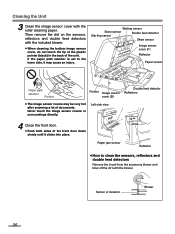
... feed roller Image sensor covers Drive rollers A Separation roller Free rollers Free rollers Free rollers Paper path selector Pointer Drive rollers Belt The paper path selector is raised, the tip may be very hot after scanning a lot of documents. If cleaned in the right direction, the roller may slip... side of the scanner. For roller cleaning, pull the belt in the direction of the arrows. Other rollers Retard rollers 24 Left side view ≥ Wipe in the direction of the arrow to rotate the rollers. Cleaning the Unit 3 Use the roller cleaning paper (KV-SS03) to remove...
... feed roller Image sensor covers Drive rollers A Separation roller Free rollers Free rollers Free rollers Paper path selector Pointer Drive rollers Belt The paper path selector is raised, the tip may be very hot after scanning a lot of documents. If cleaned in the right direction, the roller may slip... side of the scanner. For roller cleaning, pull the belt in the direction of the arrows. Other rollers Retard rollers 24 Left side view ≥ Wipe in the direction of the arrow to rotate the rollers. Cleaning the Unit 3 Use the roller cleaning paper (KV-SS03) to remove...

Scanner
Page 25
Then open the front door completely (2). Cleaning the Unit 5 Clear the roller cleaning counter with User Utility. ≥ Click [Clear Counter] button for [After Clean Roller] with User Utility. ∫ Cleaning the sensors, reflectors, double feed detectors and image sensor covers 1 Turn the power off. 2 Use your hand to pull the front door release towards you (1). 4 Close the front door. ≥ Push both sides of the front door down slowly until it clicks into place. Front door 2 2 1 Front door release (Inside the front door.) 25
Then open the front door completely (2). Cleaning the Unit 5 Clear the roller cleaning counter with User Utility. ≥ Click [Clear Counter] button for [After Clean Roller] with User Utility. ∫ Cleaning the sensors, reflectors, double feed detectors and image sensor covers 1 Turn the power off. 2 Use your hand to pull the front door release towards you (1). 4 Close the front door. ≥ Push both sides of the front door down slowly until it clicks into place. Front door 2 2 1 Front door release (Inside the front door.) 25
Scanner
Page 26
... bottom image sensor cover, do not touch the tip of the plastic pointer (black) in the back of documents. Then remove the dirt on the sensors, reflectors and double feed detectors with the roller cleaning paper. If the paper path selector is set to clean the sensors, reflectors and double feed detectors...
... bottom image sensor cover, do not touch the tip of the plastic pointer (black) in the back of documents. Then remove the dirt on the sensors, reflectors and double feed detectors with the roller cleaning paper. If the paper path selector is set to clean the sensors, reflectors and double feed detectors...
Scanner
Page 27
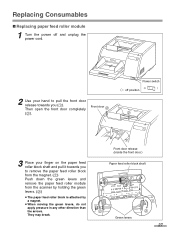
...the power cord. 2 Use your finger on the paper feed roller block shaft and pull it towards you to remove the paper feed roller block from the magnet. (1) Push down the green levers and remove the paper feed roller module from the scanner by holding the green levers. (2) ≥ The paper ...feed roller block is attached by a magnet. ≥ When moving the green levers...
...the power cord. 2 Use your finger on the paper feed roller block shaft and pull it towards you to remove the paper feed roller block from the magnet. (1) Push down the green levers and remove the paper feed roller module from the scanner by holding the green levers. (2) ≥ The paper ...feed roller block is attached by a magnet. ≥ When moving the green levers...

Scanner
Page 28
Replacing Consumables 4 Open the optional "Roller Exchange Kit (KV-SS017)", and take out the new paper feed roller module. 5 Install the new paper feed roller module with the gear on the left side and the bearings into the guide grooves of the side chassis in the scanner. (1) Then push up the green levers on both ...ends until they click into place. (2) ≥ Match the paper feed roller module with the bearings and guide grooves, and then attach it. 6 Push up on ...
Replacing Consumables 4 Open the optional "Roller Exchange Kit (KV-SS017)", and take out the new paper feed roller module. 5 Install the new paper feed roller module with the gear on the left side and the bearings into the guide grooves of the side chassis in the scanner. (1) Then push up the green levers on both ...ends until they click into place. (2) ≥ Match the paper feed roller module with the bearings and guide grooves, and then attach it. 6 Push up on ...

Scanner
Page 29
Caution: When opening the conveyor, be released. Conveyor 2 Retard roller module 1 Shaft 29 Replacing Consumables Indent 8 Pull the right side of the shaft in the direction of the arrow (2) and then remove it there. (1) Pull the retard roller module in the indent. ∫ Replacing retard roller module 7 Pull open the conveyor towards you by using the indent on the right side. ≥ When the conveyor is pulled towards you, the click-stop mechanism will be careful not get your finger stuck in the direction of the arrow and hold it .
Caution: When opening the conveyor, be released. Conveyor 2 Retard roller module 1 Shaft 29 Replacing Consumables Indent 8 Pull the right side of the shaft in the direction of the arrow (2) and then remove it there. (1) Pull the retard roller module in the indent. ∫ Replacing retard roller module 7 Pull open the conveyor towards you by using the indent on the right side. ≥ When the conveyor is pulled towards you, the click-stop mechanism will be careful not get your finger stuck in the direction of the arrow and hold it .
Scanner
Page 30
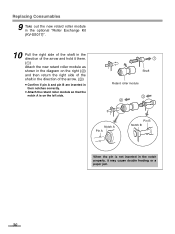
Replacing Consumables 9 Take out the new retard roller module in the optional "Roller Exchange Kit (KV-SS017)". 10 Pull the right side of the shaft in the direction of the arrow and hold it there. (1) Attach the new retard roller module as shown in the diagram on the right (2) and then return the ... the arrow. (3) ≥ Confirm if pin A and pin B are inserted in their notches correctly. ≥ Attach the retard roller module so that the notch A is on the left side. 1 Shaft Retard roller module 3 2 Notch A Pin A Pin B Notch B When the pin is not inserted in the notch properly, it may cause...
Replacing Consumables 9 Take out the new retard roller module in the optional "Roller Exchange Kit (KV-SS017)". 10 Pull the right side of the shaft in the direction of the arrow and hold it there. (1) Attach the new retard roller module as shown in the diagram on the right (2) and then return the ... the arrow. (3) ≥ Confirm if pin A and pin B are inserted in their notches correctly. ≥ Attach the retard roller module so that the notch A is on the left side. 1 Shaft Retard roller module 3 2 Notch A Pin A Pin B Notch B When the pin is not inserted in the notch properly, it may cause...

Scanner
Page 31
11 Hold the conveyor using both sides of the front door down slowly until it into place. 13 Clear the roller replacing counter with User Utility. ≥ Click [Clear Counter] button for [After Replace Roller] with User Utility. Replacing Consumables Indent Conveyor 31 Caution: If the conveyor is not closed correctly and the front door is closed, the conveyor may break. 12 Close the front door. ≥ Push both hands, and close the conveyor by pushing it clicks into the unit. ≥ When the conveyor is closed, the clickstop mechanism will operate.
11 Hold the conveyor using both sides of the front door down slowly until it into place. 13 Clear the roller replacing counter with User Utility. ≥ Click [Clear Counter] button for [After Replace Roller] with User Utility. Replacing Consumables Indent Conveyor 31 Caution: If the conveyor is not closed correctly and the front door is closed, the conveyor may break. 12 Close the front door. ≥ Push both hands, and close the conveyor by pushing it clicks into the unit. ≥ When the conveyor is closed, the clickstop mechanism will operate.

Scanner
Page 32
... Manual. ¥ Caution If the scanned images are still lined after the inside the scanner is known as the transport path and drive rollers of the User Utility using the special shading paper which is provided with this scanner. ¥ When shading adjustment is required Proceed with the shading adjustment. 32 Click "User...
... Manual. ¥ Caution If the scanned images are still lined after the inside the scanner is known as the transport path and drive rollers of the User Utility using the special shading paper which is provided with this scanner. ¥ When shading adjustment is required Proceed with the shading adjustment. 32 Click "User...
Scanner
Page 33
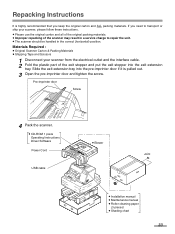
...; Blower Joint ≥ Installation manual ≥ Maintenance manual ≥ Roller cleaning paper (3 pieces) ≥ Shading chart 33 Materials Required : ≥ Original Scanner Carton & Packing Materials ≥ Shipping Tape and Scissors 1 Disconnect your scanner from the electrical outlet and the interface cable. 2 Fold the plastic part...exit stopper into the pre-imprinter door if it is highly recommended that you need to transport or ship your scanner, please follow these instructions. ≥ Please use the original carton and all of the original packing materials. ≥ Improper...
...; Blower Joint ≥ Installation manual ≥ Maintenance manual ≥ Roller cleaning paper (3 pieces) ≥ Shading chart 33 Materials Required : ≥ Original Scanner Carton & Packing Materials ≥ Shipping Tape and Scissors 1 Disconnect your scanner from the electrical outlet and the interface cable. 2 Fold the plastic part...exit stopper into the pre-imprinter door if it is highly recommended that you need to transport or ship your scanner, please follow these instructions. ≥ Please use the original carton and all of the original packing materials. ≥ Improper...

Scanner
Page 34
... Power consumption Maximum (Scanning) Minimum (Standby) Sleep mode KV-S3065CL KV-S3065CW Duplex scanning Front side : CIS (Contact Type Color Image Sensor) Back side : CIS (Contact Type Color Image Sensor) 227 mm (8.9 in.) 302 mm (11.9 in the scanner. Wider than Letter/A4 portrait : 200 sheets (64 ...Continuous paper feeding : 0.06 to 0.2 mm (2.4 to 42 lbs.)** Smaller than A7 size : 157 g/m2 only Smaller than 50 g/m2), the optional roller exchange kit for details. ** For scanning thin paper (with paper weight less than Letter/A4 portrait : 300 sheets (64 g/m2) 17 lbs. Refer...
... Power consumption Maximum (Scanning) Minimum (Standby) Sleep mode KV-S3065CL KV-S3065CW Duplex scanning Front side : CIS (Contact Type Color Image Sensor) Back side : CIS (Contact Type Color Image Sensor) 227 mm (8.9 in.) 302 mm (11.9 in the scanner. Wider than Letter/A4 portrait : 200 sheets (64 ...Continuous paper feeding : 0.06 to 0.2 mm (2.4 to 42 lbs.)** Smaller than A7 size : 157 g/m2 only Smaller than 50 g/m2), the optional roller exchange kit for details. ** For scanning thin paper (with paper weight less than Letter/A4 portrait : 300 sheets (64 g/m2) 17 lbs. Refer...

Scanner
Page 35
KV-S3065CL KV-S3065CW Operating temperature and humidity 15 °C to 30 °C (59 °F to 86 °F), 20% to 80% RH Storage temperature and humidity 0 °C to 35 °C (32 °F to 95 °F), 10% to 80% RH Roller exchange kit (KV-SS017) Roller exchange kit for thin paper (KV-SS018) Imprinter option (KV-SS014) Roller cleaning paper (KV-SS03) Ink cartridge (KV-SS021) 35 Specifications Item Operating Environment Storage Environment Option Model No.
KV-S3065CL KV-S3065CW Operating temperature and humidity 15 °C to 30 °C (59 °F to 86 °F), 20% to 80% RH Storage temperature and humidity 0 °C to 35 °C (32 °F to 95 °F), 10% to 80% RH Roller exchange kit (KV-SS017) Roller exchange kit for thin paper (KV-SS018) Imprinter option (KV-SS014) Roller cleaning paper (KV-SS03) Ink cartridge (KV-SS021) 35 Specifications Item Operating Environment Storage Environment Option Model No.


