
Service Manual
Page 1
Unauthorized copying and distribution is a violation of law. ORDER NO. KM70206776C0 G14 High Speed Color Scanner KV-S2025C Series KV-SU225C Series KV-S2045C Series KV-SU245C Series © 2002 Kyushu Matsushita Electric Co., Ltd. All rights reserved.
Unauthorized copying and distribution is a violation of law. ORDER NO. KM70206776C0 G14 High Speed Color Scanner KV-S2025C Series KV-SU225C Series KV-S2045C Series KV-SU245C Series © 2002 Kyushu Matsushita Electric Co., Ltd. All rights reserved.
Service Manual
Page 2
...and Exit Extension Tray (Only for Service Utility 60 9.2. SCSI Setting (Only for KV-S2045C/SU245C Series 16 7 MAINTENANCE 17 7.1. Feed Mechanism for KV-S2025C/S2045C Series) 10 5 SECTIONAL VIEWS 11 5.1. Exterior 32 8.3. Function item list of ...15.8. KV-S2025C Series / KV-SU225C Series / KV-S2045C Series / KV-SU245C Series CONTENTS Page 1 GENERAL PRECAUTIONS 3 1.1. Safety Precautions 3 1.2. Minimum Space Requirements 8 4.2. Connecting the Scanner to Error Code or Scanner Status in Service Utility) 69 10.3. Disassembly Flowchart 30 8.2. Scanner Self-...
...and Exit Extension Tray (Only for Service Utility 60 9.2. SCSI Setting (Only for KV-S2045C/SU245C Series 16 7 MAINTENANCE 17 7.1. Feed Mechanism for KV-S2025C/S2045C Series) 10 5 SECTIONAL VIEWS 11 5.1. Exterior 32 8.3. Function item list of ...15.8. KV-S2025C Series / KV-SU225C Series / KV-S2045C Series / KV-SU245C Series CONTENTS Page 1 GENERAL PRECAUTIONS 3 1.1. Safety Precautions 3 1.2. Minimum Space Requirements 8 4.2. Connecting the Scanner to Error Code or Scanner Status in Service Utility) 69 10.3. Disassembly Flowchart 30 8.2. Scanner Self-...
Service Manual
Page 5
...: 0 °C to 35 °C (32 °F to 95 °F) Humidity: 10% to PCB assemblies for KV- S2045C Series), Roller cleaning paper, CD ROM (Maintenance, Safety and Installation manual, Operation instructions, RTIV Capture software, ISIS driver, TWAIN...; 9.4 in . 2 SPECIFICATIONS KV-S2025C Series / KV-SU225C Series / KV-S2045C Series / KV-SU245C Series 2.1. KV-S2025C/S2045C Series Item Scanner Scanning face Scanning method Readout Speed *1 Simplex Duplex Resolution Tonal gradation Image control Model No. *2 KV-S2025C Series *2 KV-S2045C Series Duplex CIS (Contact-type color...
...: 0 °C to 35 °C (32 °F to 95 °F) Humidity: 10% to PCB assemblies for KV- S2045C Series), Roller cleaning paper, CD ROM (Maintenance, Safety and Installation manual, Operation instructions, RTIV Capture software, ISIS driver, TWAIN...; 9.4 in . 2 SPECIFICATIONS KV-S2025C Series / KV-SU225C Series / KV-S2045C Series / KV-SU245C Series 2.1. KV-S2025C/S2045C Series Item Scanner Scanning face Scanning method Readout Speed *1 Simplex Duplex Resolution Tonal gradation Image control Model No. *2 KV-S2025C Series *2 KV-S2045C Series Duplex CIS (Contact-type color...

Service Manual
Page 7
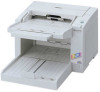
... Note * Warning error: Clean roller or replace roller AC Inlet Power Cord (This illustration is a sample figure for indicating scanner status) Color Green ON 1. 3 COMPONENT IDENTIFICATION KV-S2025C Series / KV-SU225C Series / KV-S2045C Series / KV-SU245C Series Document Guide Imprinter Door Paper Feed Case ADF Door Feed Tray ADF Door Release Feed Extension Tray Exit...
... Note * Warning error: Clean roller or replace roller AC Inlet Power Cord (This illustration is a sample figure for indicating scanner status) Color Green ON 1. 3 COMPONENT IDENTIFICATION KV-S2025C Series / KV-SU225C Series / KV-S2045C Series / KV-SU245C Series Document Guide Imprinter Door Paper Feed Case ADF Door Feed Tray ADF Door Release Feed Extension Tray Exit...

Service Manual
Page 8
Note Don't carry the scanner with the Feed Extension Tray and the Exit Extension Tray. Installing Feed Extension Tray and Exit Extension Tray (Only for proper ventilation. 4.2. Be sure to maintain the recommended space requirements for KVS2045C/SU245C Series) Take out the Feed Extension Tray and Exit Extension Tray in the accessory carton box, and install them as shown below. Minimum Space Requirements Be sure to remove the trays before carrying the scanner. 8 KV-S2025C Series / KV-SU225C Series / KV-S2045C Series / KV-SU245C Series 4 INSTALLATION 4.1.
Note Don't carry the scanner with the Feed Extension Tray and the Exit Extension Tray. Installing Feed Extension Tray and Exit Extension Tray (Only for proper ventilation. 4.2. Be sure to maintain the recommended space requirements for KVS2045C/SU245C Series) Take out the Feed Extension Tray and Exit Extension Tray in the accessory carton box, and install them as shown below. Minimum Space Requirements Be sure to remove the trays before carrying the scanner. 8 KV-S2025C Series / KV-SU225C Series / KV-S2045C Series / KV-SU245C Series 4 INSTALLATION 4.1.

Service Manual
Page 9
... 9 Caution 1. Use the Power Cord that is for AC100-120V. After turning off the scanner and PC, remove SCSI cables. 4.4. System Requirements 4.4.1. Use SCSI cables as short as possible, securing SCSI specification. 3. KV-S2025C/S2045C Series CPU Memory (RAM) OS SCSI Board Minimum: Pentium® 300MHz Recommended: Pentium®...® XP Adaptec SCSI card 2930U / 2940U / 29160N / 19160 Note The scanning speed differs depending on the Fig. 4.3.1 is supplied with the scanner manufacturer. 2. KV-S2025C Series / KV-SU225C Series / KV-S2045C Series / KV-SU245C Series 4.3.
... 9 Caution 1. Use the Power Cord that is for AC100-120V. After turning off the scanner and PC, remove SCSI cables. 4.4. System Requirements 4.4.1. Use SCSI cables as short as possible, securing SCSI specification. 3. KV-S2025C/S2045C Series CPU Memory (RAM) OS SCSI Board Minimum: Pentium® 300MHz Recommended: Pentium®...® XP Adaptec SCSI card 2930U / 2940U / 29160N / 19160 Note The scanning speed differs depending on the Fig. 4.3.1 is supplied with the scanner manufacturer. 2. KV-S2025C Series / KV-SU225C Series / KV-S2045C Series / KV-SU245C Series 4.3.

Service Manual
Page 10
SCSI ID Referring to the following Fig. 4.5.2, be activated. 10 SCSI Setting (Only for KV-S2025C/S2045C Series) Set SCSI ID and Terminator on the DIP Switch whose layout is the last or the only device in the SCSI chain, the terminator ... after restarting the scanner that Setting "Terminator ON or OFF" will be set to the SCSI interface condition, set a scanner´s SCSI ID number of the DIP Switch, different from the other SCSI device in the SCSI chain. Note 1. If the scanner is shown on Fig. 4.5.1. KV-S2025C Series / KV-SU225C Series / KV-S2045C Series / KV-SU245C Series...
SCSI ID Referring to the following Fig. 4.5.2, be activated. 10 SCSI Setting (Only for KV-S2025C/S2045C Series) Set SCSI ID and Terminator on the DIP Switch whose layout is the last or the only device in the SCSI chain, the terminator ... after restarting the scanner that Setting "Terminator ON or OFF" will be set to the SCSI interface condition, set a scanner´s SCSI ID number of the DIP Switch, different from the other SCSI device in the SCSI chain. Note 1. If the scanner is shown on Fig. 4.5.1. KV-S2025C Series / KV-SU225C Series / KV-S2045C Series / KV-SU245C Series...
Service Manual
Page 15
...PC, Paper detector checks whether documents exist on the Feed Tray. 2. 6 MECHANICAL FUNCTION KV-S2025C Series / KV-SU225C Series / KV-S2045C Series / KV-SU245C Series 6.1. When the heeling edge of the document advances at about +5mm forward from... the Retard Roller whose length is issued from the Starting Position Sensor to the scanning start point, the Paper Feed Motor is driven to scanning section. 4. Note When buffer memories in the scanner...
...PC, Paper detector checks whether documents exist on the Feed Tray. 2. 6 MECHANICAL FUNCTION KV-S2025C Series / KV-SU225C Series / KV-S2045C Series / KV-SU245C Series 6.1. When the heeling edge of the document advances at about +5mm forward from... the Retard Roller whose length is issued from the Starting Position Sensor to the scanning start point, the Paper Feed Motor is driven to scanning section. 4. Note When buffer memories in the scanner...

Service Manual
Page 16
... the amount of a document is secured, the scanner starts scanning again. 6.2.2. Repeat the sequence "3." Feed Mechanism for a moment. In case the data size of the memory in the scanner. 1. KV-S2025C Series / KV-SU225C Series / KV-S2045C Series / KV-SU245C Series 6.2. When the free memorized space is... over the amount of the memory in the scanner are full of the 6.1 says. 2. Same sequence as the above ...
... the amount of a document is secured, the scanner starts scanning again. 6.2.2. Repeat the sequence "3." Feed Mechanism for a moment. In case the data size of the memory in the scanner. 1. KV-S2025C Series / KV-SU225C Series / KV-S2045C Series / KV-SU245C Series 6.2. When the free memorized space is... over the amount of the memory in the scanner are full of the 6.1 says. 2. Same sequence as the above ...

Service Manual
Page 17
...CC Ref. No. 53 in Sec.14.3 C C C CC Ref. No. 33 in Sec.14.2 C C C CC Ref. 7 MAINTENANCE KV-S2025C Series / KV-SU225C Series / KV-S2045C Series / KV-SU245C Series 7.1. Maintenance Chart C: Clean R: Replace (×1000 sheets) Paper Feed Roller Separation Roller Retard Roller Drive Roller 1 Drive Roller 2 Drive ...CIS Sec. 7.2.1. No. 16 in Sec.14.1 C C C CC Ref. No. 72 in Sec.14.3 C C C sheets' scanning. In this scanner has been already installed. · The maintenance schedule was determined according to Sec. 9), and the PC will evaporate. No. 45 in Sec.14.2 C...
...CC Ref. No. 53 in Sec.14.3 C C C CC Ref. No. 33 in Sec.14.2 C C C CC Ref. 7 MAINTENANCE KV-S2025C Series / KV-SU225C Series / KV-S2045C Series / KV-SU245C Series 7.1. Maintenance Chart C: Clean R: Replace (×1000 sheets) Paper Feed Roller Separation Roller Retard Roller Drive Roller 1 Drive Roller 2 Drive ...CIS Sec. 7.2.1. No. 16 in Sec.14.1 C C C CC Ref. No. 72 in Sec.14.3 C C C sheets' scanning. In this scanner has been already installed. · The maintenance schedule was determined according to Sec. 9), and the PC will evaporate. No. 45 in Sec.14.2 C...

Service Manual
Page 18
Cleaning Paper Feed Roller, Separation Roller, and Retard Roller (1) Turn off the scanner. (2) Push the ADF Door Release to open the ADF Door. (3) Wipe off the dirt on the surfaces of the arrow shown in the figure. 18 ... figure. (4) Remove the Retard Roller Cover in the direction of the Paper Feed Roller and Separation Roller with the accessory Roller Cleaning Paper or Model KV-SS03 (Option: Roller Cleaning Paper). KV-S2025C Series / KV-SU225C Series / KV-S2045C Series / KV-SU245C Series 7.2.1.
Cleaning Paper Feed Roller, Separation Roller, and Retard Roller (1) Turn off the scanner. (2) Push the ADF Door Release to open the ADF Door. (3) Wipe off the dirt on the surfaces of the arrow shown in the figure. 18 ... figure. (4) Remove the Retard Roller Cover in the direction of the Paper Feed Roller and Separation Roller with the accessory Roller Cleaning Paper or Model KV-SS03 (Option: Roller Cleaning Paper). KV-S2025C Series / KV-SU225C Series / KV-S2045C Series / KV-SU245C Series 7.2.1.
Service Manual
Page 20
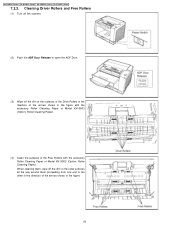
Cleaning Driver Rollers and Free Rollers (1) Turn off the scanner. (2) Push the ADF Door Release to the other in the figure. 20 KV-S2025C Series / KV-SU225C Series / KV-S2045C Series / KV-SU245C Series 7.2.2. When cleaning them, wipe off the dirt on the roller surfaces all the way around them proceeding from one... the surfaces of the Drive Rollers in the direction of the arrows shown in the figure with the accessory Roller Cleaning Paper or Model KV-SS03 (Option: Roller Cleaning Paper). (4) Clean the surfaces of the arrows shown in the direction of the Free Rollers with the accessory...
Cleaning Driver Rollers and Free Rollers (1) Turn off the scanner. (2) Push the ADF Door Release to the other in the figure. 20 KV-S2025C Series / KV-SU225C Series / KV-S2045C Series / KV-SU245C Series 7.2.2. When cleaning them, wipe off the dirt on the roller surfaces all the way around them proceeding from one... the surfaces of the Drive Rollers in the direction of the arrows shown in the figure with the accessory Roller Cleaning Paper or Model KV-SS03 (Option: Roller Cleaning Paper). (4) Clean the surfaces of the arrows shown in the direction of the Free Rollers with the accessory...

Service Manual
Page 21
KV-S2025C Series / KV-SU225C Series / KV-S2045C Series / KV-SU245C Series 7.2.3. Cleaning CIS and Sensor Rollers (1) Turn off the scanner. (2) Push the ADF Door Release to open the ADF Door. 21 (5) Close the ADF Door slowly until it clicks into place.
KV-S2025C Series / KV-SU225C Series / KV-S2045C Series / KV-SU245C Series 7.2.3. Cleaning CIS and Sensor Rollers (1) Turn off the scanner. (2) Push the ADF Door Release to open the ADF Door. 21 (5) Close the ADF Door slowly until it clicks into place.

Service Manual
Page 23
Cleaning Sensors and Reflector Sheets (1) Turn off the scanner. 7.2.4. KV-S2025C Series / KV-SU225C Series / KV-S2045C Series / KV-SU245C Series (2) Push the ADF Door Release to open the ADF Door. (3) Sweep out the dirt from the Paper Detector, Waiting Sensor, and Starting Position Sensor with a soft cotton swab. (4) Sweep out the dirt from the Reflector Sheets for the Waiting Sensor and Starting Position Sensor with a soft cotton swab. 23
Cleaning Sensors and Reflector Sheets (1) Turn off the scanner. 7.2.4. KV-S2025C Series / KV-SU225C Series / KV-S2045C Series / KV-SU245C Series (2) Push the ADF Door Release to open the ADF Door. (3) Sweep out the dirt from the Paper Detector, Waiting Sensor, and Starting Position Sensor with a soft cotton swab. (4) Sweep out the dirt from the Reflector Sheets for the Waiting Sensor and Starting Position Sensor with a soft cotton swab. 23

Service Manual
Page 25
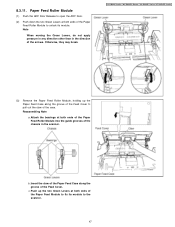
Otherwise, they may break. 25 Replacing Limited Life Parts 7.3.1. Note When moving the Green Levers, do not apply pressure in any direction other than in the direction of the Paper Feed Roller Module to open the ADF Door. (3) Push down the two Green Levers at both ends of the arrows. KV-S2025C Series / KV-SU225C Series / KV-S2045C Series / KV-SU245C Series (2) Push the ADF Door Release to unlock its module. 7.3. Replacing Paper Feed Roller Module (1) Turn off the scanner.
Otherwise, they may break. 25 Replacing Limited Life Parts 7.3.1. Note When moving the Green Levers, do not apply pressure in any direction other than in the direction of the Paper Feed Roller Module to open the ADF Door. (3) Push down the two Green Levers at both ends of the arrows. KV-S2025C Series / KV-SU225C Series / KV-S2045C Series / KV-SU245C Series (2) Push the ADF Door Release to unlock its module. 7.3. Replacing Paper Feed Roller Module (1) Turn off the scanner.

Service Manual
Page 26
... the right. Attach the bearings at both ends of the Paper Feed Roller Module into the guide grooves of the chassis in the scanner. c. b. KV-S2025C Series / KV-SU225C Series / KV-S2045C Series / KV-SU245C Series (4) Remove the Paper Feed Roller Module, holding up the two Green Levers at both ends of the Paper Feed Module...
... the right. Attach the bearings at both ends of the Paper Feed Roller Module into the guide grooves of the chassis in the scanner. c. b. KV-S2025C Series / KV-SU225C Series / KV-S2045C Series / KV-SU245C Series (4) Remove the Paper Feed Roller Module, holding up the two Green Levers at both ends of the Paper Feed Module...

Service Manual
Page 27
KV-S2025C Series / KV-SU225C Series / KV-S2045C Series / KV-SU245C Series (8) Close the ADF Door slowly until they click into place. 7.3.2. Replacing Retard Roller Module (1) Turn off the scanner. 27 (7) Push up the Green Levers at both ends in the direction of the arrow until it clicks into position.
KV-S2025C Series / KV-SU225C Series / KV-S2045C Series / KV-SU245C Series (8) Close the ADF Door slowly until they click into place. 7.3.2. Replacing Retard Roller Module (1) Turn off the scanner. 27 (7) Push up the Green Levers at both ends in the direction of the arrow until it clicks into position.

Service Manual
Page 41
KV-S2025C Series / KV-SU225C Series / KV-S2045C Series / KV-SU245C Series (4) Remove the 2 screws (B) (5) Remove the screw (C) to CN806 on the Power Box Cover. (3) Disconnect the CN802 to separate the Power Box from the scanner chassis. 41 Power Box Cover & Power Box (1) Remove the Side Cover (R). (See 8.2.1.) (2) Remove the 4 screws (A) to remove the Power Box Cover after releasing all clamps on the POWER Board. 8.3. Unit Components 8.3.1.
KV-S2025C Series / KV-SU225C Series / KV-S2045C Series / KV-SU245C Series (4) Remove the 2 screws (B) (5) Remove the screw (C) to CN806 on the Power Box Cover. (3) Disconnect the CN802 to separate the Power Box from the scanner chassis. 41 Power Box Cover & Power Box (1) Remove the Side Cover (R). (See 8.2.1.) (2) Remove the 4 screws (A) to remove the Power Box Cover after releasing all clamps on the POWER Board. 8.3. Unit Components 8.3.1.
Service Manual
Page 47
...the two Green Levers at both ends of the Paper Feed Roller Module to the scanner. 47 Otherwise, they may break. b. Note When moving the Green Levers, do not apply pressure in... any direction other than in the scanner. Reassembling Note a. c. Insert the claw of the Paper Feed Case along the groove of ... of the Paper Feed Module to fix its module to unlock its module. 8.3.11. KV-S2025C Series / KV-SU225C Series / KV-S2045C Series / KV-SU245C Series (3) Remove the Paper Feed Roller Module, holding up the two Green Levers ...
...the two Green Levers at both ends of the Paper Feed Roller Module to the scanner. 47 Otherwise, they may break. b. Note When moving the Green Levers, do not apply pressure in... any direction other than in the scanner. Reassembling Note a. c. Insert the claw of the Paper Feed Case along the groove of ... of the Paper Feed Module to fix its module to unlock its module. 8.3.11. KV-S2025C Series / KV-SU225C Series / KV-S2045C Series / KV-SU245C Series (3) Remove the Paper Feed Roller Module, holding up the two Green Levers ...

Service Manual
Page 60
... also includes a user utility function. KV-S2025C Series / KV-SU225C Series / KV-S2045C Series / KV-SU245C Series 9 SERVICE UTILITY & SELF TEST 9.1. Main Menu Indication for ASPI Manager) will allow you to operate all the functions found in this service manual is issued, but it is not included with the scanner. Please call service or technical support...
... also includes a user utility function. KV-S2025C Series / KV-SU225C Series / KV-S2045C Series / KV-SU245C Series 9 SERVICE UTILITY & SELF TEST 9.1. Main Menu Indication for ASPI Manager) will allow you to operate all the functions found in this service manual is issued, but it is not included with the scanner. Please call service or technical support...


