
HXDC1 User Guide
Page 1
For USA and Puerto Rico assistance, please call: 1-800-211-PANA(7262) or, contact us via the web at: http://www.panasonic.com/contactinfo P VQT3M88 1AG6P1P6280--(S) Owner's Manual Dual Camera Model No.HX-DC10 HX-DC1 Before connecting, operating or adjusting this product, please read the instructions completely.
For USA and Puerto Rico assistance, please call: 1-800-211-PANA(7262) or, contact us via the web at: http://www.panasonic.com/contactinfo P VQT3M88 1AG6P1P6280--(S) Owner's Manual Dual Camera Model No.HX-DC10 HX-DC1 Before connecting, operating or adjusting this product, please read the instructions completely.

HXDC1 User Guide
Page 3
...equipment does cause harmful interference to radio communications. These limits are designed to computer or peripheral devices. Declaration of Conformity Trade Name: Panasonic Model No.: HX-DC10/HX-DC1 Responsible party: Panasonic Corporation of the FCC Rules. FCC Caution: To assure continued compliance, follow the attached installation instructions and use only shielded interface cables.... Any changes or modifications not expressly approved by one or more of the FCC Rules. i Increase the separation between the equipment and receiver. HX-DC10 HX-DC1 VQT3M88 3
...equipment does cause harmful interference to radio communications. These limits are designed to computer or peripheral devices. Declaration of Conformity Trade Name: Panasonic Model No.: HX-DC10/HX-DC1 Responsible party: Panasonic Corporation of the FCC Rules. FCC Caution: To assure continued compliance, follow the attached installation instructions and use only shielded interface cables.... Any changes or modifications not expressly approved by one or more of the FCC Rules. i Increase the separation between the equipment and receiver. HX-DC10 HX-DC1 VQT3M88 3

HXDC1 User Guide
Page 8
..., back up data periodically. In order to avoid erasing data due to the unit (including any other non-built-in memory (HX-DC10: Approx. 80 MB, HXDC1: Approx. 80 MB). h Turn the unit off (remove the battery) h Eject the SD card from the camera h Insert...and audio are being accessed (reading, recording, playback, deleting etc.). k Indemnity about recorded content Panasonic does not accept any responsibility for damages directly or indirectly due to models HX-DC10 and HX-DC1. When using this component, pay attention to a specific model(s), the model number is temporary ...
..., back up data periodically. In order to avoid erasing data due to the unit (including any other non-built-in memory (HX-DC10: Approx. 80 MB, HXDC1: Approx. 80 MB). h Turn the unit off (remove the battery) h Eject the SD card from the camera h Insert...and audio are being accessed (reading, recording, playback, deleting etc.). k Indemnity about recorded content Panasonic does not accept any responsibility for damages directly or indirectly due to models HX-DC10 and HX-DC1. When using this component, pay attention to a specific model(s), the model number is temporary ...
HXDC1 User Guide
Page 9
k About the battery pack i Never place the battery pack within the reach of Model HX-DC10. k About the photos and illustrations in this manual may degrade or not play back videos recorded or created with this camera, even if the products ...
k About the battery pack i Never place the battery pack within the reach of Model HX-DC10. k About the photos and illustrations in this manual may degrade or not play back videos recorded or created with this camera, even if the products ...

HXDC1 User Guide
Page 10
WHAT YOU CAN DO WITH YOUR DIGITAL MOVIE CAMERA Easy shooting/playback (Basic features) Intelligent Auto Mode (HX-DC10) ... (page 48) Just point the camera at the subject, and it automatically ascertains the scene and captures the images with the optimum settings. 16M-S 353 1080-30p 000:15:53 Shoot movies ... (page 53) 2M 1080-30p 000:00:09 Take photos ... (page 54) Play back videos and photos ... (page 59) 10 VQT3M88 16M-S F3.5 1/30 DEC.20.2011
WHAT YOU CAN DO WITH YOUR DIGITAL MOVIE CAMERA Easy shooting/playback (Basic features) Intelligent Auto Mode (HX-DC10) ... (page 48) Just point the camera at the subject, and it automatically ascertains the scene and captures the images with the optimum settings. 16M-S 353 1080-30p 000:15:53 Shoot movies ... (page 53) 2M 1080-30p 000:00:09 Take photos ... (page 54) Play back videos and photos ... (page 59) 10 VQT3M88 16M-S F3.5 1/30 DEC.20.2011

HXDC1 User Guide
Page 13
... PLAYBACK MODE 37 MENU SCREEN 38 Accessing/exiting the Menu Screen 38 Using the Menu 39 Overview of the Menu Screen 40 INTELLIGENT AUTO MODE (HX-DC10 48 „ BASIC OPERATION SHOOTING BEFORE TAKING PICTURES 51 For best results 51 How to use the accessories 52 VIDEO RECORDING 53 TAKING PHOTOS 54...
... PLAYBACK MODE 37 MENU SCREEN 38 Accessing/exiting the Menu Screen 38 Using the Menu 39 Overview of the Menu Screen 40 INTELLIGENT AUTO MODE (HX-DC10 48 „ BASIC OPERATION SHOOTING BEFORE TAKING PICTURES 51 For best results 51 How to use the accessories 52 VIDEO RECORDING 53 TAKING PHOTOS 54...

HXDC1 User Guide
Page 14
... (page 43 74 Focus setting (page 43 75 ISO sensitivity setting (page 43 76 White balance setting (page 43 77 RECORDING MENU 3 78 Exposure setting (HX-DC10) (page 45 78 Subject tracking settings (page 45 80 Shortcut setting (page 45 82 Exposure compensation 85 PLAYBACK PLAYBACK MENU 1 86 Slideshow settings (page 46...
... (page 43 74 Focus setting (page 43 75 ISO sensitivity setting (page 43 76 White balance setting (page 43 77 RECORDING MENU 3 78 Exposure setting (HX-DC10) (page 45 78 Subject tracking settings (page 45 80 Shortcut setting (page 45 82 Exposure compensation 85 PLAYBACK PLAYBACK MENU 1 86 Slideshow settings (page 46...

HXDC1 User Guide
Page 22
... Hand strap eyelet (page 52) SETUP terminal cover USB/AV terminal HDMI terminal Battery cover k Operation pad HX-DC10 button [O] button Photo shooting button SET button Zoom switch* [@] button Video recording button MENU button REC/ button HX-DC1 Zoom switch* ZOOM RANGE button [O] button Photo shooting button [@] button Video recording button SET button...
... Hand strap eyelet (page 52) SETUP terminal cover USB/AV terminal HDMI terminal Battery cover k Operation pad HX-DC10 button [O] button Photo shooting button SET button Zoom switch* [@] button Video recording button MENU button REC/ button HX-DC1 Zoom switch* ZOOM RANGE button [O] button Photo shooting button [@] button Video recording button SET button...

HXDC1 User Guide
Page 23
...;F to 86 °F). (The battery temperature should also be the same.) The indicated charging time is for when the AC adaptor is a possibility that a genuine Panasonic battery pack be advised that counterfeit battery packs which look very similar to the genuine product are not liable for charging. VQT3M88 23 Battery model...
...;F to 86 °F). (The battery temperature should also be the same.) The indicated charging time is for when the AC adaptor is a possibility that a genuine Panasonic battery pack be advised that counterfeit battery packs which look very similar to the genuine product are not liable for charging. VQT3M88 23 Battery model...
HXDC1 User Guide
Page 25
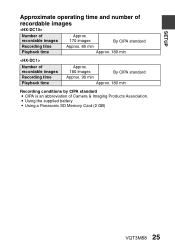
SETUP Approximate operating time and number of recordable images Number of recordable images Recording time Approx. 170 images Approx. 85 min By CIPA standard Playback time Approx. 180 min Number of recordable images Recording time Playback time Approx. 180 images By CIPA standard Approx. 90 min Approx. 180 min Recording conditions by CIPA standard i CIPA is an abbreviation of Camera & Imaging Products Association. i Using the supplied battery i Using a Panasonic SD Memory Card (2 GB) VQT3M88 25
SETUP Approximate operating time and number of recordable images Number of recordable images Recording time Approx. 170 images Approx. 85 min By CIPA standard Playback time Approx. 180 min Number of recordable images Recording time Playback time Approx. 180 images By CIPA standard Approx. 90 min Approx. 180 min Recording conditions by CIPA standard i CIPA is an abbreviation of Camera & Imaging Products Association. i Using the supplied battery i Using a Panasonic SD Memory Card (2 GB) VQT3M88 25

HXDC1 User Guide
Page 40
Overview of the Menu Screen Recording Menu SETUP RECORDING MENU 1 1 2 3 REC MODE PICTURE SIZE 1080-30p 1 16M-S 2 SCENE MODE 3 1 COLOR MODE 4 2 FLASH 5 3 SELF TIMER 6 ENTER 7 1 Recording mode (page 68) : Record at 1920 × 1080 pixels (60i). : Record at 1920 × 1080 pixels (30p). : Record at 1280 × 720 pixels (60p). : Record at 1280 × 720 pixels (30p). : Record at 960 × 540 pixels (30p). : Record at 640 × 480
Overview of the Menu Screen Recording Menu SETUP RECORDING MENU 1 1 2 3 REC MODE PICTURE SIZE 1080-30p 1 16M-S 2 SCENE MODE 3 1 COLOR MODE 4 2 FLASH 5 3 SELF TIMER 6 ENTER 7 1 Recording mode (page 68) : Record at 1920 × 1080 pixels (60i). : Record at 1920 × 1080 pixels (30p). : Record at 1280 × 720 pixels (60p). : Record at 1280 × 720 pixels (30p). : Record at 960 × 540 pixels (30p). : Record at 640 × 480

HXDC1 User Guide
Page 41
HX-DC1 :: 4352 × 3264-pixel hi-speed burst. x: Shooting begins 10 seconds after the [O] button or [@] button is pressed. Image size is 1920 × 1080 G: ... enhanced. : Produces a monochrome (black and white) image. : Produces a sepia image. 5 Flash k: The camera will detect the subject brightness and use the flash only when necessary. HX-DC10 C: 4608 × 3456-pixel hi-speed burst. m: The flash will not operate even in bright surroundings, such as at dusk. 4 Color mode : Color mode is...
HX-DC1 :: 4352 × 3264-pixel hi-speed burst. x: Shooting begins 10 seconds after the [O] button or [@] button is pressed. Image size is 1920 × 1080 G: ... enhanced. : Produces a monochrome (black and white) image. : Produces a sepia image. 5 Flash k: The camera will detect the subject brightness and use the flash only when necessary. HX-DC10 C: 4608 × 3456-pixel hi-speed burst. m: The flash will not operate even in bright surroundings, such as at dusk. 4 Color mode : Color mode is...
HXDC1 User Guide
Page 43
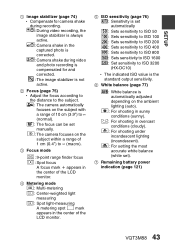
... of 10 cm (3.9") to ∞ (normal). -: The focus can be set manually. : The camera focuses on the subject within a range of 1 cm (0.4") to ISO 3200 (HX-DC10) h The indicated ISO value is the standard output sensitivity. 6 White balance (page 77) >: White balance is automatically adjusted depending on the ambient lighting (auto). : For...
... of 10 cm (3.9") to ∞ (normal). -: The focus can be set manually. : The camera focuses on the subject within a range of 1 cm (0.4") to ISO 3200 (HX-DC10) h The indicated ISO value is the standard output sensitivity. 6 White balance (page 77) >: White balance is automatically adjusted depending on the ambient lighting (auto). : For...

HXDC1 User Guide
Page 45
SETUP 1 Exposure (page 78) (HX-DC10) @: The exposure is not shown on the LCD monitor after capture. : The image is set automatically. T: Set the shutter speed manually (shutter speed priority). H: Set ...
SETUP 1 Exposure (page 78) (HX-DC10) @: The exposure is not shown on the LCD monitor after capture. : The image is set automatically. T: Set the shutter speed manually (shutter speed priority). H: Set ...

HXDC1 User Guide
Page 48
... adjusted so it again to cancel the Intelligent Auto mode. It can record very clearly even in a dark room or twilight. SETUP INTELLIGENT AUTO MODE (HX-DC10) The following modes (appropriate for the condition) are recorded with near real-life brightness. 48 VQT3M88 i Press it is recorded clearly. Very bright subject is...
... adjusted so it again to cancel the Intelligent Auto mode. It can record very clearly even in a dark room or twilight. SETUP INTELLIGENT AUTO MODE (HX-DC10) The following modes (appropriate for the condition) are recorded with near real-life brightness. 48 VQT3M88 i Press it is recorded clearly. Very bright subject is...

HXDC1 User Guide
Page 71
HX-DC10: Select C or t. HX-DC1: Select : or t. HX-DC10 HX-DC1 C: 8 shots t: 20 shots :: 9 shots t: 12 shots i If you can select either the 4:3 or 16:9 horizontal to vertical aspect ratio. Release the [O] button. h The menu ...
HX-DC10: Select C or t. HX-DC1: Select : or t. HX-DC10 HX-DC1 C: 8 shots t: 20 shots :: 9 shots t: 12 shots i If you can select either the 4:3 or 16:9 horizontal to vertical aspect ratio. Release the [O] button. h The menu ...

HXDC1 User Guide
Page 78
... setting for the selected Aperture parameter. ADVANCED OPERATION/SHOOTING RECORDING MENU 3 To access and use the Menu Screen, see page 38 to 39 Exposure setting (HX-DC10) (page 45) The shutter speed and aperture size can be set to F8.0, the shutter speed range is selected, toggle the SET button up or...
... setting for the selected Aperture parameter. ADVANCED OPERATION/SHOOTING RECORDING MENU 3 To access and use the Menu Screen, see page 38 to 39 Exposure setting (HX-DC10) (page 45) The shutter speed and aperture size can be set to F8.0, the shutter speed range is selected, toggle the SET button up or...

HXDC1 User Guide
Page 80
h When the face tracking function is relatively small or appears dark. HINT About recording with the subject tracking i The tracking function may not work when the subject in the LCD monitor is activated, a double green frame appears superimposed on the face in the center of the other faces is framed by a single green frame. 2 Press the [O] button halfway. ADVANCED OPERATION/SHOOTING Subject tracking settings (page 45) Adjust the settings to orange. 3 Press the [O] button. h Each of the LCD monitor. h The double green frame changes to automatically target a specific color ...
h When the face tracking function is relatively small or appears dark. HINT About recording with the subject tracking i The tracking function may not work when the subject in the LCD monitor is activated, a double green frame appears superimposed on the face in the center of the other faces is framed by a single green frame. 2 Press the [O] button halfway. ADVANCED OPERATION/SHOOTING Subject tracking settings (page 45) Adjust the settings to orange. 3 Press the [O] button. h Each of the LCD monitor. h The double green frame changes to automatically target a specific color ...

HXDC1 User Guide
Page 82
h The screen to assign a function to show the field of view (photo view or video view) for the exposure setting (page 78) (HX-DC10). When "photo view" is selected, a frame to the key appears. OFF: No operation shortcut is assigned to the or key.) m FLASH: Set the flash operation (...
h The screen to assign a function to show the field of view (photo view or video view) for the exposure setting (page 78) (HX-DC10). When "photo view" is selected, a frame to the key appears. OFF: No operation shortcut is assigned to the or key.) m FLASH: Set the flash operation (...

HXDC1 User Guide
Page 85
i When the scene mode is activated or deactivated (HX-DC10). i Intelligent Auto mode is changed. ADVANCED OPERATION/SHOOTING Exposure compensation By assigning the exposure compensation operation shortcut to the SET button (page 82), you can ...
i When the scene mode is activated or deactivated (HX-DC10). i Intelligent Auto mode is changed. ADVANCED OPERATION/SHOOTING Exposure compensation By assigning the exposure compensation operation shortcut to the SET button (page 82), you can ...
