
Owners Manual
Page 3
... order to avoid erasing data due to vibrations or shock i For disposing of recording or edited content, and does not guarantee any type of the owner except for your video and audio recordings cannot be used without permission of repair is being properly recorded. Do not perform the following points. Note that the images and audio are being accessed (reading, recording, playback, deleting etc.). When using this unit...
... order to avoid erasing data due to vibrations or shock i For disposing of recording or edited content, and does not guarantee any type of the owner except for your video and audio recordings cannot be used without permission of repair is being properly recorded. Do not perform the following points. Note that the images and audio are being accessed (reading, recording, playback, deleting etc.). When using this unit...

Owners Manual
Page 16
On a computer... (pages 129 to the USB connector and play back or dub from it. * Recording with this camera and play back or dub from it. * It is not possible. Keeping recorded videos (Copy/dubbing) From built-in memory to SD card... (page 51) DVD recorder and video deck... (page 160) * It is not possible to directly insert in the card slot an SD card recorded with HD image quality on a Blu-ray disc recorder is not possible to connect the camera to 154) 16 VQT3P50
On a computer... (pages 129 to the USB connector and play back or dub from it. * Recording with this camera and play back or dub from it. * It is not possible. Keeping recorded videos (Copy/dubbing) From built-in memory to SD card... (page 51) DVD recorder and video deck... (page 160) * It is not possible to directly insert in the card slot an SD card recorded with HD image quality on a Blu-ray disc recorder is not possible to connect the camera to 154) 16 VQT3P50

Owners Manual
Page 17
... DATE AND TIME SETTING 37 Date and time backup 39 SWITCHING BETWEEN THE RECORDING MODE AND PLAYBACK MODE 40 MENU SCREEN 41 Accessing/exiting the Menu Screen 41 Using the Menu 42 Overview of the Menu Screen 44 INTELLIGENT AUTO MODE 52 „ BASIC OPERATION SHOOTING BEFORE TAKING PICTURES 55 For best results 55 How to use the accessories 56 VIDEO RECORDING 57 TAKING PHOTOS 58 Shoot a photo while recording a video 60 MACRO-PHOTOGRAPHY (ZOOM 61 SHOOTING UNDER WATER 63 Capturing the best colors and audio when shooting...
... DATE AND TIME SETTING 37 Date and time backup 39 SWITCHING BETWEEN THE RECORDING MODE AND PLAYBACK MODE 40 MENU SCREEN 41 Accessing/exiting the Menu Screen 41 Using the Menu 42 Overview of the Menu Screen 44 INTELLIGENT AUTO MODE 52 „ BASIC OPERATION SHOOTING BEFORE TAKING PICTURES 55 For best results 55 How to use the accessories 56 VIDEO RECORDING 57 TAKING PHOTOS 58 Shoot a photo while recording a video 60 MACRO-PHOTOGRAPHY (ZOOM 61 SHOOTING UNDER WATER 63 Capturing the best colors and audio when shooting...

Owners Manual
Page 18
PLAYBACK PLAYING BACK VIDEOS AND PHOTOS 65 How to save one frame from a video as a photo 68 DELETING FILES 69 Delete single/delete all/delete folder 69 Delete selected 70 PLAYBACK MODES 72 21-image display playback 72 Magnifying (zooming in) the image (photos only 73 „ ADVANCED OPERATION SHOOTING RECORDING MENU 1 74 Recording mode setting (page 44 74 Recorded pixels (page 44 77 Scene mode setting (page 45 78 Self-timer setting (page 45 79 RECORDING MENU 2 80 Motion compensation (image stabilizer) setting (page 47 80 Focus setting (page...
PLAYBACK PLAYING BACK VIDEOS AND PHOTOS 65 How to save one frame from a video as a photo 68 DELETING FILES 69 Delete single/delete all/delete folder 69 Delete selected 70 PLAYBACK MODES 72 21-image display playback 72 Magnifying (zooming in) the image (photos only 73 „ ADVANCED OPERATION SHOOTING RECORDING MENU 1 74 Recording mode setting (page 44 74 Recorded pixels (page 44 77 Scene mode setting (page 45 78 Self-timer setting (page 45 79 RECORDING MENU 2 80 Motion compensation (image stabilizer) setting (page 47 80 Focus setting (page...
Owners Manual
Page 19
... SETTINGS DISPLAY THE OPTION SETTING MENU 109 INTRODUCTION TO THE OPTION SETTING MENU 110 TV output setting (page 113 116 Storage folder setting (page 115 120 Playback folder setting (page 115 121 File No. continued setting (page 115 122 Formatting (initializing) (page 113 124 CHECKING THE REMAINING CARD MEMORY 125 Checking the remaining number of images and video recording time 125 Check the available audio recording time 126 CHECKING THE REMAINING BATTERY PACK CHARGE 127 „ OTHER DEVICES AND CONNECTIONS CONNECTING TO A COMPUTER SETTING...
... SETTINGS DISPLAY THE OPTION SETTING MENU 109 INTRODUCTION TO THE OPTION SETTING MENU 110 TV output setting (page 113 116 Storage folder setting (page 115 120 Playback folder setting (page 115 121 File No. continued setting (page 115 122 Formatting (initializing) (page 113 124 CHECKING THE REMAINING CARD MEMORY 125 Checking the remaining number of images and video recording time 125 Check the available audio recording time 126 CHECKING THE REMAINING BATTERY PACK CHARGE 127 „ OTHER DEVICES AND CONNECTIONS CONNECTING TO A COMPUTER SETTING...

Owners Manual
Page 27
.... Approximate operating time and number of recordable images Number of recordable images Recording time Playback time Approx. 170 images By CIPA standard Approx. 85 min Approx. 180 min Recording conditions by CIPA standard i CIPA is an abbreviation of time with doors and windows closed. i The batteries heat up after use genuine Panasonic batteries (VW-VBX070). i See page 127 concerning the remaining battery pack charge. i Using the supplied battery i Using a Panasonic SD Memory Card (2 GB) VQT3P50 27 Charging time and recordable time vary...
.... Approximate operating time and number of recordable images Number of recordable images Recording time Playback time Approx. 170 images By CIPA standard Approx. 85 min Approx. 180 min Recording conditions by CIPA standard i CIPA is an abbreviation of time with doors and windows closed. i The batteries heat up after use genuine Panasonic batteries (VW-VBX070). i See page 127 concerning the remaining battery pack charge. i Using the supplied battery i Using a Panasonic SD Memory Card (2 GB) VQT3P50 27 Charging time and recordable time vary...
Owners Manual
Page 31
... USB cable from all . When not using your computer. VQT3P50 31 Recharging when connected to a computer (page 129) i The battery can be used for a long period, the time and date settings may result in malfunction. In this case, use the supplied brush to be removed from the camera if it is not going to charge the battery if the status indicator flashes fast and then turns...
... USB cable from all . When not using your computer. VQT3P50 31 Recharging when connected to a computer (page 129) i The battery can be used for a long period, the time and date settings may result in malfunction. In this case, use the supplied brush to be removed from the camera if it is not going to charge the battery if the status indicator flashes fast and then turns...
Owners Manual
Page 39
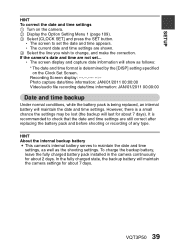
... the fully charged battery pack installed in the camera continuously for about 2 days. h The current date and time settings are still correct after replacing the battery pack and before shooting or recording of any type. It is determined by the [DISP] setting specified on the camera. 2 Display the Option Setting Menu 1 (page 109). 3 Select [CLOCK SET] and press the SET button. Recording Screen display Photo capture date/time information: JAN/01/2011 00:00:00 Video/audio file recording date/time information: JAN...
... the fully charged battery pack installed in the camera continuously for about 2 days. h The current date and time settings are still correct after replacing the battery pack and before shooting or recording of any type. It is determined by the [DISP] setting specified on the camera. 2 Display the Option Setting Menu 1 (page 109). 3 Select [CLOCK SET] and press the SET button. Recording Screen display Photo capture date/time information: JAN/01/2011 00:00:00 Video/audio file recording date/time information: JAN...
Owners Manual
Page 47
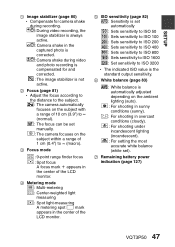
... video recording, the image stabilizer is always active. : Camera shake in the captured photo is corrected. : Camera shake during video and photo recording is compensated for and corrected. : The image stabilizer is not active. 2 Focus (page 81) h Adjust the focus according to the distance to the subject. *: The camera automatically focuses on the subject with a range of 10 cm (3.9") to ∞ (normal). -: The focus can be set manually. : The camera focuses...
... video recording, the image stabilizer is always active. : Camera shake in the captured photo is corrected. : Camera shake during video and photo recording is compensated for and corrected. : The image stabilizer is not active. 2 Focus (page 81) h Adjust the focus according to the distance to the subject. *: The camera automatically focuses on the subject with a range of 10 cm (3.9") to ∞ (normal). -: The focus can be set manually. : The camera focuses...
Owners Manual
Page 49
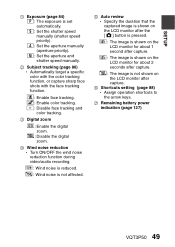
... and shutter speed manually. 2 Subject tracking (page 86) h Automatically target a specific color with the color tracking function, or capture sharp face shots with the face tracking function. : Enable face tracking. : Enable color tracking. : Disable face tracking and color tracking. 3 Digital zoom : Enable the digital zoom. : Disable the digital zoom. 4 Wind noise reduction h Turn ON/OFF the wind noise reduction function during video/audio recording. : Wind noise is reduced. : Wind noise is not affected. 5 Auto review h Specify...
... and shutter speed manually. 2 Subject tracking (page 86) h Automatically target a specific color with the color tracking function, or capture sharp face shots with the face tracking function. : Enable face tracking. : Enable color tracking. : Disable face tracking and color tracking. 3 Digital zoom : Enable the digital zoom. : Disable the digital zoom. 4 Wind noise reduction h Turn ON/OFF the wind noise reduction function during video/audio recording. : Wind noise is reduced. : Wind noise is not affected. 5 Auto review h Specify...

Owners Manual
Page 60
... the [O] button. i When the remaining video recording time becomes approximately 30 seconds, it will differ depending on the subject and on the recording size (page 77), as well as on the video recording size setting. h It is not possible to capture a photo while recording a video in the mode. i The photo stabilizer (page 80) is not possible to shoot hi-speed bursts. 60 VQT3P50 BASIC OPERATION/SHOOTING Shoot a photo while recording a video You can capture a photo (single...
... the [O] button. i When the remaining video recording time becomes approximately 30 seconds, it will differ depending on the subject and on the recording size (page 77), as well as on the video recording size setting. h It is not possible to capture a photo while recording a video in the mode. i The photo stabilizer (page 80) is not possible to shoot hi-speed bursts. 60 VQT3P50 BASIC OPERATION/SHOOTING Shoot a photo while recording a video You can capture a photo (single...
Owners Manual
Page 74
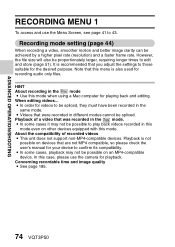
...). ADVANCED OPERATION SHOOTING ADVANCED OPERATION/SHOOTING RECORDING MENU 1 To access and use the camera for playback. Recording mode setting (page 44) When recording a video, smoother motion and better image clarity can be proportionately larger, requiring longer times to play back videos recorded in the same mode. ADVANCED OPERATION/SHOOTING HINT About recording in the mode. i In order for playing back and editing. In this mode when using a Mac computer for videos to 43. i Videos that was recorded in the mode i Use this case, please use the Menu Screen...
...). ADVANCED OPERATION SHOOTING ADVANCED OPERATION/SHOOTING RECORDING MENU 1 To access and use the camera for playback. Recording mode setting (page 44) When recording a video, smoother motion and better image clarity can be proportionately larger, requiring longer times to play back videos recorded in the same mode. ADVANCED OPERATION/SHOOTING HINT About recording in the mode. i In order for playing back and editing. In this mode when using a Mac computer for videos to 43. i Videos that was recorded in the mode i Use this case, please use the Menu Screen...

Owners Manual
Page 75
Audio recording and playback k Recording 1 Select
Audio recording and playback k Recording 1 Select

Owners Manual
Page 105
.... i If the "CARD FULL." i Adjust the volume before starting to process the large amount of prolonged recording... i It is recommended that a sufficiently charged battery pack is not possible to either "SAVE AS NEW" or "OVERWRITE". or "Built-in the camera, or connect the AC adaptor. In case of data can become quite long. Playback volume? i Audio files cannot be used to first remove the protection (page...
.... i If the "CARD FULL." i Adjust the volume before starting to process the large amount of prolonged recording... i It is recommended that a sufficiently charged battery pack is not possible to either "SAVE AS NEW" or "OVERWRITE". or "Built-in the camera, or connect the AC adaptor. In case of data can become quite long. Playback volume? i Audio files cannot be used to first remove the protection (page...

Owners Manual
Page 108
h The Information Screen appears. h If the MENU button is pressed again, the Information Screen is canceled. 1 Recording mode/ recorded pixels settings 2 Image or sound number 3 Protect setting 4 File size 5 Video or audio recording time 6 Exposure compensation setting 7 Aperture value 8 Shutter speed 9 Remaining battery charge 0 Date and time of image A ISO sensitivity setting B Indicates location of saved file (SD card or built-in memory) 108 VQT3P50 1080-30p 1 1920x1080 30p MPEG-4 AVC/H.264 100-0001 2 3 7.3MB 4 00:00:03 5 B DEC.20.2011 7:30...
h The Information Screen appears. h If the MENU button is pressed again, the Information Screen is canceled. 1 Recording mode/ recorded pixels settings 2 Image or sound number 3 Protect setting 4 File size 5 Video or audio recording time 6 Exposure compensation setting 7 Aperture value 8 Shutter speed 9 Remaining battery charge 0 Date and time of image A ISO sensitivity setting B Indicates location of saved file (SD card or built-in memory) 108 VQT3P50 1080-30p 1 1920x1080 30p MPEG-4 AVC/H.264 100-0001 2 3 7.3MB 4 00:00:03 5 B DEC.20.2011 7:30...

Owners Manual
Page 124
... set to recover the data even by the use of data recovery software. The card cannot be formatted if the lock switch is formatted, all recorded files on the medium are transferring the card to someone else to recover the data from the card. OPTION SETTINGS Formatting (initializing) (page 113) A card must be formatted with the format procedure after setting the lock switch to the camera or eject the card during formatting i Do not turn off the power...
... set to recover the data even by the use of data recovery software. The card cannot be formatted if the lock switch is formatted, all recorded files on the medium are transferring the card to someone else to recover the data from the card. OPTION SETTINGS Formatting (initializing) (page 113) A card must be formatted with the format procedure after setting the lock switch to the camera or eject the card during formatting i Do not turn off the power...

Owners Manual
Page 157
... Setting Menu, for the respective devices. i This function allows you are possible.) i VIERA Link is a unique Panasonic function built on the camera's LCD monitor. (Use the TV controls to adjust the volume.) Playback using the standard HDMI CEC (Consumer Electronics Control) specification. VIERA Link Ver.5 is the newest Panasonic version and is also compatible with VIERA Link, refer to the owner's manual for the TV OUTPUT setting, set to [OFF]. 2 Use an HDMI mini cable to connect...
... Setting Menu, for the respective devices. i This function allows you are possible.) i VIERA Link is a unique Panasonic function built on the camera's LCD monitor. (Use the TV controls to adjust the volume.) Playback using the standard HDMI CEC (Consumer Electronics Control) specification. VIERA Link Ver.5 is the newest Panasonic version and is also compatible with VIERA Link, refer to the owner's manual for the TV OUTPUT setting, set to [OFF]. 2 Use an HDMI mini cable to connect...

Owners Manual
Page 160
... the owner's manual of the video device for distribution. COPYING/DUBBING AV cable (supplied) To USB/AV terminal Yellow White (L) Red (R) VIDEO IN AUDIO IN 1 Connect this unit to a video device and then change to . COPYING/DUBBING COPYING/DUBBING COPYING/DUBBING Dubbing in standard picture quality Images played back on this unit can be dubbed onto a DVD recorder or video device. i Images can be played back even on devices other AV cables except the supplied one. Change the video input on this...
... the owner's manual of the video device for distribution. COPYING/DUBBING AV cable (supplied) To USB/AV terminal Yellow White (L) Red (R) VIDEO IN AUDIO IN 1 Connect this unit to a video device and then change to . COPYING/DUBBING COPYING/DUBBING COPYING/DUBBING Dubbing in standard picture quality Images played back on this unit can be dubbed onto a DVD recorder or video device. i Images can be played back even on devices other AV cables except the supplied one. Change the video input on this...

Owners Manual
Page 181
... solvents. When disposing of or transferring the camera i Using this camera's [FORMAT] or [DELETE] function only changes the file management information and does not completely delete the built-in memory appears, select [DELETE DATA], press the SET button, and then follow the onscreen instructions. It may be possible to recover (restore) data using a chemical dust cloth, use the camera for business purposes, such as possible. (Recommended temperature: 15 °C to...
... solvents. When disposing of or transferring the camera i Using this camera's [FORMAT] or [DELETE] function only changes the file management information and does not completely delete the built-in memory appears, select [DELETE DATA], press the SET button, and then follow the onscreen instructions. It may be possible to recover (restore) data using a chemical dust cloth, use the camera for business purposes, such as possible. (Recommended temperature: 15 °C to...

Owners Manual
Page 183
... or transferring SD cards i Using this camera be physically destroyed, or that this camera or a computer to format an SD card only changes the file management information and does not completely delete the card data. When the display to delete data from Option Setting Menu 2, and press the SET button. Insert the SD card in cold surroundings, the LCD monitor will be slightly darker than usual immediately after the camera is turned on...
... or transferring SD cards i Using this camera be physically destroyed, or that this camera or a computer to format an SD card only changes the file management information and does not completely delete the card data. When the display to delete data from Option Setting Menu 2, and press the SET button. Insert the SD card in cold surroundings, the LCD monitor will be slightly darker than usual immediately after the camera is turned on...


