

User Manual
Page 1
EB Web Site: http://www.panasonic-europe.com VQT3N01 1AG6P1P6288--(S) Model number suffix "EB" denotes UK model. Operating Instructions Dual Camera Model No.HX-DC10 HX-DC1 Before use, please read these instructions completely.
EB Web Site: http://www.panasonic-europe.com VQT3N01 1AG6P1P6288--(S) Model number suffix "EB" denotes UK model. Operating Instructions Dual Camera Model No.HX-DC10 HX-DC1 Before use, please read these instructions completely.
User Manual
Page 5
k Indemnity about recorded content Panasonic does not accept any responsibility for damages directly or indirectly due to static ...or editing does not work properly. Likewise, the above also applies in a case where any type of built-in memory (HX-DC10: Approx. 80 MB, HXDC1: Approx. 80 MB). VQT3N01 5 When using this unit, please see page 116. Do not...the built-in memory or cause a malfunction in loss of or transferring this component, pay attention to models HX-DC10 and HX-DC1. k Be sure to take some test pictures beforehand Before those important events, be sure to take some...
k Indemnity about recorded content Panasonic does not accept any responsibility for damages directly or indirectly due to static ...or editing does not work properly. Likewise, the above also applies in a case where any type of built-in memory (HX-DC10: Approx. 80 MB, HXDC1: Approx. 80 MB). VQT3N01 5 When using this unit, please see page 116. Do not...the built-in memory or cause a malfunction in loss of or transferring this component, pay attention to models HX-DC10 and HX-DC1. k Be sure to take some test pictures beforehand Before those important events, be sure to take some...

User Manual
Page 6
... illustrations are referred to play back images recorded on this unit. k About the battery pack i Never place the battery pack within the reach of Model HX-DC10. in this manual i The product images, illustrations, menu displays etc. i The file format of these operating instructions i SD Memory Card, SDHC Memory Card and SDXC...
... illustrations are referred to play back images recorded on this unit. k About the battery pack i Never place the battery pack within the reach of Model HX-DC10. in this manual i The product images, illustrations, menu displays etc. i The file format of these operating instructions i SD Memory Card, SDHC Memory Card and SDXC...

User Manual
Page 7
WHAT YOU CAN DO WITH YOUR DIGITAL MOVIE CAMERA Easy shooting/playback (Basic features) Intelligent Auto Mode (HX-DC10) ... (page 46) Just point the camera at the subject, and it automatically ascertains the scene and captures the images with the optimum settings. 16M-S 353 1080-30p 000:15:53 Shoot movies ... (page 51) 2M 1080-30p 000:00:09 Take photos ... (page 52) Play back videos and photos ... (page 57) 16M-S F3.5 1/30 20.12.2011 VQT3N01 7
WHAT YOU CAN DO WITH YOUR DIGITAL MOVIE CAMERA Easy shooting/playback (Basic features) Intelligent Auto Mode (HX-DC10) ... (page 46) Just point the camera at the subject, and it automatically ascertains the scene and captures the images with the optimum settings. 16M-S 353 1080-30p 000:15:53 Shoot movies ... (page 51) 2M 1080-30p 000:00:09 Take photos ... (page 52) Play back videos and photos ... (page 57) 16M-S F3.5 1/30 20.12.2011 VQT3N01 7
User Manual
Page 10
... PLAYBACK MODE 34 MENU SCREEN 35 Accessing/exiting the Menu Screen 35 Using the Menu 36 Overview of the Menu Screen 38 INTELLIGENT AUTO MODE (HX-DC10 46 „ BASIC OPERATION SHOOTING BEFORE TAKING PICTURES 49 For best results 49 How to use the accessories 50 VIDEO RECORDING 51 TAKING PHOTOS 52...
... PLAYBACK MODE 34 MENU SCREEN 35 Accessing/exiting the Menu Screen 35 Using the Menu 36 Overview of the Menu Screen 38 INTELLIGENT AUTO MODE (HX-DC10 46 „ BASIC OPERATION SHOOTING BEFORE TAKING PICTURES 49 For best results 49 How to use the accessories 50 VIDEO RECORDING 51 TAKING PHOTOS 52...

User Manual
Page 11
... (page 41 72 Focus setting (page 41 73 ISO sensitivity setting (page 41 74 White balance setting (page 41 75 RECORDING MENU 3 76 Exposure setting (HX-DC10) (page 43 76 Subject tracking settings (page 43 78 Shortcut setting (page 43 80 Exposure compensation 83 PLAYBACK PLAYBACK MENU 1 84 Slideshow settings (page 44...
... (page 41 72 Focus setting (page 41 73 ISO sensitivity setting (page 41 74 White balance setting (page 41 75 RECORDING MENU 3 76 Exposure setting (HX-DC10) (page 43 76 Subject tracking settings (page 43 78 Shortcut setting (page 43 80 Exposure compensation 83 PLAYBACK PLAYBACK MENU 1 84 Slideshow settings (page 44...
User Manual
Page 19
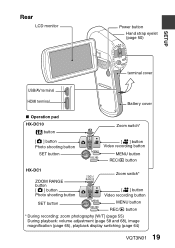
... Hand strap eyelet (page 50) SETUP terminal cover USB/AV terminal HDMI terminal Battery cover k Operation pad HX-DC10 button [O] button Photo shooting button SET button Zoom switch* [@] button Video recording button MENU button REC/ button HX-DC1 Zoom switch* ZOOM RANGE button [O] button Photo shooting button [@] button Video recording button SET button...
... Hand strap eyelet (page 50) SETUP terminal cover USB/AV terminal HDMI terminal Battery cover k Operation pad HX-DC10 button [O] button Photo shooting button SET button Zoom switch* [@] button Video recording button MENU button REC/ button HX-DC1 Zoom switch* ZOOM RANGE button [O] button Photo shooting button [@] button Video recording button SET button...
User Manual
Page 20
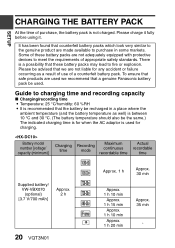
... battery packs are made available to charging time and recording capacity k Charging/recording time i Temperature: 25 °C/humidity: 60 %RH i It is recommended that a genuine Panasonic battery pack be the same.) The indicated charging time is for when the AC adaptor is used we recommend that the battery be recharged in...
... battery packs are made available to charging time and recording capacity k Charging/recording time i Temperature: 25 °C/humidity: 60 %RH i It is recommended that a genuine Panasonic battery pack be the same.) The indicated charging time is for when the AC adaptor is used we recommend that the battery be recharged in...
User Manual
Page 22
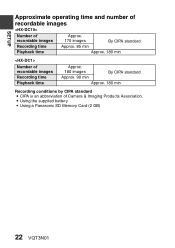
i Using the supplied battery i Using a Panasonic SD Memory Card (2 GB) 22 VQT3N01 SETUP Approximate operating time and number of recordable images Number of recordable images Recording time Approx. 170 images Approx. 85 min By CIPA standard Playback time Approx. 180 min Number of recordable images Recording time Playback time Approx. 180 images By CIPA standard Approx. 90 min Approx. 180 min Recording conditions by CIPA standard i CIPA is an abbreviation of Camera & Imaging Products Association.
i Using the supplied battery i Using a Panasonic SD Memory Card (2 GB) 22 VQT3N01 SETUP Approximate operating time and number of recordable images Number of recordable images Recording time Approx. 170 images Approx. 85 min By CIPA standard Playback time Approx. 180 min Number of recordable images Recording time Playback time Approx. 180 images By CIPA standard Approx. 90 min Approx. 180 min Recording conditions by CIPA standard i CIPA is an abbreviation of Camera & Imaging Products Association.

User Manual
Page 38
Overview of the Menu Screen Recording Menu SETUP RECORDING MENU 1 1 2 3 REC MODE PICTURE SIZE 1080-30p 1 16M-S 2 SCENE MODE 3 1 COLOUR MODE 4 2 FLASH 5 3 SELF TIMER 6 ENTER 7 1 Recording mode (page 66) : Record at 1920 × 1080 pixels (60i). : Record at 1920 × 1080 pixels (30p). : Record at 1280 × 720 pixels (60p). : Record at 1280 × 720 pixels (30p). : Record at 960 × 540 pixels (30p). : Record at 640 × 480
Overview of the Menu Screen Recording Menu SETUP RECORDING MENU 1 1 2 3 REC MODE PICTURE SIZE 1080-30p 1 16M-S 2 SCENE MODE 3 1 COLOUR MODE 4 2 FLASH 5 3 SELF TIMER 6 ENTER 7 1 Recording mode (page 66) : Record at 1920 × 1080 pixels (60i). : Record at 1920 × 1080 pixels (30p). : Record at 1280 × 720 pixels (60p). : Record at 1280 × 720 pixels (30p). : Record at 960 × 540 pixels (30p). : Record at 640 × 480

User Manual
Page 39
HX-DC1 :: 4352 × 3264-pixel hi-speed burst. x: Shooting begins 10 seconds after the [O] button or [@] button is pressed. 7 Remaining battery power indication (page 119) ... 71) N: Self-timer is 1920 × 1080 G: pixels (16:9 aspect ratio). m: The flash will detect the subject brightness and use the flash only when necessary. HX-DC10 C: 4608 × 3456-pixel hi-speed burst. All models : Image size is off.
HX-DC1 :: 4352 × 3264-pixel hi-speed burst. x: Shooting begins 10 seconds after the [O] button or [@] button is pressed. 7 Remaining battery power indication (page 119) ... 71) N: Self-timer is 1920 × 1080 G: pixels (16:9 aspect ratio). m: The flash will detect the subject brightness and use the flash only when necessary. HX-DC10 C: 4608 × 3456-pixel hi-speed burst. All models : Image size is off.
User Manual
Page 41
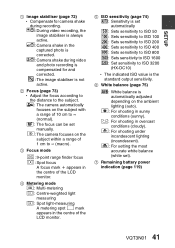
... v: Sets sensitivity to ISO 200 w: Sets sensitivity to ISO 400 6: Sets sensitivity to ISO 800 -: Sets sensitivity to ISO 1600 z: Set sensitivity to ISO 3200 (HX-DC10) h The indicated ISO value is the standard output sensitivity. 6 White balance (page 75) >: White balance is set ). 7 Remaining battery power indication (page 119) VQT3N01 41...
... v: Sets sensitivity to ISO 200 w: Sets sensitivity to ISO 400 6: Sets sensitivity to ISO 800 -: Sets sensitivity to ISO 1600 z: Set sensitivity to ISO 3200 (HX-DC10) h The indicated ISO value is the standard output sensitivity. 6 White balance (page 75) >: White balance is set ). 7 Remaining battery power indication (page 119) VQT3N01 41...

User Manual
Page 42
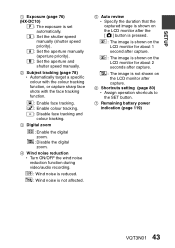
SETUP 1 RECORDING MENU 3 2 EXPOSURE P 1 3 SUBJECT TRACKING 2 DIGITAL ZOOM 3 1 WIND CUT 2 AUTO REVIEW 3 SHORTCUTS 4 1 5 6 ENTER 7 1 RECORDING MENU 3 2 SUBJECT TRACKING 2 3 DIGITAL ZOOM 3 WIND CUT 4 1 AUTO REVIEW 2 SHORTCUTS 3 1 5 6 ENTER 7 42 VQT3N01
SETUP 1 RECORDING MENU 3 2 EXPOSURE P 1 3 SUBJECT TRACKING 2 DIGITAL ZOOM 3 1 WIND CUT 2 AUTO REVIEW 3 SHORTCUTS 4 1 5 6 ENTER 7 1 RECORDING MENU 3 2 SUBJECT TRACKING 2 3 DIGITAL ZOOM 3 WIND CUT 4 1 AUTO REVIEW 2 SHORTCUTS 3 1 5 6 ENTER 7 42 VQT3N01
User Manual
Page 43
T: Set the shutter speed manually (shutter speed priority). SETUP 1 Exposure (page 76) (HX-DC10) @: The exposure is not shown on the LCD monitor for about 2 seconds after capture. 6 Shortcuts setting (page 80) h Assign operation shortcuts to the SET button. 7 ...
T: Set the shutter speed manually (shutter speed priority). SETUP 1 Exposure (page 76) (HX-DC10) @: The exposure is not shown on the LCD monitor for about 2 seconds after capture. 6 Shortcuts setting (page 80) h Assign operation shortcuts to the SET button. 7 ...

User Manual
Page 46
... want to record. The whole landscape will be recorded vividly without whiting out the background sky, which may be very bright. SETUP INTELLIGENT AUTO MODE (HX-DC10) The following modes (appropriate for the condition) are detected and focused automatically, and the brightness is adjusted so it again to activate the Intelligent Auto...
... want to record. The whole landscape will be recorded vividly without whiting out the background sky, which may be very bright. SETUP INTELLIGENT AUTO MODE (HX-DC10) The following modes (appropriate for the condition) are detected and focused automatically, and the brightness is adjusted so it again to activate the Intelligent Auto...

User Manual
Page 69
... backward from this point. Not saved Perfect shot Images are recorded (maximum number of images) starting from the last photo captured. VQT3N01 69 HX-DC10 HX-DC1 C: 8 shots t: 20 shots : : 9 shots t: 12 shots i If you continue shooting even after the maximum number of images... 16:9 horizontal to vertical aspect ratio. recorded in the built-in a hi-speed burst sequence? HX-DC10: Select C or t. HINT What is kept pressed. This menu is pressed. 2 Press the [O] button. HX-DC1: Select : or t. Release the [O] button. ADVANCED OPERATION/SHOOTING Recorded pixels (page 38...
... backward from this point. Not saved Perfect shot Images are recorded (maximum number of images) starting from the last photo captured. VQT3N01 69 HX-DC10 HX-DC1 C: 8 shots t: 20 shots : : 9 shots t: 12 shots i If you continue shooting even after the maximum number of images... 16:9 horizontal to vertical aspect ratio. recorded in the built-in a hi-speed burst sequence? HX-DC10: Select C or t. HINT What is kept pressed. This menu is pressed. 2 Press the [O] button. HX-DC1: Select : or t. Release the [O] button. ADVANCED OPERATION/SHOOTING Recorded pixels (page 38...

User Manual
Page 76
... completes the exposure setting. 76 VQT3N01 ADVANCED OPERATION/SHOOTING RECORDING MENU 3 To access and use the Menu Screen, see page 35 to 37 Exposure setting (HX-DC10) (page 43) The shutter speed and aperture size can be set to F8.0, the shutter speed range is selected, toggle the SET button up or...
... completes the exposure setting. 76 VQT3N01 ADVANCED OPERATION/SHOOTING RECORDING MENU 3 To access and use the Menu Screen, see page 35 to 37 Exposure setting (HX-DC10) (page 43) The shutter speed and aperture size can be set to F8.0, the shutter speed range is selected, toggle the SET button up or...

User Manual
Page 78
Shooting with the subject tracking i The tracking function may not work when the subject in the centre of the other faces is relatively small or appears dark. i If the scene mode function setting was fireworks , landscape or night scenery , it automatically changes to multi n. 78 VQT3N01 i The focus mode changes to 9-point range finder , and the metering mode changes to . HINT About recording with the face tracking function 1 Set the face tracking setting to automatically target a specific colour with the colour tracking function, or capture sharp face shots...
Shooting with the subject tracking i The tracking function may not work when the subject in the centre of the other faces is relatively small or appears dark. i If the scene mode function setting was fireworks , landscape or night scenery , it automatically changes to multi n. 78 VQT3N01 i The focus mode changes to 9-point range finder , and the metering mode changes to . HINT About recording with the face tracking function 1 Set the face tracking setting to automatically target a specific colour with the colour tracking function, or capture sharp face shots...

User Manual
Page 80
... key. 80 VQT3N01 h The screen to assign a function to show the field of view (photo view or video view) for the exposure setting (page 76) (HX-DC10). PHOTO VIEW: Select the desired field of view during video recording appears. When "photo view" is selected, a frame to the key appears. RECOMMENDED SETTINGS: The...
... key. 80 VQT3N01 h The screen to assign a function to show the field of view (photo view or video view) for the exposure setting (page 76) (HX-DC10). PHOTO VIEW: Select the desired field of view during video recording appears. When "photo view" is selected, a frame to the key appears. RECOMMENDED SETTINGS: The...

User Manual
Page 83
... HINT The exposure compensation setting is cancelled in the following cases: i When the pointer is set to ±0.0. i After the power is activated or deactivated (HX-DC10). i Intelligent Auto mode is turned off. i When the camera is set to the playback mode. i When the USB cable is shown at the left or...
... HINT The exposure compensation setting is cancelled in the following cases: i When the pointer is set to ±0.0. i After the power is activated or deactivated (HX-DC10). i Intelligent Auto mode is turned off. i When the camera is set to the playback mode. i When the USB cable is shown at the left or...
