
EY7460 User Guide
Page 3
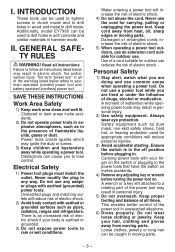
INTRODUCTION These tools can be caught in . Additionally, model EY7960 can be used to tighten screws in clutch mode and to rain or wet conditions. Cluttered or dark areas invite accidents. 2) Do not operate power .... 3) Avoid accidental starting. A moment of drugs, alcohol or medication. Ensure the switch is earthed or grounded. 3) Do not expose power tools to drill holes in wood and metal in hammer mode. Do not wear loose clothing or jewelry. Loose clothes, jewelry or long hair can cause you are doing and use any...
INTRODUCTION These tools can be caught in . Additionally, model EY7960 can be used to tighten screws in clutch mode and to rain or wet conditions. Cluttered or dark areas invite accidents. 2) Do not operate power .... 3) Avoid accidental starting. A moment of drugs, alcohol or medication. Ensure the switch is earthed or grounded. 3) Do not expose power tools to drill holes in wood and metal in hammer mode. Do not wear loose clothing or jewelry. Loose clothes, jewelry or long hair can cause you are doing and use any...
EY7460 User Guide
Page 5
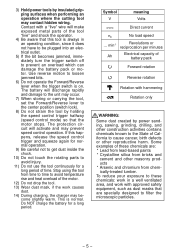
... set the Forward/Reverse lever to the center position (switch lock). 8) Do not strain the tool by power sanding, sawing, grinding, drilling, and other construction activities contains chemicals known to the State of California to cause cancer, birth defects or other masonry products * Arsenic and... normal. Symbol V meaning Volts Direct current n0 No load speed ... If this tool is always in a well ventilated area, and work with hammering Rotation only WARNING: Some dust created by holding the speed control trigger halfway (speed control mode) so that are : * Lead from lead-based...
... set the Forward/Reverse lever to the center position (switch lock). 8) Do not strain the tool by power sanding, sawing, grinding, drilling, and other construction activities contains chemicals known to the State of California to cause cancer, birth defects or other masonry products * Arsenic and... normal. Symbol V meaning Volts Direct current n0 No load speed ... If this tool is always in a well ventilated area, and work with hammering Rotation only WARNING: Some dust created by holding the speed control trigger halfway (speed control mode) so that are : * Lead from lead-based...
EY7460 User Guide
Page 9
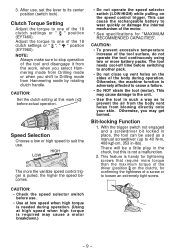
... damage to its center position (switch lock). There will be used as to Drilling mode from blowing directly onto your skin. 3. Otherwise, you shift to prevent the air from the body vent holes from Hammering mode by rotating clutch handle. Adjust the torque to one of a screw or... selector switch before switching to another pack. • Do not close up to stop operation of the 18 clutch settings or " ", " " position (EY7960). Clutch Torque Setting Adjust the torque to cause a failure. • Do NOT strain the tool (motor). LOW HIGH The more the variable speed control ...
... damage to its center position (switch lock). There will be used as to Drilling mode from blowing directly onto your skin. 3. Otherwise, you shift to prevent the air from the body vent holes from Hammering mode by rotating clutch handle. Adjust the torque to one of a screw or... selector switch before switching to another pack. • Do not close up to stop operation of the 18 clutch settings or " ", " " position (EY7960). Clutch Torque Setting Adjust the torque to cause a failure. • Do NOT strain the tool (motor). LOW HIGH The more the variable speed control ...
Service Manual
Page 1
EY7460 EY7960 Europe Oceania TABLE OF CONTENTS PAGE 1 Warning 2 2 Specifications 2 3 Troubleshooting Guide 3 4 Disassembly and Assembly Instructions 6 5 Wiring Connection Diagram 10 6 Schematic Diagram 10 7 Exploded View and Replacement Parts List -----------11 PAGE © Panasonic Electric Works Co., Ltd. 2008. Unauthorized copying and distribution is a violation of law. Order Number PTD0810X45CE Cordless Drill & Driver Cordless Hammer Drill & Driver Model No. All rights reserved.
EY7460 EY7960 Europe Oceania TABLE OF CONTENTS PAGE 1 Warning 2 2 Specifications 2 3 Troubleshooting Guide 3 4 Disassembly and Assembly Instructions 6 5 Wiring Connection Diagram 10 6 Schematic Diagram 10 7 Exploded View and Replacement Parts List -----------11 PAGE © Panasonic Electric Works Co., Ltd. 2008. Unauthorized copying and distribution is a violation of law. Order Number PTD0810X45CE Cordless Drill & Driver Cordless Hammer Drill & Driver Model No. All rights reserved.
Service Manual
Page 6
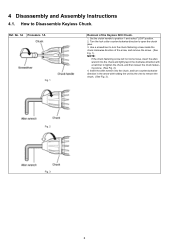
Insert the allen wrench into the chuck and lightly tap in the arrow with a hammer to tighten the chuck, and then loosen the chuck fastening screw. (See Fig. 2). 4. Set the clutch handle to open the chuck jaws. 3. Turn the lock ... will not come loose, insert the allen wrench into the chuck, and turn the chuck fastening screw inside the chuck clockwise direction of the Keyless Drill Chuck. 1. How to remove the chuck. (See Fig. 3). 4 Disassembly and Assembly Instructions 4.1. Ref. Fig. 2 Fig. 3 6
Insert the allen wrench into the chuck and lightly tap in the arrow with a hammer to tighten the chuck, and then loosen the chuck fastening screw. (See Fig. 2). 4. Set the clutch handle to open the chuck jaws. 3. Turn the lock ... will not come loose, insert the allen wrench into the chuck, and turn the chuck fastening screw inside the chuck clockwise direction of the Keyless Drill Chuck. 1. How to remove the chuck. (See Fig. 3). 4 Disassembly and Assembly Instructions 4.1. Ref. Fig. 2 Fig. 3 6

