Operating Instructions
Page 1
Operating Instructions (Household) Epilator ES‑EL9A Model No. ES‑EL7A EL9A-7A v3.indb 1 18/11/7 上午11:37
Operating Instructions (Household) Epilator ES‑EL9A Model No. ES‑EL7A EL9A-7A v3.indb 1 18/11/7 上午11:37
Operating Instructions
Page 7
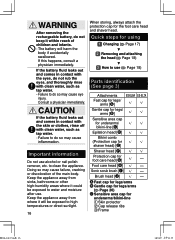
GB D F I NL E DK P N S Operating Instructions (Household) Epilator ES‑EL9A Model No. Before operating this unit, please read these instructions completely and save them for purchasing this Panasonic product. ES‑EL7A Contents Safety precautions 10 Important information 16 Quick steps for using 16 Parts identification 16 Charging 17 Before use 18 How to use 18...
GB D F I NL E DK P N S Operating Instructions (Household) Epilator ES‑EL9A Model No. Before operating this unit, please read these instructions completely and save them for purchasing this Panasonic product. ES‑EL7A Contents Safety precautions 10 Important information 16 Quick steps for using 16 Parts identification 16 Charging 17 Before use 18 How to use 18...

Operating Instructions
Page 9
The type reference of power supply unit is marked near the symbol. ►Using the head of epilation/ shaver, and the brush • The heads and brush can be used when wet. The following symbol means that a specific detachable power supply unit is ...
The type reference of power supply unit is marked near the symbol. ►Using the head of epilation/ shaver, and the brush • The heads and brush can be used when wet. The following symbol means that a specific detachable power supply unit is ...
Operating Instructions
Page 12
... skin - Use in the following persons should not use the fast cap for legs/arms or the gentle cap for underarms/ bikini‑line when epilating your underarms and bikini‑line. Always attach the sensitive area cap for legs/arms. - Doing so may cause finger injury or cause hair or...
... skin - Use in the following persons should not use the fast cap for legs/arms or the gentle cap for underarms/ bikini‑line when epilating your underarms and bikini‑line. Always attach the sensitive area cap for legs/arms. - Doing so may cause finger injury or cause hair or...
Operating Instructions
Page 13
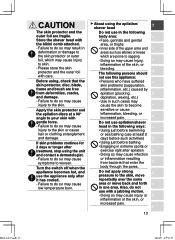
...with a jabbing motion. - Please store the skin protector and the outer foil with gentle force. - Apply the skin protector and the epilation discs at least 2 days before such activities) • Using just before swimming or sea bathing (use the appliance only after treatment, stop...burn. Doing so may cause injury to do not use this appliance: • Persons who have suffered skin problems (suppuration, inflammation, etc.) caused by epilation (plucking, depilation, waxing, etc.) - GB D F I NL E DK P N CAUTION The skin protector and the outer foil are fragile. Failure...
...with a jabbing motion. - Please store the skin protector and the outer foil with gentle force. - Apply the skin protector and the epilation discs at least 2 days before such activities) • Using just before swimming or sea bathing (use the appliance only after treatment, stop...burn. Doing so may cause injury to do not use this appliance: • Persons who have suffered skin problems (suppuration, inflammation, etc.) caused by epilation (plucking, depilation, waxing, etc.) - GB D F I NL E DK P N CAUTION The skin protector and the outer foil are fragile. Failure...
Operating Instructions
Page 16
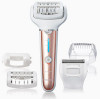
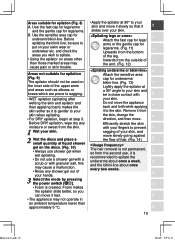
... moisture after use. Important information Do not use ( Page 18) Parts identification (See page 3) Attachments ES‑EL9A ES‑EL7A Fast cap for legs/ arms [A] Gentle cap for legs/ arms [B] Sensitive area cap for underarms/ bikini‑line [C] Epilation head [D] Bikini comb (Protection cap for shaver head) [E] Shaver head [F] Protection cap for underarms...
... moisture after use. Important information Do not use ( Page 18) Parts identification (See page 3) Attachments ES‑EL9A ES‑EL7A Fast cap for legs/ arms [A] Gentle cap for legs/ arms [B] Sensitive area cap for underarms/ bikini‑line [C] Epilation head [D] Bikini comb (Protection cap for shaver head) [E] Shaver head [F] Protection cap for underarms...

Operating Instructions
Page 17
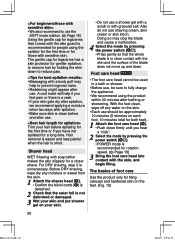
... • Charging the appliance every time it has not been in use for legs/ arms) after charging is completed. Plug the AC adaptor into the epilator (a) and a household outlet (b). (Fig. 1) Charging indication/notification light [K] glows red while charging. (Fig. 2) It turns off /on/ ... for the first time or when it is 15 °C - 35 °C. File Frame release buttons \ Frame I NL E DK P N D Epilation head 4 Epilation discs E Bikini comb (Protection cap for shaver head) F Shaver head 5 Outer foil 6 Trimmer 7 Pop‑up trimmer switch 8 Frame 9 Inner blade 0...
... • Charging the appliance every time it has not been in use for legs/ arms) after charging is completed. Plug the AC adaptor into the epilator (a) and a household outlet (b). (Fig. 1) Charging indication/notification light [K] glows red while charging. (Fig. 2) It turns off /on/ ... for the first time or when it is 15 °C - 35 °C. File Frame release buttons \ Frame I NL E DK P N D Epilation head 4 Epilation discs E Bikini comb (Protection cap for shaver head) F Shaver head 5 Outer foil 6 Trimmer 7 Pop‑up trimmer switch 8 Frame 9 Inner blade 0...

Operating Instructions
Page 18
... rotation speed can be used only for underarms/bikini‑line. 18 EL9A-7A v3.indb 18 18/11/7 上午11:37 Before use Epilation head The fast cap for legs/arms and the gentle cap for legs/arms should be used only for legs/arms. The sensitive area cap...
... rotation speed can be used only for underarms/bikini‑line. 18 EL9A-7A v3.indb 18 18/11/7 上午11:37 Before use Epilation head The fast cap for legs/arms and the gentle cap for legs/arms should be used only for legs/arms. The sensitive area cap...
Operating Instructions
Page 19
... 1 Wet your skin. 2 Wet the discs and place a small quantity of liquid shower gel on areas other than approximately 5 °C. • Apply the epilator at 90° to your skin and move slowly going against the flow of the leg. GB D F I NL E DK P N Areas suitable for underarm... swim wear or underwear etc. Do not move . Areas not suitable for underarms/ bikini‑line. (Fig. 13) Lightly apply the epilator at step 3. Before epilating the bikini‑line, be in an ambient temperature lower than those marked areas may cause a malfunction. • Rinse any moisture or...
... 1 Wet your skin. 2 Wet the discs and place a small quantity of liquid shower gel on areas other than approximately 5 °C. • Apply the epilator at 90° to your skin and move slowly going against the flow of the leg. GB D F I NL E DK P N Areas suitable for underarm... swim wear or underwear etc. Do not move . Areas not suitable for underarms/ bikini‑line. (Fig. 13) Lightly apply the epilator at step 3. Before epilating the bikini‑line, be in an ambient temperature lower than those marked areas may cause a malfunction. • Rinse any moisture or...
Operating Instructions
Page 20
...WET Shaving with soap lather makes the skin slippery for a closer shave. Foot care head ES-EL9A • The foot care head cannot be sure to fully charge the appliance. • We recommend using the epilator for the first time or for those with sensitive skin. Hair removal is easier and ... feet). 1 Attach the foot care head [H]. • Push down . For DRY shaving, step 3 is recommended for people using the product within 30 minutes after epilation. • Make sure skin is not deformed or damaged. 3 Wet your hair before and after use. • We also recommend to use the SOFT mode...
...WET Shaving with soap lather makes the skin slippery for a closer shave. Foot care head ES-EL9A • The foot care head cannot be sure to fully charge the appliance. • We recommend using the epilator for the first time or for those with sensitive skin. Hair removal is easier and ... feet). 1 Attach the foot care head [H]. • Push down . For DRY shaving, step 3 is recommended for people using the product within 30 minutes after epilation. • Make sure skin is not deformed or damaged. 3 Wet your hair before and after use. • We also recommend to use the SOFT mode...
Operating Instructions
Page 21
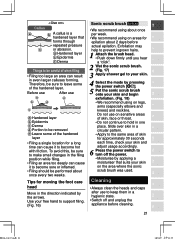
... changes in the filing position while filing. • Filing an area too deeply can cause it to turn off and unplug the appliance before actual epilation. Use your skin. 4 Select the mode by the arrows. Exfoliation may help to prevent ingrown hairs. 1 Attach the brush head. • Push down ...be removed e Leave some of when filing • Filing too large an area can cause it to support filing. (Fig. 16) Sonic scrub brush ES-EL9A • We recommend using about once every two weeks. Tips for approximately 30 seconds each time, check your skin and begin exfoliation. (Fig. 18...
... changes in the filing position while filing. • Filing an area too deeply can cause it to turn off and unplug the appliance before actual epilation. Use your skin. 4 Select the mode by the arrows. Exfoliation may help to prevent ingrown hairs. 1 Attach the brush head. • Push down ...be removed e Leave some of when filing • Filing too large an area can cause it to support filing. (Fig. 16) Sonic scrub brush ES-EL9A • We recommend using about once every two weeks. Tips for approximately 30 seconds each time, check your skin and begin exfoliation. (Fig. 18...

Operating Instructions
Page 22
...in the frame. Pour a small amount of the file. 2. Rinse any debris thoroughly with the cleaning brush [M]. (Fig. 20) Wet cleaning [ABCDEFHIJ] Epilation head/Shaver head (Fig. 21) 1. Press the power switch to the central part of water on the file and turn on the power, and thoroughly... rinse debris from the sonic scrub brush. 2. Wipe the appliance with the frame removed. 4. Dry cleaning [ABCDEF] Epilation head/Shaver head 1. Turn the switch on and then foam is not completely washed away, then a white deposit can accumulate and prevent the discs ...
...in the frame. Pour a small amount of the file. 2. Rinse any debris thoroughly with the cleaning brush [M]. (Fig. 20) Wet cleaning [ABCDEFHIJ] Epilation head/Shaver head (Fig. 21) 1. Press the power switch to the central part of water on the file and turn on the power, and thoroughly... rinse debris from the sonic scrub brush. 2. Wipe the appliance with the frame removed. 4. Dry cleaning [ABCDEF] Epilation head/Shaver head 1. Turn the switch on and then foam is not completely washed away, then a white deposit can accumulate and prevent the discs ...
Operating Instructions
Page 24
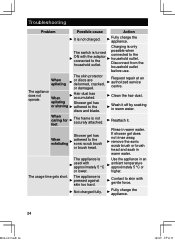
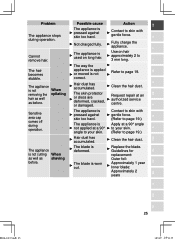
...the adaptor connected to the discs and blade. Request repair at an authorized service centre. Contact to the household outlet. Troubleshooting Problem When epilating The appliance does not operate. The appliance is not securely attached. Rinse in an ambient temperature approximately 5 °C or higher. ...appliance. 24 EL9A-7A v3.indb 24 18/11/7 上午11:37 Action Fully charge the appliance. Wash it . When epilating or shaving When caring for feet When exfoliating The usage time gets short. Hair dust has accumulated. The frame is pressed against skin...
...the adaptor connected to the discs and blade. Request repair at an authorized service centre. Contact to the household outlet. Troubleshooting Problem When epilating The appliance does not operate. The appliance is not securely attached. Rinse in an ambient temperature approximately 5 °C or higher. ...appliance. 24 EL9A-7A v3.indb 24 18/11/7 上午11:37 Action Fully charge the appliance. Wash it . When epilating or shaving When caring for feet When exfoliating The usage time gets short. Hair dust has accumulated. The frame is pressed against skin...
Operating Instructions
Page 25
... skin protector or discs are deformed, cracked, or damaged. Sensitive area cap comes off during operation. Possible cause The appliance is not When removing the epilating hair as well as shaving before . Hair dust has accumulated. The blade is deformed. Refer to skin with gentle force. The appliance is not applied...
... skin protector or discs are deformed, cracked, or damaged. Sensitive area cap comes off during operation. Possible cause The appliance is not When removing the epilating hair as well as shaving before . Hair dust has accumulated. The blade is deformed. Refer to skin with gentle force. The appliance is not applied...
Operating Instructions
Page 27
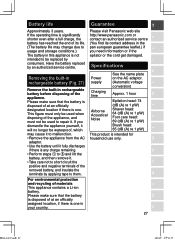
....) The battery in your country. Power supply See the name plate on the AC adaptor. (Automatic voltage conversion) Charging time Approx. 1 hour Airborne Acoustical Noise Epilation head: 74 (dB (A) re 1 pW) Shaver head: 64 (dB (A) re 1 pW) Foot care head: 69 (dB (A) re 1 pW) Brush head: ... leaflet.) if you dismantle the appliance yourself, it . Please make sure that the battery is one . Guarantee Please visit Panasonic web site http://www.panasonic.com or contact an authorized service centre (You find its life. (The battery life may cause it to malfunction. •...
....) The battery in your country. Power supply See the name plate on the AC adaptor. (Automatic voltage conversion) Charging time Approx. 1 hour Airborne Acoustical Noise Epilation head: 74 (dB (A) re 1 pW) Shaver head: 64 (dB (A) re 1 pW) Foot care head: 69 (dB (A) re 1 pW) Brush head: ... leaflet.) if you dismantle the appliance yourself, it . Please make sure that the battery is one . Guarantee Please visit Panasonic web site http://www.panasonic.com or contact an authorized service centre (You find its life. (The battery life may cause it to malfunction. •...
