
Turntable
Page 1
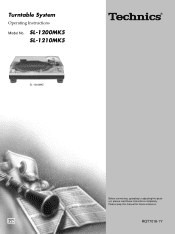
Please keep this product, please read these instructions completely. Turntable System Operating Instructions Model No. PP RQT7018-1Y SL-1200MK5 SL-1210MK5 SL-1200MK5 Before connecting, operating or adjusting this manual for future reference.
Please keep this product, please read these instructions completely. Turntable System Operating Instructions Model No. PP RQT7018-1Y SL-1200MK5 SL-1210MK5 SL-1200MK5 Before connecting, operating or adjusting this manual for future reference.
Turntable
Page 2
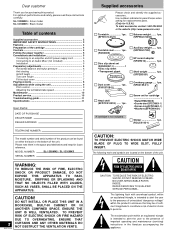
... (not included 6 Installation 6 Preparatory adjustments 6 Horizontal balance and stylus pressure 6 Anti-skating 7 Armlift height 7 Tone arm height 7 Fit the dust cover 7 Playing records 8 Adjustments while using the unit 9 Pitch control 9 Adjusting the turntable brake speed 9 Maintenance 10 Product service 10 Troubleshooting guide 11 Specifications 11 User memo: DATE OF PURCHASE DEALER NAME DEALER ADDRESS TELEPHONE NUMBER The model number and serial number of this product...
... (not included 6 Installation 6 Preparatory adjustments 6 Horizontal balance and stylus pressure 6 Anti-skating 7 Armlift height 7 Tone arm height 7 Fit the dust cover 7 Playing records 8 Adjustments while using the unit 9 Pitch control 9 Adjusting the turntable brake speed 9 Maintenance 10 Product service 10 Troubleshooting guide 11 Specifications 11 User memo: DATE OF PURCHASE DEALER NAME DEALER ADDRESS TELEPHONE NUMBER The model number and serial number of this product...
Turntable
Page 3
...exit from that to which can radiate radio frequency energy and, if not installed and used in accordance with the manufacturer's instructions. 8) Do not install near water. 6) Clean only with the limits for replacement of the following two conditions: (1) This device may cause undesired operation. ...modifications to this equipment would void the user's authority to radio or television reception, which the receiver is subject to correct the interference by turning the equipment off and on the unit and the applicable safety instructions listed below. If this equipment does cause ...
...exit from that to which can radiate radio frequency energy and, if not installed and used in accordance with the manufacturer's instructions. 8) Do not install near water. 6) Clean only with the limits for replacement of the following two conditions: (1) This device may cause undesired operation. ...modifications to this equipment would void the user's authority to radio or television reception, which the receiver is subject to correct the interference by turning the equipment off and on the unit and the applicable safety instructions listed below. If this equipment does cause ...
Turntable
Page 4
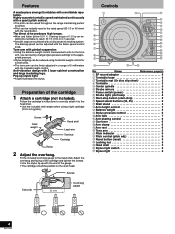
.... Preparation of 1.5 kg-cm en- Follow the cartridge's instructions to correctly attach it to 6.5 grams). Anti-vibration design with a fully electronic braking system. Tone arm with the brake speed control knob. Name Reference page(s) EP record adaptor 8 Turntable base 4 Turntable mat (Or disc slip sheet 5 Turntable 5 Center spindle 5 Strobe mirrors 9 Power switch (power 8 Strobe light, pilot lamp 8 Start-stop button...
.... Preparation of 1.5 kg-cm en- Follow the cartridge's instructions to correctly attach it to 6.5 grams). Anti-vibration design with a fully electronic braking system. Tone arm with the brake speed control knob. Name Reference page(s) EP record adaptor 8 Turntable base 4 Turntable mat (Or disc slip sheet 5 Turntable 5 Center spindle 5 Strobe mirrors 9 Power switch (power 8 Strobe light, pilot lamp 8 Start-stop button...
Turntable
Page 5
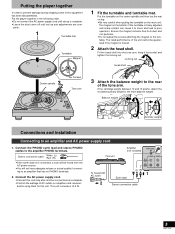
... disassembled. Stereo connection cable White (L) Red (R) •If the earth lead isn't connected, a hum will not have adequate volume or sound quality if connecting to poor operation. plete. 1 Turntable mat Turntable Magnet 1 Fit the turntable and turntable mat. Put the player together in the following order. •Do not connect the AC power supply cord until set up is...
... disassembled. Stereo connection cable White (L) Red (R) •If the earth lead isn't connected, a hum will not have adequate volume or sound quality if connecting to poor operation. plete. 1 Turntable mat Turntable Magnet 1 Fit the turntable and turntable mat. Put the player together in the following order. •Do not connect the AC power supply cord until set up is...
Turntable
Page 6
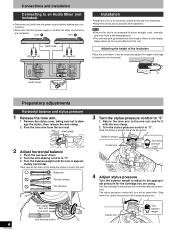
... stylus pressure control will turn at this . Unit Unit Earth lead Installation •Install the unit on a horizontal surface protected from vibrations. •Keep this unit as far as possible from a radio if there is approxi- Push the cue lever down. 2. Turn the balance weight until the arm is one nearby. mately horizontal. See the cartridge's instructions for...
... stylus pressure control will turn at this . Unit Unit Earth lead Installation •Install the unit on a horizontal surface protected from vibrations. •Keep this unit as far as possible from a radio if there is approxi- Push the cue lever down. 2. Turn the balance weight until the arm is one nearby. mately horizontal. See the cartridge's instructions for...
Turntable
Page 7
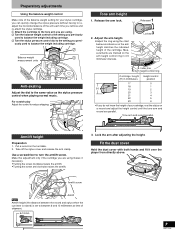
... player from directly above. Tone arm and record parallel. Take off the stylus cover and release the arm clamp. Fit the dust cover Hold the dust cover with both hands and fit it necessary. •Turning the screw clockwise lowers the armlift. •Turning the screw anti-clockwise raises the armlift. 3. For scratch play Adjust the control...
... player from directly above. Tone arm and record parallel. Take off the stylus cover and release the arm clamp. Fit the dust cover Hold the dust cover with both hands and fit it necessary. •Turning the screw clockwise lowers the armlift. •Turning the screw anti-clockwise raises the armlift. 3. For scratch play Adjust the control...
Turntable
Page 8
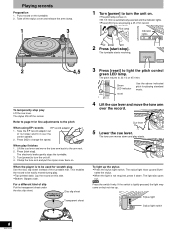
...the turntable mat. Disc slip sheet Transparent sheet 1 Turn [power] to turn the unit off the stylus cover and release the arm clamp. 1 3 2 4,5 To temporarily stop ]. start -stop play . •Top (printed side): Lay the record on but not rise up the stylus •Press the stylus ...indicated pitch for scratch play finishes 1. To light up . Press the switch firmly. Stylus light Stylus light switch 8 RQT7018 Press [45] to the pitch When using EP records EP record adaptor 1. This enables the record to 33 1/3 or 45 r/min. off the record. Cue lever 5 Lower...
...the turntable mat. Disc slip sheet Transparent sheet 1 Turn [power] to turn the unit off the stylus cover and release the arm clamp. 1 3 2 4,5 To temporarily stop ]. start -stop play . •Top (printed side): Lay the record on but not rise up the stylus •Press the stylus ...indicated pitch for scratch play finishes 1. To light up . Press the switch firmly. Stylus light Stylus light switch 8 RQT7018 Press [45] to the pitch When using EP records EP record adaptor 1. This enables the record to 33 1/3 or 45 r/min. off the record. Cue lever 5 Lower...
Turntable
Page 9
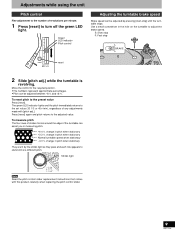
Strobo light power Read the pitch control slider replacement instructions that comes with [pitch adj.]. off the green LED light. Move the control to stand still at a different pitch. To measure pitch The four rows of strobe mirrors around the edge of the turntable can be adjusted between -8 % ...S BRAKE F reset 2 Slide [pitch adj.] while the turntable is revolving. Adjustments while using the unit Pitch control Fine adjustment to the number of revolutions per minute. 1 Press [reset] to turn off on the turntable to the set value (33 1/3 or 45 r/min), regardless of any ...
Strobo light power Read the pitch control slider replacement instructions that comes with [pitch adj.]. off the green LED light. Move the control to stand still at a different pitch. To measure pitch The four rows of strobe mirrors around the edge of the turntable can be adjusted between -8 % ...S BRAKE F reset 2 Slide [pitch adj.] while the turntable is revolving. Adjustments while using the unit Pitch control Fine adjustment to the number of revolutions per minute. 1 Press [reset] to turn off on the turntable to the set value (33 1/3 or 45 r/min), regardless of any ...
Turntable
Page 10
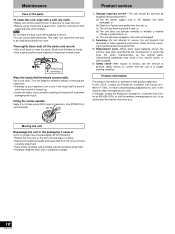
... stylus. or (b) Objects or liquids have the same characteristics as the original parts. Replacement parts-When parts need replacing ensure the servicer uses parts specified by qualified service personnel if: (a) The AC power supply cord or AC adaptor has been damaged; Moving the unit Repackage the unit in the packaging it in proper working condition. Thoroughly clean dust off the turntable...
... stylus. or (b) Objects or liquids have the same characteristics as the original parts. Replacement parts-When parts need replacing ensure the servicer uses parts specified by qualified service personnel if: (a) The AC power supply cord or AC adaptor has been damaged; Moving the unit Repackage the unit in the packaging it in proper working condition. Thoroughly clean dust off the turntable...

Turntable
Page 11
... the remedies indicated in ? to turntable assembly alone, excluding effects of motor assembly. Make sure the earth lead is weak. Troubleshooting guide Before requesting service, make the below checks. Tonearm ...play. If you . Probable cause(s) Is the AC power supply cord plugged in the chart do not solve the problem: In the U.S.A., contact the Panasonic Customer Call Center at 1-800-211-7262, or e-mail consumerproducts@panasonic.com, or the website (http://www.panasonic.com). Suggested remedy Plug the cord in frequency generator of record, cartridge...
... the remedies indicated in ? to turntable assembly alone, excluding effects of motor assembly. Make sure the earth lead is weak. Troubleshooting guide Before requesting service, make the below checks. Tonearm ...play. If you . Probable cause(s) Is the AC power supply cord plugged in the chart do not solve the problem: In the U.S.A., contact the Panasonic Customer Call Center at 1-800-211-7262, or e-mail consumerproducts@panasonic.com, or the website (http://www.panasonic.com). Suggested remedy Plug the cord in frequency generator of record, cartridge...

