

EBG60 User Guide
Page 2
GSM900 or GSM1900. Ensure the battery is designed to operate on GSM networks - This phone is fully charged before use. Important Information Important Information Thank you for packet data connections. i It also supports GPRS for purchasing this Panasonic digital cellular phone.
GSM900 or GSM1900. Ensure the battery is designed to operate on GSM networks - This phone is fully charged before use. Important Information Important Information Thank you for packet data connections. i It also supports GPRS for purchasing this Panasonic digital cellular phone.

EBG60 User Guide
Page 3
...safe to you and your environment, and conforms to observe this apparatus and may result in excess of in an aircraft. Switch off your phone. Failure to any legal requirements regarding the use of approved charging equipment is compatible with the area of use the equipment at a refuelling point... details which is both . The use of a Battery pack other than that recommended by the manufacturer may be dangerous. Use of cellular phones. Users are reminded to extreme temperatures (in safety hazard. A Fast Travel Charger (EB-CAG60US) is advised not to your cellular...
...safe to you and your environment, and conforms to observe this apparatus and may result in excess of in an aircraft. Switch off your phone. Failure to any legal requirements regarding the use of approved charging equipment is compatible with the area of use the equipment at a refuelling point... details which is both . The use of a Battery pack other than that recommended by the manufacturer may be dangerous. Use of cellular phones. Users are reminded to extreme temperatures (in safety hazard. A Fast Travel Charger (EB-CAG60US) is advised not to your cellular...
EBG60 User Guide
Page 4
... regulations. Do not leave the camera facing direct sunlight as pacemakers and hearing aids. If you would any normal phone. http://www.panasonicmobile.com iii Panasonic is not responsible for latest information/standards compliance in your guarantee - this does not affect your mind off . ... that it complies with the specifications covering RF exposure guidelines applicable at all times. Do not hold the phone as camera, game, or browser, battery life will take your statutory rights. This Panasonic mobile phone is switched on continuously for a long time, such as you use .
... regulations. Do not leave the camera facing direct sunlight as pacemakers and hearing aids. If you would any normal phone. http://www.panasonicmobile.com iii Panasonic is not responsible for latest information/standards compliance in your guarantee - this does not affect your mind off . ... that it complies with the specifications covering RF exposure guidelines applicable at all times. Do not hold the phone as camera, game, or browser, battery life will take your statutory rights. This Panasonic mobile phone is switched on continuously for a long time, such as you use .

EBG60 User Guide
Page 5
...iv Always charge the battery in a well ventilated area, not in direct sunlight or a humid, dusty or hot area. Avoid holding the phone close to excessive vibration or shock. Batteries can cause property damage, injury, or burns if terminals are no user serviceable parts. This is outside... this temperature range. If you use the phone for example, metal jewellery, keys, etc.). There are touched with a conductive material (for a long time in temperature over 40°C, the ...
...iv Always charge the battery in a well ventilated area, not in direct sunlight or a humid, dusty or hot area. Avoid holding the phone close to excessive vibration or shock. Batteries can cause property damage, injury, or burns if terminals are no user serviceable parts. This is outside... this temperature range. If you use the phone for example, metal jewellery, keys, etc.). There are touched with a conductive material (for a long time in temperature over 40°C, the ...

EBG60 User Guide
Page 6
Quick Reference Quick Reference < Press centre of the Navigation Key to select or enter the menu options 5173 Direction which the user can move around the display screen using the Navigation Key A Secondary Softkey @ Primary Softkey/Back-Key $ - # C Numeric key pads Press to answer a call or call a dialled number D Press to end a call or return to Idle screen Press and hold to switch the phone on or off E Indicates that a function is SIM Dependent F Indicates that a function is Network Dependent v
Quick Reference Quick Reference < Press centre of the Navigation Key to select or enter the menu options 5173 Direction which the user can move around the display screen using the Navigation Key A Secondary Softkey @ Primary Softkey/Back-Key $ - # C Numeric key pads Press to answer a call or call a dialled number D Press to end a call or return to Idle screen Press and hold to switch the phone on or off E Indicates that a function is SIM Dependent F Indicates that a function is Network Dependent v
EBG60 User Guide
Page 7
Contents Important information i Safety Consideraions ii Care and Maintenance iv Quick Reference v Contents ...vi Getting to Know Your Phone x Location of Controls x Getting Started 1 Fitting the SIM 1 Removing the SIM 2 Fitting the Battery 2 Removing the Battery 3 Charging the ... a Call 9 International Dialing 10 Emergency Calls 10 Ending a Call 10 Answering a Call 11 Caller Identification 11 Volume Control 11 Locking the Phone 12 Using the PIN 13 Setting Ring Volume 14 Setting Silent Ring 14 Phonebook 15 Browsing Phonebook 16 Retrieving a Number 16 Speed Dialing 17 ...
Contents Important information i Safety Consideraions ii Care and Maintenance iv Quick Reference v Contents ...vi Getting to Know Your Phone x Location of Controls x Getting Started 1 Fitting the SIM 1 Removing the SIM 2 Fitting the Battery 2 Removing the Battery 3 Charging the ... a Call 9 International Dialing 10 Emergency Calls 10 Ending a Call 10 Answering a Call 11 Caller Identification 11 Volume Control 11 Locking the Phone 12 Using the PIN 13 Setting Ring Volume 14 Setting Silent Ring 14 Phonebook 15 Browsing Phonebook 16 Retrieving a Number 16 Speed Dialing 17 ...

EBG60 User Guide
Page 8
...29 Composing a Melody 30 Setting the Backlight Time 31 Key Backlight On/Off 31 Contrast 31 Operator Notice 32 Restoring the Default Phone Settings 32 Phone Security 33 Enabling Key Guard 34 Disabling Key Guard 34 Changing the Security Codes 35 Restricting Calls 35 Applications 37 Clock ...37 ...Messages 46 Receiving Text Messages 46 Responding to Text Messages 47 Chat SMS 48 MMS: Setting Up the Phone 49 Creating an MMS Message 50 Managing Message Lists 52 Cell Broadcasts 53 Call Information 54 Recent Numbers 54 Call Duration 55 GPRS Call Duration 56 Call Charges 56 ...
...29 Composing a Melody 30 Setting the Backlight Time 31 Key Backlight On/Off 31 Contrast 31 Operator Notice 32 Restoring the Default Phone Settings 32 Phone Security 33 Enabling Key Guard 34 Disabling Key Guard 34 Changing the Security Codes 35 Restricting Calls 35 Applications 37 Clock ...37 ...Messages 46 Receiving Text Messages 46 Responding to Text Messages 47 Chat SMS 48 MMS: Setting Up the Phone 49 Creating an MMS Message 50 Managing Message Lists 52 Cell Broadcasts 53 Call Information 54 Recent Numbers 54 Call Duration 55 GPRS Call Duration 56 Call Charges 56 ...

EBG60 User Guide
Page 12
... of the equipment contained in the top right corner (˜). 5 Move the SIM retainer back into position. Getting Started Before operating this phone please read the Important Information section - Some services detailed are SIM dependent (E). see Removing the Battery, page 3. 2 Unlock the SIM ...subscription basis. For more information contact your Service Provider. see page i. Fitting the SIM The SIM is inserted into the back of the phone (–). 3 Gently raise the SIM retainer (—). 4 Place the SIM into its recess, ensuring the bevelled corner is properly locked when...
... of the equipment contained in the top right corner (˜). 5 Move the SIM retainer back into position. Getting Started Before operating this phone please read the Important Information section - Some services detailed are SIM dependent (E). see Removing the Battery, page 3. 2 Unlock the SIM ...subscription basis. For more information contact your Service Provider. see page i. Fitting the SIM The SIM is inserted into the back of the phone (–). 3 Gently raise the SIM retainer (—). 4 Place the SIM into its recess, ensuring the bevelled corner is properly locked when...

EBG60 User Guide
Page 13
Removing the SIM 1 Unlock the SIM retainer by gently pushing towards the top of the phone (™). 2 1 3 4 2 Return the SIM retainer to its flat position (™) and ensure it is correctly locked (š) before refitting the battery and battery cover. 3 4 2 5 1 Fitting ...the Battery 1 Insert the battery bottom first (–) so that the connectors touch those on the phone. 2 Press gently downwards and simultaneously lower the top of the battery into place (—). 3 Replace cover on the...
Removing the SIM 1 Unlock the SIM retainer by gently pushing towards the top of the phone (™). 2 1 3 4 2 Return the SIM retainer to its flat position (™) and ensure it is correctly locked (š) before refitting the battery and battery cover. 3 4 2 5 1 Fitting ...the Battery 1 Insert the battery bottom first (–) so that the connectors touch those on the phone. 2 Press gently downwards and simultaneously lower the top of the battery into place (—). 3 Replace cover on the...

EBG60 User Guide
Page 14
Removing the Battery Ensure the phone is switched off and the charger is disconnected from the phone before removing the battery. 1 Press top part of the cover (–) and remove (—). 2 Press the battery gently downwards (˜) and pull up from the top (™). 2 1 4 3 3
Removing the Battery Ensure the phone is switched off and the charger is disconnected from the phone before removing the battery. 1 Press top part of the cover (–) and remove (—). 2 Press the battery gently downwards (˜) and pull up from the top (™). 2 1 4 3 3

EBG60 User Guide
Page 15
Note: DO NOT force the connector as this may damage the phone and/ or the charger. Disconnecting the Fast Travel Charger When charging is to left during charging. Plug the charger into the base of the phone. The battery level indicator will scroll right to the front of the phone, ensuring the arrow on the connector is complete, unplug charger from wall outlet and disconnect the charger. 4 Insert the connector into a standard wall outlet. Charging the Battery Connecting the Fast Travel Charger The battery must be fitted in the phone before the charger is connected.
Note: DO NOT force the connector as this may damage the phone and/ or the charger. Disconnecting the Fast Travel Charger When charging is to left during charging. Plug the charger into the base of the phone. The battery level indicator will scroll right to the front of the phone, ensuring the arrow on the connector is complete, unplug charger from wall outlet and disconnect the charger. 4 Insert the connector into a standard wall outlet. Charging the Battery Connecting the Fast Travel Charger The battery must be fitted in the phone before the charger is connected.

EBG60 User Guide
Page 16
... recharge the battery. Fitting Image-In Card Customized image cards may be made and received while the phone is fully discharged between charges to the rear of Battery Level Indicator Phone on Phone off after the warning tone. The power will sound. v 1 2 3 5 Calls can be... fitted to maintain optimum battery life and performance. If this occurs during conversation, finish your phone. See Charging the Battery, page 4. Operation of the phone, behind the transparent rear cover. An Image-In template is red. Low Battery Warning When the battery power is low...
... recharge the battery. Fitting Image-In Card Customized image cards may be made and received while the phone is fully discharged between charges to the rear of Battery Level Indicator Phone on Phone off after the warning tone. The power will sound. v 1 2 3 5 Calls can be... fitted to maintain optimum battery life and performance. If this occurs during conversation, finish your phone. See Charging the Battery, page 4. Operation of the phone, behind the transparent rear cover. An Image-In template is red. Low Battery Warning When the battery power is low...
EBG60 User Guide
Page 17
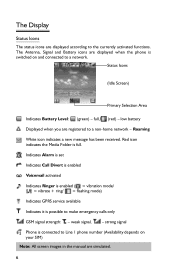
... is full. The Antenna, Signal and Battery icons are simulated. 6 The Display Status Icons The status icons are registered to a non-home network - strong signal Phone is switched on your SIM) Note: All screen images in the manual are displayed when the...
... is full. The Antenna, Signal and Battery icons are simulated. 6 The Display Status Icons The status icons are registered to a non-home network - strong signal Phone is switched on your SIM) Note: All screen images in the manual are displayed when the...
EBG60 User Guide
Page 18
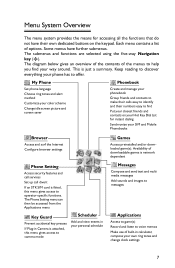
... functions. Some menus have their numbers easy to find your SIM and Mobile Phonebooks Browser Access and surf the Internet Configure browser settings Phone Setting Access security features and call services Set up call divert If an STK SIM card is fitted, this menu gives access to ...or downloaded game(s). The submenus and functions are selected using the five-way Navigation key (0). Each menu contains a list of built-in your phone has to offer. Availability of downloadable games is network dependent Messages Compose and send text and multi media messages Add sounds and images to ...
... functions. Some menus have their numbers easy to find your SIM and Mobile Phonebooks Browser Access and surf the Internet Configure browser settings Phone Setting Access security features and call services Set up call divert If an STK SIM card is fitted, this menu gives access to ...or downloaded game(s). The submenus and functions are selected using the five-way Navigation key (0). Each menu contains a list of built-in your phone has to offer. Availability of downloadable games is network dependent Messages Compose and send text and multi media messages Add sounds and images to ...

EBG60 User Guide
Page 19
...select Activate 4 Press < to activate the profile In detail: 1 From the Idle screen, press < to display the main menu 2 Use 0 to highlight the My Phone menu 3 Press < to enter the menu 4 Use 5 once to highlight the Sound Settings menu and press < to enter 5 Use 5 to highlight the mode ... press Sound Settings. Press < to activate your chosen mode Following some operations the display will automatically clear after three seconds. If this is fitted, Phone Setting menu can be accessed from the list. Selecting a Function Use < and 0 to the idle screen. To change Sound Settings (to enter ...
...select Activate 4 Press < to activate the profile In detail: 1 From the Idle screen, press < to display the main menu 2 Use 0 to highlight the My Phone menu 3 Press < to enter the menu 4 Use 5 once to highlight the Sound Settings menu and press < to enter 5 Use 5 to highlight the mode ... press Sound Settings. Press < to activate your chosen mode Following some operations the display will automatically clear after three seconds. If this is fitted, Phone Setting menu can be accessed from the list. Selecting a Function Use < and 0 to the idle screen. To change Sound Settings (to enter ...

EBG60 User Guide
Page 20
..., including: ➪ How to change ring volume Switching On & Off To turn the phone on a greeting will be displayed and then the phone will go into Idle. Making a Call Ensure that the phone is switched on, the network operator logo is displayed and the signal strength meter shows ( ) network coverage is switched on... or off ➪ How to make and end a call ➪ How to answer a call ➪ How to change earpiece volume ➪ How to lock the phone ➪ How to protect the phone using a PIN ➪ How to switch on and off , press and hold D.
..., including: ➪ How to change ring volume Switching On & Off To turn the phone on a greeting will be displayed and then the phone will go into Idle. Making a Call Ensure that the phone is switched on, the network operator logo is displayed and the signal strength meter shows ( ) network coverage is switched on... or off ➪ How to make and end a call ➪ How to answer a call ➪ How to change earpiece volume ➪ How to lock the phone ➪ How to protect the phone using a PIN ➪ How to switch on and off , press and hold D.

EBG60 User Guide
Page 21
...D 10 Ending a Call To end a call may be made even when SIM is not fitted to the phone, however, the antenna symbol ( ) must be entered, followed by the area code and phone number. 1 From Idle press and hold # until "+" is country or network operator dependent. Note: Making ...Emergency calls without a SIM installed is displayed 2 Enter country/region code (e.g. 44 for the UK; 81 for Japan) 3 Enter area code and phone number 4 Press C Note: Many countries/regions include an initial "0" in most cases, be omitted when dialing international numbers. If you have difficulties making...
...D 10 Ending a Call To end a call may be made even when SIM is not fitted to the phone, however, the antenna symbol ( ) must be entered, followed by the area code and phone number. 1 From Idle press and hold # until "+" is country or network operator dependent. Note: Making ...Emergency calls without a SIM installed is displayed 2 Enter country/region code (e.g. 44 for the UK; 81 for Japan) 3 Enter area code and phone number 4 Press C Note: Many countries/regions include an initial "0" in most cases, be omitted when dialing international numbers. If you have difficulties making...

EBG60 User Guide
Page 22
The caller's phone number, and name if stored in the same manner. 11 Press any key except D to answer a call or Press D to reject a call Note: If a call . ... Control The volume level may not always be displayed. Press any key to clear the display. Note: Caller Identification may be displayed during a call , the phone must be switched on and the signal strength meter ( ) must be displayed. Answering a Call To receive a call : Use 5 to decrease the volume...
The caller's phone number, and name if stored in the same manner. 11 Press any key except D to answer a call or Press D to reject a call Note: If a call . ... Control The volume level may not always be displayed. Press any key to clear the display. Note: Caller Identification may be displayed during a call , the phone must be switched on and the signal strength meter ( ) must be displayed. Answering a Call To receive a call : Use 5 to decrease the volume...

EBG60 User Guide
Page 23
...< to 0000. 1 From Idle press < and select (Applications >) Phone Setting > Security > Phone Lock. Press < to unlock the phone. Locking the Phone When the phone is locked, the phone lock code must be unlocked before the phone lock can be replaced by OK. Press < 2 From the submenu ... code to a 4-digit number of your own choice. 1 From Idle press < and select (Applications >) Phone Setting > Security > Phone Lock. Disabling Phone Lock The phone must be entered each time the phone is switched on to complete the change your Lock Code. Press < 2 From the submenu select Status and...
...< to 0000. 1 From Idle press < and select (Applications >) Phone Setting > Security > Phone Lock. Press < to unlock the phone. Locking the Phone When the phone is locked, the phone lock code must be unlocked before the phone lock can be replaced by OK. Press < 2 From the submenu ... code to a 4-digit number of your own choice. 1 From Idle press < and select (Applications >) Phone Setting > Security > Phone Lock. Disabling Phone Lock The phone must be entered each time the phone is switched on to complete the change your Lock Code. Press < 2 From the submenu select Status and...
EBG60 User Guide
Page 24
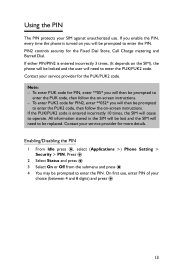
If either PIN/PIN2 is entered incorrectly 3 times, (It depends on the SIM), the phone will then be prompted to enter the PUK code, then follow the on-screen instructions. To enter PUK code for PIN, enter **05* you will ... and press < 4 You may be prompted to enter the PUK/PUK2 code. Enabling/Disabling the PIN 1 From Idle press ) Phone Setting > Security > PIN. If you enable the PIN, every time the phone is entered incorrectly 10 times, the SIM will then be prompted to enter the PUK2 code, then follow the on...
If either PIN/PIN2 is entered incorrectly 3 times, (It depends on the SIM), the phone will then be prompted to enter the PUK code, then follow the on-screen instructions. To enter PUK code for PIN, enter **05* you will ... and press < 4 You may be prompted to enter the PUK/PUK2 code. Enabling/Disabling the PIN 1 From Idle press ) Phone Setting > Security > PIN. If you enable the PIN, every time the phone is entered incorrectly 10 times, the SIM will then be prompted to enter the PUK2 code, then follow the on...

