

CT24SX11E User Guide
Page 2
... or shock hazard, do not remove cover or back. WARNING RISK OF ELECTRIC SHOCK DO NOT OPEN WARNING: To reduce the risk of electric shock to persons. Refer servicing to use only identical replacement parts in the papers with arrow head within a triangle is intended to tell the user that important operating and servicing instructions are a risk of electric...
... or shock hazard, do not remove cover or back. WARNING RISK OF ELECTRIC SHOCK DO NOT OPEN WARNING: To reduce the risk of electric shock to persons. Refer servicing to use only identical replacement parts in the papers with arrow head within a triangle is intended to tell the user that important operating and servicing instructions are a risk of electric...
CT24SX11E User Guide
Page 3
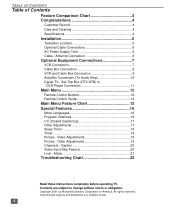
... Input Skip Feature 20 Lock - Video Adjustments 19 Picture - Set-Top Box (DTV-STB) or DVD Player Connection 11 Main Menu 12 Remote Control Buttons 12 Remote Control Guide 12 Main Menu Feature Chart 13 Special Features 16 Menu Languages 16 Program Channels 16 CC (Closed Captioning 17 Other Adjustments 17 Sleep Timer 18 Timer 18 Picture - TABLE OF CONTENTS Table of Contents Feature Comparison Chart 3 Congratulations 4 Customer Record 4 Care and Cleaning 4 Specifications 4 Installation 5 Television Location 5 Optional Cable Connections 6 AC Power Supply Cord 6 Cable...
... Input Skip Feature 20 Lock - Video Adjustments 19 Picture - Set-Top Box (DTV-STB) or DVD Player Connection 11 Main Menu 12 Remote Control Buttons 12 Remote Control Guide 12 Main Menu Feature Chart 13 Special Features 16 Menu Languages 16 Program Channels 16 CC (Closed Captioning 17 Other Adjustments 17 Sleep Timer 18 Timer 18 Picture - TABLE OF CONTENTS Table of Contents Feature Comparison Chart 3 Congratulations 4 Customer Record 4 Care and Cleaning 4 Specifications 4 Installation 5 Television Location 5 Optional Cable Connections 6 AC Power Supply Cord 6 Cable...

CT24SX11E User Guide
Page 4
... Comparison Chart CT-24SX11 CT-24SX11U CT-F2511 CT-F2511X CT-F2521L MODELS FEATURES MENU LANGUAGE ENG/SPAN/FR VIDEO INPUT PICTURE MEMORY V-CHIP CAPABILITY 75 OHM INPUT CHANNEL INFO BANNER VIDEO INPUT SKIP VIDEO NORM AUDIO NORM STEREO AI SOUND BASS/BALANCE/TREBLE SURROUND BBE A/V IN (REAR/FRONT) AUDIO OUT S-VHS INPUT COMPONENT INPUT HEADPHONE JACK rrrrr rrrrr rrrrr rrrrr rrrrr rrrrr rrrrr rrrrr rrrrr rrrrr rrrrr rrrrr...
... Comparison Chart CT-24SX11 CT-24SX11U CT-F2511 CT-F2511X CT-F2521L MODELS FEATURES MENU LANGUAGE ENG/SPAN/FR VIDEO INPUT PICTURE MEMORY V-CHIP CAPABILITY 75 OHM INPUT CHANNEL INFO BANNER VIDEO INPUT SKIP VIDEO NORM AUDIO NORM STEREO AI SOUND BASS/BALANCE/TREBLE SURROUND BBE A/V IN (REAR/FRONT) AUDIO OUT S-VHS INPUT COMPONENT INPUT HEADPHONE JACK rrrrr rrrrr rrrrr rrrrr rrrrr rrrrr rrrrr rrrrr rrrrr rrrrr rrrrr rrrrr...
CT24SX11E User Guide
Page 5
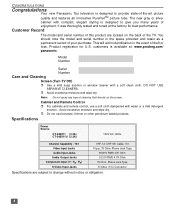
... PureFlatTM picture tube. Cable-113 1Vp-p, 75 Ohm, Phono Jack Type 500mV RMS 47K Ohm 0-2.0V RMS 4.7K Ohm 75 Ohm, Phono Jack Type S-Video (Y-C) Connector Specifications are located on the screen. Model Number Serial Number Care and Cleaning Screen (Turn TV Off) r Use a mild soap solution or window cleaner with water or a mild detergent solution. Cabinet and Remote Control r For cabinets and remote control, use benzene, thinner or other petroleum based products...
... PureFlatTM picture tube. Cable-113 1Vp-p, 75 Ohm, Phono Jack Type 500mV RMS 47K Ohm 0-2.0V RMS 4.7K Ohm 75 Ohm, Phono Jack Type S-Video (Y-C) Connector Specifications are located on the screen. Model Number Serial Number Care and Cleaning Screen (Turn TV Off) r Use a mild soap solution or window cleaner with water or a mild detergent solution. Cabinet and Remote Control r For cabinets and remote control, use benzene, thinner or other petroleum based products...
CT24SX11E User Guide
Page 7
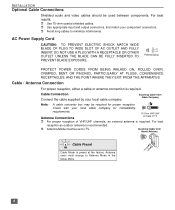
... THE POINT WHERE THEY EXIT FROM THE APPARATUS. r Antenna Mode must change to minimize interference. r Avoid long cables to Antenna Mode in the Setup Menu. 6 Check with your component connectors. INSTALLATION Optional Cable Connections Shielded audio and video cables should be set to TV. Cable Connection Connect the cable supplied by your local cable company. AC Power Supply Cord CAUTION: TO PREVENT ELECTRIC SHOCK MATCH WIDE BLADE OF PLUG TO WIDE SLOT OF AC OUTLET AND FULLY...
... THE POINT WHERE THEY EXIT FROM THE APPARATUS. r Antenna Mode must change to minimize interference. r Avoid long cables to Antenna Mode in the Setup Menu. 6 Check with your component connectors. INSTALLATION Optional Cable Connections Shielded audio and video cables should be set to TV. Cable Connection Connect the cable supplied by your local cable company. AC Power Supply Cord CAUTION: TO PREVENT ELECTRIC SHOCK MATCH WIDE BLADE OF PLUG TO WIDE SLOT OF AC OUTLET AND FULLY...
CT24SX11E User Guide
Page 8
... Jack used for more information. Select the Video mode by observing the following steps: A. CONNECTIONS ON BACK OF TV CABLES NOT SUPPLIED VCR AUDIO INPUT 1 COMPONENT R L VIDEO INPUT ANT PR PB Y/VIDEO INPUT 2 Use L either the S-VideoTOoAr UVDidIOeo connecAtiMonP. Reduce the brightness/contrast setting to front or rear Audio/Video input jacks. 2. The on-screen label will display Component or Video 1 depending on which source is viewable on normal programs in the form of time. Operate optional equipment as instructed in actual use...
... Jack used for more information. Select the Video mode by observing the following steps: A. CONNECTIONS ON BACK OF TV CABLES NOT SUPPLIED VCR AUDIO INPUT 1 COMPONENT R L VIDEO INPUT ANT PR PB Y/VIDEO INPUT 2 Use L either the S-VideoTOoAr UVDidIOeo connecAtiMonP. Reduce the brightness/contrast setting to front or rear Audio/Video input jacks. 2. The on-screen label will display Component or Video 1 depending on which source is viewable on normal programs in the form of time. Operate optional equipment as instructed in actual use...
CT24SX11E User Guide
Page 9
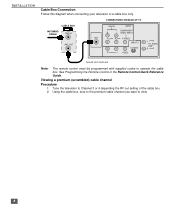
... Guide. INSTALLATION Cable Box Connection Follow this diagram when connecting your television to view. 8 Viewing a premium (scrambled) cable channel Procedure 1. Using the cable box, tune to the premium cable channel you want to a cable box only. CONNECTIONS ON BACK OF TV CABLE BOX INCOMING CABLE ANT IN ANT OUT ANT AUDIO INPUT 1 COMPONENT R L VIDEO INPUT PR PB Y/VIDEO INPUT 2 S-VIDEO R L VIDEO L TO AUDIO AMP R CABLES NOT SUPPLIED Note: The remote control must be programmed with supplied codes to Channel 3 or 4 depending the RF out setting of the cable box...
... Guide. INSTALLATION Cable Box Connection Follow this diagram when connecting your television to view. 8 Viewing a premium (scrambled) cable channel Procedure 1. Using the cable box, tune to the premium cable channel you want to a cable box only. CONNECTIONS ON BACK OF TV CABLE BOX INCOMING CABLE ANT IN ANT OUT ANT AUDIO INPUT 1 COMPONENT R L VIDEO INPUT PR PB Y/VIDEO INPUT 2 S-VIDEO R L VIDEO L TO AUDIO AMP R CABLES NOT SUPPLIED Note: The remote control must be programmed with supplied codes to Channel 3 or 4 depending the RF out setting of the cable box...
CT24SX11E User Guide
Page 10
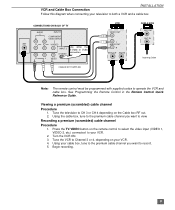
S-VIDEO R R L VIDEO VCR VIDEO OUT L AUDIO OUT R ANT OUT ANT IN CABLE BOX ANT OUT ANT IN Incoming Cable CABLES NOT SUPPLIED Note: The remote control must be programmed with supplied codes to operate the VCR and cable box. Tune the television to CH 3 or CH 4 depending on your VCR. 2. Viewing a premium (scrambled) cable channel Procedure 1. Press the TV/VIDEO button on the remote control to select the video input (VIDEO 1, VIDEO 2, etc.) connected to your VCR. 4. VideoTOoAr UVDiIdOeo connecAtiMonP. Tune the VCR to Channel 3 or 4, depending on the...
S-VIDEO R R L VIDEO VCR VIDEO OUT L AUDIO OUT R ANT OUT ANT IN CABLE BOX ANT OUT ANT IN Incoming Cable CABLES NOT SUPPLIED Note: The remote control must be programmed with supplied codes to operate the VCR and cable box. Tune the television to CH 3 or CH 4 depending on your VCR. 2. Viewing a premium (scrambled) cable channel Procedure 1. Press the TV/VIDEO button on the remote control to select the video input (VIDEO 1, VIDEO 2, etc.) connected to your VCR. 4. VideoTOoAr UVDiIdOeo connecAtiMonP. Tune the VCR to Channel 3 or 4, depending on the...

CT24SX11E User Guide
Page 11
... AUDIO AMP terminals cannot be connected directly to minimum. 3. Set amplifier volume to external speakers. Select TV SPEAKERS OF & VAO from the TV. Volume, mute, bass, treble and balance are now controlled from AUDIO menu. 6. INSTALLATION Amplifier Connection (To Audio Amp) Connect to match the TV. 5. Note: In OFF & FAO the volume is controlled by the external amplifier. Select TV SPEAKERS ON from AUDIO menu. 2. CONNECTIONS ON BACK OF TV CABLES NOT SUPPLIED AUDIO INPUT 1 External Amplifier COMPONENT R L VIDEO INPUT ANT PR PB Y/VIDEO INPUT 2 L TO AUDIO...
... AUDIO AMP terminals cannot be connected directly to minimum. 3. Set amplifier volume to external speakers. Select TV SPEAKERS OF & VAO from the TV. Volume, mute, bass, treble and balance are now controlled from AUDIO menu. 6. INSTALLATION Amplifier Connection (To Audio Amp) Connect to match the TV. 5. Note: In OFF & FAO the volume is controlled by the external amplifier. Select TV SPEAKERS ON from AUDIO menu. 2. CONNECTIONS ON BACK OF TV CABLES NOT SUPPLIED AUDIO INPUT 1 External Amplifier COMPONENT R L VIDEO INPUT ANT PR PB Y/VIDEO INPUT 2 L TO AUDIO...
CT24SX11E User Guide
Page 12
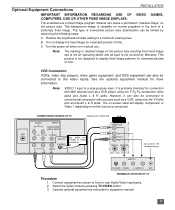
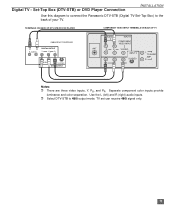
... 480i signal only. 11 Separate component color inputs provide luminance and color separation. TERMINALS ON BACK OF DTV-STB OR DVD PLAYER COMPONENT VIDEO INPUT TERMINALS ON BACK OF TV CABLES NOT SUPPLIED R-AUDIO-L DIGITAL OUTPUT Y PB PR R-AUDIO-L VIDE O S-VIDEO NTSC OUTPUT ANT AUDIO INPUT 1 COMPONENT R L VIDEO INPUT PR PB Y/VIDEO INPUT 2 S-VIDEO R L VIDEO L TO AUDIO AMP R Notes: r There are three video inputs, Y, PB, and PR. Set-Top Box (DTV-STB) or DVD Player Connection INSTALLATION Use this diagram to connect the Panasonic DTV-STB (Digital TV-Set-Top Box) to...
... 480i signal only. 11 Separate component color inputs provide luminance and color separation. TERMINALS ON BACK OF DTV-STB OR DVD PLAYER COMPONENT VIDEO INPUT TERMINALS ON BACK OF TV CABLES NOT SUPPLIED R-AUDIO-L DIGITAL OUTPUT Y PB PR R-AUDIO-L VIDE O S-VIDEO NTSC OUTPUT ANT AUDIO INPUT 1 COMPONENT R L VIDEO INPUT PR PB Y/VIDEO INPUT 2 S-VIDEO R L VIDEO L TO AUDIO AMP R Notes: r There are three video inputs, Y, PB, and PR. Set-Top Box (DTV-STB) or DVD Player Connection INSTALLATION Use this diagram to connect the Panasonic DTV-STB (Digital TV-Set-Top Box) to...
CT24SX11E User Guide
Page 14
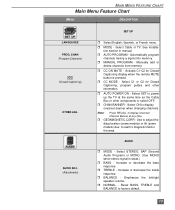
... Closed Captioning, program guides and other components or select OFF. Select SET to power up the TV at any time. Note: Press RECALL to factory default. 13 Use to adjust the discoloration (some models) or tilt (some models) due to display onscreen banner when changing channels. r MODE - Automatically program channels having a signal into memory. Select C1 or C2 for Closed Captioning display when the remote MUTE button is weak.) r BASS - AUDIO r MODE - Increase or decrease the treble response. Emphasize the left/right speaker volume...
... Closed Captioning, program guides and other components or select OFF. Select SET to power up the TV at any time. Note: Press RECALL to factory default. 13 Use to adjust the discoloration (some models) or tilt (some models) due to display onscreen banner when changing channels. r MODE - Automatically program channels having a signal into memory. Select C1 or C2 for Closed Captioning display when the remote MUTE button is weak.) r BASS - AUDIO r MODE - Increase or decrease the treble response. Emphasize the left/right speaker volume...

CT24SX11E User Guide
Page 15
... selected days. (Clock must be set to provide outstanding natural sound r MODE - r OFF & FIXED AUDIO OUT - r TINT - Adjust white balance to stereo. audio adjustable by the external amplifier. Enhances audio response when listening to COOL (blue), WARM (red) or NORMAL. 14 r ON - PICTURE VIDEO ADJ. (Adjustments) OTHER ADJ. (Adjustments) r COLOR - TV speakers operate normally. TIMER CLOCK SET SLEEP TIMER r Set the time and the day of musical passages to use Timer features). r NORMAL- Adjust desired color intensity. TV speakers off - r Set timer to factory default...
... selected days. (Clock must be set to provide outstanding natural sound r MODE - r OFF & FIXED AUDIO OUT - r TINT - Adjust white balance to stereo. audio adjustable by the external amplifier. Enhances audio response when listening to COOL (blue), WARM (red) or NORMAL. 14 r ON - PICTURE VIDEO ADJ. (Adjustments) OTHER ADJ. (Adjustments) r COLOR - TV speakers operate normally. TIMER CLOCK SET SLEEP TIMER r Set the time and the day of musical passages to use Timer features). r NORMAL- Adjust desired color intensity. TV speakers off - r Set timer to factory default...
CT24SX11E User Guide
Page 16
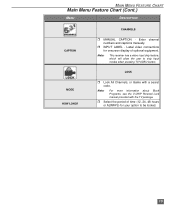
... channel numbers and captions manually. Label video connections for your option to skip Input modes when pressing TV/VIDEO button. LOCK r Lock All Channels, or Game with the TV package. Note: This receiver has a video input skip feature, which will allow the user to be locked. 15 CHANNELS r MANUAL CAPTION - r INPUT LABEL - Note: For more information about Block Programs, see the V-CHIP Parental Lock manual provided with a secret code. MAIN MENU FEATURE CHART Main Menu Feature Chart (Cont.) MENU DESCRIPTION CAPTION MODE HOW LONG? r Select...
... channel numbers and captions manually. Label video connections for your option to skip Input modes when pressing TV/VIDEO button. LOCK r Lock All Channels, or Game with the TV package. Note: This receiver has a video input skip feature, which will allow the user to be locked. 15 CHANNELS r MANUAL CAPTION - r INPUT LABEL - Note: For more information about Block Programs, see the V-CHIP Parental Lock manual provided with a secret code. MAIN MENU FEATURE CHART Main Menu Feature Chart (Cont.) MENU DESCRIPTION CAPTION MODE HOW LONG? r Select...
CT24SX11E User Guide
Page 17
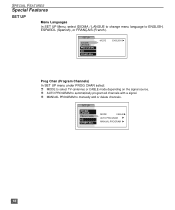
MODE K CABLE K AUTO PROGRAM K MANUAL PROGRAM 16 SETUP IDIOMA/ LANGUE PROG CHAN CC OTHER ADJ. MODE K ENGLISH Prog Chan (Program Channels) In SET UP menu under PROG CHAN select: r MODE to manually add or delete channels. SET UP IDIOMA/ LANGUE PROG CHAN CC OTHER ADJ. r MANUAL PROGRAM to select TV (antenna) or CABLE mode depending on the signal source. SPECIAL FEATURES Special Features SET UP Menu Languages In SET UP Menu, select IDIOMA / LANGUE to change menu language to automatically program all channels with a signal. r AUTO PROGRAM to ENGLISH, ESPA...
MODE K CABLE K AUTO PROGRAM K MANUAL PROGRAM 16 SETUP IDIOMA/ LANGUE PROG CHAN CC OTHER ADJ. MODE K ENGLISH Prog Chan (Program Channels) In SET UP menu under PROG CHAN select: r MODE to manually add or delete channels. SET UP IDIOMA/ LANGUE PROG CHAN CC OTHER ADJ. r MANUAL PROGRAM to select TV (antenna) or CABLE mode depending on the signal source. SPECIAL FEATURES Special Features SET UP Menu Languages In SET UP Menu, select IDIOMA / LANGUE to change menu language to automatically program all channels with a signal. r AUTO PROGRAM to ENGLISH, ESPA...
CT24SX11E User Guide
Page 18
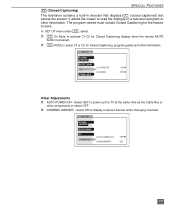
... Closed Captioning for Closed Captioning display when the remote MUTE button is pressed. SETUP IDIOMA/ LANGUE PROG CHAN CC OTHER ADJ. r CHANNEL BANNER - SET UP IDIOMA/ LANGUE PROG CHAN CC OTHER ADJ. Select ON to select C1 or C2 for Closed Captioning, program guides and other information. AUTO POWER ON CHAN BANNER OFF K ON 17 Select SET to power up the TV at the same time as the Cable Box or other information. In SET UP menu...
... Closed Captioning for Closed Captioning display when the remote MUTE button is pressed. SETUP IDIOMA/ LANGUE PROG CHAN CC OTHER ADJ. r CHANNEL BANNER - SET UP IDIOMA/ LANGUE PROG CHAN CC OTHER ADJ. Select ON to select C1 or C2 for Closed Captioning, program guides and other information. AUTO POWER ON CHAN BANNER OFF K ON 17 Select SET to power up the TV at the same time as the Cable Box or other information. In SET UP menu...
CT24SX11E User Guide
Page 19
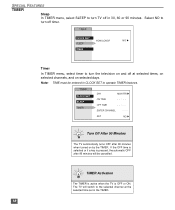
... K Timer In TIMER menu, select timer to turn the television on and off at the selected time set in CLOCK SET to operate TIMER features. NO K Turn Off After 90 Minutes The TV automatically turns OFF after 90 minutes will switch to turn off in 30, 60 or 90 minutes. TIMER Activation The TIMER is active when the TV is pressed, the automatic OFF after 90 minutes when turned on selected days. TIMER CLOCK SET SLEEP TIMER...
... K Timer In TIMER menu, select timer to turn the television on and off at the selected time set in CLOCK SET to operate TIMER features. NO K Turn Off After 90 Minutes The TV automatically turns OFF after 90 minutes will switch to turn off in 30, 60 or 90 minutes. TIMER Activation The TIMER is active when the TV is pressed, the automatic OFF after 90 minutes when turned on selected days. TIMER CLOCK SET SLEEP TIMER...

CT24SX11E User Guide
Page 20
...19 r BRIGHTNESS - Adjust white areas of outline detail. r NORMAL - OTHER ADJ. r TINT - Note: Picture adjustments can be individually set for crisp detail. select: r COLOR TEMP to increase and decrease WARM (red) and COOL (blue) colors to factory default settings. Reset all picture adjustments to suit personal preferences. Adjust clarity of picture. Adjust desired color intensity. PICTURE VIDEO ADJ. PICTURE SPECIAL FEATURES Video Adjustments In Picture menu under OTHER ADJ. Adjust dark areas for each video input mode. PICTURE VIDEO ADJ. select: r COLOR -
...19 r BRIGHTNESS - Adjust white areas of outline detail. r NORMAL - OTHER ADJ. r TINT - Note: Picture adjustments can be individually set for crisp detail. select: r COLOR TEMP to increase and decrease WARM (red) and COOL (blue) colors to factory default settings. Reset all picture adjustments to suit personal preferences. Adjust clarity of picture. Adjust desired color intensity. PICTURE VIDEO ADJ. PICTURE SPECIAL FEATURES Video Adjustments In Picture menu under OTHER ADJ. Adjust dark areas for each video input mode. PICTURE VIDEO ADJ. select: r COLOR -
CT24SX11E User Guide
Page 21
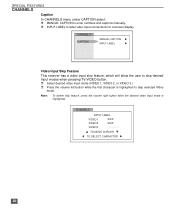
... VIDEO 3.) r Press the volume left button while the first character is highlighted. Note: To delete skip feature, press the volume right button while the desired video input mode is highlighted to label video input connections for onscreen display. CHANNELS CAPTION K MANUAL CAPTION INPUT LABEL K Video Input Skip Feature This receiver has a video input skip feature, which will allow the user to enter numbers and captions manually. SPECIAL FEATURES CHANNELS Caption In CHANNELS menu under CAPTION select: r MANUAL CAPTION to skip desired Input modes when pressing TV/VIDEO button...
... VIDEO 3.) r Press the volume left button while the first character is highlighted. Note: To delete skip feature, press the volume right button while the desired video input mode is highlighted to label video input connections for onscreen display. CHANNELS CAPTION K MANUAL CAPTION INPUT LABEL K Video Input Skip Feature This receiver has a video input skip feature, which will allow the user to enter numbers and captions manually. SPECIAL FEATURES CHANNELS Caption In CHANNELS menu under CAPTION select: r MANUAL CAPTION to skip desired Input modes when pressing TV/VIDEO button...
CT24SX11E User Guide
Page 22
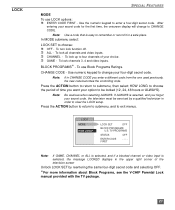
... code, the television must be locked (12, 24, 48 hours or ALWAYS). LOCK SET OFF BLOCK PROGRAMS: U.S. LOCK SPECIAL FEATURES MODE To use Block Programs Ratings. r ALL - To lock up to four channels of your secret code for the first time, the onscreen display will change your option to be serviced by reentering the same four-digit secret code and selecting OFF. For more information about Block Programs, see the V-CHIP Parental Lock manual...
... code, the television must be locked (12, 24, 48 hours or ALWAYS). LOCK SET OFF BLOCK PROGRAMS: U.S. LOCK SPECIAL FEATURES MODE To use Block Programs Ratings. r ALL - To lock up to four channels of your secret code for the first time, the onscreen display will change your option to be serviced by reentering the same four-digit secret code and selecting OFF. For more information about Block Programs, see the V-CHIP Parental Lock manual...
CT24SX11E User Guide
Page 23
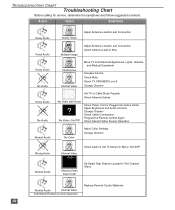
... Video / No PIP Set TV or Cable Mode Properly Check Antenna Cables Check Power Cord is Plugged into Active Outlet Adjust Brightness and Audio Controls Change Channel Check Cable Connections Program the Remote Control Again Check Second Video Source Operation No Color Adjust Color Settings Change Channel Wrong Audio Normal Audio Normal Video VIDEO 1 Missing Video Input mode Check Audio Is Set To Stereo Or Mono, Not SAP De-Select Skip Feature Located In The Channel Menu Normal Audio Normal Video Intermittent Remote Control Operation Replace Remote Control Batteries 22 AUDIO VIDEO...
... Video / No PIP Set TV or Cable Mode Properly Check Antenna Cables Check Power Cord is Plugged into Active Outlet Adjust Brightness and Audio Controls Change Channel Check Cable Connections Program the Remote Control Again Check Second Video Source Operation No Color Adjust Color Settings Change Channel Wrong Audio Normal Audio Normal Video VIDEO 1 Missing Video Input mode Check Audio Is Set To Stereo Or Mono, Not SAP De-Select Skip Feature Located In The Channel Menu Normal Audio Normal Video Intermittent Remote Control Operation Replace Remote Control Batteries 22 AUDIO VIDEO...


