
CFP1P1 User Guide
Page 1
... 16 LCD (Touchscreen 20 Backlight Setting 22 Entering Information 23 Program Buttons 28 Battery Power 29 SD Memory Card/MultiMedia Card 31 Panasonic Backup 32 Pocket Internet Explorer 35 Connecting to Your Computer 36 Customizing the Computer 40 Troubleshooting Dealing with Problems 43 Appendix For Effective Use 47 Specifications 48 LIMITED USE LICENSE AGREEMENT 50 Please read this instructions manual carefully before using this product and save this manual for future use. ® Handheld Computer OPERATING INSTRUCTIONS Model No...
... 16 LCD (Touchscreen 20 Backlight Setting 22 Entering Information 23 Program Buttons 28 Battery Power 29 SD Memory Card/MultiMedia Card 31 Panasonic Backup 32 Pocket Internet Explorer 35 Connecting to Your Computer 36 Customizing the Computer 40 Troubleshooting Dealing with Problems 43 Appendix For Effective Use 47 Specifications 48 LIMITED USE LICENSE AGREEMENT 50 Please read this instructions manual carefully before using this product and save this manual for future use. ® Handheld Computer OPERATING INSTRUCTIONS Model No...
CFP1P1 User Guide
Page 8
... a connection cannot be replaced with cables attached, and do this manual, carefully read the instruction manuals for the peripheral devices being used. Only use . Connect the devices properly, paying close attention to the condition and position of pins, etc.). If the connector has holding screws, fasten the screws firmly. Precautions About High Temperature Mode This computer has a high temperature mode function that conform to the computer's specifications...
... a connection cannot be replaced with cables attached, and do this manual, carefully read the instruction manuals for the peripheral devices being used. Only use . Connect the devices properly, paying close attention to the condition and position of pins, etc.). If the connector has holding screws, fasten the screws firmly. Precautions About High Temperature Mode This computer has a high temperature mode function that conform to the computer's specifications...
CFP1P1 User Guide
Page 10
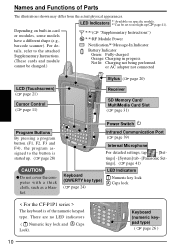
Power Switch Infrared Communication Port ( page 39) Internal Microphone For detailed settings, tap - [Settings] - [System] tab - [Panasonic Settings]. ( page 41) Keyboard (QWERTY key type) ( page 24) LED Indicators Numeric key lock Caps lock < For the CF-P1P1 series > The keyboard is started up ( page 41). Keyboard (numeric keypad type) ( page 26 ) 10 Depending on specific models. *2 Can be changed.) *1*2 ( "Supplementary Instructions") *1*2 RF Module Power Notification/*1 Message-In Indicator Battery Indicator Green: Fully-charged Orange: Charging in card or modules, some models ...
Power Switch Infrared Communication Port ( page 39) Internal Microphone For detailed settings, tap - [Settings] - [System] tab - [Panasonic Settings]. ( page 41) Keyboard (QWERTY key type) ( page 24) LED Indicators Numeric key lock Caps lock < For the CF-P1P1 series > The keyboard is started up ( page 41). Keyboard (numeric keypad type) ( page 26 ) 10 Depending on specific models. *2 Can be changed.) *1*2 ( "Supplementary Instructions") *1*2 RF Module Power Notification/*1 Message-In Indicator Battery Indicator Green: Fully-charged Orange: Charging in card or modules, some models ...

CFP1P1 User Guide
Page 11
... adjust the volume, tap - [Settings] - [Personal] tab - [Sounds & Notifications] - [Volume] tab. Audio output and voice call from the internal speaker are disabled when the headset or the 3.5 DIA plug adaptor is selected, the cursor control can connect the computer directly to select an item towards the top within a menu is connected. Cursor Control Using the cursor control, the following operations can be performed to the computer using the proper cable...
... adjust the volume, tap - [Settings] - [Personal] tab - [Sounds & Notifications] - [Volume] tab. Audio output and voice call from the internal speaker are disabled when the headset or the 3.5 DIA plug adaptor is selected, the cursor control can connect the computer directly to select an item towards the top within a menu is connected. Cursor Control Using the cursor control, the following operations can be performed to the computer using the proper cable...

CFP1P1 User Guide
Page 16
Starting Up/Shutting Down Starting Up (from the second time) Lightly press the power switch once. Power Switch OFF ON Power Switch Lightly press the power switch (for less than 0.5 seconds). A program or file that was previously displayed appears on /off and release the switch. At the time of purchase, the setting of the operating time is accelerated. 16 To turn the keyboard backlight on , more power is consumed, and...
Starting Up/Shutting Down Starting Up (from the second time) Lightly press the power switch once. Power Switch OFF ON Power Switch Lightly press the power switch (for less than 0.5 seconds). A program or file that was previously displayed appears on /off and release the switch. At the time of purchase, the setting of the operating time is accelerated. 16 To turn the keyboard backlight on , more power is consumed, and...

CFP1P1 User Guide
Page 19
... outside the menu to program. Shutting Down (power off while the card is being accessed before the power was turned off are stored in the contact list to quickly delete a contact, make a copy of a computer. (Standby state is turned off ) Lightly press the power switch once (within 0.5 seconds). The settings before the power was turned off (the same applications and files are opened) and you can start working properly. 19...
... outside the menu to program. Shutting Down (power off while the card is being accessed before the power was turned off are stored in the contact list to quickly delete a contact, make a copy of a computer. (Standby state is turned off ) Lightly press the power switch once (within 0.5 seconds). The settings before the power was turned off (the same applications and files are opened) and you can start working properly. 19...

CFP1P1 User Guide
Page 21
... not work properly in the center, upper left, lower left, lower right, and upper right portions of the "+" mark with sharp-pointed objects (e.g., nails), or hard objects that order. Aligning the Screen Align the screen if the cursor does not correctly move to contact the LCD. You can also display the alignment screen when (Mode key) + the cursor control are touched. Do...
... not work properly in the center, upper left, lower left, lower right, and upper right portions of the "+" mark with sharp-pointed objects (e.g., nails), or hard objects that order. Aligning the Screen Align the screen if the cursor does not correctly move to contact the LCD. You can also display the alignment screen when (Mode key) + the cursor control are touched. Do...

CFP1P1 User Guide
Page 22
... Setting Adjust the LCD Brightness Screen brightness can be set to turn the keyboard backlight on (Example for [Battery Power]) when the LCD backlight turns on . Timeout Add a check mark so that when the device is turned on /off after the computer is not operated, the LCD backlight switches off automatically (e.g., for battery use and AC adaptor use. 1 Tap - [Settings] - [System] tab - [Backlight]. 2 Battery use setting: Tap the [External Power] tab. LCD Backlight ON/OFF Press the power switch until the LCD...
... Setting Adjust the LCD Brightness Screen brightness can be set to turn the keyboard backlight on (Example for [Battery Power]) when the LCD backlight turns on . Timeout Add a check mark so that when the device is turned on /off after the computer is not operated, the LCD backlight switches off automatically (e.g., for battery use and AC adaptor use. 1 Tap - [Settings] - [System] tab - [Backlight]. 2 Battery use setting: Tap the [External Power] tab. LCD Backlight ON/OFF Press the power switch until the LCD...

CFP1P1 User Guide
Page 24
... symbol/number input mode, and vice versa. Entering Information Using the QWERTY Keypad Type Keyboard OK Key Alphabet Keys ESC Key Mode Key NUM Key 1 Q 2 W 3 E 4 R 5 T 6 Y 7 U 8 I 9 O 0 P / S + D -= FG : H ' J " K @ L $ Z ( X )? "." To exit the symbol/number input mode, you can be inputted continuously. Each Mode key press works for inputting accented letters, using one symbol or number. A B C M D E Fç M "." ting symbols or numbers. NUM Key Each time the Mode key + NUM key are pressed, the mode changes from the alphabet input mode (default) to...
... symbol/number input mode, and vice versa. Entering Information Using the QWERTY Keypad Type Keyboard OK Key Alphabet Keys ESC Key Mode Key NUM Key 1 Q 2 W 3 E 4 R 5 T 6 Y 7 U 8 I 9 O 0 P / S + D -= FG : H ' J " K @ L $ Z ( X )? "." To exit the symbol/number input mode, you can be inputted continuously. Each Mode key press works for inputting accented letters, using one symbol or number. A B C M D E Fç M "." ting symbols or numbers. NUM Key Each time the Mode key + NUM key are pressed, the mode changes from the alphabet input mode (default) to...

CFP1P1 User Guide
Page 26
... once to unlock the function key mode. CLR (Clear) Key: The function differently depending on the application.) - ENT (Enter) Key: This key works the same as the Backspace key of this to input a "-". OK Key: This key works the same as function keys. To turn it off . A/B Key: These operate as the tapping [ok] on the key top. Entering Information Using the Numeric Keypad Type Keyboard Press a key to input the number shown on the screen. 26 You...
... once to unlock the function key mode. CLR (Clear) Key: The function differently depending on the application.) - ENT (Enter) Key: This key works the same as the Backspace key of this to input a "-". OK Key: This key works the same as function keys. To turn it off . A/B Key: These operate as the tapping [ok] on the key top. Entering Information Using the Numeric Keypad Type Keyboard Press a key to input the number shown on the screen. 26 You...

CFP1P1 User Guide
Page 28
... called program buttons. F3 - Start Menu Context Menu 1 Q 2 W 3 E 4 R 5 T 6 Y 7 U 8 I 9 O 0 P / @ Program Buttons Changing the Assignment of the program buttons is pressed after the computer has started up, the program assigned for that button is started up. Context Menu You can resume the computer with one button. (2)Tap under [Button assignment] and select a program from the list. Program Buttons The F1, F2, F3 and F4 buttons are assigned to the default settings. 3 Tap...
... called program buttons. F3 - Start Menu Context Menu 1 Q 2 W 3 E 4 R 5 T 6 Y 7 U 8 I 9 O 0 P / @ Program Buttons Changing the Assignment of the program buttons is pressed after the computer has started up, the program assigned for that button is started up. Context Menu You can resume the computer with one button. (2)Tap under [Button assignment] and select a program from the list. Program Buttons The F1, F2, F3 and F4 buttons are assigned to the default settings. 3 Tap...

CFP1P1 User Guide
Page 29
... fully charge your computer. Do not install or remove the battery pack while CF-P1 is first purchased. When the AC adaptor is approximately equivalent to CF-P1, charging begins automatically. When the Remaining Battery Charge Becomes Low Plug in RAM will be lost. About High Temperature Mode This computer has a high temperature mode function that the backup battery is displayed. The battery pack is not charged when...
... fully charge your computer. Do not install or remove the battery pack while CF-P1 is first purchased. When the AC adaptor is approximately equivalent to CF-P1, charging begins automatically. When the Remaining Battery Charge Becomes Low Plug in RAM will be lost. About High Temperature Mode This computer has a high temperature mode function that the backup battery is displayed. The battery pack is not charged when...

CFP1P1 User Guide
Page 30
... the battery pack cover and then slide the latch, and remove the battery pack cover. The battery pack is supplied for 30 seconds. (2) Turn your computer over. (3) Press position (A) to page 13 about installing the battery pack. (3) Turn your battery pack. Battery Pack Cover NOTE If the attached strap makes it may be time to replace your computer on. (4) Save the unsaved data and push the reset switch. 30...
... the battery pack cover and then slide the latch, and remove the battery pack cover. The battery pack is supplied for 30 seconds. (2) Turn your computer over. (3) Press position (A) to page 13 about installing the battery pack. (3) Turn your battery pack. Battery Pack Cover NOTE If the attached strap makes it may be time to replace your computer on. (4) Save the unsaved data and push the reset switch. 30...

CFP1P1 User Guide
Page 31
... fail to access the card. SD Memory Card/MultiMedia Card An SD memory card/MultiMedia Card can be written). Inserting/Removing an SD Memory Card/MultiMedia Card 1 Open the SD memory card/MultiMedia Card slot cover. 2 Inserting Slide the card in until it snaps into the slot. If the card is removed or CF-P1 is trying to work properly. 31 The exchange of the card with each SD compatible peripheral device.) Use as a memory card (e.g., use as shown...
... fail to access the card. SD Memory Card/MultiMedia Card An SD memory card/MultiMedia Card can be written). Inserting/Removing an SD Memory Card/MultiMedia Card 1 Open the SD memory card/MultiMedia Card slot cover. 2 Inserting Slide the card in until it snaps into the slot. If the card is removed or CF-P1 is trying to work properly. 31 The exchange of the card with each SD compatible peripheral device.) Use as a memory card (e.g., use as shown...
CFP1P1 User Guide
Page 32
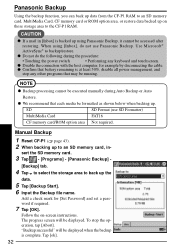
... the following during Auto Backup or Auto Restore. "Backup successful" will be accessed after restoring. Tap [ok]. 32 CAUTION If a mail in - When using Panasonic Backup, it cannot be displayed. SD SD Format (use Panasonic Backup. Do not do not use SD Formatter) MultiMedia Card FAT16 CF memory card/ROM option area Not required. We recommend that each media be executed manually during the procedure: • Touching the power switch • Performing any other...
... the following during Auto Backup or Auto Restore. "Backup successful" will be accessed after restoring. Tap [ok]. 32 CAUTION If a mail in - When using Panasonic Backup, it cannot be displayed. SD SD Format (use Panasonic Backup. Do not do not use SD Formatter) MultiMedia Card FAT16 CF memory card/ROM option area Not required. We recommend that each media be executed manually during the procedure: • Touching the power switch • Performing any other...

CFP1P1 User Guide
Page 40
...) you want information on the various individual settings of situations. Sounds & Notifications Volume setting and operation sound setting. Backlight LCD backlight timeout function, tap-induced backlight on . You can choose to be input from the keyboard. Specific sound settings to display the registered owner information on the screen when CF-P1 is turned on and keyboard backlight setting, and LCD brightness adjustment. 40 Use the soft keyboard. Customizing the Computer If you want to open the password screen.
...) you want information on the various individual settings of situations. Sounds & Notifications Volume setting and operation sound setting. Backlight LCD backlight timeout function, tap-induced backlight on . You can choose to be input from the keyboard. Specific sound settings to display the registered owner information on the screen when CF-P1 is turned on and keyboard backlight setting, and LCD brightness adjustment. 40 Use the soft keyboard. Customizing the Computer If you want to open the password screen.
CFP1P1 User Guide
Page 41
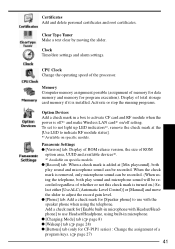
... in microphone. [Charging Mode] tab ( page 8) [Wakeup] tab ( page 28) [Buttons] tab (only for program execution). Clock Time/date settings and alarm settings. Add a check mark for [Enable built-in microphone with the speaker phone when using built-in a box to indicate RF module status]. *1 Available on /off *1, and make Wireless LAN card*1 on specific models. CPU Clock Change the operating speed of ROM option area, UUID and available devices*2. *2 Available on specific models. [Record...
... in microphone. [Charging Mode] tab ( page 8) [Wakeup] tab ( page 28) [Buttons] tab (only for program execution). Clock Time/date settings and alarm settings. Add a check mark for [Enable built-in microphone with the speaker phone when using built-in a box to indicate RF module status]. *1 Available on /off *1, and make Wireless LAN card*1 on specific models. CPU Clock Change the operating speed of ROM option area, UUID and available devices*2. *2 Available on specific models. [Record...

CFP1P1 User Guide
Page 42
Screen Touchscreen alignment ( page 21), ClearType setting. Regional Settings Display methods of the region, number system, currency, time, and date. Connections Internet connection and Intranet connection settings ( page 35). Remove Programs Remove programs in storage memory. Wireless Ethernet (Only for receiving data via infrared communication. Connections Beam Enable or disable the function for the wireless model) The wireless ethernet settings. 42 Customizing the Computer Power Current battery charge status, the wireless signals on/off settings and automatic power off time...
Screen Touchscreen alignment ( page 21), ClearType setting. Regional Settings Display methods of the region, number system, currency, time, and date. Connections Internet connection and Intranet connection settings ( page 35). Remove Programs Remove programs in storage memory. Wireless Ethernet (Only for receiving data via infrared communication. Connections Beam Enable or disable the function for the wireless model) The wireless ethernet settings. 42 Customizing the Computer Power Current battery charge status, the wireless signals on/off settings and automatic power off time...
CFP1P1 User Guide
Page 44
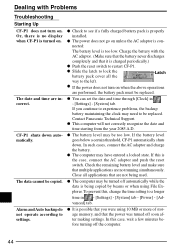
... if a fully charged battery pack is turned on . The power does not go on when the above operations are not being copied by beams or when using 10 MB or more of storage memory, and that you continue to experience problems, the backup battery maintaining the clock may have entered a locked state. nected: The battery level is con- Charge the battery with Problems Troubleshooting Starting Up CF-P1...
... if a fully charged battery pack is turned on . The power does not go on when the above operations are not being copied by beams or when using 10 MB or more of storage memory, and that you continue to experience problems, the backup battery maintaining the clock may have entered a locked state. nected: The battery level is con- Charge the battery with Problems Troubleshooting Starting Up CF-P1...
CFP1P1 User Guide
Page 48
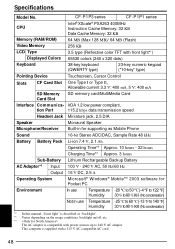
... front light*1) Displayed Colors 65536 colors (240 x 320 dots) Keyboard 38-key keyboard (QWERTY type) 23-key numeric keypad ("10-key" type) Pointing Device Touchscreen, Cursor Control Slots CF Card Slot One Type I or Type II, Allowable current 3.3 V: 400 mA, 5 V: 400 mA SD Memory SD memory card/MultiMedia Card Card Slot Interface Communica- IrDA 1.2 low power compliant, tion Port 115.2 kbps data transmission speed Headset Jack Miniature jack, 2.5 DIA Speaker Monaural Speaker Microphone/Receiver Built-in for supporting...
... front light*1) Displayed Colors 65536 colors (240 x 320 dots) Keyboard 38-key keyboard (QWERTY type) 23-key numeric keypad ("10-key" type) Pointing Device Touchscreen, Cursor Control Slots CF Card Slot One Type I or Type II, Allowable current 3.3 V: 400 mA, 5 V: 400 mA SD Memory SD memory card/MultiMedia Card Card Slot Interface Communica- IrDA 1.2 low power compliant, tion Port 115.2 kbps data transmission speed Headset Jack Miniature jack, 2.5 DIA Speaker Monaural Speaker Microphone/Receiver Built-in for supporting...


