Ip Camera
Page 1
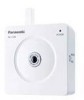
BL-C1A Wired Type BL-C20A BL-C20A Wireless/Wired Type Please read this manual before using, and save this manual for customers in the USA or Puerto Rico Operating Instructions BL-C1A Network Camera Indoor Use Only Model No. Panasonic Network Camera Website: http://www.panasonic.com/netcam for future reference.
BL-C1A Wired Type BL-C20A BL-C20A Wireless/Wired Type Please read this manual before using, and save this manual for customers in the USA or Puerto Rico Operating Instructions BL-C1A Network Camera Indoor Use Only Model No. Panasonic Network Camera Website: http://www.panasonic.com/netcam for future reference.
Ip Camera
Page 2
...The brightness about 1 m (3 feet 3 inches) away under auxiliary fluorescent light. bob.viewnetcam.com) instead of network. You can buffer the camera images, transfer images to view distant objects.*2 A mouse wheel operation or clicking the right mouse button increase or ... the Single Camera screen, the Multi Camera screen, and the Buffered Image screen. The Setup, Maintenance and Support pages are displayed only in flexible communication. Operating Instructions Main Features [For BL-C20A] Wireless Communication This Network Camera is also available. Wireless installation is...
...The brightness about 1 m (3 feet 3 inches) away under auxiliary fluorescent light. bob.viewnetcam.com) instead of network. You can buffer the camera images, transfer images to view distant objects.*2 A mouse wheel operation or clicking the right mouse button increase or ... the Single Camera screen, the Multi Camera screen, and the Buffered Image screen. The Setup, Maintenance and Support pages are displayed only in flexible communication. Operating Instructions Main Features [For BL-C20A] Wireless Communication This Network Camera is also available. Wireless installation is...
Ip Camera
Page 3
...is based in part depending on the model. Abbreviations • UPnP is the abbreviation for both BL-C1A (Wired Type) and BL-C20A (Wireless/Wired Type). is for "Universal Plug and Play". • "Network Camera" is called "CD-ROM" in this manual are different in part on the work of the... Independent JPEG Group. Read this manual carefully and use the Network Camera properly. (The model no. Operating ...
...is based in part depending on the model. Abbreviations • UPnP is the abbreviation for both BL-C1A (Wired Type) and BL-C20A (Wireless/Wired Type). is for "Universal Plug and Play". • "Network Camera" is called "CD-ROM" in this manual are different in part on the work of the... Independent JPEG Group. Read this manual carefully and use the Network Camera properly. (The model no. Operating ...
Ip Camera
Page 6
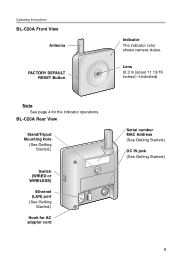
BL-C20A Rear View Stand/Tripod Mounting Hole (See Getting Started.) Switch (WIRED or WIRELESS) Ethernet (LAN) port (See Getting Started.) Hook for the indicator operations. Operating Instructions BL-C20A Front View Antenna FACTORY DEFAULT RESET Button Indicator The indicator color shows camera status. Lens (0.3 m [about 11 13/16 inches]-Unlimited) Note See page 4 for AC adaptor cord Serial number MAC Address (See Getting Started.) DC IN jack (See Getting Started.) 6
BL-C20A Rear View Stand/Tripod Mounting Hole (See Getting Started.) Switch (WIRED or WIRELESS) Ethernet (LAN) port (See Getting Started.) Hook for the indicator operations. Operating Instructions BL-C20A Front View Antenna FACTORY DEFAULT RESET Button Indicator The indicator color shows camera status. Lens (0.3 m [about 11 13/16 inches]-Unlimited) Note See page 4 for AC adaptor cord Serial number MAC Address (See Getting Started.) DC IN jack (See Getting Started.) 6
Ip Camera
Page 7
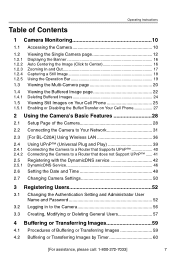
... Images 24 Viewing Still Images on Your Cell Phone 25 Enabling or Disabling the Buffer/Transfer on Your Cell Phone 27 2 Using the Camera's Basic Features 28 2.1 Setup Page of the Camera 28 2.2 Connecting the Camera to Your Network 31 2.3 [For BL-C20A] Using Wireless LAN 36 2.4 2.4.1 2.4.2 2.5 2.5.1 2.6 Using UPnP™ (Universal Plug and Play 39 Connecting the...
... Images 24 Viewing Still Images on Your Cell Phone 25 Enabling or Disabling the Buffer/Transfer on Your Cell Phone 27 2 Using the Camera's Basic Features 28 2.1 Setup Page of the Camera 28 2.2 Connecting the Camera to Your Network 31 2.3 [For BL-C20A] Using Wireless LAN 36 2.4 2.4.1 2.4.2 2.5 2.5.1 2.6 Using UPnP™ (Universal Plug and Play 39 Connecting the...
Ip Camera
Page 8
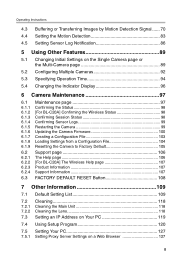
... 5 Using Other Features 89 5.1 Changing Initial Settings on the Single Camera page or the Multi-Camera page 89 5.2 Configuring Multiple Cameras 92 5.3 Specifying Operation Time 94 5.4 Changing the Indicator Display 96 6 Camera Maintenance 97 6.1 6.1.1 6.1.2 6.1.3 6.1.4 6.1.5 6.1.6 6.1.7 6.1.8 6.1.9 6.2 6.2.1 6.2.2 6.2.3 6.2.4 6.3 Maintenance page 97 Confirming the Status 98 [For BL-C20A] Confirming the Wireless Status 98 Confirming Session Status 98 Confirming Sensor Logs 99...
... 5 Using Other Features 89 5.1 Changing Initial Settings on the Single Camera page or the Multi-Camera page 89 5.2 Configuring Multiple Cameras 92 5.3 Specifying Operation Time 94 5.4 Changing the Indicator Display 96 6 Camera Maintenance 97 6.1 6.1.1 6.1.2 6.1.3 6.1.4 6.1.5 6.1.6 6.1.7 6.1.8 6.1.9 6.2 6.2.1 6.2.2 6.2.3 6.2.4 6.3 Maintenance page 97 Confirming the Status 98 [For BL-C20A] Confirming the Wireless Status 98 Confirming Session Status 98 Confirming Sensor Logs 99...
Ip Camera
Page 13
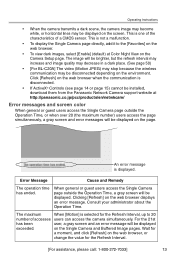
...interval may increase and image quality may decrease in a dark place. (See page 50) • [For BL-C20A] The video (Motion JPEG) may stop because the wireless communication may be displayed on the page. Consult your administrator about the Operation Time. Error Message Cause and Remedy ... users access the Single Camera page outside the Operation Time, a gray screen will be displayed exceeded. An error message is disconnected. • If ActiveX® Controls (see page 14 or page 15) cannot be installed, download them from the Panasonic Network Camera support website at Color ...
...interval may increase and image quality may decrease in a dark place. (See page 50) • [For BL-C20A] The video (Motion JPEG) may stop because the wireless communication may be displayed on the page. Consult your administrator about the Operation Time. Error Message Cause and Remedy ... users access the Single Camera page outside the Operation Time, a gray screen will be displayed exceeded. An error message is disconnected. • If ActiveX® Controls (see page 14 or page 15) cannot be installed, download them from the Panasonic Network Camera support website at Color ...

Ip Camera
Page 29
... Enables automatic port forwarding and creates a shortcut to send log notifications by email (see page 50). Operating Instructions Basic (1) Network Configures network settings to connect the camera to the network (see page 31). (2) [For BL-C20A] Configure a wireless network (see page 57). Account (7) Administrator*1 Sets authentication and administrator security (user name and password) (see page 52). (8) General User...
... Enables automatic port forwarding and creates a shortcut to send log notifications by email (see page 50). Operating Instructions Basic (1) Network Configures network settings to connect the camera to the network (see page 31). (2) [For BL-C20A] Configure a wireless network (see page 57). Account (7) Administrator*1 Sets authentication and administrator security (user name and password) (see page 52). (8) General User...
Ip Camera
Page 35
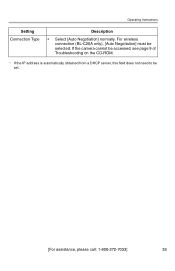
If the camera cannot be accessed, see page 9 of Troubleshooting on the CD-ROM. *1 If the IP address is automatically obtained from a DHCP server, this field does not need to be selected. For wireless connection (BL-C20A only), [Auto Negotiation] must be set. [For assistance, please call: 1-800-272-7033] 35 Operating Instructions Setting Connection Type Description • Select [Auto Negotiation] normally.
If the camera cannot be accessed, see page 9 of Troubleshooting on the CD-ROM. *1 If the IP address is automatically obtained from a DHCP server, this field does not need to be selected. For wireless connection (BL-C20A only), [Auto Negotiation] must be set. [For assistance, please call: 1-800-272-7033] 35 Operating Instructions Setting Connection Type Description • Select [Auto Negotiation] normally.
Ip Camera
Page 36
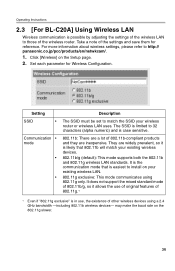
... [For BL-C20A] Using Wireless LAN Wireless communication is possible by adjusting the settings of the wireless LAN to those of other wireless devices using 802.11g only. It does not support the mixed standard mode of 802.11b/g, so it is easiest to match the SSID your existing wireless devices....The SSID must be set to install on your existing wireless LAN. 802.11g exclusive: This mode communicates using a 2.4 GHz bandwidth -including 802.11b wireless devices- Set each parameter for reference. The SSID is limited to http:// panasonic.co.jp/pcc/products/en/netwkcam/. 1. They are ...
... [For BL-C20A] Using Wireless LAN Wireless communication is possible by adjusting the settings of the wireless LAN to those of other wireless devices using 802.11g only. It does not support the mixed standard mode of 802.11b/g, so it is easiest to match the SSID your existing wireless devices....The SSID must be set to install on your existing wireless LAN. 802.11g exclusive: This mode communicates using a 2.4 GHz bandwidth -including 802.11b wireless devices- Set each parameter for reference. The SSID is limited to http:// panasonic.co.jp/pcc/products/en/netwkcam/. 1. They are ...

Ip Camera
Page 37
...], [ASCII 5 characters 64 bit], [ASCII 13 characters 128 bit] or [ASCII 16 characters 152 bit]. • Selecting [WEP] at the wireless router. 3. Check the same key number as set to the wireless router, and set the same encryption as the standard WEPKey. One or all of the four keys can be set...
...], [ASCII 5 characters 64 bit], [ASCII 13 characters 128 bit] or [ASCII 16 characters 152 bit]. • Selecting [WEP] at the wireless router. 3. Check the same key number as set to the wireless router, and set the same encryption as the standard WEPKey. One or all of the four keys can be set...
Ip Camera
Page 38
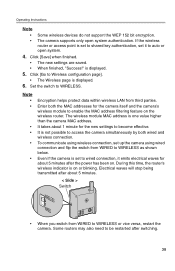
...will stop being transmitted after switching. 38 If the wireless router or access point is one value higher than the camera MAC address. During this time, the router's wireless indicator is not possible to access the camera simultaneously by both the MAC addresses for the new settings...feature on or blinking. Set the switch to be restarted after about 1 minute for the camera itself and the camera's wireless module to become effective. It is on the wireless router. Some routers may also need to WIRELESS. is displayed. 5. It takes about 5 minutes. < Side > Switch • ...
...will stop being transmitted after switching. 38 If the wireless router or access point is one value higher than the camera MAC address. During this time, the router's wireless indicator is not possible to access the camera simultaneously by both the MAC addresses for the new settings...feature on or blinking. Set the switch to be restarted after about 1 minute for the camera itself and the camera's wireless module to become effective. It is on the wireless router. Some routers may also need to WIRELESS. is displayed. 5. It takes about 5 minutes. < Side > Switch • ...
Ip Camera
Page 97
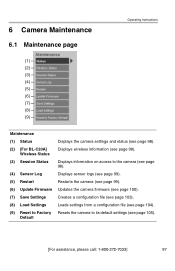
... Loads settings from a configuration file (see page 104). (9) Reset to Factory Resets the camera to its default settings (see page 98). 6 Camera Maintenance 6.1 Maintenance page (1) (2) (3) (4) (5) (6) (7) (8) (9) Operating Instructions Maintenance (1) Status Displays the camera settings and status (see page 98). (2) [For BL-C20A] Displays wireless information (see page 105). Default [For assistance, please call: 1-800-272-7033] 97...
... Loads settings from a configuration file (see page 104). (9) Reset to Factory Resets the camera to its default settings (see page 98). 6 Camera Maintenance 6.1 Maintenance page (1) (2) (3) (4) (5) (6) (7) (8) (9) Operating Instructions Maintenance (1) Status Displays the camera settings and status (see page 98). (2) [For BL-C20A] Displays wireless information (see page 105). Default [For assistance, please call: 1-800-272-7033] 97...
Ip Camera
Page 98
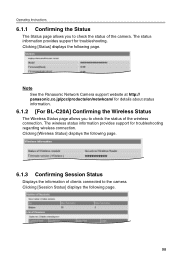
... page. 6.1.3 Confirming Session Status Displays the information of the wireless connection. Clicking [Session Status] displays the following page. 98 Note See the Panasonic Network Camera support website at http:// panasonic.co.jp/pcc/products/en/netwkcam/ for details about status information. 6.1.2 [For BL-C20A] Confirming the Wireless Status The Wireless Status page allows you to check the status of...
... page. 6.1.3 Confirming Session Status Displays the information of the wireless connection. Clicking [Session Status] displays the following page. 98 Note See the Panasonic Network Camera support website at http:// panasonic.co.jp/pcc/products/en/netwkcam/ for details about status information. 6.1.2 [For BL-C20A] Confirming the Wireless Status The Wireless Status page allows you to check the status of...
Ip Camera
Page 105
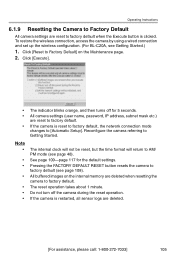
...; If the camera is reset to factory default, the network connection mode changes to factory default. Pressing the FACTORY DEFAULT RESET button resets the camera to factory default (see page 48). Operating Instructions 6.1.9 Resetting the Camera to Factory Default All camera settings are reset... Maintenance page. 2. Click [Execute]. • The indicator blinks orange, and then turns off the camera during the reset operation. To restore the wireless connection, access the camera by using a wired connection and set up the wireless configuration. (For BL-C20A, see Getting Started.) 1.
...; If the camera is reset to factory default, the network connection mode changes to factory default. Pressing the FACTORY DEFAULT RESET button resets the camera to factory default (see page 48). Operating Instructions 6.1.9 Resetting the Camera to Factory Default All camera settings are reset... Maintenance page. 2. Click [Execute]. • The indicator blinks orange, and then turns off the camera during the reset operation. To restore the wireless connection, access the camera by using a wired connection and set up the wireless configuration. (For BL-C20A, see Getting Started.) 1.
Ip Camera
Page 106
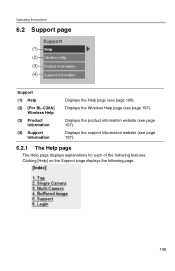
Clicking [Help] on the Support page displays the following features. Displays the support information website (see page 107). Displays the product information website (see page 107). 6.2.1 The Help page The Help page displays explanations for each of the following page. 106 Displays the Wireless Help page (see page 106). Operating Instructions 6.2 Support page (1) (2) (3) (4) Support (1) Help (2) [For BL-C20A] Wireless Help (3) Product Information (4) Support Information Displays the Help page (see page 107).
Clicking [Help] on the Support page displays the following features. Displays the support information website (see page 107). Displays the product information website (see page 107). 6.2.1 The Help page The Help page displays explanations for each of the following page. 106 Displays the Wireless Help page (see page 106). Operating Instructions 6.2 Support page (1) (2) (3) (4) Support (1) Help (2) [For BL-C20A] Wireless Help (3) Product Information (4) Support Information Displays the Help page (see page 107).

Ip Camera
Page 107
... displayed only when logging in as an administrator. 6.2.3 Product Information See the Panasonic Network Camera support website for product information. Operating Instructions 6.2.2 [For BL-C20A] The Wireless Help page The Wireless Help page explains Wireless Basic configuration, Wireless Cipher configuration and Wireless Status. Note [Wireless Help] is not connected to the Internet, the website cannot be displayed. [For assistance, please call...
... displayed only when logging in as an administrator. 6.2.3 Product Information See the Panasonic Network Camera support website for product information. Operating Instructions 6.2.2 [For BL-C20A] The Wireless Help page The Wireless Help page explains Wireless Basic configuration, Wireless Cipher configuration and Wireless Status. Note [Wireless Help] is not connected to the Internet, the website cannot be displayed. [For assistance, please call...

Ip Camera
Page 108
If you lose your user name and password, use this button to factory default. To restore the wireless connection, access the camera by using a wired connection and set up the wireless configuration. (For BL-C20A, see page 48). All buffered images on the internal memory are deleted. 108 Operating Instructions 6.3 FACTORY DEFAULT RESET Button There is...
If you lose your user name and password, use this button to factory default. To restore the wireless connection, access the camera by using a wired connection and set up the wireless configuration. (For BL-C20A, see page 48). All buffered images on the internal memory are deleted. 108 Operating Instructions 6.3 FACTORY DEFAULT RESET Button There is...
Ip Camera
Page 110
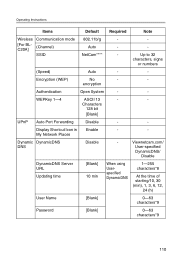
... characters*9 110 Characters 128 bit [Blank] UPnP Auto Port Forwarding Disable - - Up to 32 characters, signs or numbers (Speed) Auto - - encryption Authentication Open System - - My Network Places Dynamic DynamicDNS DNS Disable - WEPKey 1-4 ASCII 13 - - Operating Instructions Items Default Required Note Wireless Communication mode 802.11b/g - - [For BLC20A] (Channel) Auto - -
... characters*9 110 Characters 128 bit [Blank] UPnP Auto Port Forwarding Disable - - Up to 32 characters, signs or numbers (Speed) Auto - - encryption Authentication Open System - - My Network Places Dynamic DynamicDNS DNS Disable - WEPKey 1-4 ASCII 13 - - Operating Instructions Items Default Required Note Wireless Communication mode 802.11b/g - - [For BLC20A] (Channel) Auto - -
Ip Camera
Page 125
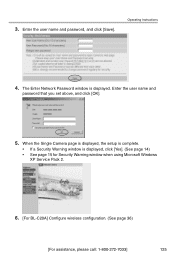
The Enter Network Password window is displayed, click [Yes]. (See page 14) • See page 15 for Security Warning window when using Microsoft Windows XP Service Pack 2. 6. [For BL-C20A] Configure wireless configuration. (See page 36) [For assistance, please call: 1-800-272-7033] 125 When the Single Camera page is displayed, the setup is complete. • If a Security Warning window is displayed. Enter the user name and password, and click [Save]. Operating Instructions 4. Enter the user name and password that you set above, and click [OK]. 5. 3.
The Enter Network Password window is displayed, click [Yes]. (See page 14) • See page 15 for Security Warning window when using Microsoft Windows XP Service Pack 2. 6. [For BL-C20A] Configure wireless configuration. (See page 36) [For assistance, please call: 1-800-272-7033] 125 When the Single Camera page is displayed, the setup is complete. • If a Security Warning window is displayed. Enter the user name and password, and click [Save]. Operating Instructions 4. Enter the user name and password that you set above, and click [OK]. 5. 3.
