Operating Instructions
Page 6
... User Name and Password 103 6.3 General Users ...104 6.4 Guest Users ...107 6.5 The Login Tab ...109 7 Advanced Settings 110 7.1 Changing Image Display Settings 110 7.2 Registering Multiple Cameras 113 7.3 Specifying Operation Times 115 7.4 Changing the Indicator Display 117 7.5 Privacy Mode ...118 8 Camera Administration and Maintenance 119 8.1 Confirming Camera Status 119 8.2 Confirming Wireless Status (BL-C131A Only 120 8.3 Confirming...
... User Name and Password 103 6.3 General Users ...104 6.4 Guest Users ...107 6.5 The Login Tab ...109 7 Advanced Settings 110 7.1 Changing Image Display Settings 110 7.2 Registering Multiple Cameras 113 7.3 Specifying Operation Times 115 7.4 Changing the Indicator Display 117 7.5 Privacy Mode ...118 8 Camera Administration and Maintenance 119 8.1 Confirming Camera Status 119 8.2 Confirming Wireless Status (BL-C131A Only 120 8.3 Confirming...

Operating Instructions
Page 7
...://192.168.0.253:50001 If you are accessing the camera from outside, i.e., from a PC that is not 80. • The user name and password required to the same network as Viewnetcam.com (see Page 109. Note that accessing the camera this way may only work when you have registered ...with a DNS service, such as the camera. 1.1 Accessing the Camera 1 Camera Monitoring 1.1 Accessing the Camera You will need to know ...
...://192.168.0.253:50001 If you are accessing the camera from outside, i.e., from a PC that is not 80. • The user name and password required to the same network as Viewnetcam.com (see Page 109. Note that accessing the camera this way may only work when you have registered ...with a DNS service, such as the camera. 1.1 Accessing the Camera 1 Camera Monitoring 1.1 Accessing the Camera You will need to know ...

Operating Instructions
Page 25
...page (see Page 82 or Page 133). The default settings for the camera (see Page 107). If a camera displayed on network conditions, PC performance, the number of people accessing the cameras, and the type of cameras displayed, all images are not available and their global IP addresses. As ..., about 3 to improve the refresh rate by the other cameras. *3 If the camera does not support pan and tilt features, this camera using their corresponding buttons or controls will need to enter a valid user name and password in 192 ´ 144 pixel resolution, images are required to...
...page (see Page 82 or Page 133). The default settings for the camera (see Page 107). If a camera displayed on network conditions, PC performance, the number of people accessing the cameras, and the type of cameras displayed, all images are not available and their global IP addresses. As ..., about 3 to improve the refresh rate by the other cameras. *3 If the camera does not support pan and tilt features, this camera using their corresponding buttons or controls will need to enter a valid user name and password in 192 ´ 144 pixel resolution, images are required to...
Operating Instructions
Page 37
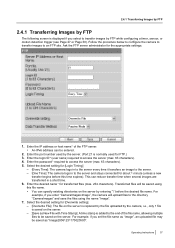
... the appropriate settings. 1. For example, if you enter "CameraImages\Image", the camera will be saved on the server by the server. (Port 21 is normally ...Timing] - [Every Time]: The camera logs in to the server every time it transfers an image to the server. - [One Time]: The camera logs in a short time. ...by FTP The following screen is displayed if you select to transfer images by the camera, i.e., only 1 file is saved on the server. - [Save as New ...27 or Page 30). Follow the procedure below to configure the camera to transfer images to access the server (max. 63 characters). 4. Enter ...
... the appropriate settings. 1. For example, if you enter "CameraImages\Image", the camera will be saved on the server by the server. (Port 21 is normally ...Timing] - [Every Time]: The camera logs in to the server every time it transfers an image to the server. - [One Time]: The camera logs in a short time. ...by FTP The following screen is displayed if you select to transfer images by the camera, i.e., only 1 file is saved on the server. - [Save as New ...27 or Page 30). Follow the procedure below to configure the camera to transfer images to access the server (max. 63 characters). 4. Enter ...

Operating Instructions
Page 41
... 20061231173020500.jpg). 6. Enter the login ID*2 (user name) required to access the server (max. 63 characters). a. Enter the password*2 required to access the server (max. 63 characters). - [SMTP authentication]: Select this option if the outgoing E-mail server requires ... notification, see Page 48. *1 [Space and [>] cannot be entered. *2 ["] cannot be entered. 5. Enter the password*2 required to access the server (max. 63 characters). • The camera supports LOGIN, PLAIN, and CRAM-MD5 authentication. 8. d. b. a. Enter the text*2 that if you by E-mail ...
... 20061231173020500.jpg). 6. Enter the login ID*2 (user name) required to access the server (max. 63 characters). a. Enter the password*2 required to access the server (max. 63 characters). - [SMTP authentication]: Select this option if the outgoing E-mail server requires ... notification, see Page 48. *1 [Space and [>] cannot be entered. *2 ["] cannot be entered. 5. Enter the password*2 required to access the server (max. 63 characters). • The camera supports LOGIN, PLAIN, and CRAM-MD5 authentication. 8. d. b. a. Enter the text*2 that if you by E-mail ...
Operating Instructions
Page 42
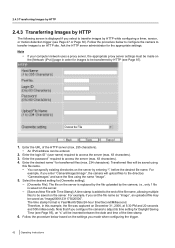
...site. Ask the HTTP server administrator for transferred files (max. 234 characters). Enter the password*1 required to the directory "CameraImages" and save the files using this example, the file was captured on the [Network (IPv4)] page in this file name. • You can be saved on the...files to adjust its time setting for [Overwrite setting]. - [Overwrite File]: The file on the server is replaced by the file uploaded by the camera, i.e., only 1 file is saved on the server. - [Save as "Image20061231173020500". Follow the procedure below based on the settings you made on ...
...site. Ask the HTTP server administrator for transferred files (max. 234 characters). Enter the password*1 required to the directory "CameraImages" and save the files using this example, the file was captured on the [Network (IPv4)] page in this file name. • You can be saved on the...files to adjust its time setting for [Overwrite setting]. - [Overwrite File]: The file on the server is replaced by the file uploaded by the camera, i.e., only 1 file is saved on the server. - [Save as "Image20061231173020500". Follow the procedure below based on the settings you made on ...

Operating Instructions
Page 47
...be displayed in E-mail messages sent by the camera (max. 44 characters). 6. Enter the text*2 that will be entered. Enter the port number used by the server. (Port 110 is normally used for sending E-mail. Enter the password*2 required to access the server (max. 63 ...also necessary. Enter the settings as you click [Save]. *1 [Space and [>] cannot be entered. *2 ["] cannot be entered. 7. b. Enter the password*2 required to access the server (max. 63 characters). - [SMTP authentication]: Select this option if the outgoing E-mail server requires POP before SMTP authentication ...
...be displayed in E-mail messages sent by the camera (max. 44 characters). 6. Enter the text*2 that will be entered. Enter the port number used by the server. (Port 110 is normally used for sending E-mail. Enter the password*2 required to access the server (max. 63 ...also necessary. Enter the settings as you click [Save]. *1 [Space and [>] cannot be entered. *2 ["] cannot be entered. 7. b. Enter the password*2 required to access the server (max. 63 characters). - [SMTP authentication]: Select this option if the outgoing E-mail server requires POP before SMTP authentication ...
Operating Instructions
Page 48
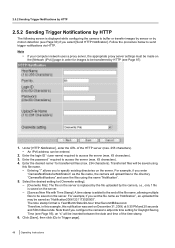
...Page 87). 1. For example, if you set the file name as "Notification", an uploaded file may be saved as the file name, the camera will upload files to the end of the HTTP server (max. 255 characters). • An IPv6 address can be transferred by the... Trigger page]. 48 Operating Instructions Enter the password*1 required to access the server (max. 63 characters). 3. Select the desired setting for images to be made on the [Network (IPv4)] page in this example, this file name. • Entering "\" allows you configure the camera to specify existing directories on the server. ...
...Page 87). 1. For example, if you set the file name as "Notification", an uploaded file may be saved as the file name, the camera will upload files to the end of the HTTP server (max. 255 characters). • An IPv6 address can be transferred by the... Trigger page]. 48 Operating Instructions Enter the password*1 required to access the server (max. 63 characters). 3. Select the desired setting for images to be made on the [Network (IPv4)] page in this example, this file name. • Entering "\" allows you configure the camera to specify existing directories on the server. ...

Operating Instructions
Page 60
... the host name*1 of the SMTP server (outgoing mail server). • An IPv6 address can be shown to the recipient as you by the camera (max. 44 characters). 10. Up to access the server (max. 63 characters). Enter the settings as the sender of the E-mail. •... the outgoing E-mail server requires POP before SMTP authentication when sending E-mail messages.The following settings are also necessary. Enter the password*2 required to authenticate], select the authentication method your ISP. 8. Enter the login ID*2 (user name) required to 3 addresses can be entered. 9.
... the host name*1 of the SMTP server (outgoing mail server). • An IPv6 address can be shown to the recipient as you by the camera (max. 44 characters). 10. Up to access the server (max. 63 characters). Enter the settings as the sender of the E-mail. •... the outgoing E-mail server requires POP before SMTP authentication when sending E-mail messages.The following settings are also necessary. Enter the password*2 required to authenticate], select the authentication method your ISP. 8. Enter the login ID*2 (user name) required to 3 addresses can be entered. 9.
Operating Instructions
Page 62
... when using any of these features, please read the following notes. • Certain mobile phones are not available with Panasonic Network Cameras. Before using a mobile phone that do not support password authentication are not compatible with Panasonic Network Cameras. • Certain mobile phones may not display images correctly. • Video images cannot be displayed on mobile phones...
... when using any of these features, please read the following notes. • Certain mobile phones are not available with Panasonic Network Cameras. Before using a mobile phone that do not support password authentication are not compatible with Panasonic Network Cameras. • Certain mobile phones may not display images correctly. • Video images cannot be displayed on mobile phones...

Operating Instructions
Page 63
...a mobile phone or PC without entering a user name or password. 3.1 Accessing the Camera from Your Mobile Phone 3.1 Accessing the Camera from the camera is displayed. • If the camera image is not displayed properly, try accessing the camera by the IP address of the IP address. If an ...authentication dialog is displayed, enter the user name and password. • A still image from...
...a mobile phone or PC without entering a user name or password. 3.1 Accessing the Camera from Your Mobile Phone 3.1 Accessing the Camera from the camera is displayed. • If the camera image is not displayed properly, try accessing the camera by the IP address of the IP address. If an ...authentication dialog is displayed, enter the user name and password. • A still image from...

Operating Instructions
Page 64
...on Your Mobile Phone Still images from guest users (i.e, anonymous users; If you can access the camera's mobile phone pages using a mobile phone or PC without entering a user name or password. Press [4] or [6] to pan the lens left or right, respectively, or press [2] or [8] to the home position. ...H. G • You must be logged in to the camera as the administrator by selecting [Alarm Log], [Buffer/Transfer], ...
...on Your Mobile Phone Still images from guest users (i.e, anonymous users; If you can access the camera's mobile phone pages using a mobile phone or PC without entering a user name or password. Press [4] or [6] to pan the lens left or right, respectively, or press [2] or [8] to the home position. ...H. G • You must be logged in to the camera as the administrator by selecting [Alarm Log], [Buffer/Transfer], ...

Operating Instructions
Page 78
...the settings required to use a third-party Dynamic DNS service to the Dynamic DNS service provider. • After configuring the camera to use that service. Enter the password*2 provided by the Dynamic DNS service provider (max. 63 characters). 7. On the left side of its current address. 6.... We cannot guarantee that your camera will first need to subscribe to use a third-party Dynamic DNS service, it may not be ...
...the settings required to use a third-party Dynamic DNS service to the Dynamic DNS service provider. • After configuring the camera to use that service. Enter the password*2 provided by the Dynamic DNS service provider (max. 63 characters). 7. On the left side of its current address. 6.... We cannot guarantee that your camera will first need to subscribe to use a third-party Dynamic DNS service, it may not be ...

Operating Instructions
Page 103
.... Click [Save]. Operating Instructions 103 Under [Administrator Authentication], enter the user name and password, then re-enter the password for verification. • See Page 147 for added security. 1. Note that uses many characters and is difficult to guess. Change the password periodically for a list of the screen under [Account], click [Administrator]. 3. 6.2 Changing the...
.... Click [Save]. Operating Instructions 103 Under [Administrator Authentication], enter the user name and password, then re-enter the password for verification. • See Page 147 for added security. 1. Note that uses many characters and is difficult to guess. Change the password periodically for a list of the screen under [Account], click [Administrator]. 3. 6.2 Changing the...

Operating Instructions
Page 104
... 1. On the left side of valid characters. Note • • For security, we recommend setting user names and passwords that are never displayed. When general users access the camera, the [Internet], [Setup], and [Maintenance] tabs are difficult to guess. Click the [Setup] tab. 2. Under [...Modify]. 4. Each user has his or her own user name and password, and you want to 50 general user accounts can control the camera features that [Space and [:] are available to access those pages. Change the passwords periodically for a list of the screen under [Account], click [General...
... 1. On the left side of valid characters. Note • • For security, we recommend setting user names and passwords that are never displayed. When general users access the camera, the [Internet], [Setup], and [Maintenance] tabs are difficult to guess. Click the [Setup] tab. 2. Under [...Modify]. 4. Each user has his or her own user name and password, and you want to 50 general user accounts can control the camera features that [Space and [:] are available to access those pages. Change the passwords periodically for a list of the screen under [Account], click [General...

Operating Instructions
Page 107
...access from guest users (mobile only)]: Guest users can control the camera features that you configured the camera to access the camera. Click the [Setup] tab. 3. You have the option of user names and passwords. You can access the camera's mobile phone page only. - [Do not permit access from the...are commonly known as "hackers", to whom you do not need to enter a user name or password to allow access. Operating Instructions 107 Because the camera can access the camera through the use of allowing guest access, but it is strongly recommended that are anonymous users, ...
...access from guest users (mobile only)]: Guest users can control the camera features that you configured the camera to access the camera. Click the [Setup] tab. 3. You have the option of user names and passwords. You can access the camera's mobile phone page only. - [Do not permit access from the...are commonly known as "hackers", to whom you do not need to enter a user name or password to allow access. Operating Instructions 107 Because the camera can access the camera through the use of allowing guest access, but it is strongly recommended that are anonymous users, ...

Operating Instructions
Page 118
... changes to disable privacy mode, the administrator's user name and password must be entered. Click the [Setup] tab. 2. Under [Privacy Mode], select [Enable]. 4. Accessing the camera from green to red). - Click [Save]. 118 Operating Instructions Pressing the PRIVACY button on the front of the ... PRIVACY button. 1. 7.5 Privacy Mode 7.5 Privacy Mode Privacy mode allows you to protect your privacy by hiding the lens inside the camera, preventing camera images from a mobile phone (see Page 64) as the administrator. When [Privacy Mode is activated. - Turning privacy mode on...
... changes to disable privacy mode, the administrator's user name and password must be entered. Click the [Setup] tab. 2. Under [Privacy Mode], select [Enable]. 4. Accessing the camera from green to red). - Click [Save]. 118 Operating Instructions Pressing the PRIVACY button on the front of the ... PRIVACY button. 1. 7.5 Privacy Mode 7.5 Privacy Mode Privacy mode allows you to protect your privacy by hiding the lens inside the camera, preventing camera images from a mobile phone (see Page 64) as the administrator. When [Privacy Mode is activated. - Turning privacy mode on...
Operating Instructions
Page 125
...• • • • • The saved configuration file contains user names, passwords, and other private information. A dialog prompts you save a configuration file and then update the camera's firmware later, the configuration file may not be able to save a configuration file after you update...under [Maintenance], click [Save Settings]. 3. You can save a configuration file (i.e., a backup of the camera's settings, remember to save a configuration file of the camera's settings) on your PC and restore the settings later if desired (see Page 143). The configuration file...
...• • • • • The saved configuration file contains user names, passwords, and other private information. A dialog prompts you save a configuration file and then update the camera's firmware later, the configuration file may not be able to save a configuration file after you update...under [Maintenance], click [Save Settings]. 3. You can save a configuration file (i.e., a backup of the camera's settings, remember to save a configuration file of the camera's settings) on your PC and restore the settings later if desired (see Page 143). The configuration file...
Operating Instructions
Page 126
... the settings are loaded, the settings are restored as they were saved, therefore the camera's IP address may change . Network settings and the administrator user name and password are restored as they were saved, therefore the administrator user name and password may change . Click [Browse...]. A dialog prompts you can also use the Setup Program...
... the settings are loaded, the settings are restored as they were saved, therefore the camera's IP address may change . Network settings and the administrator user name and password are restored as they were saved, therefore the administrator user name and password may change . Click [Browse...]. A dialog prompts you can also use the Setup Program...

Operating Instructions
Page 127
...panning and tilting, it is being reset. Click [Execute]. • The indicator blinks orange, and then turns off for a list of the camera's default settings. Reconfigure the camera by referring to turn off the camera. See Page 149 for a few seconds. All buffered images - When the camera...]. Click the [Maintenance] tab. 2. All camera settings (including the user name, password, IP address, subnet mask etc.) The network connection mode changes to AM/PM mode. Operating Instructions 127 8.9 Resetting the Camera 8.9 Resetting the Camera You can reset all of the screen under...
...panning and tilting, it is being reset. Click [Execute]. • The indicator blinks orange, and then turns off for a list of the camera's default settings. Reconfigure the camera by referring to turn off the camera. See Page 149 for a few seconds. All buffered images - When the camera...]. Click the [Maintenance] tab. 2. All camera settings (including the user name, password, IP address, subnet mask etc.) The network connection mode changes to AM/PM mode. Operating Instructions 127 8.9 Resetting the Camera 8.9 Resetting the Camera You can reset all of the screen under...


