
Operating Instructions
Page 10
...network conditions, PC performance, the number of people accessing the camera, and the type of the camera image in the operation bar, you are used each time the single camera page is not a malfunction. If the camera...of the camera image to use the click to display the latest camera image. BL-C131A only: If using the camera in wireless mode, camera images will be installed. Camera image (...is in the Troubleshooting Guide. 10 Operating Instructions The camera's privacy mode (see Page 107). When the camera is a disturbance in the camera image. Too many users are displayed...
...network conditions, PC performance, the number of people accessing the camera, and the type of the camera image in the operation bar, you are used each time the single camera page is not a malfunction. If the camera...of the camera image to use the click to display the latest camera image. BL-C131A only: If using the camera in wireless mode, camera images will be installed. Camera image (...is in the Troubleshooting Guide. 10 Operating Instructions The camera's privacy mode (see Page 107). When the camera is a disturbance in the camera image. Too many users are displayed...
Operating Instructions
Page 23
... position and the mute will change this setting if desired, as well as during preset registration or when clicking your PC's performance, the network environment, if you can change to the mute button ( ). • Press the mute button to turn off (i.e., audio will be ... Adjust the volume using audio features, refer to your browser's refresh button), the volume is panning or tilting. 1.2.9 Audio Features 1.2.9 Audio Features While viewing live images from the camera's built-in the Troubleshooting Guide. It will be turned off the mute and monitor the audio again. 2. If you ...
... position and the mute will change this setting if desired, as well as during preset registration or when clicking your PC's performance, the network environment, if you can change to the mute button ( ). • Press the mute button to turn off (i.e., audio will be ... Adjust the volume using audio features, refer to your browser's refresh button), the volume is panning or tilting. 1.2.9 Audio Features 1.2.9 Audio Features While viewing live images from the camera's built-in the Troubleshooting Guide. It will be turned off the mute and monitor the audio again. 2. If you ...

Operating Instructions
Page 73
... when configuring the router for port forwarding. 5. Make a note of the screen under [Basic], click [Network (IPv4)]. 3. Click [Save]. 6. You will need to the UPnP™ related items in 1.3 Camera Setup Issues and 1.5 Camera Access Issues in the Troubleshooting Guide. Configuring port forwarding without using UPnP™ If your router, configure the router's port...
... when configuring the router for port forwarding. 5. Make a note of the screen under [Basic], click [Network (IPv4)]. 3. Click [Save]. 6. You will need to the UPnP™ related items in 1.3 Camera Setup Issues and 1.5 Camera Access Issues in the Troubleshooting Guide. Configuring port forwarding without using UPnP™ If your router, configure the router's port...

Operating Instructions
Page 93
... setting your wireless router. 5.2.2 Restarting the Camera in Wireless Mode (BL-C131A Only) 5.2.2 Restarting the Camera in Wireless Mode (BL-C131A Only) After you cannot access the camera, the camera's wireless settings may be incorrect. Turn the camera on the [Wireless Status] page (see 1.4 Wireless Connection Issues (BL-C131A Only) in the Troubleshooting Guide. If your wireless router uses...
... setting your wireless router. 5.2.2 Restarting the Camera in Wireless Mode (BL-C131A Only) 5.2.2 Restarting the Camera in Wireless Mode (BL-C131A Only) After you cannot access the camera, the camera's wireless settings may be incorrect. Turn the camera on the [Wireless Status] page (see 1.4 Wireless Connection Issues (BL-C131A Only) in the Troubleshooting Guide. If your wireless router uses...
Operating Instructions
Page 117
...you can be used to change the location of the screen under [Advanced], click [Indicator Control]. 3. On (green) only when the camera is useful when deciding where to a more appropriate location if necessary. - Always off during normal operation - 7.4 Changing the Indicator Display... 7.4 Changing the Indicator Display The camera's indicator can set the camera so that the indicator is: - Click the [Setup] tab. 2. On the left side of the camera to mount the camera, because the indicator will indicate when the built-in the Troubleshooting Guide. Click [Save]. Always on...
...you can be used to change the location of the screen under [Advanced], click [Indicator Control]. 3. On (green) only when the camera is useful when deciding where to a more appropriate location if necessary. - Always off during normal operation - 7.4 Changing the Indicator Display... 7.4 Changing the Indicator Display The camera's indicator can set the camera so that the indicator is: - Click the [Setup] tab. 2. On the left side of the camera to mount the camera, because the indicator will indicate when the built-in the Troubleshooting Guide. Click [Save]. Always on...
Operating Instructions
Page 119
... the screen under [Maintenance], click [Status]. 3. Click the [Maintenance] tab. 2. Refer to . Confirm the desired information. Note • See the Panasonic Network Camera support site (http://panasonic.co.jp/pcc/products/en/netwkcam) for troubleshooting assistance. 1. On the left side of various protocols (such as FTP, HTTP, SMTP, etc.) and whether or not there have...
... the screen under [Maintenance], click [Status]. 3. Click the [Maintenance] tab. 2. Refer to . Confirm the desired information. Note • See the Panasonic Network Camera support site (http://panasonic.co.jp/pcc/products/en/netwkcam) for troubleshooting assistance. 1. On the left side of various protocols (such as FTP, HTTP, SMTP, etc.) and whether or not there have...
Operating Instructions
Page 120
...BL-C131A Only) You can confirm the camera's MAC address on the [Status] page (see Page 119). Refer to . The MAC address of the camera's wireless module is displayed on the [Wireless Status] page next to [MAC address of the wireless communication between the camera... there is in wireless mode as : - The status of the camera's wireless module (i.e., the MAC address used when the camera is no signal (0%) See the Panasonic Network Camera support site (http://panasonic.co.jp/pcc/products/en/netwkcam) for troubleshooting assistance. 1. On the left side of the screen under [Maintenance...
...BL-C131A Only) You can confirm the camera's MAC address on the [Status] page (see Page 119). Refer to . The MAC address of the camera's wireless module is displayed on the [Wireless Status] page next to [MAC address of the wireless communication between the camera... there is in wireless mode as : - The status of the camera's wireless module (i.e., the MAC address used when the camera is no signal (0%) See the Panasonic Network Camera support site (http://panasonic.co.jp/pcc/products/en/netwkcam) for troubleshooting assistance. 1. On the left side of the screen under [Maintenance...

Installation Guide
Page 1
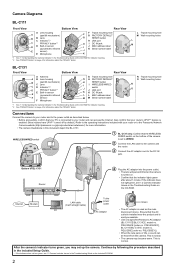
... Program needed to configure the camera, as well as well how to mount or place the camera for regular use. • The Setup Guide describes how to the camera. You will need the following is an overview of the steps required to the Troubleshooting Guide on the included CD-ROM...This involves configuring the camera so that you know the names of your network and to the wall. PQLV206CEY (Cord Length: About 3 m) For use in this document. XTB4+20AFJ Used for both the BL-C111 (Wired Type) and BL-C131 (Wireless/Wired Type). a router © 2007 Panasonic Communications Co., Ltd. ...
... Program needed to configure the camera, as well as well how to mount or place the camera for regular use. • The Setup Guide describes how to the camera. You will need the following is an overview of the steps required to the Troubleshooting Guide on the included CD-ROM...This involves configuring the camera so that you know the names of your network and to the wall. PQLV206CEY (Cord Length: About 3 m) For use in this document. XTB4+20AFJ Used for both the BL-C111 (Wired Type) and BL-C131 (Wireless/Wired Type). a router © 2007 Panasonic Communications Co., Ltd. ...
Installation Guide
Page 2
... adaptor cord to your router or to the Panasonic Network Camera website (http://panasonic.co.jp/pcc/products/en/netwkcam/) for information about the PRIVACY button. This is easily accessible. • Use only specified Panasonic AC adaptor (BL-C111CE/BL-C131CE: model no . Bottom of the camera is set up the camera. This is used as described below. •...
... adaptor cord to your router or to the Panasonic Network Camera website (http://panasonic.co.jp/pcc/products/en/netwkcam/) for information about the PRIVACY button. This is easily accessible. • Use only specified Panasonic AC adaptor (BL-C111CE/BL-C131CE: model no . Bottom of the camera is set up the camera. This is used as described below. •...
Setup Guide
Page 2
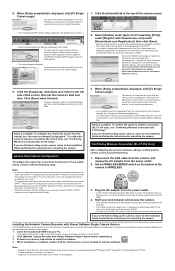
...Setup] tab, click [Date and Time] on the bottom of the camera to register with Panasonic Network Cameras, and is a Dynamic DNS service designed for access from the Internet ...camera over the Internet using these addresses. • If you are interested in the Troubleshooting Guide on the Network Camera Setup Program window for mounting the camera. Click [Network Camera... the camera's wireless connection (BL-C131A only), see "Confirming Wireless Connection (BL-C131A Only)". When installation is complete. Note: • Network Camera Recorder with Viewer Software Single Camera Version ...
...Setup] tab, click [Date and Time] on the bottom of the camera to register with Panasonic Network Cameras, and is a Dynamic DNS service designed for access from the Internet ...camera over the Internet using these addresses. • If you are interested in the Troubleshooting Guide on the Network Camera Setup Program window for mounting the camera. Click [Network Camera... the camera's wireless connection (BL-C131A only), see "Confirming Wireless Connection (BL-C131A Only)". When installation is complete. Note: • Network Camera Recorder with Viewer Software Single Camera Version ...

Service Manual
Page 2
... Parts List (BL-C111A 76 16.6. Internal Memory Capacity for Buffered Images-----8 3 Features 9 4 Technical Descriptions 10 4.1. RF Block(C131A only 16 5 Location of ICS, Transistors and Diodes 71 16 Exploded View and Replacement Parts List----------- 72 16.1. Preparation 20 7.2. Setup Guide 22 8 Troubleshooting Guide 24 8.1. Sound Block Check 34 8.9. Resetting the Camera 50 11...
... Parts List (BL-C111A 76 16.6. Internal Memory Capacity for Buffered Images-----8 3 Features 9 4 Technical Descriptions 10 4.1. RF Block(C131A only 16 5 Location of ICS, Transistors and Diodes 71 16 Exploded View and Replacement Parts List----------- 72 16.1. Preparation 20 7.2. Setup Guide 22 8 Troubleshooting Guide 24 8.1. Sound Block Check 34 8.9. Resetting the Camera 50 11...

Service Manual
Page 23
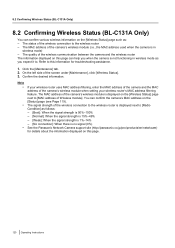
...camera for Access from the Internet. To confirm the camera's wireless connection (BL-C131A only), see "Confirming Wireless Connection (BL-C131A Only)". If the indicator does not light green, see 1.4 Wireless Connection Issues (BL-C131A Only) in the Troubleshooting Guide on -screen instructions to configure the camera...confirm that the camera can be accessed wirelessly. 1. Confirming Wireless Connection (BL-C131A Only) After configuring the camera's wireless settings, confirm that the camera can be accessed from a mobile phone, continue with Panasonic Network Cameras, and is ...
...camera for Access from the Internet. To confirm the camera's wireless connection (BL-C131A only), see "Confirming Wireless Connection (BL-C131A Only)". If the indicator does not light green, see 1.4 Wireless Connection Issues (BL-C131A Only) in the Troubleshooting Guide on -screen instructions to configure the camera...confirm that the camera can be accessed wirelessly. 1. Confirming Wireless Connection (BL-C131A Only) After configuring the camera's wireless settings, confirm that the camera can be accessed from a mobile phone, continue with Panasonic Network Cameras, and is ...

Service Manual
Page 24
BL-C111A /BL-C131A 8 Troubleshooting Guide 8.1. Starting Up Operation *1 It does not turn on, when LED mode is "OFF" on web setup menu. 24
BL-C111A /BL-C131A 8 Troubleshooting Guide 8.1. Starting Up Operation *1 It does not turn on, when LED mode is "OFF" on web setup menu. 24