Operating Instructions
Page 4
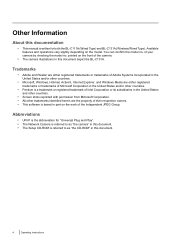
.... • This software is written for "Universal Plug and Play". • The Network Camera is referred to as "the camera" in this document. • The Setup CD-ROM is referred to as "the CD-ROM" in this document. 4 Operating Instructions Abbreviations • UPnP is the abbreviation for both the BL-C111A (Wired Type) and BL-C131A (Wireless/Wired Type).
.... • This software is written for "Universal Plug and Play". • The Network Camera is referred to as "the camera" in this document. • The Setup CD-ROM is referred to as "the CD-ROM" in this document. 4 Operating Instructions Abbreviations • UPnP is the abbreviation for both the BL-C111A (Wired Type) and BL-C131A (Wireless/Wired Type).
Operating Instructions
Page 82
...message is displayed, click [Restart]. The current network settings can leave this setting at [Auto Negotiation]. • BL-C131A only: If using the camera in this section. - [Automatic Setup]: Allows the camera to automatically obtain the appropriate network settings from your broadband router or from your Internet... 4. Note • • If the camera's IP address was changed as described in wireless mode, [Auto Negotiation] must be confirmed on the CD-ROM to specify your network settings (if necessary), after which the camera obtains an IP address automatically from the DHCP ...
...message is displayed, click [Restart]. The current network settings can leave this setting at [Auto Negotiation]. • BL-C131A only: If using the camera in this section. - [Automatic Setup]: Allows the camera to automatically obtain the appropriate network settings from your broadband router or from your Internet... 4. Note • • If the camera's IP address was changed as described in wireless mode, [Auto Negotiation] must be confirmed on the CD-ROM to specify your network settings (if necessary), after which the camera obtains an IP address automatically from the DHCP ...

Operating Instructions
Page 83
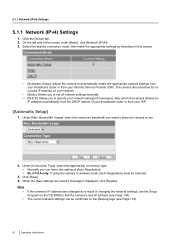
...to be configured using port 80. Ask your ISP or network administrator about which port numbers are connecting multiple cameras and plan on the CD-ROM. 2. Under [Internet Connection], enter the port number to be assigned to the camera. • The default port number is 80, however...4000: used for ICQ - 6661-6667: used for IRC • If you want to allow the camera to be assigned to each camera. Operating Instructions 83 5.1.1 Network (IPv4) Settings [Static] 1. Under [Network Configuration from the Internet using the Setup Program on using port numbers in the 50000-50050 range. 3.
...to be configured using port 80. Ask your ISP or network administrator about which port numbers are connecting multiple cameras and plan on the CD-ROM. 2. Under [Internet Connection], enter the port number to be assigned to the camera. • The default port number is 80, however...4000: used for ICQ - 6661-6667: used for IRC • If you want to allow the camera to be assigned to each camera. Operating Instructions 83 5.1.1 Network (IPv4) Settings [Static] 1. Under [Network Configuration from the Internet using the Setup Program on using port numbers in the 50000-50050 range. 3.

Operating Instructions
Page 85
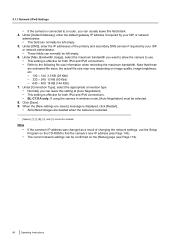
...the host name*1 if required by your ISP or network administrator about which port numbers are connecting multiple cameras and plan on the CD-ROM. 2. Under [Internet Connection], enter the port number to be assigned to the camera. • The default port number is 80, however... If you want to allow the camera to be configured using the Setup Program on using port forwarding to each camera. Ask your ISP or network administrator. 5.1.1 Network (IPv4) Settings [DHCP] 1. We recommend using port 80. Operating Instructions 85 Under [Network Configuration from the Internet using port ...
...the host name*1 if required by your ISP or network administrator about which port numbers are connecting multiple cameras and plan on the CD-ROM. 2. Under [Internet Connection], enter the port number to be assigned to the camera. • The default port number is 80, however... If you want to allow the camera to be configured using the Setup Program on using port forwarding to each camera. Ask your ISP or network administrator. 5.1.1 Network (IPv4) Settings [DHCP] 1. We recommend using port 80. Operating Instructions 85 Under [Network Configuration from the Internet using port ...
Operating Instructions
Page 86
... current network settings can normally be confirmed on the [Status] page (see Page 143). the actual file size may vary depending on the CD-ROM to find the camera's new... IP address (see Page 119). 86 Operating Instructions Under [Connection Type], select the appropriate connection type. • Normally you want to allow the camera to use the Setup... the IP addresses of changing the network settings, use . • This setting is effective for both IPv4 and IPv6 connections. • BL-C131A only: If using the camera in wireless mode, [Auto Negotiation]...
... current network settings can normally be confirmed on the [Status] page (see Page 143). the actual file size may vary depending on the CD-ROM to find the camera's new... IP address (see Page 119). 86 Operating Instructions Under [Connection Type], select the appropriate connection type. • Normally you want to allow the camera to use the Setup... the IP addresses of changing the network settings, use . • This setting is effective for both IPv4 and IPv6 connections. • BL-C131A only: If using the camera in wireless mode, [Auto Negotiation]...
Operating Instructions
Page 143
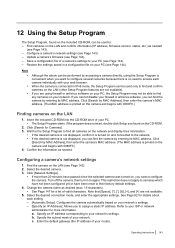
... be used only to access each setting. - [Automatic Setup]: Configures the camera automatically based on your ISP or network administrator for a list of your router). Wait for Cameras]. 3. Configuring a camera's network settings 1. a. Specify the subnet mask of a camera's settings to : - c. 12 Using the Setup Program The Setup Program, found on the CD-ROM. 2. Save a configuration file of your PC (see...
... be used only to access each setting. - [Automatic Setup]: Configures the camera automatically based on your ISP or network administrator for a list of your router). Wait for Cameras]. 3. Configuring a camera's network settings 1. a. Specify the subnet mask of a camera's settings to : - c. 12 Using the Setup Program The Setup Program, found on the CD-ROM. 2. Save a configuration file of your PC (see...
Operating Instructions
Page 144
... by your router). Click [Update Firmware]. Insert the included CD-ROM into the CD-ROM drive of your ISP or network administrator for more information. The configuration file's extension (.dat) must not be able to your PC. • The Setup Program starts. Restoring settings from the Panasonic Network Camera website and click [Open]. 5. d. Refer to use . 6. If...
... by your router). Click [Update Firmware]. Insert the included CD-ROM into the CD-ROM drive of your ISP or network administrator for more information. The configuration file's extension (.dat) must not be able to your PC. • The Setup Program starts. Restoring settings from the Panasonic Network Camera website and click [Open]. 5. d. Refer to use . 6. If...

Installation Guide
Page 1
...Used for both the BL-C111 (Wired Type) and BL-C131 (Wireless/Wired Type). Setup CD-ROM (1 pc.) Order No. BL-C111 Model No. (Wired Type) BL-C131 (Wireless/Wired Type) This manual is written for wall mounting the camera. printed on the ...Network Camera is referred to as "the camera" in this document. • The Setup CD-ROM is an overview of your camera depends on the included CD-ROM. Washer S (2 pcs.) Order No. XWG35FJ Used when mounting the camera. You will need the following items are included. a LAN cable (CAT-5 straight cable) - a router © 2007 Panasonic...
...Used for both the BL-C111 (Wired Type) and BL-C131 (Wireless/Wired Type). Setup CD-ROM (1 pc.) Order No. BL-C111 Model No. (Wired Type) BL-C131 (Wireless/Wired Type) This manual is written for wall mounting the camera. printed on the ...Network Camera is referred to as "the camera" in this document. • The Setup CD-ROM is an overview of your camera depends on the included CD-ROM. Washer S (2 pcs.) Order No. XWG35FJ Used when mounting the camera. You will need the following items are included. a LAN cable (CAT-5 straight cable) - a router © 2007 Panasonic...
Installation Guide
Page 2
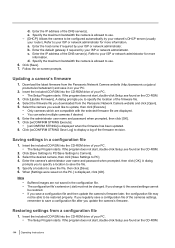
... Setup Guide. • If the indicator does not turn green, see 1.2 Camera Indicator Issues in the Troubleshooting Guide on the CD-ROM. Bottom of the camera is normal. Ensure that the indicator lights green after about 1 minute. N Tripod mounting hole O Wall mounting holes N O Connections Connect the camera to your router and to the Panasonic Network Camera website (http://panasonic...
... Setup Guide. • If the indicator does not turn green, see 1.2 Camera Indicator Issues in the Troubleshooting Guide on the CD-ROM. Bottom of the camera is normal. Ensure that the indicator lights green after about 1 minute. N Tripod mounting hole O Wall mounting holes N O Connections Connect the camera to your router and to the Panasonic Network Camera website (http://panasonic...

Installation Guide
Page 3
... sensor before deciding where to the active detection range of the sensor, or that you limit the pan and tilt range of locations when mounting the camera. If the lens is no temperature difference between objects in sensor. 7. We recommend that you should... the following areas. Choosing a Location to the Panasonic Network Camera website at an area outside of the camera. Refer to Mount the Camera Notes About the Camera's Built-in the Setup Guide. Avoid these images later as on the CD-ROM) or change the camera's location if necessary. You can verify the sensor...
... sensor before deciding where to the active detection range of the sensor, or that you limit the pan and tilt range of locations when mounting the camera. If the lens is no temperature difference between objects in sensor. 7. We recommend that you should... the following areas. Choosing a Location to the Panasonic Network Camera website at an area outside of the camera. Refer to Mount the Camera Notes About the Camera's Built-in the Setup Guide. Avoid these images later as on the CD-ROM) or change the camera's location if necessary. You can verify the sensor...
Setup Guide
Page 1
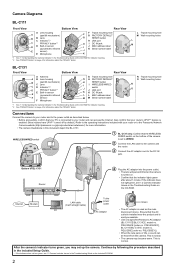
...; The Setup CD-ROM is written for connecting your firewall or antivirus software, you cannot configure the camera. Setup Guide Network Camera Indoor Use Only Please read the Important Information document and followed the instructions in the Installation Guide for both the BL-C111A (Wired Type) and BL-C131A (Wireless/Wired Type). Panasonic Network Camera Website: http://panasonic.net/pcc/ipcam/ BL-C111A Model No...
...; The Setup CD-ROM is written for connecting your firewall or antivirus software, you cannot configure the camera. Setup Guide Network Camera Indoor Use Only Please read the Important Information document and followed the instructions in the Installation Guide for both the BL-C111A (Wired Type) and BL-C131A (Wireless/Wired Type). Panasonic Network Camera Website: http://panasonic.net/pcc/ipcam/ BL-C111A Model No...
Setup Guide
Page 2
...camera's wireless connection (BL-C131A only), see 1.2 Camera Indicator Issues in wireless mode. Set the WIRELESS/WIRED switch on the Network Camera Setup Program window for access from the Internet or from Internet Configuration To configure the camera for details about this software. 1. Start your desktop to access the camera. Click [Manual] on the bottom of the Panasonic Network Camera...enabled [Auto Port Forwarding (IPv4)], the camera's port number may need to access the camera in the Troubleshooting Guide on the CD-ROM for information about the installation and ...
...camera's wireless connection (BL-C131A only), see 1.2 Camera Indicator Issues in wireless mode. Set the WIRELESS/WIRED switch on the Network Camera Setup Program window for access from the Internet or from Internet Configuration To configure the camera for details about this software. 1. Start your desktop to access the camera. Click [Manual] on the bottom of the Panasonic Network Camera...enabled [Auto Port Forwarding (IPv4)], the camera's port number may need to access the camera in the Troubleshooting Guide on the CD-ROM for information about the installation and ...

Service Manual
Page 20
...Network Camera. • Set up software (Setup CD-ROM) • PC to fulfill the system requirements. • Ethernet Router or Wireless Router for LAN Connection. • Ethernet cable (two pieces of November 2006, Windows Vista will be supported in order for the camera to the Panasonic Network Camera website at http://panasonic...Interface 10/100 Mbps network card Wireless Interface IEEE 802.11b/g (Embedded) (BL-C131A Only) Web Browser Internet Explorer® 6.0 or later (not included) Audio PC speaker or headphones (required to use it. BL-C111A /BL-C131A 7 Operation ...
...Network Camera. • Set up software (Setup CD-ROM) • PC to fulfill the system requirements. • Ethernet Router or Wireless Router for LAN Connection. • Ethernet cable (two pieces of November 2006, Windows Vista will be supported in order for the camera to the Panasonic Network Camera website at http://panasonic...Interface 10/100 Mbps network card Wireless Interface IEEE 802.11b/g (Embedded) (BL-C131A Only) Web Browser Internet Explorer® 6.0 or later (not included) Audio PC speaker or headphones (required to use it. BL-C111A /BL-C131A 7 Operation ...
Service Manual
Page 22
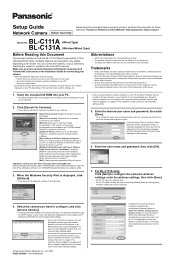
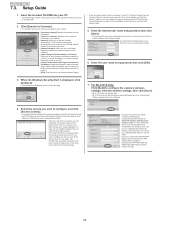
...network. For more than one camera, you can distinguish cameras by model number, printed on , you to 5.2.1 Configuring the Camera for Cameras]: Displays a list of the camera, or by configuring the corresponding camera settings to view the included documentation. Setup Guide 1. Turn off the camera, then turn it again. BL-C111A /BL...] or [DHCP] and enter the appropriate settings. • If you have a Panasonic BB-HGW700A Network Camera Control Unit, WEP settings will be able to reset the camera and configure it on the CDROM. • If you can skip this program]: Displays...
...network. For more than one camera, you can distinguish cameras by model number, printed on , you to 5.2.1 Configuring the Camera for Cameras]: Displays a list of the camera, or by configuring the corresponding camera settings to view the included documentation. Setup Guide 1. Turn off the camera, then turn it again. BL-C111A /BL...] or [DHCP] and enter the appropriate settings. • If you have a Panasonic BB-HGW700A Network Camera Control Unit, WEP settings will be able to reset the camera and configure it on the CDROM. • If you can skip this program]: Displays...

Service Manual
Page 23
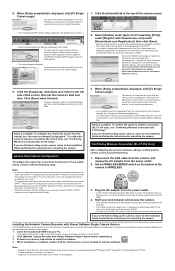
...Installation Guide and follow the instructions for access from a mobile phone, continue with Panasonic Network Cameras, and is displayed, click [To Single Camera page]. If you are finished setting up the camera, return to Viewnetcam.com Registration page] when it is turned off by default ... UPnP™, refer to Section 4 Configuring the Camera for Access from the Internet in the Troubleshooting Guide on the CD-ROM. • You may have its UPnP™ feature turned on (it is displayed. Setup is complete. BL-C111A/BL-C131A 1. ActiveX Controls must have changed. Click ...
...Installation Guide and follow the instructions for access from a mobile phone, continue with Panasonic Network Cameras, and is displayed, click [To Single Camera page]. If you are finished setting up the camera, return to Viewnetcam.com Registration page] when it is turned off by default ... UPnP™, refer to Section 4 Configuring the Camera for Access from the Internet in the Troubleshooting Guide on the CD-ROM. • You may have its UPnP™ feature turned on (it is displayed. Setup is complete. BL-C111A/BL-C131A 1. ActiveX Controls must have changed. Click ...