Operating Instructions
Page 1
BL-C111A BL-C131A Operating Instructions Network Camera BL-C111A (Wired Type) Model BL-C131A (Wireless/Wired Type) Please read this document before using the product, and save this document for customers in the USA or Puerto Rico Panasonic Network Camera Website: http://www.panasonic.com/netcam for future reference.
BL-C111A BL-C131A Operating Instructions Network Camera BL-C111A (Wired Type) Model BL-C131A (Wireless/Wired Type) Please read this document before using the product, and save this document for customers in the USA or Puerto Rico Panasonic Network Camera Website: http://www.panasonic.com/netcam for future reference.

Operating Instructions
Page 2
... in pyroelectric infrared sensor, which uses infrared rays to an FTP or HTTP server as desired. You can also program the camera to transfer images via E-mail or upload them to your mouse to select the video format that best suits your needs. ... and easy. You can also be monitored from home. UPnP™ support When connecting the camera to a UPnP™ compatible router, the camera's network settings can be used to trigger the camera to buffer (i.e., temporarily store) camera images in the camera image. For more information, see Page 71. 2 Operating Instructions
... in pyroelectric infrared sensor, which uses infrared rays to an FTP or HTTP server as desired. You can also program the camera to transfer images via E-mail or upload them to your mouse to select the video format that best suits your needs. ... and easy. You can also be monitored from home. UPnP™ support When connecting the camera to a UPnP™ compatible router, the camera's network settings can be used to trigger the camera to buffer (i.e., temporarily store) camera images in the camera image. For more information, see Page 71. 2 Operating Instructions

Operating Instructions
Page 3
.... Wireless connectivity (BL-C131A only) The BL-C131A supports wireless standards IEEE 802.11b and IEEE 802.11g, giving you can be displayed in English, French, German, Italian, Spanish, Russian, Simplified Chinese, Korean, and Japanese. Viewnetcam.com support After registering your choosing, such as bob.viewnetcam.com. Operating Instructions 3 When used camera pages can...
.... Wireless connectivity (BL-C131A only) The BL-C131A supports wireless standards IEEE 802.11b and IEEE 802.11g, giving you can be displayed in English, French, German, Italian, Spanish, Russian, Simplified Chinese, Korean, and Japanese. Viewnetcam.com support After registering your choosing, such as bob.viewnetcam.com. Operating Instructions 3 When used camera pages can...
Operating Instructions
Page 4
... in this documentation • This manual is written for "Universal Plug and Play". • The Network Camera is referred to as "the camera" in part on the work of the Independent JPEG Group. Trademarks • Adobe and Reader are either registered trademarks or...this document. 4 Operating Instructions Available features and operations vary slightly depending on the front of your camera by checking the model no . printed on the model. You can confirm the model no . Abbreviations • UPnP is the abbreviation for both the BL-C111A (Wired Type) and BL-C131A (Wireless/Wired Type...
... in this documentation • This manual is written for "Universal Plug and Play". • The Network Camera is referred to as "the camera" in part on the work of the Independent JPEG Group. Trademarks • Adobe and Reader are either registered trademarks or...this document. 4 Operating Instructions Available features and operations vary slightly depending on the front of your camera by checking the model no . printed on the model. You can confirm the model no . Abbreviations • UPnP is the abbreviation for both the BL-C111A (Wired Type) and BL-C131A (Wireless/Wired Type...

Operating Instructions
Page 5
...-party Dynamic DNS Service 78 Confirming Internet Access 80 5 Changing Camera Settings 81 5.1 5.1.1 5.1.2 5.2 5.2.1 5.2.2 5.3 Network Settings ...81 Network (IPv4) Settings 82 Proxy Server Settings ...87 Using the Camera in Wireless Mode (BL-C131A Only 88 Configuring the Camera for Wireless Connection (BL-C131A Only 89 Restarting the Camera in Wireless Mode (BL-C131A Only 93 UPnP™ Settings ...94 Operating Instructions 5
...-party Dynamic DNS Service 78 Confirming Internet Access 80 5 Changing Camera Settings 81 5.1 5.1.1 5.1.2 5.2 5.2.1 5.2.2 5.3 Network Settings ...81 Network (IPv4) Settings 82 Proxy Server Settings ...87 Using the Camera in Wireless Mode (BL-C131A Only 88 Configuring the Camera for Wireless Connection (BL-C131A Only 89 Restarting the Camera in Wireless Mode (BL-C131A Only 93 UPnP™ Settings ...94 Operating Instructions 5
Operating Instructions
Page 6
...Cameras 113 7.3 Specifying Operation Times 115 7.4 Changing the Indicator Display 117 7.5 Privacy Mode ...118 8 Camera Administration and Maintenance 119 8.1 Confirming Camera Status 119 8.2 Confirming Wireless Status (BL...-C131A Only 120 8.3 Confirming Session Status 121 8.4 Confirming Alarm Logs 122 8.5 Restarting the Camera 123 8.6 Updating the Camera... 13 Technical Information 146 13.1 Cleaning the Camera 146 13.2 ASCII Character Table 147 13.3...
...Cameras 113 7.3 Specifying Operation Times 115 7.4 Changing the Indicator Display 117 7.5 Privacy Mode ...118 8 Camera Administration and Maintenance 119 8.1 Confirming Camera Status 119 8.2 Confirming Wireless Status (BL...-C131A Only 120 8.3 Confirming Session Status 121 8.4 Confirming Alarm Logs 122 8.5 Restarting the Camera 123 8.6 Updating the Camera... 13 Technical Information 146 13.1 Cleaning the Camera 146 13.2 ASCII Character Table 147 13.3...

Operating Instructions
Page 7
...Example: http://192.168.0.253:50001 If you are accessing the camera from outside, i.e., from a PC that is displayed. Operating Instructions 7 When the authentication dialog is displayed. For more information, see Page 75), enter the URL instead of the camera, if it is not displayed, click the [Login] tab ... have registered with a DNS service, such as the camera. Example: http://192.168.0.253 If the camera's port number is a port number other than 80, enter ":" and the port number after the camera's top page is not connected to the same network as Viewnetcam.com (see Page 109.
...Example: http://192.168.0.253:50001 If you are accessing the camera from outside, i.e., from a PC that is displayed. Operating Instructions 7 When the authentication dialog is displayed. For more information, see Page 75), enter the URL instead of the camera, if it is not displayed, click the [Login] tab ... have registered with a DNS service, such as the camera. Example: http://192.168.0.253 If the camera's port number is a port number other than 80, enter ":" and the port number after the camera's top page is not connected to the same network as Viewnetcam.com (see Page 109.
Operating Instructions
Page 8
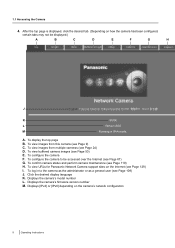
... URLs for Panasonic Network Camera support sites on the Internet (see Page 50) E. Displays the camera's firmware version number M. Displays [IPv4] or [IPv6] depending on how the camera has been ...camera's model number L. To view images from this camera (see Page 24) D. To view images from multiple cameras (see Page 9) C. A. To configure the camera F. To log in IPv4 mode. Click the desired display language K. 1.1 Accessing the Camera 4. After the top page is displayed, click the desired tab. (Depending on the camera's network configuration 8 Operating Instructions...
... URLs for Panasonic Network Camera support sites on the Internet (see Page 50) E. Displays the camera's firmware version number M. Displays [IPv4] or [IPv6] depending on how the camera has been ...camera's model number L. To view images from this camera (see Page 24) D. To view images from multiple cameras (see Page 9) C. A. To configure the camera F. To log in IPv4 mode. Click the desired display language K. 1.1 Accessing the Camera 4. After the top page is displayed, click the desired tab. (Depending on the camera's network configuration 8 Operating Instructions...

Operating Instructions
Page 9
...Date and time overlay, alarm state overlay (see Page 110) Operating Instructions 9 Camera name (see Page 110) C. Click the [Single] tab. • ActiveX® Controls must be installed in order to view MPEG-4 images, MJPEG images, or to install them. The single camera page AB C D E FG Oct.18,06 11:29:59AM M...appropriate ActiveX Control is displayed at the top of the screen, see Page 12. • If the camera image is not displayed, or if the ActiveX message is not installed, the camera will prompt you to use audio features. Volume slider (see Page 23) D. For more information see...
...Date and time overlay, alarm state overlay (see Page 110) Operating Instructions 9 Camera name (see Page 110) C. Click the [Single] tab. • ActiveX® Controls must be installed in order to view MPEG-4 images, MJPEG images, or to install them. The single camera page AB C D E FG Oct.18,06 11:29:59AM M...appropriate ActiveX Control is displayed at the top of the screen, see Page 12. • If the camera image is not displayed, or if the ActiveX message is not installed, the camera will prompt you to use audio features. Volume slider (see Page 23) D. For more information see...

Operating Instructions
Page 10
Operation bar (see Page 118) has been turned on network conditions, PC performance, the number of people accessing the camera, and the type of objects being viewed. If the camera image is not displayed immediately or correctly, click your mouse to not display images at this time of ...the Troubleshooting Guide. 10 Operating Instructions See Page 11 or Page 12 for guest users (see Page 110) J. click to return to the 1.4 Wireless Connection Issues (BL-C131A Only) in the camera image. The image refresh rate may be installed. 1.2 Viewing Live Camera Images F. Too many users ...
Operation bar (see Page 118) has been turned on network conditions, PC performance, the number of people accessing the camera, and the type of objects being viewed. If the camera image is not displayed immediately or correctly, click your mouse to not display images at this time of ...the Troubleshooting Guide. 10 Operating Instructions See Page 11 or Page 12 for guest users (see Page 110) J. click to return to the 1.4 Wireless Connection Issues (BL-C131A Only) in the camera image. The image refresh rate may be installed. 1.2 Viewing Live Camera Images F. Too many users ...

Operating Instructions
Page 11
... and select [Install ActiveX Control...]. 2. Operating Instructions 11 1.2 Viewing Live Camera Images ActiveX dialog for Windows XP Service Pack 2 To view video images (i.e., MPEG-4 and MJPEG images) or use the camera's audio features, the corresponding ActiveX Controls must be installed, download them from the Panasonic Network Camera website (http://panasonic.co.jp/pcc/products/en/netwkcam/). 1. Note...
... and select [Install ActiveX Control...]. 2. Operating Instructions 11 1.2 Viewing Live Camera Images ActiveX dialog for Windows XP Service Pack 2 To view video images (i.e., MPEG-4 and MJPEG images) or use the camera's audio features, the corresponding ActiveX Controls must be installed, download them from the Panasonic Network Camera website (http://panasonic.co.jp/pcc/products/en/netwkcam/). 1. Note...

Operating Instructions
Page 12
...-ins], select [Enable]. Confirm that Internet Explorer is displayed, however, you need to wait a moment before camera images are displayed. 12 Operating Instructions Click [Tools]®[Internet Options]®[Security] tab and click [Custom level] on the CD-ROM and double... and MJPEG images) or use the camera's audio features, ActiveX Controls must be installed, download them from the Panasonic Network Camera support site (http://panasonic.co.jp/pcc/products/en/netwkcam) or install them from the Panasonic Network Camera website (http://panasonic.co.jp/pcc/products/en/netwkcam/)....
...-ins], select [Enable]. Confirm that Internet Explorer is displayed, however, you need to wait a moment before camera images are displayed. 12 Operating Instructions Click [Tools]®[Internet Options]®[Security] tab and click [Custom level] on the CD-ROM and double... and MJPEG images) or use the camera's audio features, ActiveX Controls must be installed, download them from the Panasonic Network Camera support site (http://panasonic.co.jp/pcc/products/en/netwkcam) or install them from the Panasonic Network Camera website (http://panasonic.co.jp/pcc/products/en/netwkcam/)....

Operating Instructions
Page 13
Operating Instructions 13 If you want to view still images. In this case, you can use a proxy server, see Page 137. • If your computer or your network administrator. 1.2 Viewing Live Camera Images • If you use the [Refresh Rate] selector to select to view video images, consult your network uses a firewall for security purposes, the firewall may prevent video images from being displayed.
Operating Instructions 13 If you want to view still images. In this case, you can use a proxy server, see Page 137. • If your computer or your network administrator. 1.2 Viewing Live Camera Images • If you use the [Refresh Rate] selector to select to view video images, consult your network uses a firewall for security purposes, the firewall may prevent video images from being displayed.
Operating Instructions
Page 14
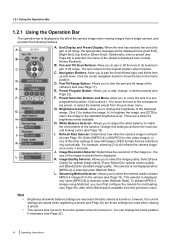
...the pull-down menu. White Balance Selector: Allows you to pan the lens left of 9 H brightness levels available. Refresh Rate Selector: Determines how often the camera image is refreshed (see Page 22). 14 Operating Instructions Preset Selection Buttons and Menu: Allow you to change the ...home position if necessary (see Page 19). The camera lens moves to the home position when it is ...
...the pull-down menu. White Balance Selector: Allows you to pan the lens left of 9 H brightness levels available. Refresh Rate Selector: Determines how often the camera image is refreshed (see Page 22). 14 Operating Instructions Preset Selection Buttons and Menu: Allow you to change the ...home position if necessary (see Page 19). The camera lens moves to the home position when it is ...
Operating Instructions
Page 15
... tilt scan buttons Allow you to center the image within the zoomed area, but the lens will not pan or tilt. Note, however, that the camera may not be able to the maximum pan or tilt range allowed. 1. Users can be moved to center on the desired point. Any forced movement ... [Pan/Tilt Range] button was used to the home position. Simply move the lens to limit the maximum pan and tilt range of the lens. The lens returns to its maximum pan or tilt range. Navigation buttons Allow you to pan or tilt the lens to the original position when finished. Operating Instructions 15...
... tilt scan buttons Allow you to center the image within the zoomed area, but the lens will not pan or tilt. Note, however, that the camera may not be able to the maximum pan or tilt range allowed. 1. Users can be moved to center on the desired point. Any forced movement ... [Pan/Tilt Range] button was used to the home position. Simply move the lens to limit the maximum pan and tilt range of the lens. The lens returns to its maximum pan or tilt range. Navigation buttons Allow you to pan or tilt the lens to the original position when finished. Operating Instructions 15...
Operating Instructions
Page 16
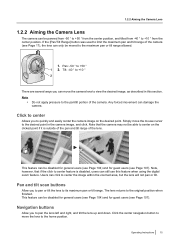
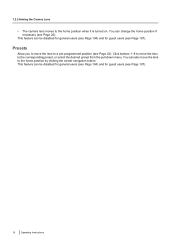
...the pull-down menu. You can be disabled for general users (see Page 104) and for guest users (see Page 22). 1.2.2 Aiming the Camera Lens • The camera lens moves to a pre-programmed position (see Page 22). You can be disabled for general users (see Page 104) and for guest users ...(see Page 107). This feature can change the home position if necessary (see Page 107). 16 Operating Instructions Presets Allow you to move the ...
...the pull-down menu. You can be disabled for general users (see Page 104) and for guest users (see Page 22). 1.2.2 Aiming the Camera Lens • The camera lens moves to a pre-programmed position (see Page 22). You can be disabled for general users (see Page 104) and for guest users ...(see Page 107). This feature can change the home position if necessary (see Page 107). 16 Operating Instructions Presets Allow you to move the ...
Operating Instructions
Page 17
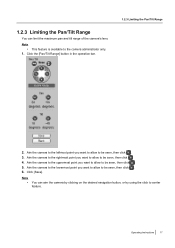
Operating Instructions 17 Note • This feature is available to the camera administrator only. 1. Note • You can limit the maximum pan and tilt range of the camera's lens. Aim the camera to the leftmost point you want to allow to be seen, then click . 3. Aim the camera to the uppermost point you... want to allow to be seen, then click . 4. Aim the camera to the lowermost point you want to allow to be seen, then click . 6. Click [Save]. 1.2.3 Limiting the Pan/Tilt Range You can aim the camera by clicking on the desired navigation button, or by using the click ...
Operating Instructions 17 Note • This feature is available to the camera administrator only. 1. Note • You can limit the maximum pan and tilt range of the camera's lens. Aim the camera to the leftmost point you want to allow to be seen, then click . 3. Aim the camera to the uppermost point you... want to allow to be seen, then click . 4. Aim the camera to the lowermost point you want to allow to be seen, then click . 6. Click [Save]. 1.2.3 Limiting the Pan/Tilt Range You can aim the camera by clicking on the desired navigation button, or by using the click ...
Operating Instructions
Page 18
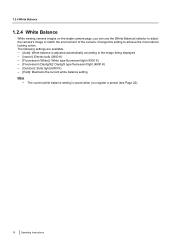
... - [Auto]: White balance is saved when you register a preset (see Page 22). 18 Operating Instructions 1.2.4 White Balance 1.2.4 White Balance While viewing camera images on the single camera page, you can use the [White Balance] selector to adjust the camera's image to the image being displayed - [Indoor]: Electric bulb (2800 K) - [Fluorescent (White)]:...[Hold]: Maintains the current white balance setting Note • The current white balance setting is adjusted automatically according to match the environment of the camera. Change this setting to achieve the most natural looking colors.
... - [Auto]: White balance is saved when you register a preset (see Page 22). 18 Operating Instructions 1.2.4 White Balance 1.2.4 White Balance While viewing camera images on the single camera page, you can use the [White Balance] selector to adjust the camera's image to the image being displayed - [Indoor]: Electric bulb (2800 K) - [Fluorescent (White)]:...[Hold]: Maintains the current white balance setting Note • The current white balance setting is adjusted automatically according to match the environment of the camera. Change this setting to achieve the most natural looking colors.
Operating Instructions
Page 19
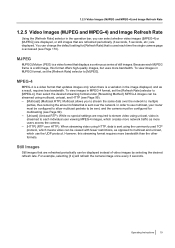
...this format offers high-quality images, but uses more bandwidth. To view images in MJPEG format, set the [Refresh Rate] selector to [MJPEG]. Operating Instructions 19 To view images in MPEG-4 format, set the [Refresh Rate] selector to [MPEG-4], then select the desired streaming format under [Streaming Method]. ... MPEG-4) and Image Refresh Rate Using the [Refresh Rate] selector in the operation bar, you to stream the same data over the network to each individual user viewing MPEG-4 images, which creates more network traffic as more users access the camera. - [HTTP] (RTP over the...
...this format offers high-quality images, but uses more bandwidth. To view images in MJPEG format, set the [Refresh Rate] selector to [MJPEG]. Operating Instructions 19 To view images in MPEG-4 format, set the [Refresh Rate] selector to [MPEG-4], then select the desired streaming format under [Streaming Method]. ... MPEG-4) and Image Refresh Rate Using the [Refresh Rate] selector in the operation bar, you to stream the same data over the network to each individual user viewing MPEG-4 images, which creates more network traffic as more users access the camera. - [HTTP] (RTP over the...

Operating Instructions
Page 20
...look. Viewing video images on a mobile phone. The zoom magnification (´1.0-´10.0) is not available when viewing camera images on the single camera page - Zoom out 2 20 Operating Instructions You can be used when: - Viewing video images from you to zoom up to zoom in this section. ... increases, image quality decreases. Zoom out Zooming with the scroll wheel With the cursor placed over the camera image, rotate the scroll wheel away from multiple cameras on the multi camera page - Zoom in , and right-click the lower part of the image to zoom in 2. The...
...look. Viewing video images on a mobile phone. The zoom magnification (´1.0-´10.0) is not available when viewing camera images on the single camera page - Zoom out 2 20 Operating Instructions You can be used when: - Viewing video images from you to zoom up to zoom in this section. ... increases, image quality decreases. Zoom out Zooming with the scroll wheel With the cursor placed over the camera image, rotate the scroll wheel away from multiple cameras on the multi camera page - Zoom in , and right-click the lower part of the image to zoom in 2. The...