Operating Instructions
Page 71
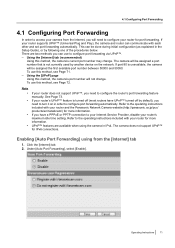
There are available when using from the Internet, you will need to configure your router and the Panasonic Network Camera website (http://panasonic.co.jp/pcc/ products/en/netwkcam/) for more information. If you have UPnP™ turned off (most routers have a PPPoE or PPTP ... two methods you can be done during initial configuration (as explained in the Setup Guide), or by another device on in IPv4. The camera does not support UPnP™ for IPv6 connections. If port 80 is unavailable, the camera will be assigned a port number that is turned off by default), you...
There are available when using from the Internet, you will need to configure your router and the Panasonic Network Camera website (http://panasonic.co.jp/pcc/ products/en/netwkcam/) for more information. If you have UPnP™ turned off (most routers have a PPPoE or PPTP ... two methods you can be done during initial configuration (as explained in the Setup Guide), or by another device on in IPv4. The camera does not support UPnP™ for IPv6 connections. If port 80 is unavailable, the camera will be assigned a port number that is turned off by default), you...

Operating Instructions
Page 73
...forwarding feature. • When configuring port forwarding, store the camera's IP address and port number that the status is [...[Connection Mode], click [Static]. 4. Click [Restart]. 7. Register the camera to configure the router's port forwarding feature manually. 1. While referring to ...™, you noted above. 8. Click [Save]. 6. Click the [Setup] tab. 2. You will need to use a Dynamic DNS service, such... to the UPnP™ related items in 1.3 Camera Setup Issues and 1.5 Camera Access Issues in the Troubleshooting Guide. 4.1 Configuring Port Forwarding 2. On the left ...
...forwarding feature. • When configuring port forwarding, store the camera's IP address and port number that the status is [...[Connection Mode], click [Static]. 4. Click [Restart]. 7. Register the camera to configure the router's port forwarding feature manually. 1. While referring to ...™, you noted above. 8. Click [Save]. 6. Click the [Setup] tab. 2. You will need to use a Dynamic DNS service, such... to the UPnP™ related items in 1.3 Camera Setup Issues and 1.5 Camera Access Issues in the Troubleshooting Guide. 4.1 Configuring Port Forwarding 2. On the left ...

Operating Instructions
Page 81
... camera after changing certain network settings, use the Setup Program to the instructions provided in the Setup Guide. If your Internet Service Provider or network administrator for the appropriate network settings. After changing network settings and clicking [Save], the camera must log in to the camera as explained in the Setup Guide. 5.1 Network Settings 5 Changing Camera Settings 5.1 Network Settings The camera's network settings are deleted when the camera...
... camera after changing certain network settings, use the Setup Program to the instructions provided in the Setup Guide. If your Internet Service Provider or network administrator for the appropriate network settings. After changing network settings and clicking [Save], the camera must log in to the camera as explained in the Setup Guide. 5.1 Network Settings 5 Changing Camera Settings 5.1 Network Settings The camera's network settings are deleted when the camera...

Operating Instructions
Page 88
In this . Refer to the camera. Restart the camera in Wireless Mode (BL-C131A Only) The BL-C131A can be used wirelessly. c. Configure the camera for wired connection. Configure the camera's wireless settings (see Page 93). 88 Operating Instructions b. 5.2 Using the Camera in Wireless Mode (BL-C131A Only) 5.2 Using the Camera in wireless mode (see Page 89). In order to use the camera wirelessly, you have not done this case, there is no need to connect a LAN cable to the included Installation Guide and Setup Guide if you must: a.
In this . Refer to the camera. Restart the camera in Wireless Mode (BL-C131A Only) The BL-C131A can be used wirelessly. c. Configure the camera for wired connection. Configure the camera's wireless settings (see Page 93). 88 Operating Instructions b. 5.2 Using the Camera in Wireless Mode (BL-C131A Only) 5.2 Using the Camera in wireless mode (see Page 89). In order to use the camera wirelessly, you have not done this case, there is no need to connect a LAN cable to the included Installation Guide and Setup Guide if you must: a.
Operating Instructions
Page 117
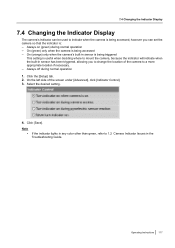
... location if necessary. - Always on (green) during normal operation 1. Click the [Setup] tab. 2. Note • If the indicator lights in the Troubleshooting Guide. 7.4 Changing the Indicator Display 7.4 Changing the Indicator Display The camera's indicator can be used to indicate when the camera is being accessed, however you to change the location of the screen...
... location if necessary. - Always on (green) during normal operation 1. Click the [Setup] tab. 2. Note • If the indicator lights in the Troubleshooting Guide. 7.4 Changing the Indicator Display 7.4 Changing the Indicator Display The camera's indicator can be used to indicate when the camera is being accessed, however you to change the location of the screen...

Operating Instructions
Page 127
...network connection mode changes to AM/PM mode. When the camera is being reset. Click [Execute]. • The indicator blinks orange, and then turns off the camera while the camera... is reset, the internal clock will not be reset, but the time format will be set to [Automatic Setup...]. All buffered images - See Page 149 for a few seconds. Note • • • • Do not turn off the camera. Reconfigure the camera... 8.9 Resetting the Camera 8.9 Resetting the Camera You can reset all of the camera's settings to the [Setup Guide]. Click the [...
...network connection mode changes to AM/PM mode. When the camera is being reset. Click [Execute]. • The indicator blinks orange, and then turns off the camera while the camera... is reset, the internal clock will not be reset, but the time format will be set to [Automatic Setup...]. All buffered images - See Page 149 for a few seconds. Note • • • • Do not turn off the camera. Reconfigure the camera... 8.9 Resetting the Camera 8.9 Resetting the Camera You can reset all of the camera's settings to the [Setup Guide]. Click the [...

Installation Guide
Page 1
... Information for a description of the steps required to set up the camera (described in the camera's packaging. AC Adaptor (1 pc.) Order No. PQLV206EY (Cord Length: About 3 m) For use . • The Setup Guide describes how to install and setup the camera. PQQX15803ZA KK0107CM0 (CE) Installation Guide Network Camera Indoor Use Only Please read the included Important Information before using the...
... Information for a description of the steps required to set up the camera (described in the camera's packaging. AC Adaptor (1 pc.) Order No. PQLV206EY (Cord Length: About 3 m) For use . • The Setup Guide describes how to install and setup the camera. PQQX15803ZA KK0107CM0 (CE) Installation Guide Network Camera Indoor Use Only Please read the included Important Information before using the...
Installation Guide
Page 2
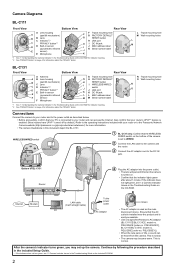
... See 1.1 Understanding the Camera Indicator in the Troubleshooting Guide on page 4 for indicator meaning. *2 See "PRIVACY Button" on the CD-ROM. WIRELESS/WIRED switch 1 BL-C131 only: Confirm that your router and to the Panasonic Network Camera website (http://panasonic.co.jp/pcc/products/...Setup Guide. • If the indicator does not turn green, see 1.2 Camera Indicator Issues in the Troubleshooting Guide on the CD-ROM for information about the PRIVACY button. L Tripod mounting hole M Wall mounting holes L M BL-C131 Front View Bottom View A Antenna A B Lens housing B (pan...
... See 1.1 Understanding the Camera Indicator in the Troubleshooting Guide on page 4 for indicator meaning. *2 See "PRIVACY Button" on the CD-ROM. WIRELESS/WIRED switch 1 BL-C131 only: Confirm that your router and to the Panasonic Network Camera website (http://panasonic.co.jp/pcc/products/...Setup Guide. • If the indicator does not turn green, see 1.2 Camera Indicator Issues in the Troubleshooting Guide on the CD-ROM for information about the PRIVACY button. L Tripod mounting hole M Wall mounting holes L M BL-C131 Front View Bottom View A Antenna A B Lens housing B (pan...

Installation Guide
Page 3
...pan and tilt features. 30° 8. Choosing a Location to Mount the Camera Notes About the Camera's Built-in the Operating Instructions on a hot summer day, the sensor may not perform properly in pyroelectric infrared sensor before deciding where to the camera's indicator. If an object is within about the built-in the Setup Guide... inaccurate detections. Remove any obstacles in the Operating Instructions on the CD-ROM, and configure the camera to the Panasonic Network Camera website at an area outside of the sensor's active detection range, the objects that trigger the sensor...
...pan and tilt features. 30° 8. Choosing a Location to Mount the Camera Notes About the Camera's Built-in the Operating Instructions on a hot summer day, the sensor may not perform properly in pyroelectric infrared sensor before deciding where to the camera's indicator. If an object is within about the built-in the Setup Guide... inaccurate detections. Remove any obstacles in the Operating Instructions on the CD-ROM, and configure the camera to the Panasonic Network Camera website at an area outside of the sensor's active detection range, the objects that trigger the sensor...
Setup Guide
Page 1
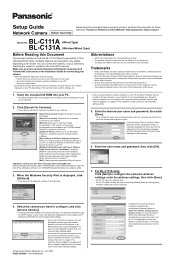
... included on page 2 in the Installation Guide to find your camera's MAC address label). • If more than 20 minutes have passed since the selected camera was turned on your PC. • The Setup Program starts. Setup Guide Network Camera Indoor Use Only Please read the Important ... sure you cannot configure the camera. If the program does not start, double-click Setup.exe found on the model. For BL-C131A Only: Click [Next] to your router. - Panasonic Network Camera Website: http://panasonic.net/pcc/ipcam/ BL-C111A Model No. (Wired Type) BL-C131A (Wireless/Wired Type) ...
... included on page 2 in the Installation Guide to find your camera's MAC address label). • If more than 20 minutes have passed since the selected camera was turned on your PC. • The Setup Program starts. Setup Guide Network Camera Indoor Use Only Please read the Important ... sure you cannot configure the camera. If the program does not start, double-click Setup.exe found on the model. For BL-C131A Only: Click [Next] to your router. - Panasonic Network Camera Website: http://panasonic.net/pcc/ipcam/ BL-C111A Model No. (Wired Type) BL-C131A (Wireless/Wired Type) ...
Setup Guide
Page 2
.... When [Setup completed] is complete. These are finished setting up the camera and can be UPnP™ compatible and must have changed. Confirming Wireless Connection (BL-C131A Only) After configuring the camera's wireless settings, confirm that the camera can be ... Guide and follow the instructions for the single camera version of this address. 1. To configure the camera for access over the LAN or from the Internet using a PC, use with Viewer Software Single Camera Version Installation]. 3. Click [Network Camera Recorder with Panasonic Network Cameras,...
.... When [Setup completed] is complete. These are finished setting up the camera and can be UPnP™ compatible and must have changed. Confirming Wireless Connection (BL-C131A Only) After configuring the camera's wireless settings, confirm that the camera can be ... Guide and follow the instructions for the single camera version of this address. 1. To configure the camera for access over the LAN or from the Internet using a PC, use with Viewer Software Single Camera Version Installation]. 3. Click [Network Camera Recorder with Panasonic Network Cameras,...

Service Manual
Page 2
... 8.9. Disassembly Instructions(BL-C111A 40 9.2. Resetting the Camera Using the FACTORY DEFAULT RESET Button 50 12 Block Diagram 51 13 Schematic Diagram 52 13.1. Main Board (Component View 65 14.2. Cabinet and Electrical Parts Location(BLC111A 72 16.2. Replacement Parts List (BL-C111A 76 16.6. For The Schematic Diagram 52 13.2. Setup Guide 22 8 Troubleshooting Guide 24 8.1. Other...
... 8.9. Disassembly Instructions(BL-C111A 40 9.2. Resetting the Camera Using the FACTORY DEFAULT RESET Button 50 12 Block Diagram 51 13 Schematic Diagram 52 13.1. Main Board (Component View 65 14.2. Cabinet and Electrical Parts Location(BLC111A 72 16.2. Replacement Parts List (BL-C111A 76 16.6. For The Schematic Diagram 52 13.2. Setup Guide 22 8 Troubleshooting Guide 24 8.1. Other...
Service Manual
Page 22
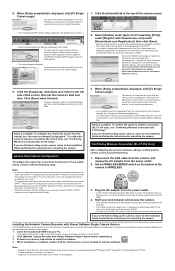
... If you have a Panasonic BB-HGW700A Network Camera Control Unit, WEP settings will be able to find any cameras on page 2 in the camera using the DHCP feature of your camera's MAC address label). • If more than one camera, you cannot configure the camera. For BL-C131A Only: Click [Next... wireless router, and to your network. • [About this step by MAC address (see "Camera Diagrams" on your network. • [Manual]: Allows you will not be entered manually. 22 BL-C111A /BL-C131A 7.3. If you cannot disable your PC. • The Setup Program starts. Enter the user ...
... If you have a Panasonic BB-HGW700A Network Camera Control Unit, WEP settings will be able to find any cameras on page 2 in the camera using the DHCP feature of your camera's MAC address label). • If more than one camera, you cannot configure the camera. For BL-C131A Only: Click [Next... wireless router, and to your network. • [About this step by MAC address (see "Camera Diagrams" on your network. • [Manual]: Allows you will not be entered manually. 22 BL-C111A /BL-C131A 7.3. If you cannot disable your PC. • The Setup Program starts. Enter the user ...

Service Manual
Page 23
...8226; If you are finished setting up the camera, return to the Installation Guide and follow the instructions for access from a ...Panasonic Network Cameras, and is displayed. To confirm the camera's wireless connection (BL-C131A only), see "Access from the Internet. Disconnect the LAN cable from the camera, and unplug the AC adaptor from Internet Configuration To configure the camera for mounting the camera...camera. These are finished setting up the camera and can be accessed wirelessly. 1. Click the [Setup] tab, click [Date and Time] on the CDROM. 4. BL-C111A/BL...
...8226; If you are finished setting up the camera, return to the Installation Guide and follow the instructions for access from a ...Panasonic Network Cameras, and is displayed. To confirm the camera's wireless connection (BL-C131A only), see "Access from the Internet. Disconnect the LAN cable from the camera, and unplug the AC adaptor from Internet Configuration To configure the camera for mounting the camera...camera. These are finished setting up the camera and can be accessed wirelessly. 1. Click the [Setup] tab, click [Date and Time] on the CDROM. 4. BL-C111A/BL...

Service Manual
Page 24
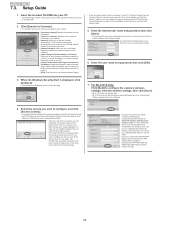
BL-C111A /BL-C131A 8 Troubleshooting Guide 8.1. Starting Up Operation *1 It does not turn on, when LED mode is "OFF" on web setup menu. 24
BL-C111A /BL-C131A 8 Troubleshooting Guide 8.1. Starting Up Operation *1 It does not turn on, when LED mode is "OFF" on web setup menu. 24
Service Manual
Page 50
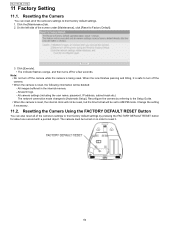
...will be deleted: - All alarm logs - All camera settings (including the user name, password, IP address, subnet mask etc.) The network connection mode changes to Factory Default]. 3. The camera must be set to the Setup Guide. • When the camera is being reset. Click [Execute]. • ...seconds. Resetting the Camera You can also reset all of the screen under [Maintenance], click [Reset to [Automatic Setup]. All images buffered in order to reset it is safe to their factory default settings. 1. Change the setting if necessary . 11.2. BL-C111A /BL-C131A 11 Factory ...
...will be deleted: - All alarm logs - All camera settings (including the user name, password, IP address, subnet mask etc.) The network connection mode changes to Factory Default]. 3. The camera must be set to the Setup Guide. • When the camera is being reset. Click [Execute]. • ...seconds. Resetting the Camera You can also reset all of the screen under [Maintenance], click [Reset to [Automatic Setup]. All images buffered in order to reset it is safe to their factory default settings. 1. Change the setting if necessary . 11.2. BL-C111A /BL-C131A 11 Factory ...