
Pro-line Network Cam
Page 6
...4.3 Buffering or Transferring Images by Alarm Signal 107 4.4 Buffering or Transferring Images by Motion Detection Signal.... 119 4.5 Transferring Camera Images in Transport Mode 131 4.6 Transferring Camera Images in Tunnel Mode 132 4.7 Setting the Motion Detection 133 4.8 Setting Alarm Log Notification 137 4.9 4.9.1 4.9.2 4.9.3 ... SD Memory Recording 144 5 Using Other Features 145 5.1 Changing Initial Settings on the Single Camera page or the Multi-Camera page 145 5.2 Configuring Multiple Cameras 148 5.3 Specifying Operation Time 150 5.4 Controlling External Output 152 6
...4.3 Buffering or Transferring Images by Alarm Signal 107 4.4 Buffering or Transferring Images by Motion Detection Signal.... 119 4.5 Transferring Camera Images in Transport Mode 131 4.6 Transferring Camera Images in Tunnel Mode 132 4.7 Setting the Motion Detection 133 4.8 Setting Alarm Log Notification 137 4.9 4.9.1 4.9.2 4.9.3 ... SD Memory Recording 144 5 Using Other Features 145 5.1 Changing Initial Settings on the Single Camera page or the Multi-Camera page 145 5.2 Configuring Multiple Cameras 148 5.3 Specifying Operation Time 150 5.4 Controlling External Output 152 6
Pro-line Network Cam
Page 7
...154 Confirming the Status 155 Confirming Session Status 155 Confirming Alarm Logs 156 Restarting the Camera 157 Updating the Camera Firmware 158 Creating the Configuration File 160 Loading Settings from a Configuration File 161 Resetting the Camera to Factory Default 162 Support page 163 The Help page 163 Product Information 163 ...Setting Your PC 186 Setting Proxy Server Settings on a Web Browser 186 Setting UPnP™ to Display Camera Shortcut in My Network Places......189 Setting the Internet Temporary File Setting on the Web Browser...........189 ASCII Character Table 190 7.8...
...154 Confirming the Status 155 Confirming Session Status 155 Confirming Alarm Logs 156 Restarting the Camera 157 Updating the Camera Firmware 158 Creating the Configuration File 160 Loading Settings from a Configuration File 161 Resetting the Camera to Factory Default 162 Support page 163 The Help page 163 Product Information 163 ...Setting Your PC 186 Setting Proxy Server Settings on a Web Browser 186 Setting UPnP™ to Display Camera Shortcut in My Network Places......189 Setting the Internet Temporary File Setting on the Web Browser...........189 ASCII Character Table 190 7.8...

Pro-line Network Cam
Page 36
... Click the [Multi] tab at the View Type, video (Motion JPEG) or audio buttons cannot be displayed. If you need to 12 camera images. The selfcamera is displayed. 2. Audio Control Bar (Talk button, Listen button and Adjustment Bar) (See page 34) 3. Capture Image... cameras. second interval). Selects [320 x 240] (default) or [160 x 120] pixels resolution. Operating Instructions 1.7 Viewing the Multi-Camera page To view multiple cameras on the Multi-Camera page, you select [All] at the top of the page. • The Multi-Camera page can display up to configure each camera ...
... Click the [Multi] tab at the View Type, video (Motion JPEG) or audio buttons cannot be displayed. If you need to 12 camera images. The selfcamera is displayed. 2. Audio Control Bar (Talk button, Listen button and Adjustment Bar) (See page 34) 3. Capture Image... cameras. second interval). Selects [320 x 240] (default) or [160 x 120] pixels resolution. Operating Instructions 1.7 Viewing the Multi-Camera page To view multiple cameras on the Multi-Camera page, you select [All] at the top of the page. • The Multi-Camera page can display up to configure each camera ...
Pro-line Network Cam
Page 46
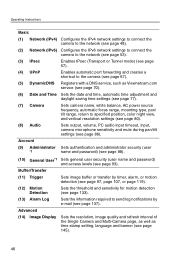
... security (user name and password) and access levels (see page 145). 46 Operating Instructions Basic (1) Network (IPv4) Configures the IPv4 network settings to connect the camera to the network (see page 48). (2) Network (IPv6) Configures the IPv6 network settings to connect the camera to the network (see page 53). (3) IPsec Enables IPsec (Transport or Tunnel mode) (see page 57). (4) UPnP...
... security (user name and password) and access levels (see page 145). 46 Operating Instructions Basic (1) Network (IPv4) Configures the IPv4 network settings to connect the camera to the network (see page 48). (2) Network (IPv6) Configures the IPv6 network settings to connect the camera to the network (see page 53). (3) IPsec Enables IPsec (Transport or Tunnel mode) (see page 57). (4) UPnP...

Pro-line Network Cam
Page 48
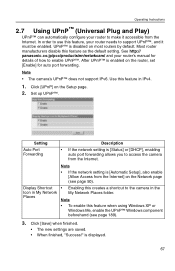
.... Enter each connection mode. 3. Operating Instructions 2.2 Connecting the Camera to Your IPv4 Network The Network page offers three options to configure the camera in IPv4. • [Automatic Setup] automatically assigns an unused IP address to the camera, and uses UPnP™ (Universal Plug and Play) to configure your network. Uses ISP DHCP server function. • See below for...
.... Enter each connection mode. 3. Operating Instructions 2.2 Connecting the Camera to Your IPv4 Network The Network page offers three options to configure the camera in IPv4. • [Automatic Setup] automatically assigns an unused IP address to the camera, and uses UPnP™ (Universal Plug and Play) to configure your network. Uses ISP DHCP server function. • See below for...

Pro-line Network Cam
Page 50
... not available. 50 The buffered images on your network, each data field. To enable Internet access to the camera, check [No]. If you use multiple cameras with the same class as "192.168.0.253". Setting Allow Access from • the Internet (Automatic Setup Only) Network • Configuration from Setup Program (Static/DHCP Only) Port Number...
... not available. 50 The buffered images on your network, each data field. To enable Internet access to the camera, check [No]. If you use multiple cameras with the same class as "192.168.0.253". Setting Allow Access from • the Internet (Automatic Setup Only) Network • Configuration from Setup Program (Static/DHCP Only) Port Number...

Pro-line Network Cam
Page 53
... the previous page without saving changes. 53 Uses a static IP address. 3. Most common mode of setup. Operating Instructions 2.3 Connecting the Camera to Your IPv6 Network The Network page offers two options to configure the camera in the relevant data field. Note • IPv6 is automatically assigned an IPv6 prefix from the IPv6 router, and produces...
... the previous page without saving changes. 53 Uses a static IP address. 3. Most common mode of setup. Operating Instructions 2.3 Connecting the Camera to Your IPv6 Network The Network page offers two options to configure the camera in the relevant data field. Note • IPv6 is automatically assigned an IPv6 prefix from the IPv6 router, and produces...
Pro-line Network Cam
Page 67
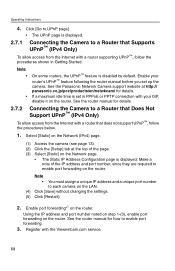
... Shortcut Icon in My Network Places • Enabling this feature in the My Network Places folder. See http:// panasonic.co.jp/pcc/products/en/netwkcam/ and your router's manual for auto port forwarding. Set up UPnP™. Note • If the network setting is disabled on ...the camera in IPv4. 1. Note • To enable this feature as the default setting. Operating Instructions 2.7 Using UPnP™ (Universal Plug and Play) UPnP™ can automatically configure your router to make it must be enabled. Setting Auto Port Forwarding Description • If the network setting...
... Shortcut Icon in My Network Places • Enabling this feature in the My Network Places folder. See http:// panasonic.co.jp/pcc/products/en/netwkcam/ and your router's manual for auto port forwarding. Set up UPnP™. Note • If the network setting is disabled on ...the camera in IPv4. 1. Note • To enable this feature as the default setting. Operating Instructions 2.7 Using UPnP™ (Universal Plug and Play) UPnP™ can automatically configure your router to make it must be enabled. Setting Auto Port Forwarding Description • If the network setting...
Pro-line Network Cam
Page 68
.... (3) Select [Static] on the router. Operating Instructions 4. See the Panasonic Network Camera support website at the top of the IP address and port number, since they are required to enable port forwarding on the Network page. • The Static IP Address Configuration page is displayed. 2.7.1 Connecting the Camera to enable port forwarding. 3. Select [Static] on the...
.... (3) Select [Static] on the router. Operating Instructions 4. See the Panasonic Network Camera support website at the top of the IP address and port number, since they are required to enable port forwarding on the Network page. • The Static IP Address Configuration page is displayed. 2.7.1 Connecting the Camera to enable port forwarding. 3. Select [Static] on the...

Pro-line Network Cam
Page 148
... configured multiple cameras, you can be configured. Operating Instructions 5.2 Configuring Multiple Cameras The Multi-Camera Setup page allows you to configure camera IP addresses and camera names to view multiple images on the Setup page. 2. is displayed. Note • • If you click the camera ...number, the modification page is displayed as the Port No, and the model no. The camera settings can change the camera number. These configurations are entered automatically. Select the number, and click [Move]....
... configured multiple cameras, you can be configured. Operating Instructions 5.2 Configuring Multiple Cameras The Multi-Camera Setup page allows you to configure camera IP addresses and camera names to view multiple images on the Setup page. 2. is displayed. Note • • If you click the camera ...number, the modification page is displayed as the Port No, and the model no. The camera settings can change the camera number. These configurations are entered automatically. Select the number, and click [Move]....
Pro-line Network Cam
Page 154
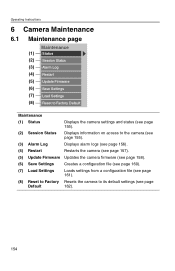
... Displays alarm logs (see page 156). (4) Restart Restarts the camera (see page 157). (5) Update Firmware Updates the camera firmware (see page 158). (6) Save Settings Creates a configuration file (see page 160). (7) Load Settings Loads settings from a configuration file (see page 161). (8) Reset to Factory Resets the camera to its default settings (see page Default 162). 154
... Displays alarm logs (see page 156). (4) Restart Restarts the camera (see page 157). (5) Update Firmware Updates the camera firmware (see page 158). (6) Save Settings Creates a configuration file (see page 160). (7) Load Settings Loads settings from a configuration file (see page 161). (8) Reset to Factory Resets the camera to its default settings (see page Default 162). 154
Pro-line Network Cam
Page 160
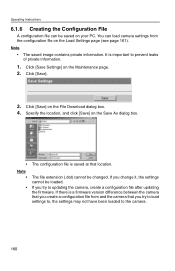
...changed. Click [Save Settings] on your PC. Operating Instructions 6.1.6 Creating the Configuration File A configuration file can load camera settings from and the camera that location. It is important to the camera. 160 Note • The saved image contains private information. If there is ... dialog box. 4. Click [Save] on the Save As dialog box. • The configuration file is a firmware version difference between the camera that you create a configuration file from the configuration file on the Load Settings page (see page 161). If you try to updating the...
...changed. Click [Save Settings] on your PC. Operating Instructions 6.1.6 Creating the Configuration File A configuration file can load camera settings from and the camera that location. It is important to the camera. 160 Note • The saved image contains private information. If there is ... dialog box. 4. Click [Save] on the Save As dialog box. • The configuration file is a firmware version difference between the camera that you create a configuration file from the configuration file on the Load Settings page (see page 161). If you try to updating the...
Pro-line Network Cam
Page 161
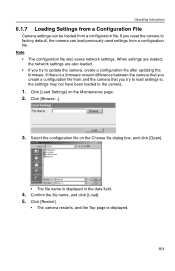
... box, and click [Open]. • The file name is displayed. 161 If you reset the camera to factory default, the camera can be loaded from a configuration file. Select the configuration file on the Maintenance page. 2. Note • The configuration file also saves network settings. Confirm the file name, and click [Load]. 5. When settings are loaded, the...
... box, and click [Open]. • The file name is displayed. 161 If you reset the camera to factory default, the camera can be loaded from a configuration file. Select the configuration file on the Maintenance page. 2. Note • The configuration file also saves network settings. Confirm the file name, and click [Load]. 5. When settings are loaded, the...

Pro-line Network Cam
Page 167
Note Automatic Setup/Static/ DHCP - Operating Instructions 7.2 Default Setting List Basic Items Network Connection Mode (IPv4) Allow Access from the Internet (Automatic Setup only) Network Configuration from Setup Program (Static/DHCP only) Port No. (Static/DHCP only) IP address (Static only) Subnet Mask (Static only) Host Name (DHCP only) Default Gateway (...
Note Automatic Setup/Static/ DHCP - Operating Instructions 7.2 Default Setting List Basic Items Network Connection Mode (IPv4) Allow Access from the Internet (Automatic Setup only) Network Configuration from Setup Program (Static/DHCP only) Port No. (Static/DHCP only) IP address (Static only) Subnet Mask (Static only) Host Name (DHCP only) Default Gateway (...
