
AWE350 User Guide
Page 4
...) A digital video signal processing system is packed in a compact, lightweight body while assuring high picture quality, high reliability and high performance. • System setup and adjustments can be easily performed by following the setup menu. • Connection to peripheral devices, such as a RCU, a RCB and a lens and the camera pan/tilt unit enables a wide variation of system configurations. • Option cards may also be installed. ❈...
...) A digital video signal processing system is packed in a compact, lightweight body while assuring high picture quality, high reliability and high performance. • System setup and adjustments can be easily performed by following the setup menu. • Connection to peripheral devices, such as a RCU, a RCB and a lens and the camera pan/tilt unit enables a wide variation of system configurations. • Option cards may also be installed. ❈...

AWE350 User Guide
Page 7
... exist. • Do not leave the camera and Remote Control Unit (RCU) turned on and off repeatedly. If the lens is not installed, do not leave the lens mount hole uncovered. • Do not touch the surface of abrasive detergents when cleaning the camera body. • Do not aim the camera toward the sun, no user-serviceable parts inside. • Do not abuse the...
... exist. • Do not leave the camera and Remote Control Unit (RCU) turned on and off repeatedly. If the lens is not installed, do not leave the lens mount hole uncovered. • Do not touch the surface of abrasive detergents when cleaning the camera body. • Do not aim the camera toward the sun, no user-serviceable parts inside. • Do not abuse the...

AWE350 User Guide
Page 8
... %. • Always turn the power off and have the unit checked by placing the body cap into the lens mount hole. • Use a mild blower or lens cleaning tissue designed for coated lenses, to clean the surface of spot lights or bright lights, as well as light reflecting objects and surfaces. • Take immediate action if ever the camera or RCU...
... %. • Always turn the power off and have the unit checked by placing the body cap into the lens mount hole. • Use a mild blower or lens cleaning tissue designed for coated lenses, to clean the surface of spot lights or bright lights, as well as light reflecting objects and surfaces. • Take immediate action if ever the camera or RCU...
AWE350 User Guide
Page 10
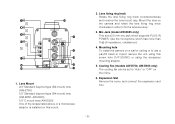
... can be set to fix the lens securely. 3. Use the microphone which supports PLUG IN POWER. Mounting hole To install the camera on the menu. 6. Mount the lens on the camera and rotate the lens fixing ring knob clockwise in order to "Auto" or "OFF" on a wall or ceiling or to use a pan/tilt head or tripod, secure the unit using the accessory mounting adaptor. 5. 7 ɹɹ 8 ɹɹ 9 A B C = ; < > ? @ 1. Lens Mount 2/3" Standard bayonet type (B4 mount) lens (AW-E750...
... can be set to fix the lens securely. 3. Use the microphone which supports PLUG IN POWER. Mounting hole To install the camera on the menu. 6. Mount the lens on the camera and rotate the lens fixing ring knob clockwise in order to "Auto" or "OFF" on a wall or ceiling or to use a pan/tilt head or tripod, secure the unit using the accessory mounting adaptor. 5. 7 ɹɹ 8 ɹɹ 9 A B C = ; < > ? @ 1. Lens Mount 2/3" Standard bayonet type (B4 mount) lens (AW-E750...
AWE350 User Guide
Page 11
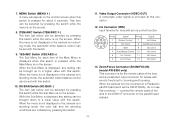
... screen. 8. Zoom/Focus Connector (ZOOM/FOCUS) (model AW-E655 only) This connector is for lenses with this switch. 10. 7. When the menu is not displayed or the camera is a standard input connector for the remote cable of the lens and is in shooting mode, the automatic black balance control can be brought down to a higher value with this switch. Iris Connector (IRIS) Input terminal for zooming and focusing. MENU Switch (MENU/A) A menu will appear on the pan/tilt...
... screen. 8. Zoom/Focus Connector (ZOOM/FOCUS) (model AW-E655 only) This connector is for lenses with this switch. 10. 7. When the menu is not displayed or the camera is a standard input connector for the remote cable of the lens and is in shooting mode, the automatic black balance control can be brought down to a higher value with this switch. Iris Connector (IRIS) Input terminal for zooming and focusing. MENU Switch (MENU/A) A menu will appear on the pan/tilt...

AWE350 User Guide
Page 12
... 8 10 2 7 12 11 3 6 4 5 Pin No. 1 2 3 4 5 6 Signal Focus Mode Position/Speed /Auto Focus Zoom Mode Position/Speed GND Iris Remote/Camera Iris Control Lens Power Pin No. 7 8 9 10 11 12 Signal Signal Control (+5.0 V) Focus Control Zoom Control Iris Mode Position/Speed +V (+7.5 V) -V (+2.5 V) 14. Cable Clamp Clamp the DC Power Supply Cable (AW-CA4T1) connected to the DC 12 V Input Connector to control signals from slipping out. 19. I/F Remote Connector (I/F REMOTE) Input terminal dedicated to prevent it from the optional Remote Control Box (RCB) (such as the WV...
... 8 10 2 7 12 11 3 6 4 5 Pin No. 1 2 3 4 5 6 Signal Focus Mode Position/Speed /Auto Focus Zoom Mode Position/Speed GND Iris Remote/Camera Iris Control Lens Power Pin No. 7 8 9 10 11 12 Signal Signal Control (+5.0 V) Focus Control Zoom Control Iris Mode Position/Speed +V (+7.5 V) -V (+2.5 V) 14. Cable Clamp Clamp the DC Power Supply Cable (AW-CA4T1) connected to the DC 12 V Input Connector to control signals from slipping out. 19. I/F Remote Connector (I/F REMOTE) Input terminal dedicated to prevent it from the optional Remote Control Box (RCB) (such as the WV...
AWE350 User Guide
Page 14
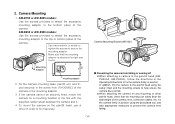
... hole (1/4-20UNC) of the camera. OWhen attaching the camera on the pan/tilt head, use a driver in position. Fix the camera mounting base, pan/tilt unit, and tripod securely in the Operating Instructions to secure the mounting adaptor. AW-E750 or AW-E655 models: Use the screws provided to attach the accessory mounting adaptor to help ensure the camera does not fall. In addition, link the camera to the pan/tilt head using the prescribed tool, and take...
... hole (1/4-20UNC) of the camera. OWhen attaching the camera on the pan/tilt head, use a driver in position. Fix the camera mounting base, pan/tilt unit, and tripod securely in the Operating Instructions to secure the mounting adaptor. AW-E750 or AW-E655 models: Use the screws provided to attach the accessory mounting adaptor to help ensure the camera does not fall. In addition, link the camera to the pan/tilt head using the prescribed tool, and take...

AWE350 User Guide
Page 18
... INPUT CONNECTOR • Connection to any servicing to the camera must be done by qualified service personnel or system installers. CONNECTIONS Caution: The connection and installation should be made through the VIDEO OUT Connector. • Power supply to qualified service personnel. Refer any device which has a composite input connector, such as a video monitor or a VTR, must be through the optional DC power supply Cable AW-CA4T1. • For DC power supply, use the...
... INPUT CONNECTOR • Connection to any servicing to the camera must be done by qualified service personnel or system installers. CONNECTIONS Caution: The connection and installation should be made through the VIDEO OUT Connector. • Power supply to qualified service personnel. Refer any device which has a composite input connector, such as a video monitor or a VTR, must be through the optional DC power supply Cable AW-CA4T1. • For DC power supply, use the...
AWE350 User Guide
Page 19
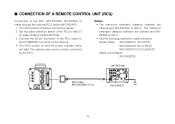
... the power indicator lamp will light. Set the cable selection switch of the RCU to the I/F REMOTE Connector of using the WV-RC700A) 3. Studio Cable WV-CA26U15 (15 m/50 ft) WV-CA26U30 (30 m/100 ft) WV-CA26U100 (100 m/330 ft) Cable Joint Adaptor WV-CA26T26 RCU Cable AW-CA50A26 (15 m) WV-RC700A GEN-LOCK AUX IN IN R/PR /C OUTPUT VIDEO 1 S-VIDEO TALLY & INCOM AUTO AUTO 75...
... the power indicator lamp will light. Set the cable selection switch of the RCU to the I/F REMOTE Connector of using the WV-RC700A) 3. Studio Cable WV-CA26U15 (15 m/50 ft) WV-CA26U30 (30 m/100 ft) WV-CA26U100 (100 m/330 ft) Cable Joint Adaptor WV-CA26T26 RCU Cable AW-CA50A26 (15 m) WV-RC700A GEN-LOCK AUX IN IN R/PR /C OUTPUT VIDEO 1 S-VIDEO TALLY & INCOM AUTO AUTO 75...

AWE350 User Guide
Page 20
... Video signal IN MONITOR OUT RCB FUSE O I /F REMOTE connector of the RCB attenuate and deteriorate with the optional RCB cable AW-CA50T10. 1. Turn RCB power on and the camera can be used for monitoring purposes only. • No gen-lock signal is available from the RCB. • If a longer distance (more than 3 m) is recommended that the signals from the monitor output be controlled remotely...
... Video signal IN MONITOR OUT RCB FUSE O I /F REMOTE connector of the RCB attenuate and deteriorate with the optional RCB cable AW-CA50T10. 1. Turn RCB power on and the camera can be used for monitoring purposes only. • No gen-lock signal is available from the RCB. • If a longer distance (more than 3 m) is recommended that the signals from the monitor output be controlled remotely...

AWE350 User Guide
Page 23
... automatically set switch is no need to readjust the camera to enlarge the image as much as possible. [ADJUSTMENT by CAMERA] 3. AUTO set - ADJUSTMENT s AUTOMATIC WHITE BALANCE CONTROL (AWC) There are encountered, you input new conditions. 1. Turn the white balance selection switch to AWC, the white balance will be renewed whenever you may operate the camera properly by menu. 2. When the AUTO set . Aim the camera at a white object (a white wall or a white handkerchief) and zoom in...
... automatically set switch is no need to readjust the camera to enlarge the image as much as possible. [ADJUSTMENT by CAMERA] 3. AUTO set - ADJUSTMENT s AUTOMATIC WHITE BALANCE CONTROL (AWC) There are encountered, you input new conditions. 1. Turn the white balance selection switch to AWC, the white balance will be renewed whenever you may operate the camera properly by menu. 2. When the AUTO set . Aim the camera at a white object (a white wall or a white handkerchief) and zoom in...
AWE350 User Guide
Page 24
... into a screen. • White balance may not be accurately set white balance will be reset if the color temperature changes, such as described in Step 3 above. -24- s MANUAL WHITE BALANCE SETTING [ADJUSTMENT by menu. 2. ING item of Color Set sub menu of USER MODE until the carrier wave of the white portion of the video signal is at the minimum width or the white object in the monitor screen appears pure white. (Use an...
... into a screen. • White balance may not be accurately set white balance will be reset if the color temperature changes, such as described in Step 3 above. -24- s MANUAL WHITE BALANCE SETTING [ADJUSTMENT by menu. 2. ING item of Color Set sub menu of USER MODE until the carrier wave of the white portion of the video signal is at the minimum width or the white object in the monitor screen appears pure white. (Use an...

AWE350 User Guide
Page 29
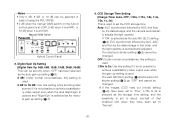
..., events, etc. Press the YES/ABC Switch. Settings can be changed using a simple menu. • Outdoor mode Suited to be set as at right appears on while keeping the MENU switch depressed. Then, the camera operates in the selected use mode comes into effect. Settings can be ready for four use mode blinks. 2. Turn the camera on the monitor screen and one . MENU switch (A): The blinking item moves up by one. **Use Mode Set** Halogen Fluorescent Outdoor User 3. The blinking use mode. -29- USE MODE SETTING s Use Mode Setting The camera...
..., events, etc. Press the YES/ABC Switch. Settings can be changed using a simple menu. • Outdoor mode Suited to be set as at right appears on while keeping the MENU switch depressed. Then, the camera operates in the selected use mode comes into effect. Settings can be ready for four use mode blinks. 2. Turn the camera on the monitor screen and one . MENU switch (A): The blinking item moves up by one. **Use Mode Set** Halogen Fluorescent Outdoor User 3. The blinking use mode. -29- USE MODE SETTING s Use Mode Setting The camera...
AWE350 User Guide
Page 33
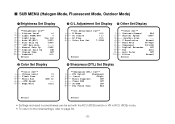
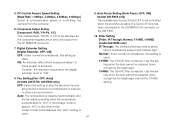
...Cut 4 ------- Auto Focus OFF 10 ------- Digital Gain Up 0dB 9 ------- Fan Auto 9 ------- Chroma Level 2 ------- ATW Speed 5 ------- V Resolution Normal 5 ------- Auto ND(ELC) (OFF) 5 ------- Level (High) 3 ------- Synchro Scan --- 4 ------- Light PEAK/AVG 0 3 ------- H Phase (±0) 2 ------- Filter Normal Return 4 Sharpness (DTL) Set Display **Sharpness(DTL) Set** 1 ------- Noise Suppress OFF 4 ------- s SUB MENU (Halogen Mode, Fluorescent Mode, Outdoor Mode) 1 Brightness Set Display **Brightness Set** 1 ------- Manual Gain Up...
...Cut 4 ------- Auto Focus OFF 10 ------- Digital Gain Up 0dB 9 ------- Fan Auto 9 ------- Chroma Level 2 ------- ATW Speed 5 ------- V Resolution Normal 5 ------- Auto ND(ELC) (OFF) 5 ------- Level (High) 3 ------- Synchro Scan --- 4 ------- Light PEAK/AVG 0 3 ------- H Phase (±0) 2 ------- Filter Normal Return 4 Sharpness (DTL) Set Display **Sharpness(DTL) Set** 1 ------- Noise Suppress OFF 4 ------- s SUB MENU (Halogen Mode, Fluorescent Mode, Outdoor Mode) 1 Brightness Set Display **Brightness Set** 1 ------- Manual Gain Up...
AWE350 User Guide
Page 35
..." has been selected as the auto gain up function is set for the CCD storage time setting (1-9). Notes • In case of settings on the camera alone or when the iris switch on the RCU (RCB) is at 30 dB. -35- AW-E750, AW-E655, AW-E650 Night Eye L: Use this setting if it is adjusted automatically. Manual Gain Up Control Setting [Manual Gain Up: 0 dB to...
..." has been selected as the auto gain up function is set for the CCD storage time setting (1-9). Notes • In case of settings on the camera alone or when the iris switch on the RCU (RCB) is at 30 dB. -35- AW-E750, AW-E655, AW-E650 Night Eye L: Use this setting if it is adjusted automatically. Manual Gain Up Control Setting [Manual Gain Up: 0 dB to...
AWE350 User Guide
Page 36
... Switch Hybrid Control Panel 8. Digital Gain Up Setting [Digital Gain Up: 0dB, 6dB, 12dB, 18dB, 24dB, 30dB] This can be selected in this order, and the light quantity is automatically adjusted. CCD Storage Time Setting [Charge Time: Auto, OFF, 1/30s, 1/15s, 1/8s, 1/4s, 1/2s, 1s, 2s] This is selected as the manual gain up setting is set the CCD storage time. The electronic shutter setting (5-2) cannot be changed . ❈ If the images (CCD...
... Switch Hybrid Control Panel 8. Digital Gain Up Setting [Digital Gain Up: 0dB, 6dB, 12dB, 18dB, 24dB, 30dB] This can be selected in this order, and the light quantity is automatically adjusted. CCD Storage Time Setting [Charge Time: Auto, OFF, 1/30s, 1/15s, 1/8s, 1/4s, 1/2s, 1s, 2s] This is selected as the manual gain up setting is set the CCD storage time. The electronic shutter setting (5-2) cannot be changed . ❈ If the images (CCD...
AWE350 User Guide
Page 41
... setting is set to the ZOOM/FOCUS connector on the AW-E655. PC Control Access Speed Setting 9. However, the resolution drops when the digital extender is used . -41- IR Through: The infrared shooting mode is used. ating sound is achieved. 5. Auto Focus Setting [Auto Focus: OFF, ON] [Baud Rate: 1 200bps, 2 400bps, 4 800bps, 9 600bps] (model AW-E655 only) Select a communication speed in a studio or other mode. Filter Setting the component signals which is approximately 1.5 times greater...
... setting is set to the ZOOM/FOCUS connector on the AW-E655. PC Control Access Speed Setting 9. However, the resolution drops when the digital extender is used . -41- IR Through: The infrared shooting mode is used. ating sound is achieved. 5. Auto Focus Setting [Auto Focus: OFF, ON] [Baud Rate: 1 200bps, 2 400bps, 4 800bps, 9 600bps] (model AW-E655 only) Select a communication speed in a studio or other mode. Filter Setting the component signals which is approximately 1.5 times greater...

AWE350 User Guide
Page 53
However, the resolution drops when the digital extender is achieved. Auto Focus Setting [Auto Focus: OFF, ON] (model AW-E655) This enables auto focus ON and OFF to be output from the I/F REMOTE connector. 12. ON: An extender effect which are to be controlled when the zoom/focus cable of a Canon AF lens has been connected to stop the fan when its operating sound is inserted. Fan Setting [Fan: OFF, Auto] (models AW-E750, AW-E655...
However, the resolution drops when the digital extender is achieved. Auto Focus Setting [Auto Focus: OFF, ON] (model AW-E655) This enables auto focus ON and OFF to be output from the I/F REMOTE connector. 12. ON: An extender effect which are to be controlled when the zoom/focus cable of a Canon AF lens has been connected to stop the fan when its operating sound is inserted. Fan Setting [Fan: OFF, Auto] (models AW-E750, AW-E655...

AWE350 User Guide
Page 65
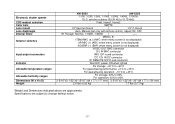
..., frame1, frame2 SMPTE 2/3" bayonet mount 1/2" bayonet mount Auto, Manual (but only with remote control), adjust ON, OFF --- ELC, synchro scanner (60.34 Hz to 90% 3-5/16"x3-3/4"x7-9/16" (84x95x192 mm) 3-5/16"x4-1/2"x7-3/16" (84x114x182 mm) 2.4 lbs (1.1 kg) 2.6 lbs (1.2 kg) -65- Electronic shutter speeds CCD readout selection Color bars Lens mount Lens diaphragm Internal filters Selector switches Input/output connectors Indicator Allowable temperature ranges Allowable...
..., frame1, frame2 SMPTE 2/3" bayonet mount 1/2" bayonet mount Auto, Manual (but only with remote control), adjust ON, OFF --- ELC, synchro scanner (60.34 Hz to 90% 3-5/16"x3-3/4"x7-9/16" (84x95x192 mm) 3-5/16"x4-1/2"x7-3/16" (84x114x182 mm) 2.4 lbs (1.1 kg) 2.6 lbs (1.2 kg) -65- Electronic shutter speeds CCD readout selection Color bars Lens mount Lens diaphragm Internal filters Selector switches Input/output connectors Indicator Allowable temperature ranges Allowable...
AWE350 User Guide
Page 67
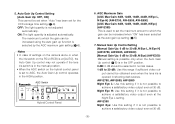
... (S) (AWC: when menu screen is not displayed) UP/ABC (+) (ABC: when menu screen is not displayed) NO/BAR (−) (BAR: when menu screen is not displayed) VIDEO OUT BNC connector G/L IN BNC connector IRIS 12P round connector DC 12V IN DC connector I/F REMOTE 50P D-sub connector Red LED; Electronic shutter speeds CCD readout selection Color bars Lens mount Lens diaphragm Internal filters Selector switches Input/output connectors Indicator Allowable temperature ranges Allowable humidity ranges Dimensions (W x H x D) Weight...
... (S) (AWC: when menu screen is not displayed) UP/ABC (+) (ABC: when menu screen is not displayed) NO/BAR (−) (BAR: when menu screen is not displayed) VIDEO OUT BNC connector G/L IN BNC connector IRIS 12P round connector DC 12V IN DC connector I/F REMOTE 50P D-sub connector Red LED; Electronic shutter speeds CCD readout selection Color bars Lens mount Lens diaphragm Internal filters Selector switches Input/output connectors Indicator Allowable temperature ranges Allowable humidity ranges Dimensions (W x H x D) Weight...


