
AWE300A User Guide
Page 2
... number of this unit in the space provided and retain this book as a permanent record of your purchase to aid identification in the event of this equipment in a residential area is intended to alert the user to the presence of uninsulated "dangerous voltage" within the product's enclosure that may be found to comply with the instruction manual...
... number of this unit in the space provided and retain this book as a permanent record of your purchase to aid identification in the event of this equipment in a residential area is intended to alert the user to the presence of uninsulated "dangerous voltage" within the product's enclosure that may be found to comply with the instruction manual...

AWE300A User Guide
Page 3
CONTENTS PREFACE ...2 FEATURES ...2 SPECIAL NOTES ON OPERATION ...3 PRECAUTIONS ...4 MAJOR OPERATING CONTROLS AND THEIR FUNCTIONS 6 MOUNTING ...10 FLANGE BACK ADJUSTMENT ...12 IRIS GAIN CONTROL IN A LENS ...13 CONNECTIONS ...14 ADJUSTMENT ...20 USE MODE SETTING ...27 MENU ITEM SETTING ...29 SETTING TO INITIAL SET ...46 APPEARANCE ...49 SPECIFICATIONS ...50 STANDARD ACCESSORIES ...52 OPTIONAL ACCESSORIES ...52 -1-
CONTENTS PREFACE ...2 FEATURES ...2 SPECIAL NOTES ON OPERATION ...3 PRECAUTIONS ...4 MAJOR OPERATING CONTROLS AND THEIR FUNCTIONS 6 MOUNTING ...10 FLANGE BACK ADJUSTMENT ...12 IRIS GAIN CONTROL IN A LENS ...13 CONNECTIONS ...14 ADJUSTMENT ...20 USE MODE SETTING ...27 MENU ITEM SETTING ...29 SETTING TO INITIAL SET ...46 APPEARANCE ...49 SPECIFICATIONS ...50 STANDARD ACCESSORIES ...52 OPTIONAL ACCESSORIES ...52 -1-
AWE300A User Guide
Page 4
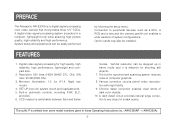
... and a lens and the camera pan/tilt unit enables a wide variation of dark color objects. 10. Vertical resolution can be installed. The suffix P is effective for shooting still objects. 7. A digital video signal processing system is switchable between field and frame by following the setup menu. System setup and adjustments can be stepped up in frame mode and it is omitted from some model numbers given in these Operating Instructions (ex...
... and a lens and the camera pan/tilt unit enables a wide variation of dark color objects. 10. Vertical resolution can be installed. The suffix P is effective for shooting still objects. 7. A digital video signal processing system is switchable between field and frame by following the setup menu. System setup and adjustments can be stepped up in frame mode and it is omitted from some model numbers given in these Operating Instructions (ex...
AWE300A User Guide
Page 5
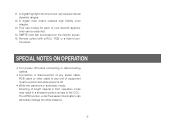
... of your specific applications can adversely change the white balance. -3- SMPTE color bar is in a smeared picture unique to any unit of bright objects in ELC operation mode may result in automatic mode; Four use modes for each of any studio cable, RCB cable or other cable to the CCD. SPECIAL NOTES ON OPERATION • Turn power off . • While the camera is indicated on the monitor screen. 15. 11...
... of your specific applications can adversely change the white balance. -3- SMPTE color bar is in a smeared picture unique to any unit of bright objects in ELC operation mode may result in automatic mode; Four use modes for each of any studio cable, RCB cable or other cable to the CCD. SPECIAL NOTES ON OPERATION • Turn power off . • While the camera is indicated on the monitor screen. 15. 11...
AWE300A User Guide
Page 6
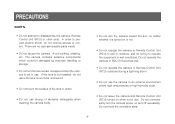
... aim the camera toward the sun, no user-serviceable parts inside. • Do not abuse the camera. In order to prevent electric shock, do not try to operate the equipment in use . Avoid striking, shaking, etc. If the lens is turned on or not. • Do not expose the camera or Remote Control Unit (RCU) to disassemble the camera, Remote Control Unit (RCU) or other units. Do not...
... aim the camera toward the sun, no user-serviceable parts inside. • Do not abuse the camera. In order to prevent electric shock, do not try to operate the equipment in use . Avoid striking, shaking, etc. If the lens is turned on or not. • Do not expose the camera or Remote Control Unit (RCU) to disassemble the camera, Remote Control Unit (RCU) or other units. Do not...
AWE300A User Guide
Page 7
... %. • Always turn the power off when the camera is hard to be used. Operate the camera and RCU only when there is dirty. In case the dirt is not going to remove, use . If the lens is not installed, protect the surface of the prism by placing the body cap into the lens mount hole. • Use a mild blower or lens cleaning tissue...
... %. • Always turn the power off when the camera is hard to be used. Operate the camera and RCU only when there is dirty. In case the dirt is not going to remove, use . If the lens is not installed, protect the surface of the prism by placing the body cap into the lens mount hole. • Use a mild blower or lens cleaning tissue...

AWE300A User Guide
Page 9
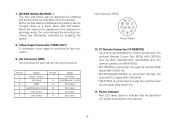
.... When the menu is not displayed or the camera is in shooting mode, the automatic black balance control can be selected by pressing the switch while the menu is displayed, any setting can be mounted. 2. When the menu is not displayed or the camera is on a wall, ceiling with this switch. 6. OPTION CARD MENU ITEM/AWC VIDEO OUT I/F REMOTE G/L IN YES/ABC + NO/BAR - Flange-back Adjustment Screws (FOCUS/LOCK) When...
.... When the menu is not displayed or the camera is in shooting mode, the automatic black balance control can be selected by pressing the switch while the menu is displayed, any setting can be mounted. 2. When the menu is not displayed or the camera is on a wall, ceiling with this switch. 6. OPTION CARD MENU ITEM/AWC VIDEO OUT I/F REMOTE G/L IN YES/ABC + NO/BAR - Flange-back Adjustment Screws (FOCUS/LOCK) When...
AWE300A User Guide
Page 10
.../WV-RC550 is connected through the optional pan/ tilt unit cable (AW-CA50T15). 11. Power Indicator Red LED lamp lights to the camera. -8- Iris Connector (IRIS) Input terminal for lens with this switch while the Sub Menu is connected through the optional RCU cable (AW-CA50A26). * AW-PH300 is on the screen. I/F Remote Connector (I/F REMOTE) Input terminal dedicated to a lower value with an iris control function. NO/BAR Switch (NO/BAR...
.../WV-RC550 is connected through the optional pan/ tilt unit cable (AW-CA50T15). 11. Power Indicator Red LED lamp lights to the camera. -8- Iris Connector (IRIS) Input terminal for lens with this switch while the Sub Menu is connected through the optional RCU cable (AW-CA50A26). * AW-PH300 is on the screen. I/F Remote Connector (I/F REMOTE) Input terminal dedicated to a lower value with an iris control function. NO/BAR Switch (NO/BAR...
AWE300A User Guide
Page 12
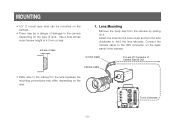
... the camera by pulling on it. Control Cable To Lens I /F REMOTE G/L IN YES/ABC + IRIS NO/BAR - OPTION CARD MENU ITEM/AWC VIDEO OUT I /F Connector of Camera Pan/tilt Unit Camera Cable • Refer also to the manual for the lens because the mounting procedures may be a danger of damage to hold the lens securely. MOUNTING • 1/3" C mount type lens can be mounted on the camera. • There may differ depending on the lens. Use a lens whose mount screw...
... the camera by pulling on it. Control Cable To Lens I /F REMOTE G/L IN YES/ABC + IRIS NO/BAR - OPTION CARD MENU ITEM/AWC VIDEO OUT I /F Connector of Camera Pan/tilt Unit Camera Cable • Refer also to the manual for the lens because the mounting procedures may be a danger of damage to hold the lens securely. MOUNTING • 1/3" C mount type lens can be mounted on the camera. • There may differ depending on the lens. Use a lens whose mount screw...

AWE300A User Guide
Page 13
... the camera mounting adaptor. 3. 2. Camera Mounting 1. When changing the camera mounting adapter, use a screwdriver or similar tool to the top or bottom of the camera. Fix the camera mounting base, pan/tilt unit, and tripod securely in the screw hole (1/4-20UNC) of the camera, lens, connection cables, etc., fix the camera firmly in position. Fix the mounting adaptor to tighten the screws firmly. If the camera cannot be securely fixed, stick the supplied rubber sheet to help ensure the camera...
... the camera mounting adaptor. 3. 2. Camera Mounting 1. When changing the camera mounting adapter, use a screwdriver or similar tool to the top or bottom of the camera. Fix the camera mounting base, pan/tilt unit, and tripod securely in the screw hole (1/4-20UNC) of the camera, lens, connection cables, etc., fix the camera firmly in position. Fix the mounting adaptor to tighten the screws firmly. If the camera cannot be securely fixed, stick the supplied rubber sheet to help ensure the camera...
AWE300A User Guide
Page 16
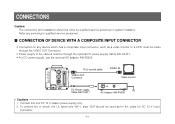
... wire VW-1, style 1007 should be used as a video monitor or a VCR, must be made through the VIDEO OUT Connector. • Power supply to the camera must be through the optional DC power supply Cable AW-CA4T1. • For DC power supply, use the optional AC adaptor AW-PS505. CONNECTIONS Caution: The connection and installation should be done by qualified service personnel or system installers. s CONNECTION OF DEVICE WITH A COMPOSITE INPUT CONNECTOR...
... wire VW-1, style 1007 should be used as a video monitor or a VCR, must be made through the VIDEO OUT Connector. • Power supply to the camera must be through the optional DC power supply Cable AW-CA4T1. • For DC power supply, use the optional AC adaptor AW-PS505. CONNECTIONS Caution: The connection and installation should be done by qualified service personnel or system installers. s CONNECTION OF DEVICE WITH A COMPOSITE INPUT CONNECTOR...
AWE300A User Guide
Page 17
... between the camera and WV-RC700A is made through the optional RCU cable AW-CA50A26. 1. Set the cable selection switch of the RCU to MULTI -15- Turn RCU power off before connecting cables. 2. Studio Cable WV-CA26U15 (15 m/50 ft) WV-CA26U30 (30 m/100 ft) WV-CA26U100 (100 m/330 ft) Cable Joint Adaptor WV-CA26T26 OPTION CARD MENU ITEM/AWC VIDEO OUT I /F REMOTE Connector of using the...
... between the camera and WV-RC700A is made through the optional RCU cable AW-CA50A26. 1. Set the cable selection switch of the RCU to MULTI -15- Turn RCU power off before connecting cables. 2. Studio Cable WV-CA26U15 (15 m/50 ft) WV-CA26U30 (30 m/100 ft) WV-CA26U100 (100 m/330 ft) Cable Joint Adaptor WV-CA26T26 OPTION CARD MENU ITEM/AWC VIDEO OUT I /F REMOTE Connector of using the...

AWE300A User Guide
Page 18
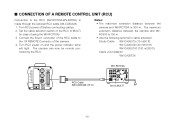
... CARD MENU ITEM/AWC VIDEO OUT I ON POWER FUSE FUSE(POWER) FUSE Cautions 1. DC12V IN 3. The 10-pin connector must be used for DC 12 V Input Connector. Turn RCB power on and the camera can be connected to a DC 12 V class 2 power supply only. 2. Notes: • The monitor output signals of the camera. s CONNECTION OF A REMOTE CONTROL BOX (RCB) The RCB (WV-CB700A) and the camera must be controlled remotely by the RCB. Connect...
... CARD MENU ITEM/AWC VIDEO OUT I ON POWER FUSE FUSE(POWER) FUSE Cautions 1. DC12V IN 3. The 10-pin connector must be used for DC 12 V Input Connector. Turn RCB power on and the camera can be connected to a DC 12 V class 2 power supply only. 2. Notes: • The monitor output signals of the camera. s CONNECTION OF A REMOTE CONTROL BOX (RCB) The RCB (WV-CB700A) and the camera must be controlled remotely by the RCB. Connect...

AWE300A User Guide
Page 19
... ON position. DC12V IN Camera Mounting Hole Adaptor (Supplied) Pan/tilt unit AW-PH300 Pan/tilt unit Cable AW-CA50T15 Coaxial Cable Coaxial Cable POWER OFF O I /F REMOTE G/L IN YES/ABC + IRIS NO/BAR - s CONNECTION OF DEVICES WITH CAMERA PAN/TILT CONTROL SYSTEM • To connect the pan/tilt unit to the pan/tilt unit. 4. Connect the 15-pin end of the pan/tilt unit cable to the hybrid control panel with the 10BASE-T cable and coaxial cable. LENS IRIS Cable LENS ZOOM/FOCUS Cable OPTION CARD MENU ITEM/AWC VIDEO OUT I ON POWER FUSE(POWER) FUSE...
... ON position. DC12V IN Camera Mounting Hole Adaptor (Supplied) Pan/tilt unit AW-PH300 Pan/tilt unit Cable AW-CA50T15 Coaxial Cable Coaxial Cable POWER OFF O I /F REMOTE G/L IN YES/ABC + IRIS NO/BAR - s CONNECTION OF DEVICES WITH CAMERA PAN/TILT CONTROL SYSTEM • To connect the pan/tilt unit to the pan/tilt unit. 4. Connect the 15-pin end of the pan/tilt unit cable to the hybrid control panel with the 10BASE-T cable and coaxial cable. LENS IRIS Cable LENS ZOOM/FOCUS Cable OPTION CARD MENU ITEM/AWC VIDEO OUT I ON POWER FUSE(POWER) FUSE...

AWE300A User Guide
Page 20
VIDEO OUT Camera for supplying the reference signals. • Adjust the SC-phase and H-phase at the Video Output Connector. VIDEO OUT G/L IN FOCUS LOCK Convertible Camera AW - CAMERA FOCUS LOCK Convertible Camera AW - FOCUS LOCK Convertible Camera AW - s CONNECTION WITH MULTIPLE CAMERAS (COLOR LOCK MODE) q An example of connection for VBS/BB input (Color lock mode). • One of the multiple cameras is used as the source of reference signals. • Supply a synchronizing signal (BB...
VIDEO OUT Camera for supplying the reference signals. • Adjust the SC-phase and H-phase at the Video Output Connector. VIDEO OUT G/L IN FOCUS LOCK Convertible Camera AW - CAMERA FOCUS LOCK Convertible Camera AW - FOCUS LOCK Convertible Camera AW - s CONNECTION WITH MULTIPLE CAMERAS (COLOR LOCK MODE) q An example of connection for VBS/BB input (Color lock mode). • One of the multiple cameras is used as the source of reference signals. • Supply a synchronizing signal (BB...

AWE300A User Guide
Page 23
... conditions. 1. AUTO LED AUTO/ATW ATW A B AUTO AWC HOLD ABC RCU (RCB) PAINTING R GAIN B R PED B TOTAL PED AUTO set . Turn the white balance selection switch to enlarge the image as much as possible. [ADJUSTMENT by menu. 2. In normal shooting mode: Press the ITEM/AWC switch for two different light sources color temperatures, with the RCU (RCB, Hybrid control panel)] 4. Aim the camera at a white object (a white wall or a white handkerchief) and zoom in...
... conditions. 1. AUTO LED AUTO/ATW ATW A B AUTO AWC HOLD ABC RCU (RCB) PAINTING R GAIN B R PED B TOTAL PED AUTO set . Turn the white balance selection switch to enlarge the image as much as possible. [ADJUSTMENT by menu. 2. In normal shooting mode: Press the ITEM/AWC switch for two different light sources color temperatures, with the RCU (RCB, Hybrid control panel)] 4. Aim the camera at a white object (a white wall or a white handkerchief) and zoom in...

AWE300A User Guide
Page 24
... 2 second. 3. Aim the camera at a large white object. s MANUAL WHITE BALANCE SETTING [ADJUSTMENT by menu. 2. Adjust the red gain/blue gain control in the PAINT- • Since the camera has a built-in memory, the set to continuously match changes of the object is not necessary to avoid overly bright objects in over 10 % of the monitor screen area. ting the white balance. (painting setting in USER MODE only. 1.
... 2 second. 3. Aim the camera at a large white object. s MANUAL WHITE BALANCE SETTING [ADJUSTMENT by menu. 2. Adjust the red gain/blue gain control in the PAINT- • Since the camera has a built-in memory, the set to continuously match changes of the object is not necessary to avoid overly bright objects in over 10 % of the monitor screen area. ting the white balance. (painting setting in USER MODE only. 1.

AWE300A User Guide
Page 29
... monitor screen and one . **Use Mode Set** Halogen Fluorescent Outdoor User 3. ITEM/AWC switch ( ), NO/BAR switch (-): The blinking item moves down by one. Settings can be changed using a detail menu. s SETTING BY CAMERA 1. Then, the camera operates in the selected use mode blink. Press the MENU switch, ITEM/AWC switch, or NO/BAR switch to let the desired use mode. -27- Press the YES/ABC switch. Settings can be changed using a simple menu. • Outdoor mode Suited to outdoor shooting. The use mode blinks. © © 2. USE MODE SETTING s Use Mode Setting...
... monitor screen and one . **Use Mode Set** Halogen Fluorescent Outdoor User 3. ITEM/AWC switch ( ), NO/BAR switch (-): The blinking item moves down by one. Settings can be changed using a detail menu. s SETTING BY CAMERA 1. Then, the camera operates in the selected use mode blink. Press the MENU switch, ITEM/AWC switch, or NO/BAR switch to let the desired use mode. -27- Press the YES/ABC switch. Settings can be changed using a simple menu. • Outdoor mode Suited to outdoor shooting. The use mode blinks. © © 2. USE MODE SETTING s Use Mode Setting...

AWE300A User Guide
Page 30
... operation mode is selected depending on the position of Hybrid control panel 1 2 3 4 CAMERA MENU ITEM/AWC YES/ABC NO/BAR MENU ITEM/AWC YES/ABC + NO/BAR - VIDEO OUT I/F REMOTE G/L IN IRIS DC12V IN RCU (RCB) AUTO/ATW ATW A B PAINTING R GAIN B TOTAL PED AUTO AWC HOLD ABC R PED SHUTTER SCENE 100 500 1000S/S USER 1 2 OFF ELC SET 3 B IRIS MAN AUTO SCENE FILE Switch Hybrid Control Panel POWER...
... operation mode is selected depending on the position of Hybrid control panel 1 2 3 4 CAMERA MENU ITEM/AWC YES/ABC NO/BAR MENU ITEM/AWC YES/ABC + NO/BAR - VIDEO OUT I/F REMOTE G/L IN IRIS DC12V IN RCU (RCB) AUTO/ATW ATW A B PAINTING R GAIN B TOTAL PED AUTO AWC HOLD ABC R PED SHUTTER SCENE 100 500 1000S/S USER 1 2 OFF ELC SET 3 B IRIS MAN AUTO SCENE FILE Switch Hybrid Control Panel POWER...
AWE300A User Guide
Page 35
... obtained even when the lens iris is opened in case of using the RCU (RCB). • 0 dB when the manual GAIN switch on the hybrid control panel is increased by adding the digital gain up . N/Eye (Night Eye): Sensitivity is set to AGC, the Auto Gain Up control operates in the manual position. • When the AGC switch on the hybrid control panel is at...
... obtained even when the lens iris is opened in case of using the RCU (RCB). • 0 dB when the manual GAIN switch on the hybrid control panel is increased by adding the digital gain up . N/Eye (Night Eye): Sensitivity is set to AGC, the Auto Gain Up control operates in the manual position. • When the AGC switch on the hybrid control panel is at...


