
AWE300A User Guide
Page 2
...marking of this book as a permanent record of your purchase to aid identification in the event of electric shock to persons. Model No. Cet appareil numérique...installed and used in the space provided and retain this product may be found on the bottom of the unit. You should note the serial number of this unit in accordance with the limits for a Class A digital device, pursuant to part... the user to the presence of the FCC Rules. NO USER SERVICEABLE PARTS INSIDE. The serial number of important operating and maintenance (servicing) instructions in which case the user will ...
...marking of this book as a permanent record of your purchase to aid identification in the event of electric shock to persons. Model No. Cet appareil numérique...installed and used in the space provided and retain this product may be found on the bottom of the unit. You should note the serial number of this unit in accordance with the limits for a Class A digital device, pursuant to part... the user to the presence of the FCC Rules. NO USER SERVICEABLE PARTS INSIDE. The serial number of important operating and maintenance (servicing) instructions in which case the user will ...

AWE300A User Guide
Page 3
CONTENTS PREFACE ...2 FEATURES ...2 SPECIAL NOTES ON OPERATION ...3 PRECAUTIONS ...4 MAJOR OPERATING CONTROLS AND THEIR FUNCTIONS 6 MOUNTING ...10 FLANGE BACK ADJUSTMENT ...12 IRIS GAIN CONTROL IN A LENS ...13 CONNECTIONS ...14 ADJUSTMENT ...20 USE MODE SETTING ...27 MENU ITEM SETTING ...29 SETTING TO INITIAL SET ...46 APPEARANCE ...49 SPECIFICATIONS ...50 STANDARD ACCESSORIES ...52 OPTIONAL ACCESSORIES ...52 -1-
CONTENTS PREFACE ...2 FEATURES ...2 SPECIAL NOTES ON OPERATION ...3 PRECAUTIONS ...4 MAJOR OPERATING CONTROLS AND THEIR FUNCTIONS 6 MOUNTING ...10 FLANGE BACK ADJUSTMENT ...12 IRIS GAIN CONTROL IN A LENS ...13 CONNECTIONS ...14 ADJUSTMENT ...20 USE MODE SETTING ...27 MENU ITEM SETTING ...29 SETTING TO INITIAL SET ...46 APPEARANCE ...49 SPECIFICATIONS ...50 STANDARD ACCESSORIES ...52 OPTIONAL ACCESSORIES ...52 -1-
AWE300A User Guide
Page 4
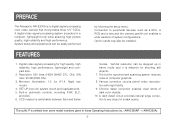
... detail correction enables clear shots of system configurations. The suffix P is a digital signal processing color video camera that incorporates three 1/3" CCDs. PREFACE The Panasonic AW-E300A is omitted from some model numbers given in these Operating Instructions (ex.: AW-E300AP → AW-E300A). -2- The built-in synchronized scanning system reduces noise in automatic controls, including ATW, ELC, and AGC 6. SET UP menu for high quality...
... detail correction enables clear shots of system configurations. The suffix P is a digital signal processing color video camera that incorporates three 1/3" CCDs. PREFACE The Panasonic AW-E300A is omitted from some model numbers given in these Operating Instructions (ex.: AW-E300AP → AW-E300A). -2- The built-in synchronized scanning system reduces noise in automatic controls, including ATW, ELC, and AGC 6. SET UP menu for high quality...
AWE300A User Guide
Page 5
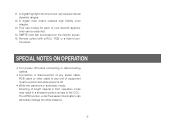
.... A digital color matrix enables high fidelity color images. 13. SMPTE color bar is off before connecting or disconnecting cables. • Connection or disconnection of any studio cable, RCB cable or other cable to the CCD. Remote control with a RCU, RCB or a Hybrid con- Shooting of equipment must be selected. 14. SPECIAL NOTES ON OPERATION • Turn power off . • While the camera is in a smeared picture unique to any unit...
.... A digital color matrix enables high fidelity color images. 13. SMPTE color bar is off before connecting or disconnecting cables. • Connection or disconnection of any studio cable, RCB cable or other cable to the CCD. Remote control with a RCU, RCB or a Hybrid con- Shooting of equipment must be selected. 14. SPECIAL NOTES ON OPERATION • Turn power off . • While the camera is in a smeared picture unique to any unit...
AWE300A User Guide
Page 6
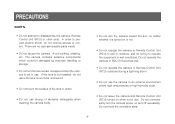
... lens mount hole uncovered. • Do not touch the surface of abrasive detergents when cleaning the camera body. • Do not aim the camera toward the sun, no user-serviceable parts inside. • Do not abuse the camera. Do not block the ventilation slots. -4- There are no matter whether it becomes wet. • Do not operate the camera or Remote Control Unit (RCU) outdoors...
... lens mount hole uncovered. • Do not touch the surface of abrasive detergents when cleaning the camera body. • Do not aim the camera toward the sun, no user-serviceable parts inside. • Do not abuse the camera. Do not block the ventilation slots. -4- There are no matter whether it becomes wet. • Do not operate the camera or Remote Control Unit (RCU) outdoors...
AWE300A User Guide
Page 7
...'S • Refer any servicing to be used. Turn the power off and have the unit checked by placing the lens cap over when the camera is dirty. Operate the camera and RCU only when there is not installed, protect the surface of the prism by placing the body cap into the lens mount hole. • Use a mild blower or lens cleaning tissue designed for...
...'S • Refer any servicing to be used. Turn the power off and have the unit checked by placing the lens cap over when the camera is dirty. Operate the camera and RCU only when there is not installed, protect the surface of the prism by placing the body cap into the lens mount hole. • Use a mild blower or lens cleaning tissue designed for...

AWE300A User Guide
Page 9
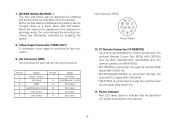
Lens Mount 1/3" C mount type lens or a microscope adaptor can be mounted. 2. While the Sub Menu is on a wall, ceiling with this switch while the menu is displayed, any setting can be brought up to adjust the flange-back. 4. Flange-back Adjustment Screws (FOCUS/LOCK) When flange-back adjustment is necessary, loosen the lock screw and turn the focus screw to a higher value with a mounting bracket or tripod. © 3. IRIS DC12V...
Lens Mount 1/3" C mount type lens or a microscope adaptor can be mounted. 2. While the Sub Menu is on a wall, ceiling with this switch while the menu is displayed, any setting can be brought up to adjust the flange-back. 4. Flange-back Adjustment Screws (FOCUS/LOCK) When flange-back adjustment is necessary, loosen the lock screw and turn the focus screw to a higher value with a mounting bracket or tripod. © 3. IRIS DC12V...
AWE300A User Guide
Page 10
... Auto/Remote Control Not Used Not Used Not Used Not Used Iris Connector (IRIS) oq i !0 w u !2 !1 e ytr 10. Video Output Connector (VIDEO OUT) A composite video signal is on the screen. 7. Iris Connector (IRIS) Input terminal for lens with this connector. 9. While the Sub Menu is supplied to a lower value with an iris control function. Power Indicator Red LED lamp lights to indicate that the specified DC power is displayed any setting can be brought down to the camera. -8- I/F Remote Connector (I/F REMOTE...
... Auto/Remote Control Not Used Not Used Not Used Not Used Iris Connector (IRIS) oq i !0 w u !2 !1 e ytr 10. Video Output Connector (VIDEO OUT) A composite video signal is on the screen. 7. Iris Connector (IRIS) Input terminal for lens with this connector. 9. While the Sub Menu is supplied to a lower value with an iris control function. Power Indicator Red LED lamp lights to indicate that the specified DC power is displayed any setting can be brought down to the camera. -8- I/F Remote Connector (I/F REMOTE...
AWE300A User Guide
Page 12
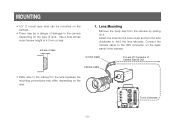
... CARD MENU ITEM/AWC VIDEO OUT I /F Connector of lens. DC12V IN To Iris Connector -10- Control Cable To Lens I /F REMOTE G/L IN YES/ABC + IRIS NO/BAR - Lens Mounting Remove the body cap from the camera by pulling on the back panel of the camera. MOUNTING • 1/3" C mount type lens can be mounted on the camera. • There may be a danger of damage to the camera depending on the type of Camera Pan/tilt Unit Camera Cable...
... CARD MENU ITEM/AWC VIDEO OUT I /F Connector of lens. DC12V IN To Iris Connector -10- Control Cable To Lens I /F REMOTE G/L IN YES/ABC + IRIS NO/BAR - Lens Mounting Remove the body cap from the camera by pulling on the back panel of the camera. MOUNTING • 1/3" C mount type lens can be mounted on the camera. • There may be a danger of damage to the camera depending on the type of Camera Pan/tilt Unit Camera Cable...

AWE300A User Guide
Page 13
.... 3. Mounting adaptor Camera Mounting Bracket (WV-831) 2. If the camera cannot be securely fixed, stick the supplied rubber sheet to the mounting adaptor, then mount the camera. $ Preventing the camera from falling. -11- Camera Mounting 1. Fix the camera mounting base, pan/tilt unit, and tripod securely in position. OWhen attaching the camera on any mounting or other pan/tilt head, check that the mounting can safely bear the total weight of the camera, lens, connection cables, etc., fix the camera firmly in position using...
.... 3. Mounting adaptor Camera Mounting Bracket (WV-831) 2. If the camera cannot be securely fixed, stick the supplied rubber sheet to the mounting adaptor, then mount the camera. $ Preventing the camera from falling. -11- Camera Mounting 1. Fix the camera mounting base, pan/tilt unit, and tripod securely in position. OWhen attaching the camera on any mounting or other pan/tilt head, check that the mounting can safely bear the total weight of the camera, lens, connection cables, etc., fix the camera firmly in position using...
AWE300A User Guide
Page 16
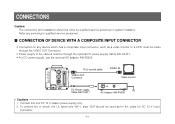
... cable VIDEO OUT Connector VIDEO IN Video monitor DC Power supply Cable AW-CA4T1 POWER OFF O I /F REMOTE G/L IN YES/ABC + IRIS NO/BAR - s CONNECTION OF DEVICE WITH A COMPOSITE INPUT CONNECTOR • Connection to any servicing to qualified service personnel. CONNECTIONS Caution: The connection and installation should be used as a video monitor or a VCR, must be made through the VIDEO OUT Connector. • Power supply to the camera must be done by qualified service personnel or system installers. OPTION CARD MENU ITEM...
... cable VIDEO OUT Connector VIDEO IN Video monitor DC Power supply Cable AW-CA4T1 POWER OFF O I /F REMOTE G/L IN YES/ABC + IRIS NO/BAR - s CONNECTION OF DEVICE WITH A COMPOSITE INPUT CONNECTOR • Connection to any servicing to qualified service personnel. CONNECTIONS Caution: The connection and installation should be used as a video monitor or a VCR, must be made through the VIDEO OUT Connector. • Power supply to the camera must be done by qualified service personnel or system installers. OPTION CARD MENU ITEM...
AWE300A User Guide
Page 17
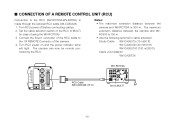
... before connecting cables. 2. Connect the 50-pin connector of the RCU cable to MULTI (in case of the camera. 4. The maximum extension distance between the camera and WV-RC700A is 300 m. s CONNECTION OF A REMOTE CONTROL UNIT (RCU) Connection to MULTI -15- Set the cable selection switch of the RCU to the I /F REMOTE G/L IN YES/ABC + IRIS NO/BAR - Turn RCU power on and the power indicator lamp will light. The camera...
... before connecting cables. 2. Connect the 50-pin connector of the RCU cable to MULTI (in case of the camera. 4. The maximum extension distance between the camera and WV-RC700A is 300 m. s CONNECTION OF A REMOTE CONTROL UNIT (RCU) Connection to MULTI -15- Set the cable selection switch of the RCU to the I /F REMOTE G/L IN YES/ABC + IRIS NO/BAR - Turn RCU power on and the power indicator lamp will light. The camera...

AWE300A User Guide
Page 18
... + IRIS NO/BAR - Connect the 50-pin connector of the RCB cable to a DC 12 V class 2 power supply only. 2. AC Adaptor AW-PS505 AC Adaptor AW-PS505 USER SET ALL 1 2 RCB WV-CB700A -16- To prevent fire or shock, the UL listed wire VW-1, style 1007 should be controlled remotely by the RCB. OPTION CARD MENU ITEM/AWC VIDEO OUT I /F REMOTE connector of the RCB...
... + IRIS NO/BAR - Connect the 50-pin connector of the RCB cable to a DC 12 V class 2 power supply only. 2. AC Adaptor AW-PS505 AC Adaptor AW-PS505 USER SET ALL 1 2 RCB WV-CB700A -16- To prevent fire or shock, the UL listed wire VW-1, style 1007 should be controlled remotely by the RCB. OPTION CARD MENU ITEM/AWC VIDEO OUT I /F REMOTE connector of the RCB...

AWE300A User Guide
Page 19
... position. Connect the pan/tilt unit to the I/F Remote connector on the hybrid control panel in the OFF position, respectively. 2. LENS IRIS Cable LENS ZOOM/FOCUS Cable OPTION CARD MENU ITEM/AWC VIDEO OUT I ON POWER FUSE(POWER) FUSE(LAMP) FUSE FUSE FUSE FUSE AC Adaptor AW-PS300 Pan/tilt unit AC Adaptor AW-PS300 Video Monitor Composite Video S VIDEO 10BASE-T Cable Hybrid control panel AW-RP501 G / L IN BREVIEW MONITOR OUT TD MULTI PORT HUB S-VIDEO OUT AUX CONTROL DC12V IN TALLY PAN/TILT CONTROL PAN/TILT CAMERA CONTROL OUT CONTROL...
... position. Connect the pan/tilt unit to the I/F Remote connector on the hybrid control panel in the OFF position, respectively. 2. LENS IRIS Cable LENS ZOOM/FOCUS Cable OPTION CARD MENU ITEM/AWC VIDEO OUT I ON POWER FUSE(POWER) FUSE(LAMP) FUSE FUSE FUSE FUSE AC Adaptor AW-PS300 Pan/tilt unit AC Adaptor AW-PS300 Video Monitor Composite Video S VIDEO 10BASE-T Cable Hybrid control panel AW-RP501 G / L IN BREVIEW MONITOR OUT TD MULTI PORT HUB S-VIDEO OUT AUX CONTROL DC12V IN TALLY PAN/TILT CONTROL PAN/TILT CAMERA CONTROL OUT CONTROL...

AWE300A User Guide
Page 20
... - VIDEO OUT Camera for supplying the reference signals. • Adjust the SC-phase and H-phase at the Video Output Connector. s CONNECTION WITH MULTIPLE CAMERAS (COLOR LOCK MODE) q An example of connection for VBS/BB input (Color lock mode). • One of the multiple cameras is used as the source of reference signals. • Supply a synchronizing signal (BB) to the G/L Input Connectors of each cameras. • Do not switch off the camera used...
... - VIDEO OUT Camera for supplying the reference signals. • Adjust the SC-phase and H-phase at the Video Output Connector. s CONNECTION WITH MULTIPLE CAMERAS (COLOR LOCK MODE) q An example of connection for VBS/BB input (Color lock mode). • One of the multiple cameras is used as the source of reference signals. • Supply a synchronizing signal (BB) to the G/L Input Connectors of each cameras. • Do not switch off the camera used...

AWE300A User Guide
Page 23
... change the white balance mode to enlarge the image as much as possible. [ADJUSTMENT by menu. 2. AUTO LED AUTO/ATW ATW A B AUTO AWC HOLD ABC RCU (RCB) PAINTING R GAIN B R PED B TOTAL PED AUTO set . There is completed. Aim the camera at a white object (a white wall or a white handkerchief) and zoom in to either AWC A or AWC B by CAMERA] 3. In normal shooting mode: Press the ITEM/AWC switch for two different light sources color...
... change the white balance mode to enlarge the image as much as possible. [ADJUSTMENT by menu. 2. AUTO LED AUTO/ATW ATW A B AUTO AWC HOLD ABC RCU (RCB) PAINTING R GAIN B R PED B TOTAL PED AUTO set . There is completed. Aim the camera at a white object (a white wall or a white handkerchief) and zoom in to either AWC A or AWC B by CAMERA] 3. In normal shooting mode: Press the ITEM/AWC switch for two different light sources color...

AWE300A User Guide
Page 24
... white object in the monitor screen appears pure white. (Use an oscilloscope or a waveform monitor for over 10 % of those objects remains unchanged. s MANUAL WHITE BALANCE SETTING [ADJUSTMENT by menu. 2. However, it must occupy over 2 second. 3. Notes: • For white balance setting aim the camera at a white object and try to position it in USER MODE only. 1. s AUTOMATIC TRACKING WHITE BALANCE SETTING (ATW) White balance will be reset if the color tempera- The white...
... white object in the monitor screen appears pure white. (Use an oscilloscope or a waveform monitor for over 10 % of those objects remains unchanged. s MANUAL WHITE BALANCE SETTING [ADJUSTMENT by menu. 2. However, it must occupy over 2 second. 3. Notes: • For white balance setting aim the camera at a white object and try to position it in USER MODE only. 1. s AUTOMATIC TRACKING WHITE BALANCE SETTING (ATW) White balance will be reset if the color tempera- The white...

AWE300A User Guide
Page 29
... fluorescent lighting. After the use mode blink. Settings can be changed using a simple menu. • User mode Settings can be ready for four use mode comes into effect. s SETTING BY CAMERA 1. MENU switch ( ): The blinking item moves up by one. **Use Mode Set** Halogen Fluorescent Outdoor User 3. The blinking use modes have been preset. Turn the camera on the monitor screen and one . ITEM/AWC switch ( ), NO/BAR switch (-): The blinking item moves down by one of the use mode setting menu shown at weddings, parties, lecture meetings, events...
... fluorescent lighting. After the use mode blink. Settings can be changed using a simple menu. • User mode Settings can be ready for four use mode comes into effect. s SETTING BY CAMERA 1. MENU switch ( ): The blinking item moves up by one. **Use Mode Set** Halogen Fluorescent Outdoor User 3. The blinking use modes have been preset. Turn the camera on the monitor screen and one . ITEM/AWC switch ( ), NO/BAR switch (-): The blinking item moves down by one of the use mode setting menu shown at weddings, parties, lecture meetings, events...

AWE300A User Guide
Page 30
... Hybrid control panel 1 2 3 4 CAMERA MENU ITEM/AWC YES/ABC NO/BAR MENU ITEM/AWC YES/ABC + NO/BAR - ABC G/L PHASE ON 90° 180° SC H 0° 270° OFF T. P E D CABLE COMP Y C SCENE FILE Switch -28- Operation mode Halogen Mode Fluorescent Mode Outdoor Mode User's Mode Scene File Switch Position of RCU (RCB) 1 2 3 USER SET Scene File Switch Position of the scene file switch. VIDEO OUT I/F REMOTE G/L IN IRIS DC12V IN RCU (RCB) AUTO...
... Hybrid control panel 1 2 3 4 CAMERA MENU ITEM/AWC YES/ABC NO/BAR MENU ITEM/AWC YES/ABC + NO/BAR - ABC G/L PHASE ON 90° 180° SC H 0° 270° OFF T. P E D CABLE COMP Y C SCENE FILE Switch -28- Operation mode Halogen Mode Fluorescent Mode Outdoor Mode User's Mode Scene File Switch Position of RCU (RCB) 1 2 3 USER SET Scene File Switch Position of the scene file switch. VIDEO OUT I/F REMOTE G/L IN IRIS DC12V IN RCU (RCB) AUTO...
AWE300A User Guide
Page 35
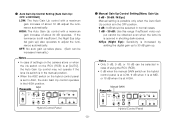
... still insufficient, the Night Eye (digital gain up takes place. (Gain can be selected in case of using the RCU (RCB). • 0 dB when the manual GAIN switch on the hybrid control panel is opened in the HIGH position. P E D CABLE COMP Y C Hybrid Control Panel -33- t Auto Gain Up Control Setting [Auto Gain Up: OFF/ LOW/HIGH] LOW: The Auto Gain Up control with a maximum gain...
... still insufficient, the Night Eye (digital gain up takes place. (Gain can be selected in case of using the RCU (RCB). • 0 dB when the manual GAIN switch on the hybrid control panel is opened in the HIGH position. P E D CABLE COMP Y C Hybrid Control Panel -33- t Auto Gain Up Control Setting [Auto Gain Up: OFF/ LOW/HIGH] LOW: The Auto Gain Up control with a maximum gain...


