

AGEZ50U User Guide
Page 1
VQT9420 AG-EZ50UP Mini Before attempting to connect, operate or adjust this product, please read these instructions thoroughly. R Digital Video Camera/Recorder Operating Instructions Model No.
VQT9420 AG-EZ50UP Mini Before attempting to connect, operate or adjust this product, please read these instructions thoroughly. R Digital Video Camera/Recorder Operating Instructions Model No.
AGEZ50U User Guide
Page 2
...Cahuenga Blvd. If this unit. Trade Name: Model No.: Responsible party: Support Contact: Panasonic AG-EZ50UP Matsushita Electric Corporation of the FCC Rules. The serial number is on the ... installation instructions and use in VCR machines with Part 15 of this manual as your convenient Camera/Recorder information source. You have purchased one or more of the following two conditions: (1) ...Model No. This symbol alerts the user that interference will bring you for a Class B digital device, pursuant to computer or peripheral devices. Please take time to record and play back in...
...Cahuenga Blvd. If this unit. Trade Name: Model No.: Responsible party: Support Contact: Panasonic AG-EZ50UP Matsushita Electric Corporation of the FCC Rules. The serial number is on the ... installation instructions and use in VCR machines with Part 15 of this manual as your convenient Camera/Recorder information source. You have purchased one or more of the following two conditions: (1) ...Model No. This symbol alerts the user that interference will bring you for a Class B digital device, pursuant to computer or peripheral devices. Please take time to record and play back in...

AGEZ50U User Guide
Page 4
...attempt to determine that will often require extensive work by following conditions: a. This action could permanently damage the internal parts of your Camera/ Recorder body. ≥TO PROTECT THE LENS... Such as the original part. Important Safeguards 17) Objects and Liquids - This ... car, next to its normal operation. Improper cleaning can scratch the lens coating. ≥TO PROTECT THE FINISH OF YOUR CAMERA/ RECORDER... Your Camera/Recorder has been designed for service. 20) Replacement Parts - If the video unit does not operate normally by a qualified technician...
...attempt to determine that will often require extensive work by following conditions: a. This action could permanently damage the internal parts of your Camera/ Recorder body. ≥TO PROTECT THE LENS... Such as the original part. Important Safeguards 17) Objects and Liquids - This ... car, next to its normal operation. Improper cleaning can scratch the lens coating. ≥TO PROTECT THE FINISH OF YOUR CAMERA/ RECORDER... Your Camera/Recorder has been designed for service. 20) Replacement Parts - If the video unit does not operate normally by a qualified technician...
AGEZ50U User Guide
Page 5
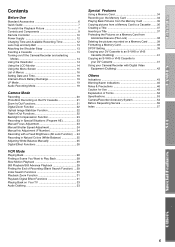
...Date and Time 19 Internal Lithium Battery Recharge 19 LP Mode 19 Audio Recording Mode 19 Camera Mode Recording 20 PhotoShot Recording on the DV Cassette 21 Zoom In/Out Functions 21 Digital Zoom Function 22 Optical Image Stabilizer Function 22 Fade In/Out Functions 22 Backlight Compensation ... Cassette to an S-VHS or VHS Cassette (Dubbing 41 Copying an S-VHS or VHS Cassette to your DV Cassette 41 Using your Camera/Recorder with Digital Video Equipment (Dubbing 42 Others Indications 43 Warning/Alarm Indications 45 Notes & Precautions 46 Caution for Use 49 Explanation of Terms 52 ...
...Date and Time 19 Internal Lithium Battery Recharge 19 LP Mode 19 Audio Recording Mode 19 Camera Mode Recording 20 PhotoShot Recording on the DV Cassette 21 Zoom In/Out Functions 21 Digital Zoom Function 22 Optical Image Stabilizer Function 22 Fade In/Out Functions 22 Backlight Compensation ... Cassette to an S-VHS or VHS Cassette (Dubbing 41 Copying an S-VHS or VHS Cassette to your DV Cassette 41 Using your Camera/Recorder with Digital Video Equipment (Dubbing 42 Others Indications 43 Warning/Alarm Indications 45 Notes & Precautions 46 Caution for Use 49 Explanation of Terms 52 ...

AGEZ50U User Guide
Page 6
... in an area which has special AC outlets. 2) Battery Pack (l 12) ≥Supplies power to the Camera/Recorder. CAUTION: This unit will operate on the left are accessories packaged with the Camera/Recorder. 1) AC Adaptor, DC Cable and AC Cable (l 12) ≥Supplies power to the... Camera/Recorder. 3) Remote Controller and Button-Type Battery (l 10, 11) 4) Lens Cap and Lens Cap Cord (l 13) 5) A/V Cable (l 33, 41) 6) ...
... in an area which has special AC outlets. 2) Battery Pack (l 12) ≥Supplies power to the Camera/Recorder. CAUTION: This unit will operate on the left are accessories packaged with the Camera/Recorder. 1) AC Adaptor, DC Cable and AC Cable (l 12) ≥Supplies power to the... Camera/Recorder. 3) Remote Controller and Button-Type Battery (l 10, 11) 4) Lens Cap and Lens Cap Cord (l 13) 5) A/V Cable (l 33, 41) 6) ...

AGEZ50U User Guide
Page 7
... AC Adaptor, disconnect it. 2 Attach the Charged Battery to the Camera/Recorder. (l 12) ≥Attach the battery after tilting the Viewfinder upward. 3 Turn the Camera/Recorder on. (l 14) ≥Slide the 1 Switch to [ON]. (The [CAMERA] Lamp lights up.) 4 Insert the Cassette. (l 13) ≥...8805;Press the [PUSH/TO CLOSE] 3 to load the Cassette. ≥Close the lower compartment Cover. CAMERA VCR CARD P.B. 5 MODE ON OFF 4 POWER CAMERA VCR CARD P.B. 6 MODE ON OFF POWER 5 7 BACK LIGHT 6 SEARCH 7 CAMERA VCR CARD P.B. MODE ON OFF POWER 8 5 Start recording. (l 20) ≥Press the 4 ...
... AC Adaptor, disconnect it. 2 Attach the Charged Battery to the Camera/Recorder. (l 12) ≥Attach the battery after tilting the Viewfinder upward. 3 Turn the Camera/Recorder on. (l 14) ≥Slide the 1 Switch to [ON]. (The [CAMERA] Lamp lights up.) 4 Insert the Cassette. (l 13) ≥...8805;Press the [PUSH/TO CLOSE] 3 to load the Cassette. ≥Close the lower compartment Cover. CAMERA VCR CARD P.B. 5 MODE ON OFF 4 POWER CAMERA VCR CARD P.B. 6 MODE ON OFF POWER 5 7 BACK LIGHT 6 SEARCH 7 CAMERA VCR CARD P.B. MODE ON OFF POWER 8 5 Start recording. (l 20) ≥Press the 4 ...

AGEZ50U User Guide
Page 8
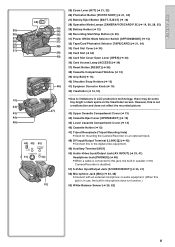
... shut out unnecessary light. 16) Lens (LEICA DICOMAR) ≥LEICA is a registered trademark of Leica microsystems IR GmbH and DICOMAR is a registered trademark of Leica Camera AG. 17) MC Protector (l 51) 18) Remote Control Sensor (l 11) 19) Tally Lamp (l 20) 20) Focus Button [FOCUS] (l 23) 21) Mode...25) 23) Menu Button [MENU] (l 15) 24) Multi-Function Dial [PUSH] (l 15, 19, 28, 29) 8 2) 3) 1) 10) 11) 12) TITLE MULTI/P-IN-P BACK LIGHT 4) CAMERA STILL 5) PUSH OPEN 6) FADE 7) 8) SEARCH 9) 13) 14) 15) 20) FOCUS 21) AUTO MANUAL AE LOCK 22) SHUTTER/IRIS W.B. 23) 24) PUSH VOL/JOG MENU 18...
... shut out unnecessary light. 16) Lens (LEICA DICOMAR) ≥LEICA is a registered trademark of Leica microsystems IR GmbH and DICOMAR is a registered trademark of Leica Camera AG. 17) MC Protector (l 51) 18) Remote Control Sensor (l 11) 19) Tally Lamp (l 20) 20) Focus Button [FOCUS] (l 23) 21) Mode...25) 23) Menu Button [MENU] (l 15) 24) Multi-Function Dial [PUSH] (l 15, 19, 28, 29) 8 2) 3) 1) 10) 11) 12) TITLE MULTI/P-IN-P BACK LIGHT 4) CAMERA STILL 5) PUSH OPEN 6) FADE 7) 8) SEARCH 9) 13) 14) 15) 20) FOCUS 21) AUTO MANUAL AE LOCK 22) SHUTTER/IRIS W.B. 23) 24) PUSH VOL/JOG MENU 18...
AGEZ50U User Guide
Page 9
...(l 13) 45) 45) Lower Cassette Compartment Cover (l 13) 46) Cassette Holder (l 13) 47) Tripod Receptacle (Tripod Mounting Hole) ≥Used for mounting the Camera/Recorder on an optional tripod. 48) 49) AUX 50) AV IN/OUT PHONES 48) DV Input/Output Terminal (i.LINK) [¥] (l 42) ≥Connect this ...IN/OUT] (l 33, 41) 52) Microphone Jack [MIC] (l 33, 48) ≥Connect with an external microphone or audio equipment. (When this to the digital video equipment. 49) Auxiliary Terminal [AUX] S-VIDEO IN/OUT MIC 51) 52) 50) Audio-Video Input/Output Jack [AV IN/OUT] (l 33, 41) ...
...(l 13) 45) 45) Lower Cassette Compartment Cover (l 13) 46) Cassette Holder (l 13) 47) Tripod Receptacle (Tripod Mounting Hole) ≥Used for mounting the Camera/Recorder on an optional tripod. 48) 49) AUX 50) AV IN/OUT PHONES 48) DV Input/Output Terminal (i.LINK) [¥] (l 42) ≥Connect this ...IN/OUT] (l 33, 41) 52) Microphone Jack [MIC] (l 33, 48) ≥Connect with an external microphone or audio equipment. (When this to the digital video equipment. 49) Auxiliary Terminal [AUX] S-VIDEO IN/OUT MIC 51) 52) 50) Audio-Video Input/Output Jack [AV IN/OUT] (l 33, 41) ...

AGEZ50U User Guide
Page 10
...28) 18) Playback Zoom Button [P.B. 1) VIDEO CAMERA OSD START/ DATE/ PHOTO STOP TIME SHOT 2) COUNTER RESET TITLE ZOOM 6) 3) T MULTI/ P-IN-P ¥REC A.DUB sVOL r 7) 4) V/REW PLAY FF/W W 6 1 5 5) STILL ADV PAUSE STILL ADV E ; SEARCH OFF/ON P.B.DIGITAL P.B. Remote Controller Buttons 1) Date and Time ...30) Stop Button [∫] (l 28, 29, 35) 10 ZOOM SET P.B.DIGITAL ITEM 16) 17) 18) 19) 26) 27) 28) 29) 30) OSD DATE/ TIME PHOTO SHOT VIDEO CAMERA START/ STOP COUNTER RESET TITLE MULTI/ P-IN-P ¥REC A.DUB ZOOM T sVOL r V/REW PLAY FF/W W 6 1 5 ...
...28) 18) Playback Zoom Button [P.B. 1) VIDEO CAMERA OSD START/ DATE/ PHOTO STOP TIME SHOT 2) COUNTER RESET TITLE ZOOM 6) 3) T MULTI/ P-IN-P ¥REC A.DUB sVOL r 7) 4) V/REW PLAY FF/W W 6 1 5 5) STILL ADV PAUSE STILL ADV E ; SEARCH OFF/ON P.B.DIGITAL P.B. Remote Controller Buttons 1) Date and Time ...30) Stop Button [∫] (l 28, 29, 35) 10 ZOOM SET P.B.DIGITAL ITEM 16) 17) 18) 19) 26) 27) 28) 29) 30) OSD DATE/ TIME PHOTO SHOT VIDEO CAMERA START/ STOP COUNTER RESET TITLE MULTI/ P-IN-P ¥REC A.DUB ZOOM T sVOL r V/REW PLAY FF/W W 6 1 5 ...

AGEZ50U User Guide
Page 11
... they can also use . P.B. Keep away from the central axis 1 ≥The above 212°F (100°C) or incinerate. T MULTI/ P-IN-P ¥REC A.DUB sVOL r Setting on the Camera/Recorder: V/REW PLAY FF/W W 6 1 5 Set [REMOTE] on the [OTHER FUNCTIONS] Sub-Menu to [VCR1] Mode. 11 If swallowed call your doctor...Replace.... STORE SEARCH ZOOM [VCR1]: Press the [D] Button and [∫] Button simultaneously. 1 2 OFF/ON MENU SET 1 [VCR2]: Press the [E] Button and [∫] Button simultaneously. 2 P.B.DIGITAL ITEM ≥When the battery in mouth.
... they can also use . P.B. Keep away from the central axis 1 ≥The above 212°F (100°C) or incinerate. T MULTI/ P-IN-P ¥REC A.DUB sVOL r Setting on the Camera/Recorder: V/REW PLAY FF/W W 6 1 5 Set [REMOTE] on the [OTHER FUNCTIONS] Sub-Menu to [VCR1] Mode. 11 If swallowed call your doctor...Replace.... STORE SEARCH ZOOM [VCR1]: Press the [D] Button and [∫] Button simultaneously. 1 2 OFF/ON MENU SET 1 [VCR2]: Press the [E] Button and [∫] Button simultaneously. 2 P.B.DIGITAL ITEM ≥When the battery in mouth.

AGEZ50U User Guide
Page 12
.... (2 h.) 3 h 15 min. 4 h 15 min. (3 h 35 min.) 5 h 20 min. 8 h. (6 h 40 min.) Disconnecting the Power Source Set the [OFF/ON/MODE] Switch to the Camera/Recorder. If the Battery is used. PUSH BATT. EJECT ª Using the Battery ≥Before use , the available recording time may become longer. EJECT] Button...lights up, and charging starts. ≥When the [CHARGE] Lamp goes off, charging is connected to the [DC OUT] Jack on the Camera/Recorder. 3 Connect the DC connector plug to the AC Adaptor, disconnect it . ≥For other notes, see page 46. The numeric characters...
.... (2 h.) 3 h 15 min. 4 h 15 min. (3 h 35 min.) 5 h 20 min. 8 h. (6 h 40 min.) Disconnecting the Power Source Set the [OFF/ON/MODE] Switch to the Camera/Recorder. If the Battery is used. PUSH BATT. EJECT ª Using the Battery ≥Before use , the available recording time may become longer. EJECT] Button...lights up, and charging starts. ≥When the [CHARGE] Lamp goes off, charging is connected to the [DC OUT] Jack on the Camera/Recorder. 3 Connect the DC connector plug to the AC Adaptor, disconnect it . ≥For other notes, see page 46. The numeric characters...

AGEZ50U User Guide
Page 13
...it cannot slip off. 2 3 1 OPEN / EJECT 4 R E C SAVE 3 4 PUSH TO CLOSE Inserting a Cassette When power is supplied to the Camera/Recorder, the cassette can be taken out without turning the Camera/Recorder on. 1 Slide the [OPEN/EJECT] Lever 3 to the right and pull down to open the Cassette Compartment. 2 Insert a Cassette...For other notes, see page 46. ª Accidental Erasure Prevention Opening the accidental erasure prevention slider 4 on the cassette (by sliding it in the [REC] arrow direction). 13 1 3 2 Lens Cap and Grip Belt To protect the Lens surface, attach the Lens Cap.
...it cannot slip off. 2 3 1 OPEN / EJECT 4 R E C SAVE 3 4 PUSH TO CLOSE Inserting a Cassette When power is supplied to the Camera/Recorder, the cassette can be taken out without turning the Camera/Recorder on. 1 Slide the [OPEN/EJECT] Lever 3 to the right and pull down to open the Cassette Compartment. 2 Insert a Cassette...For other notes, see page 46. ª Accidental Erasure Prevention Opening the accidental erasure prevention slider 4 on the cassette (by sliding it in the [REC] arrow direction). 13 1 3 2 Lens Cap and Grip Belt To protect the Lens surface, attach the Lens Cap.

AGEZ50U User Guide
Page 14
...170; How to Switch Modes 2 Slide the [OFF/ON/MODE] Switch. ≥With each slide of the Switch, the Mode switches in the order of Camera Mode, VCR Mode, and Card Playback Mode. ≥The appropriate Mode Lamp lights up. ª How to Turn off . 3 Adjust the LCD Monitor...that the displays inside the Viewfinder become clear and easy to the downward direction. Forcefully rotating the LCD monitor beyond these ranges will damage the Camera/Recorder. HIGH EVF LBORWIG|H|T|N|E-S-S-- Brightness of the Viewfinder [EVF BRIGHTNESS] Adjust the brightness of the image in the direction of the arrow. ...
...170; How to Switch Modes 2 Slide the [OFF/ON/MODE] Switch. ≥With each slide of the Switch, the Mode switches in the order of Camera Mode, VCR Mode, and Card Playback Mode. ≥The appropriate Mode Lamp lights up. ª How to Turn off . 3 Adjust the LCD Monitor...that the displays inside the Viewfinder become clear and easy to the downward direction. Forcefully rotating the LCD monitor beyond these ranges will damage the Camera/Recorder. HIGH EVF LBORWIG|H|T|N|E-S-S-- Brightness of the Viewfinder [EVF BRIGHTNESS] Adjust the brightness of the image in the direction of the arrow. ...
AGEZ50U User Guide
Page 15
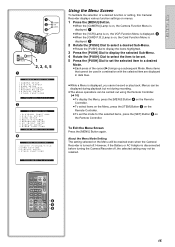
... cannot be retained. However, if the Battery or AC Adaptor is disconnected before turning the Camera/Recorder off . 1 2 CAMERA VCR CARD P.B. 3 PUSH VOL/JOG MENU 1 1 2, 3, 4, 5 CAMERA FUNCTIONS 1.CAMERA SETUP 2.DIGITAL EFFECT 3.CARD SETUP 4.MULTI-PICTURES 5.RECORDING SETUP 6.DISPLAY SETUP 7.OTHER FUNCTIONS PUSH MENU TO...Screen To facilitate the selection of the cursor [1] brings up a subsequent Mode. OSD DATE/ TIME PHOTO SHOT VIDEO CAMERA START/ STOP COUNTER RESET TITLE MULTI/ P-IN-P ¥REC A.DUB ZOOM T sVOL r V/REW PLAY FF/W W 6 1 5 STILL ADV PAUSE STILL ADV E ;...
... cannot be retained. However, if the Battery or AC Adaptor is disconnected before turning the Camera/Recorder off . 1 2 CAMERA VCR CARD P.B. 3 PUSH VOL/JOG MENU 1 1 2, 3, 4, 5 CAMERA FUNCTIONS 1.CAMERA SETUP 2.DIGITAL EFFECT 3.CARD SETUP 4.MULTI-PICTURES 5.RECORDING SETUP 6.DISPLAY SETUP 7.OTHER FUNCTIONS PUSH MENU TO...Screen To facilitate the selection of the cursor [1] brings up a subsequent Mode. OSD DATE/ TIME PHOTO SHOT VIDEO CAMERA START/ STOP COUNTER RESET TITLE MULTI/ P-IN-P ¥REC A.DUB ZOOM T sVOL r V/REW PLAY FF/W W 6 1 5 STILL ADV PAUSE STILL ADV E ;...
AGEZ50U User Guide
Page 16
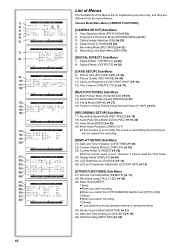
...YES DISPLAY ALL PARTIAL OFF LCD MODE NORMAL BRIGHT LCD/EVF SET ---- YES SELF-REC NORMAL MIRROR RETURN ---- Camera Mode Main-Menu [CAMERA FUNCTIONS] [CAMERA SETUP] Sub-Menu 1) Auto Exposure Mode [PROG.AE] (l 23) 2) ...Progressive Photoshot Mode [PROGRESSIVE] (l 21) 3) Optical Image Stabilizer [EIS] (l 22) 4) Digital Zoom [D.ZOOM] (l 22) 5) Recording Mode [REC MODE] (l 21) 6) Returning to the Main-Menu [RETURN] [DIGITAL EFFECT] Sub-Menu 7) Digital Effects 1 [EFFECT1] (l 26) 8) Digital...
...YES DISPLAY ALL PARTIAL OFF LCD MODE NORMAL BRIGHT LCD/EVF SET ---- YES SELF-REC NORMAL MIRROR RETURN ---- Camera Mode Main-Menu [CAMERA FUNCTIONS] [CAMERA SETUP] Sub-Menu 1) Auto Exposure Mode [PROG.AE] (l 23) 2) ...Progressive Photoshot Mode [PROGRESSIVE] (l 21) 3) Optical Image Stabilizer [EIS] (l 22) 4) Digital Zoom [D.ZOOM] (l 22) 5) Recording Mode [REC MODE] (l 21) 6) Returning to the Main-Menu [RETURN] [DIGITAL EFFECT] Sub-Menu 7) Digital Effects 1 [EFFECT1] (l 26) 8) Digital...
AGEZ50U User Guide
Page 17
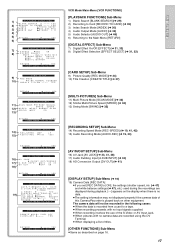
... 5) Audio Selector [AUDIO OUT] (l 48) 6) Returning to the Main-Menu [RETURN] [DIGITAL EFFECT] Sub-Menu 7) Digital Effect On/Off [EFFECT] (l 31, 32) 8) Digital Effect Selection [EFFECT SELECT] (l 31, 32) [CARD SETUP] Sub-Menu 9) Picture Quality [REC MODE] (l 34) 10) Title Creation [CREATE TITLE] (l 37) [MULTI-PICTURES] Sub... [A.DUB INPUT] (l 33) 18) AD Conversion Output [DV OUT] (l 41) [DISPLAY SETUP] Sub-Menu (l 16) 19) Camera Data [REC DATA] ≥If you set [REC DATA] to a tape. ≥ When recording proceeds with no input signals supplied. ≥ When recording involves the use of the ...
... 5) Audio Selector [AUDIO OUT] (l 48) 6) Returning to the Main-Menu [RETURN] [DIGITAL EFFECT] Sub-Menu 7) Digital Effect On/Off [EFFECT] (l 31, 32) 8) Digital Effect Selection [EFFECT SELECT] (l 31, 32) [CARD SETUP] Sub-Menu 9) Picture Quality [REC MODE] (l 34) 10) Title Creation [CREATE TITLE] (l 37) [MULTI-PICTURES] Sub... [A.DUB INPUT] (l 33) 18) AD Conversion Output [DV OUT] (l 41) [DISPLAY SETUP] Sub-Menu (l 16) 19) Camera Data [REC DATA] ≥If you set [REC DATA] to a tape. ≥ When recording proceeds with no input signals supplied. ≥ When recording involves the use of the ...

AGEZ50U User Guide
Page 19
...the date and time. When the [0] Indication is lit, the internal lithium battery is near exhaustion. 1 Connect the AC Adaptor to the Camera/Recorder with [REC-SPEED] on 2 tracks in stereo, while the other equipment. ≥Audio Dubbing is possible with LP Mode. (l 33) Audio Recording...desired recording speed can be restricted. ≥The contents that the built-in clock in LP Mode are recorded in the Camera/Recorder may be selected with [AUDIO-REC] on a playback image, or some functions may become inaccurate. If the [0] Indication is possible that are not completely ...
...the date and time. When the [0] Indication is lit, the internal lithium battery is near exhaustion. 1 Connect the AC Adaptor to the Camera/Recorder with [REC-SPEED] on 2 tracks in stereo, while the other equipment. ≥Audio Dubbing is possible with LP Mode. (l 33) Audio Recording...desired recording speed can be restricted. ≥The contents that the built-in clock in LP Mode are recorded in the Camera/Recorder may be selected with [AUDIO-REC] on a playback image, or some functions may become inaccurate. If the [0] Indication is possible that are not completely ...

AGEZ50U User Guide
Page 20
...248; 9 20 Recording 1 Set the [OFF/ON/MODE] Switch to [ON]. ≥The [CAMERA] Lamp lights up. 1 2 Press the Recording Start/Stop Button. ≥Recording starts. ≥After the [RECORD] is displayed, it changes to [REC]. 2 ≥The Tally Lamp (LED Lamp) 3 lights up if the [TALLY LED] on ... smooth transition from this condition, turn on the power again. ≥When recording while the Mode Selector Switch is set [SELF-REC] on the [OTHER FUNCTIONS] Sub-menu is paused (Camera Search) The recorded scene can be adjusted manually.) (l 23, 24, 25) ≥For other notes, see page 46....
...248; 9 20 Recording 1 Set the [OFF/ON/MODE] Switch to [ON]. ≥The [CAMERA] Lamp lights up. 1 2 Press the Recording Start/Stop Button. ≥Recording starts. ≥After the [RECORD] is displayed, it changes to [REC]. 2 ≥The Tally Lamp (LED Lamp) 3 lights up if the [TALLY LED] on ... smooth transition from this condition, turn on the power again. ≥When recording while the Mode Selector Switch is set [SELF-REC] on the [OTHER FUNCTIONS] Sub-menu is paused (Camera Search) The recorded scene can be adjusted manually.) (l 23, 24, 25) ≥For other notes, see page 46....
AGEZ50U User Guide
Page 21
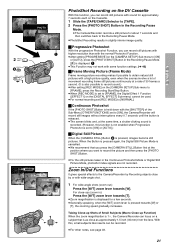
...pressed, images become still pictures. With this function is not enabled when Progressive Photoshot is set to [ON] or [AUTO].) ª Digital Still Picture When the [CAMERA STILL] Button 2 is as close as approximately 1.5 inch (35 mm) from the lens. Taking Close-up Function) When the zoom ... second. (It is also possible to record sound.) ≥After setting [REC MODE] on the [CAMERA SETUP] Sub-menu to [FRAME], press the Recording Start/Stop Button. ≥When [REC MODE] is set to [ON], the Camera/Recorder will record still images without interruptions every 0.7 seconds until the button is...
...pressed, images become still pictures. With this function is not enabled when Progressive Photoshot is set to [ON] or [AUTO].) ª Digital Still Picture When the [CAMERA STILL] Button 2 is as close as approximately 1.5 inch (35 mm) from the lens. Taking Close-up Function) When the zoom ... second. (It is also possible to record sound.) ≥After setting [REC MODE] on the [CAMERA SETUP] Sub-menu to [FRAME], press the Recording Start/Stop Button. ≥When [REC MODE] is set to [ON], the Camera/Recorder will record still images without interruptions every 0.7 seconds until the button is...
AGEZ50U User Guide
Page 22
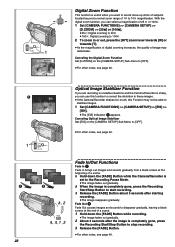
... you are recording in unstable situations and the Camera/Recorder is shaky, you can select a magnification of 25 t or 100t. 1 Set [CAMERA FUNCTIONS] >> [CAMERA SETUP] >> [D.ZOOM] >> [25t] or [100t]. ≥25k: Digital zooming to 25t ≥100k: Digital zooming to 100t 2 To zoom in these ... in or out, press the [W/T] zoom lever towards [W] or towards [T]. ≥As the magnification of digital zooming increases, the quality of image may not be able to stabilize images. 1 Set [CAMERA FUNCTIONS] >> [CAMERA SETUP] >> [EIS] >> [ON]. ≥The [EIS] Indication 1 appears. 2 WT PUSH MENU...
... you are recording in unstable situations and the Camera/Recorder is shaky, you can select a magnification of 25 t or 100t. 1 Set [CAMERA FUNCTIONS] >> [CAMERA SETUP] >> [D.ZOOM] >> [25t] or [100t]. ≥25k: Digital zooming to 25t ≥100k: Digital zooming to 100t 2 To zoom in these ... in or out, press the [W/T] zoom lever towards [W] or towards [T]. ≥As the magnification of digital zooming increases, the quality of image may not be able to stabilize images. 1 Set [CAMERA FUNCTIONS] >> [CAMERA SETUP] >> [EIS] >> [ON]. ≥The [EIS] Indication 1 appears. 2 WT PUSH MENU...


