
Owners Manual
Page 2
... Safety Instructions...3 Caution ...5 Features ...6 Front Panel and Rear Panel Illustration 7 VFD Illustration ...8 Remote Controller ...9 Connections Connecting to a TV Set ...10 Connecting to an AV Amplifier with 2 Channels Analog Audio Input 11 Connecting to an AV Amplifier with 5.1 Channels Analog Audio Input 12 Connecting to a AV Amplifier with Digital Audio Input 13 Connecting to Headphones ...14 Basic Playback Basic Operation ...15 Function Illustrations Modes and Features Setup ...16 Remote Controller Operation ...23 MP3 Playing ...33 Others Trouble Shooting ...34 Specifications...
... Safety Instructions...3 Caution ...5 Features ...6 Front Panel and Rear Panel Illustration 7 VFD Illustration ...8 Remote Controller ...9 Connections Connecting to a TV Set ...10 Connecting to an AV Amplifier with 2 Channels Analog Audio Input 11 Connecting to an AV Amplifier with 5.1 Channels Analog Audio Input 12 Connecting to a AV Amplifier with Digital Audio Input 13 Connecting to Headphones ...14 Basic Playback Basic Operation ...15 Function Illustrations Modes and Features Setup ...16 Remote Controller Operation ...23 MP3 Playing ...33 Others Trouble Shooting ...34 Specifications...
Owners Manual
Page 3
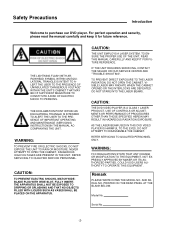
... PREVENT DIRECT EXPOSURE TO THE LASER RADIATION, DO NOT OPEN THE CABINET. AS THE LASER BEAM USED IN THIS DVD VIDEO PLAYER IS HARMFUL TO THE EYES, DO NOT ATTEMPT TO DISASSEMBLE THE CABINET. THE EXCLAMATION POINT WITHIN AN EQUILATERAL TRIANGLE IS INTENDED TO ALERT THE USER TO THE PRESENCE OF IMPORTANT OPERATING AND MAINTENANCE (SERVICING) INSTRUCTIONSIN THE MANUAL ACCOMPANYING...
... PREVENT DIRECT EXPOSURE TO THE LASER RADIATION, DO NOT OPEN THE CABINET. AS THE LASER BEAM USED IN THIS DVD VIDEO PLAYER IS HARMFUL TO THE EYES, DO NOT ATTEMPT TO DISASSEMBLE THE CABINET. THE EXCLAMATION POINT WITHIN AN EQUILATERAL TRIANGLE IS INTENDED TO ALERT THE USER TO THE PRESENCE OF IMPORTANT OPERATING AND MAINTENANCE (SERVICING) INSTRUCTIONSIN THE MANUAL ACCOMPANYING...

Owners Manual
Page 6
... disc tray. Suggest that the cover and rear panel become a little hot after a period of this product from air-conditions room where you move this product for a long time, because these conditions. No using for a while. To avoid unwanted operation, please turn off the power when you often check and maintain it . HOW TO SHOW CLEAR PICTURE This player is opening or closing...
... disc tray. Suggest that the cover and rear panel become a little hot after a period of this product from air-conditions room where you move this product for a long time, because these conditions. No using for a while. To avoid unwanted operation, please turn off the power when you often check and maintain it . HOW TO SHOW CLEAR PICTURE This player is opening or closing...
Owners Manual
Page 7
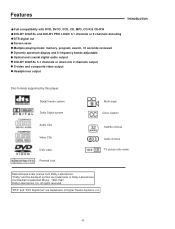
... DTS digital out Screen saver Multiple playing mode: memory, program, search, 10 seconds reviewed Dynamic spectrum display and 6 frequency bands adjustable Optical and coaxial digital audio output DOLBY DIGITAL 5.1 channels or down mix 2 channels output S-video and composite video output Headphones output Disc formats supported by this player: Digital theatre system Dolby Digital system Audio CDs Video CDs DVD video Parental Lock Multi-angle Close Caption Subtitle choices Audio choices TV picture ratio mode Manufactured under license from Dolby Laboratories. Confidential Unpublished Works...
... DTS digital out Screen saver Multiple playing mode: memory, program, search, 10 seconds reviewed Dynamic spectrum display and 6 frequency bands adjustable Optical and coaxial digital audio output DOLBY DIGITAL 5.1 channels or down mix 2 channels output S-video and composite video output Headphones output Disc formats supported by this player: Digital theatre system Dolby Digital system Audio CDs Video CDs DVD video Parental Lock Multi-angle Close Caption Subtitle choices Audio choices TV picture ratio mode Manufactured under license from Dolby Laboratories. Confidential Unpublished Works...

Owners Manual
Page 9
... chapter number(DVD). Indicate the track number(VCD). PBC indicator 8. Sleep mode indicator 12. Illuminate during repeat playback. Illuminate during still picture. ALL Repeat of chapter(DVD)/track(CD, VCD). Illuminate the total playing time on . 1. Twinkle when receiving messages from the Remote controller. -8- Repeat indicator 7. Play indicator 9. A-B Repeat of a section between two specific points(A-B repeat). Illuminate during Karaoke mode or Recorder mode. Pause indicator 10. Illuminate when a CD-DA disc is loaded. DVD indicator...
... chapter number(DVD). Indicate the track number(VCD). PBC indicator 8. Sleep mode indicator 12. Illuminate during repeat playback. Illuminate during still picture. ALL Repeat of chapter(DVD)/track(CD, VCD). Illuminate the total playing time on . 1. Twinkle when receiving messages from the Remote controller. -8- Repeat indicator 7. Play indicator 9. A-B Repeat of a section between two specific points(A-B repeat). Illuminate during Karaoke mode or Recorder mode. Pause indicator 10. Illuminate when a CD-DA disc is loaded. DVD indicator...

Owners Manual
Page 10
Remote Controller 1. OSD/SETUP button 7. Previous/Fast backward button 9. Next/Fast forward button 12. VOL/CH button 26. SEARCH button 10. TITLE button 5. ENTER button 18. OPEN/CLOSE button 3. MENU button 6. PLAY button 17. SLOW FWD button 8. PAUSE/STEP button 13. A-B repeat button 20. EQUALIZER button 24. MEMORY button 21. STANDBY/ON button 2. Digit buttons 11. RETURN button 19. TIMER button 25 23 29. CLEAR button 14. SUBTITLE button Note: The buttons are 23 & 25 unavailable for this model. -9- Arrow buttons 15. PLAY MODE button 22. ZOOM button 27....
Remote Controller 1. OSD/SETUP button 7. Previous/Fast backward button 9. Next/Fast forward button 12. VOL/CH button 26. SEARCH button 10. TITLE button 5. ENTER button 18. OPEN/CLOSE button 3. MENU button 6. PLAY button 17. SLOW FWD button 8. PAUSE/STEP button 13. A-B repeat button 20. EQUALIZER button 24. MEMORY button 21. STANDBY/ON button 2. Digit buttons 11. RETURN button 19. TIMER button 25 23 29. CLEAR button 14. SUBTITLE button Note: The buttons are 23 & 25 unavailable for this model. -9- Arrow buttons 15. PLAY MODE button 22. ZOOM button 27....

Owners Manual
Page 14
Set the amplifier's audio input to an AV Amplifier with Digital Audio Input Connections Notes: 1. Either Optical or Coaxial digital audio output can be selected. 2. Set the player's audio out in Raw or PCM mode. 3. Connecting to the channel you have connected. -13-
Set the amplifier's audio input to an AV Amplifier with Digital Audio Input Connections Notes: 1. Either Optical or Coaxial digital audio output can be selected. 2. Set the player's audio out in Raw or PCM mode. 3. Connecting to the channel you have connected. -13-
Owners Manual
Page 16
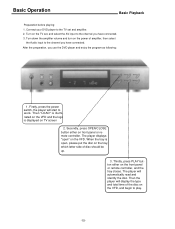
... tray, which letter side of the disc on the TV set and amplifier. 2. When the tray is displayed on the power of amplifier, then select the Audio input to the channel you use the DVD player and enjoy the program as following: 1. Then "LOAD" is illuminated on the VFD and the logo is open " on front panel or remote controller. The player will display the type and total time of disc should be up. 3. Turn...
... tray, which letter side of the disc on the TV set and amplifier. 2. When the tray is displayed on the power of amplifier, then select the Audio input to the channel you use the DVD player and enjoy the program as following: 1. Then "LOAD" is illuminated on the VFD and the logo is open " on front panel or remote controller. The player will display the type and total time of disc should be up. 3. Turn...

Owners Manual
Page 17
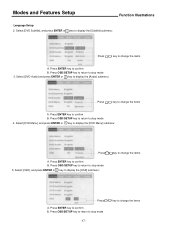
... the setup menu 1. Press OSD/SETUP key to return to stop mode, press OSD/SETUP key, and the TV screen will display the setup menu as the following: Press key to change the items setup menu A.Press ENTER key to change the items A. Press ENTER key to change the items A. Press OSD/SETUP key to return to stop mode Language Setup Select [Language] in the setup menu, and press ENTER key to display the [Language] submenu...
... the setup menu 1. Press OSD/SETUP key to return to stop mode, press OSD/SETUP key, and the TV screen will display the setup menu as the following: Press key to change the items setup menu A.Press ENTER key to change the items A. Press ENTER key to change the items A. Press OSD/SETUP key to return to stop mode Language Setup Select [Language] in the setup menu, and press ENTER key to display the [Language] submenu...
Owners Manual
Page 18
.../SETUP key to return to display the [DVD Menu] submenu: Press A. Press ENTER key to stop mode 3. Press OSD/SETUP key to return to confirm B. Select [DVD Subtitle], and press ENTER or key to display the [Subtitle] submenu: Press key to stop mode 5. Press ENTER key to stop mode -17- Press OSD/SETUP key to return to confirm B. Modes and Features Setup Function Illustrations Language Setup 2. Press OSD/SETUP key to return to change...
.../SETUP key to return to display the [DVD Menu] submenu: Press A. Press ENTER key to stop mode 3. Press OSD/SETUP key to return to confirm B. Select [DVD Subtitle], and press ENTER or key to display the [Subtitle] submenu: Press key to stop mode 5. Press ENTER key to stop mode -17- Press OSD/SETUP key to return to confirm B. Modes and Features Setup Function Illustrations Language Setup 2. Press OSD/SETUP key to return to change...
Owners Manual
Page 19
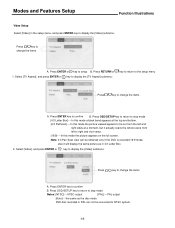
... the DVD is recorded 16:9 mode, else it actually scans the whole scene from the left to right and vice-versa. [16:9]----In this mode the picture appears on the full screen. Select [TV Aspect], and press ENTER or key to display the [TV Aspect] submenu: key to return to the setup menu Press key to change the items A. Modes and Features Setup Function Illustrations Video Setup Select [Video] in PAL can...
... the DVD is recorded 16:9 mode, else it actually scans the whole scene from the left to right and vice-versa. [16:9]----In this mode the picture appears on the full screen. Select [TV Aspect], and press ENTER or key to display the [TV Aspect] submenu: key to return to the setup menu Press key to change the items A. Modes and Features Setup Function Illustrations Video Setup Select [Video] in PAL can...
Owners Manual
Page 20
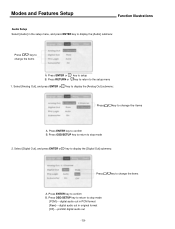
... items A. Press ENTER key to setup B. Press ENTER or key to confirm B. Modes and Features Setup Function Illustrations Audio Setup Select [Audio] in original format [Off]----prohibit digital audio out -19- Press OSD/SETUP key to return to change the items A. Press OSD/SETUP key to return to stop mode [PCM]----digital audio out in PCM format [Raw]----digital audio out in the setup menu, and press ENTER key to display the [Audio] submenu: Press key to...
... items A. Press ENTER key to setup B. Press ENTER or key to confirm B. Modes and Features Setup Function Illustrations Audio Setup Select [Audio] in original format [Off]----prohibit digital audio out -19- Press OSD/SETUP key to return to change the items A. Press OSD/SETUP key to return to stop mode [PCM]----digital audio out in PCM format [Raw]----digital audio out in the setup menu, and press ENTER key to display the [Audio] submenu: Press key to...
Owners Manual
Page 22
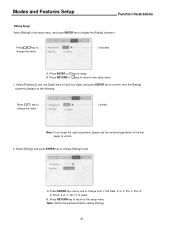
G, 3. R, 7. Modes and Features Setup Function Illustrations Rating Setup Select [Rating] in the last page) to change the items Unlocked A. Select [Password], and use Digital keys to input four digits, and press ENTER key to confirm, then the [Rating] submenu displays as the following: Press key to change the items Locked Note: If you forget the user's password, please use the universal password (in the setup menu, and press ENTER key to display the [Rating] submenu...
G, 3. R, 7. Modes and Features Setup Function Illustrations Rating Setup Select [Rating] in the last page) to change the items Unlocked A. Select [Password], and use Digital keys to input four digits, and press ENTER key to confirm, then the [Rating] submenu displays as the following: Press key to change the items Locked Note: If you forget the user's password, please use the universal password (in the setup menu, and press ENTER key to display the [Rating] submenu...

Owners Manual
Page 24
... tray. -23- Note: This function is in standby, press STAND BY/ON key or any key on . Remote Controller Operation Function Illustrations STAND BY/ON During the playback, press STAND BY/ON key, the player will stop playing and turn to standby mode, and the standby indicator turns on the front panel, the player will start to work again, and the standby indicator turns off. While the player is subject to display the menu...
... tray. -23- Note: This function is in standby, press STAND BY/ON key or any key on . Remote Controller Operation Function Illustrations STAND BY/ON During the playback, press STAND BY/ON key, the player will stop playing and turn to standby mode, and the standby indicator turns on the front panel, the player will start to work again, and the standby indicator turns off. While the player is subject to display the menu...

Owners Manual
Page 26
... following: Press PLAY key to input the track, title, chapter numbers and time you press SLOW FWD key, the player will review the disc fast at 1/2, 1/4, 1/6, 1/7 time of the normal speed in a cycle as the following : Press PLAY key to confirm. Remote Controller Operation Function Illustrations Digital keys These keys are used to play normallv. -25- When the item with digits displays on the screen, press Digital keys to select the desired...
... following: Press PLAY key to input the track, title, chapter numbers and time you press SLOW FWD key, the player will review the disc fast at 1/2, 1/4, 1/6, 1/7 time of the normal speed in a cycle as the following : Press PLAY key to confirm. Remote Controller Operation Function Illustrations Digital keys These keys are used to play normallv. -25- When the item with digits displays on the screen, press Digital keys to select the desired...

Owners Manual
Page 28
.... Remote Controller Operation Function Illustrations CLEAR Press CLEAR key to the original mode. Press PLAY key to return to normal playback. PLAY Press PLAY key in playing status, and you have no 10 seconds reviewed function STOP Press STOP key when the player is playing, and playback will pause. Note: MP3 disc and some DVD discs have input. It deletes one digital by pressing it will play forward for over 2 seconds. Note: If the player stops...
.... Remote Controller Operation Function Illustrations CLEAR Press CLEAR key to the original mode. Press PLAY key to return to normal playback. PLAY Press PLAY key in playing status, and you have no 10 seconds reviewed function STOP Press STOP key when the player is playing, and playback will pause. Note: MP3 disc and some DVD discs have input. It deletes one digital by pressing it will play forward for over 2 seconds. Note: If the player stops...

Owners Manual
Page 29
... menu or stop status. If you can save the current information of disc. The function is disable. Remote Controller Operation * Function Illustrations RETURN When the DVD or VCD/SVCD(PBC is on) is going to be power-off automatically. The player can input the time which the player is playing, press RETURN key to return to B automatically. Press it in some function menus, and the current display will repeat...
... menu or stop status. If you can save the current information of disc. The function is disable. Remote Controller Operation * Function Illustrations RETURN When the DVD or VCD/SVCD(PBC is on) is going to be power-off automatically. The player can input the time which the player is playing, press RETURN key to return to B automatically. Press it in some function menus, and the current display will repeat...

Owners Manual
Page 33
... During DVD playback Press ANGLE key, you can view the pictures from one camera angle to the another. Press it once, you can view the picture from the different camera angles. SUBTITLE During DVD playback Press SUBTITLE key successively to select up to 8 kinds of audio language output. During SVCD playback Press AUDIO key successively to select up to 4 kinds of audio language output. Remote Controller Operation Function Illustrations ZOOM During VCD/SVCD/DVD playback, press...
... During DVD playback Press ANGLE key, you can view the pictures from one camera angle to the another. Press it once, you can view the picture from the different camera angles. SUBTITLE During DVD playback Press SUBTITLE key successively to select up to 8 kinds of audio language output. During SVCD playback Press AUDIO key successively to select up to 4 kinds of audio language output. Remote Controller Operation Function Illustrations ZOOM During VCD/SVCD/DVD playback, press...
Owners Manual
Page 35
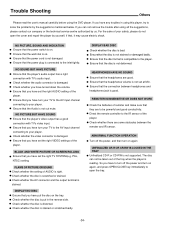
... of AUDIO is not set the right TV SYSTEM(e.g. BLACK AND WHITE PICTURE OR SCREEN ROLLING Ensure that you have turned down the volume. Check whether the disc is bad. Direct the remote controller to the inlet tightly. DISPLAY BAD DISC Check whether the disc is stained or scratched badly. So you have put in using this player, try to your player. Trouble Shooting Others Please read the user's manual carefully before using...
... of AUDIO is not set the right TV SYSTEM(e.g. BLACK AND WHITE PICTURE OR SCREEN ROLLING Ensure that you have turned down the volume. Check whether the disc is bad. Direct the remote controller to the inlet tightly. DISPLAY BAD DISC Check whether the disc is stained or scratched badly. So you have put in using this player, try to your player. Trouble Shooting Others Please read the user's manual carefully before using...

Owners Manual
Page 37
... battery compartment. 3 3. Notes: Direct the remote controller at the remote sensor and press the button. (The pictures of player and remoter are only for along period of time remove the batteries to match the "+" and "-" of the DVD player to operate the DVD player via the remote controller. Do not insert batteries into the remote controller in each direction of the front of the remote sensor. Do not leave dead or exhausted batteries in the remote controller...
... battery compartment. 3 3. Notes: Direct the remote controller at the remote sensor and press the button. (The pictures of player and remoter are only for along period of time remove the batteries to match the "+" and "-" of the DVD player to operate the DVD player via the remote controller. Do not insert batteries into the remote controller in each direction of the front of the remote sensor. Do not leave dead or exhausted batteries in the remote controller...


