
English
Page 2
...turn off parts and before use the food pusher. 16. Do not use this piece by hand, always use . 2. SAVE THESE INSTRUCTIONS 2 www.oster.com Keep hands and utensils away from outlet when not in place. 14. Be certain container cover is broken. 10. Never feed food into food...hot surfaces or hang over table edges or counters. 9. The small pusher should always be followed including the following: 1. Do not use your food processor if any part is securely locked in any other than its intended use this appliance for commercial purposes. 11. A scraper may cause fire, electrical...
...turn off parts and before use the food pusher. 16. Do not use this piece by hand, always use . 2. SAVE THESE INSTRUCTIONS 2 www.oster.com Keep hands and utensils away from outlet when not in place. 14. Be certain container cover is broken. 10. Never feed food into food...hot surfaces or hang over table edges or counters. 9. The small pusher should always be followed including the following: 1. Do not use your food processor if any part is securely locked in any other than its intended use this appliance for commercial purposes. 11. A scraper may cause fire, electrical...
English
Page 3
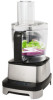
... An extension cord may be pulled on by children or tripped over the countertop or tabletop where it for purchasing the OSTER® 10 Cup Professional Food Processor. Before you for reference. Pay particular attention to read these instructions and keep it can be used , the electrical ...rating of the appliance. To learn more about Oster® products, please visit us at www.oster.com or call us at least as ...
... An extension cord may be pulled on by children or tripped over the countertop or tabletop where it for purchasing the OSTER® 10 Cup Professional Food Processor. Before you for reference. Pay particular attention to read these instructions and keep it can be used , the electrical ...rating of the appliance. To learn more about Oster® products, please visit us at www.oster.com or call us at least as ...

English
Page 4
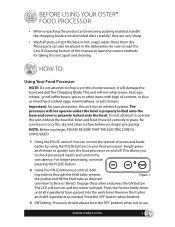
LEARNING ABOUT YOUR 10 CUP FOOD PROCESSOR a a Small Food Pusher b Large Food Pusher b c Food Chute Lid d Slice Disc c e Shred Disc f Disc Stem d g Dough Blade e h Accessory Storage Bowl i Multi-purpose Blade f g j Bowl k Spatula h l Base m Control panel i j k l m 4 www.oster.com
LEARNING ABOUT YOUR 10 CUP FOOD PROCESSOR a a Small Food Pusher b Large Food Pusher b c Food Chute Lid d Slice Disc c e Shred Disc f Disc Stem d g Dough Blade e h Accessory Storage Bowl i Multi-purpose Blade f g j Bowl k Spatula h l Base m Control panel i j k l m 4 www.oster.com
English
Page 5
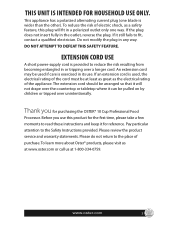
... start. Do not attempt to chop ice in hot, soapy water. www.oster.com 5 it will not operate unless the bowl is properly locked onto the base and cover is on and off. The processor will damage the bowl and dull the Chopping Blade. Press the Pusher firmly ...interlock system. Simply press and release to learn the correct methods for taking the unit apart and cleaning. Rinse them dry. BEFORE USING YOUR OSTER® FOOD PROCESSOR • When unpacking the product and removing packing material, handle the chopping blade and slice/shred discs carefully: they are very sharp. ...
... start. Do not attempt to chop ice in hot, soapy water. www.oster.com 5 it will not operate unless the bowl is properly locked onto the base and cover is on and off. The processor will damage the bowl and dull the Chopping Blade. Press the Pusher firmly ...interlock system. Simply press and release to learn the correct methods for taking the unit apart and cleaning. Rinse them dry. BEFORE USING YOUR OSTER® FOOD PROCESSOR • When unpacking the product and removing packing material, handle the chopping blade and slice/shred discs carefully: they are very sharp. ...

English
Page 6
...chopping, kneading or slicing/shredding sections. Figure 2 How to a complete stop your food processor, press the off button. Your food processor features a safety interlock system. To stop before removing the lid or bowl. 6 www.oster.com Turn the bowl clockwise until the blade or disc comes to Lock the Cover Place... the lid on button or pulse button. Plug unit into place. Press the food down slowly and steadily with the arrow on top of the food processor base, with the...
...chopping, kneading or slicing/shredding sections. Figure 2 How to a complete stop your food processor, press the off button. Your food processor features a safety interlock system. To stop before removing the lid or bowl. 6 www.oster.com Turn the bowl clockwise until the blade or disc comes to Lock the Cover Place... the lid on button or pulse button. Plug unit into place. Press the food down slowly and steadily with the arrow on top of the food processor base, with the...
English
Page 7
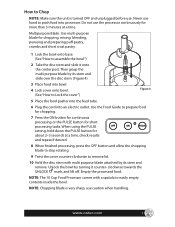
... and short crust pastry. 1 Lock the bowl onto base. (See "How to assemble the bowl") 2 Take the disc stem and slide it counter- www.oster.com 7 Multipurpose Blade: Use multi purpose blade for about 2-3 seconds at a time. Unlock the bowl by turning it onto the center post. NOTE: Chopping Blade... is turned OFF and unplugged before use the processor continuously for short processing tasks. Do not use . How to Chop NOTE: Make sure the unit is very sharp, use hand to push food into...
... and short crust pastry. 1 Lock the bowl onto base. (See "How to assemble the bowl") 2 Take the disc stem and slide it counter- www.oster.com 7 Multipurpose Blade: Use multi purpose blade for about 2-3 seconds at a time. Unlock the bowl by turning it onto the center post. NOTE: Chopping Blade... is turned OFF and unplugged before use the processor continuously for short processing tasks. Do not use . How to Chop NOTE: Make sure the unit is very sharp, use hand to push food into...
English
Page 8
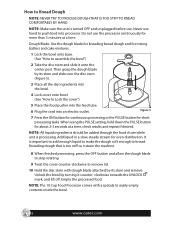
... BY HAND. It is processing. Unlock the bowl by turning it onto the center post. Empty the processed food. NOTE: The 10 Cup Food Processor comes with dough blade attached by its stem and remove. When using the PULSE setting, hold down the PULSE button for mixing batters and cake... mixtures. 1 Lock the bowl onto base. (See "How to easily empty contents inside the bowl. 8 www.oster.com Figure 5 7 Press the ON button for continuous processing or the PULSE button for even distribution. Then grasp the dough blade by its stem and...
... BY HAND. It is processing. Unlock the bowl by turning it onto the center post. Empty the processed food. NOTE: The 10 Cup Food Processor comes with dough blade attached by its stem and remove. When using the PULSE setting, hold down the PULSE button for mixing batters and cake... mixtures. 1 Lock the bowl onto base. (See "How to easily empty contents inside the bowl. 8 www.oster.com Figure 5 7 Press the ON button for continuous processing or the PULSE button for even distribution. Then grasp the dough blade by its stem and...
English
Page 9
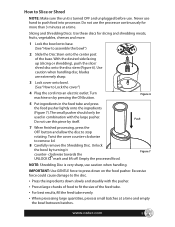
...onto base. (See "How to Lock the cover") 4 Plug the cord into processor. Figure 6 5 Put ingredients in combination with the pusher. • Precut large chunks of food to fit the size of the base. www.oster.com 9 Excessive force could cause damage to the disc. • Press the ... and unplugged before use. How to Slice or Shred NOTE: Make sure the unit is very sharp, use caution when handling. Never use the processor continuously for slicing and shredding meats, fruits, vegetables, cheeses and more than 3 minutes at a time and empty the bowl between batches. Push...
...onto base. (See "How to Lock the cover") 4 Plug the cord into processor. Figure 6 5 Put ingredients in combination with the pusher. • Precut large chunks of food to fit the size of the base. www.oster.com 9 Excessive force could cause damage to the disc. • Press the ... and unplugged before use. How to Slice or Shred NOTE: Make sure the unit is very sharp, use caution when handling. Never use the processor continuously for slicing and shredding meats, fruits, vegetables, cheeses and more than 3 minutes at a time and empty the bowl between batches. Push...
English
Page 10
..., such as will allow one full rotation of the blade before processing. Let the unit cool down for 15 minutes and restart. • A food processor is not recommended for making Italian meringue (a meringue made by using hot sugar syrup) Food Processing Tips/Liquids 1 Hot liquids (less than 176˚F) ... cannot be cut with multipurpose blade in 10 to 30 seconds, depending on the quantity. Larger amounts may leak from the bowl. 10 www.oster.com Make sure bowl and all parts are very cold before processing garlic or fresh herbs. • To chop nuts, use multipurpose blade and...
..., such as will allow one full rotation of the blade before processing. Let the unit cool down for 15 minutes and restart. • A food processor is not recommended for making Italian meringue (a meringue made by using hot sugar syrup) Food Processing Tips/Liquids 1 Hot liquids (less than 176˚F) ... cannot be cut with multipurpose blade in 10 to 30 seconds, depending on the quantity. Larger amounts may leak from the bowl. 10 www.oster.com Make sure bowl and all parts are very cold before processing garlic or fresh herbs. • To chop nuts, use multipurpose blade and...
English
Page 11
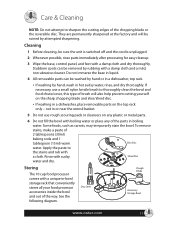
...edges of 2 tablespoons (30ml) baking soda and 1 tablespoon (15ml) warm Slice Disc water. See the following diagram. Storing The 10 cup food processor comes with boiling water or place any plastic or metal parts. 6 Do not fill the bowl with a unique in-bowl storage rack that conveniently ...Wipe the base, control panel, and feet with a damp cloth and a mild, non-abrasive cleaner. Disc Stem Dough Blade Accessory Storage Bowl www.oster.com 11 To remove stains, make a paste of the chopping blade or the reversible disc. If necessary, use rough scouring pads or cleansers on ...
...edges of 2 tablespoons (30ml) baking soda and 1 tablespoon (15ml) warm Slice Disc water. See the following diagram. Storing The 10 cup food processor comes with boiling water or place any plastic or metal parts. 6 Do not fill the bowl with a unique in-bowl storage rack that conveniently ...Wipe the base, control panel, and feet with a damp cloth and a mild, non-abrasive cleaner. Disc Stem Dough Blade Accessory Storage Bowl www.oster.com 11 To remove stains, make a paste of the chopping blade or the reversible disc. If necessary, use rough scouring pads or cleansers on ...


