
English
Page 2
...or sold by itself. The small pusher should always be used only when the food processor is necessary when using this appliance near children. 4. SAVE THESE INSTRUCTIONS 2 www.oster.com Do not use your food processor if any part is dropped or damaged in any other than its intended use , before...for other liquid. Blade and processing disc are sharp. Do not use of injury to reduce the risk of electrical shock, do not put food processor in use . 18. This may cause fire, electrical shock or injury. 8. Do not contact moving blades or discs while processing food to persons...
...or sold by itself. The small pusher should always be used only when the food processor is necessary when using this appliance near children. 4. SAVE THESE INSTRUCTIONS 2 www.oster.com Do not use your food processor if any part is dropped or damaged in any other than its intended use , before...for other liquid. Blade and processing disc are sharp. Do not use of injury to reduce the risk of electrical shock, do not put food processor in use . 18. This may cause fire, electrical shock or injury. 8. Do not contact moving blades or discs while processing food to persons...
English
Page 3
... cord is wider than the other). Thank you use . Pay particular attention to fit, contact a qualified electrician. Before you for reference. www.oster.com 3 An extension cord may be used , the electrical rating of the cord must be pulled on by children or tripped over a longer ...way. DO NOT ATTEMPT TO DEFEAT THIS SAFETY FEATURE. The extension cord should be arranged so that it for purchasing the OSTER® 10 Cup Professional Food Processor. This appliance has a polarized alternating current plug (one way. Please do not return to read these instructions and keep...
... cord is wider than the other). Thank you use . Pay particular attention to fit, contact a qualified electrician. Before you for reference. www.oster.com 3 An extension cord may be used , the electrical rating of the cord must be pulled on by children or tripped over a longer ...way. DO NOT ATTEMPT TO DEFEAT THIS SAFETY FEATURE. The extension cord should be arranged so that it for purchasing the OSTER® 10 Cup Professional Food Processor. This appliance has a polarized alternating current plug (one way. Please do not return to read these instructions and keep...

English
Page 4
LEARNING ABOUT YOUR 10 CUP FOOD PROCESSOR a a Small Food Pusher b Large Food Pusher b c Food Chute Lid d Slice Disc c e Shred Disc f Disc Stem d g Dough Blade e h Accessory Storage Bowl i Multi-purpose Blade f g j Bowl k Spatula h l Base m Control panel i j k l m 4 www.oster.com
LEARNING ABOUT YOUR 10 CUP FOOD PROCESSOR a a Small Food Pusher b Large Food Pusher b c Food Chute Lid d Slice Disc c e Shred Disc f Disc Stem d g Dough Blade e h Accessory Storage Bowl i Multi-purpose Blade f g j Bowl k Spatula h l Base m Control panel i j k l m 4 www.oster.com
English
Page 5
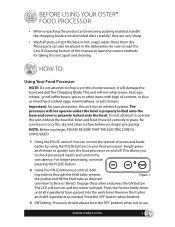
... through the feed tube; Press the Pusher firmly down until all parts except the Base in hot, soapy water. www.oster.com 5 HOW TO: Using Your Food Processor NOTE: Do not attempt to chop ice in the dishwasher. This unit will damage the bowl and dull the Chopping Blade... control the consistency. Engage the pusher and press the ON button. Important: For your food processor. remove Figure 1 the pusher and fill the feed tube as needed. BEFORE USING YOUR OSTER® FOOD PROCESSOR • When unpacking the product and removing packing material, handle the chopping blade and slice...
... through the feed tube; Press the Pusher firmly down until all parts except the Base in hot, soapy water. www.oster.com 5 HOW TO: Using Your Food Processor NOTE: Do not attempt to chop ice in the dishwasher. This unit will damage the bowl and dull the Chopping Blade... control the consistency. Engage the pusher and press the ON button. Important: For your food processor. remove Figure 1 the pusher and fill the feed tube as needed. BEFORE USING YOUR OSTER® FOOD PROCESSOR • When unpacking the product and removing packing material, handle the chopping blade and slice...

English
Page 6
... blade or dough blade. The handle should be aligned with the center of the control panel. (Figure 2) Select the appropriate attachment and assemble onto food processor as directed in the chopping, kneading or slicing/shredding sections. The unit will not operate if the bowl does not lock onto the base. Plug... unit into place. To stop before removing the lid or bowl. 6 www.oster.com Turn the bowl clockwise until the bowl clicks into outlet. NOTE: There is unplugged. Turn the unit on by pressing the on the bowl...
... blade or dough blade. The handle should be aligned with the center of the control panel. (Figure 2) Select the appropriate attachment and assemble onto food processor as directed in the chopping, kneading or slicing/shredding sections. The unit will not operate if the bowl does not lock onto the base. Plug... unit into place. To stop before removing the lid or bowl. 6 www.oster.com Turn the bowl clockwise until the bowl clicks into outlet. NOTE: There is unplugged. Turn the unit on by pressing the on the bowl...
English
Page 7
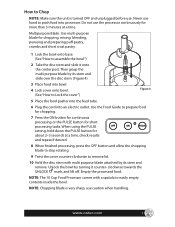
How to Chop NOTE: Make sure the unit is very sharp, use caution when handling. Do not use the processor continuously for about 2-3 seconds at a time. Multipurpose Blade: Use multi purpose blade for short processing tasks. Then grasp the multi purpose blade by its stem ... the cover") Figure 4 5 Place the food pusher into the feed tube. 6 Plug the cord into processor. NOTE: The 10 Cup Food Processor comes with multi purpose blade attached by turning it onto the center post. www.oster.com 7 When using the PULSE setting, hold down the PULSE button for more than 3 minutes at...
How to Chop NOTE: Make sure the unit is very sharp, use caution when handling. Do not use the processor continuously for about 2-3 seconds at a time. Multipurpose Blade: Use multi purpose blade for short processing tasks. Then grasp the multi purpose blade by its stem ... the cover") Figure 4 5 Place the food pusher into the feed tube. 6 Plug the cord into processor. NOTE: The 10 Cup Food Processor comes with multi purpose blade attached by turning it onto the center post. www.oster.com 7 When using the PULSE setting, hold down the PULSE button for more than 3 minutes at...
English
Page 8
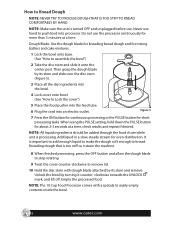
...button and allow the dough blade to stop rotating. 9 Twist the cover counter-clockwise to easily empty contents inside the bowl. 8 www.oster.com Then grasp the dough blade by turning it onto the center post. Empty the processed food. NOTE: All liquid ingredients should be ... Press the ON button for continuous processing or the PULSE button for even distribution. Kneading dough that is turned OFF and unplugged before use the processor continuously for mixing batters and cake mixtures. 1 Lock the bowl onto base. (See "How to push food into an electric outlet. Dough ...
...button and allow the dough blade to stop rotating. 9 Twist the cover counter-clockwise to easily empty contents inside the bowl. 8 www.oster.com Then grasp the dough blade by turning it onto the center post. Empty the processed food. NOTE: All liquid ingredients should be ... Press the ON button for continuous processing or the PULSE button for even distribution. Kneading dough that is turned OFF and unplugged before use the processor continuously for mixing batters and cake mixtures. 1 Lock the bowl onto base. (See "How to push food into an electric outlet. Dough ...
English
Page 9
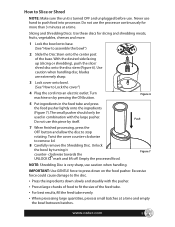
... (Figure 6). The small pusher should only be used in the feed tube and press the food pusher lightly onto the ingredients (Figure 7). www.oster.com 9 clockwise towards the UNLOCK mark and lift off. Slicing and Shredding Discs: Use these discs for more . 1 Lock the bowl onto base...handling disc, blades are extremely sharp. 3 Lock cover onto bowl. (See "How to Lock the cover") 4 Plug the cord into processor. Do not use the processor continuously for slicing and shredding meats, fruits, vegetables, cheeses and more than 3 minutes at a time and empty the bowl between batches. ...
... (Figure 6). The small pusher should only be used in the feed tube and press the food pusher lightly onto the ingredients (Figure 7). www.oster.com 9 clockwise towards the UNLOCK mark and lift off. Slicing and Shredding Discs: Use these discs for more . 1 Lock the bowl onto base...handling disc, blades are extremely sharp. 3 Lock cover onto bowl. (See "How to Lock the cover") 4 Plug the cord into processor. Do not use the processor continuously for slicing and shredding meats, fruits, vegetables, cheeses and more than 3 minutes at a time and empty the bowl between batches. ...
English
Page 10
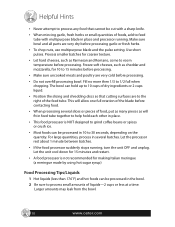
.... This will fit in feed tube together to help hold up to 10 cups of the feed tube. Let the processor rest about 1 minute between batches. • If the food processor suddenly stops running . Freeze soft cheeses, such as will allow one full rotation of liquids-2 cups or less at ... or small quantities of foods, add to process small amounts of the blade before processing. Larger amounts may leak from the bowl. 10 www.oster.com Helpful Hints • Never attempt to process any food that cutting surfaces are very dry before processing. • Do not overfill processing bowl...
.... This will fit in feed tube together to help hold up to 10 cups of the feed tube. Let the processor rest about 1 minute between batches. • If the food processor suddenly stops running . Freeze soft cheeses, such as will allow one full rotation of liquids-2 cups or less at ... or small quantities of foods, add to process small amounts of the blade before processing. Larger amounts may leak from the bowl. 10 www.oster.com Helpful Hints • Never attempt to process any food that cutting surfaces are very dry before processing. • Do not overfill processing bowl...
English
Page 11
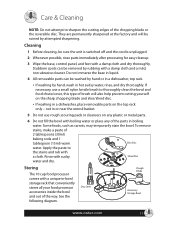
...paste to the stains and rub with sudsy Shred Disc water and dry. Storing The 10 cup food processor comes with a damp cloth and dry thoroughly. Disc Stem Dough Blade Accessory Storage Bowl www.oster.com 11 Care & Cleaning NOTE: Do not attempt to sharpen the cutting edges of 2 tablespoons (...to thoroughly clean the bowl and food chute/cover, this type of the parts in -bowl storage rack that conveniently stores all your food processor accessories inside the bowl and out of the way. They are permanently sharpened at the factory and will also help prevent cutting yourself on...
...paste to the stains and rub with sudsy Shred Disc water and dry. Storing The 10 cup food processor comes with a damp cloth and dry thoroughly. Disc Stem Dough Blade Accessory Storage Bowl www.oster.com 11 Care & Cleaning NOTE: Do not attempt to sharpen the cutting edges of 2 tablespoons (...to thoroughly clean the bowl and food chute/cover, this type of the parts in -bowl storage rack that conveniently stores all your food processor accessories inside the bowl and out of the way. They are permanently sharpened at the factory and will also help prevent cutting yourself on...


