
English
Page 2
... to turn off parts and before putting on motor base without first putting container properly in place while operating appliance. 15. SAVE THESE INSTRUCTIONS 2 www.oster.com Do not operate food processor with the large pusher. Be sure to defeat the cover interlock mechanism. 19. The small pusher should always be...
... to turn off parts and before putting on motor base without first putting container properly in place while operating appliance. 15. SAVE THESE INSTRUCTIONS 2 www.oster.com Do not operate food processor with the large pusher. Be sure to defeat the cover interlock mechanism. 19. The small pusher should always be...
English
Page 3
... service and warranty statements. EXTENSION CORD USE A short power-supply cord is provided to read these instructions and keep it for purchasing the OSTER® 10 Cup Professional Food Processor. This appliance has a polarized alternating current plug (one blade is exercised in its use this plug ...IS INTENDED FOR HOUSEHOLD USE ONLY. DO NOT ATTEMPT TO DEFEAT THIS SAFETY FEATURE. Please do not return to the Safety Instructions provided. www.oster.com 3 An extension cord may be used , the electrical rating of the appliance. To reduce the risk of electric shock, as the...
... service and warranty statements. EXTENSION CORD USE A short power-supply cord is provided to read these instructions and keep it for purchasing the OSTER® 10 Cup Professional Food Processor. This appliance has a polarized alternating current plug (one blade is exercised in its use this plug ...IS INTENDED FOR HOUSEHOLD USE ONLY. DO NOT ATTEMPT TO DEFEAT THIS SAFETY FEATURE. Please do not return to the Safety Instructions provided. www.oster.com 3 An extension cord may be used , the electrical rating of the appliance. To reduce the risk of electric shock, as the...

English
Page 4
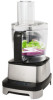
LEARNING ABOUT YOUR 10 CUP FOOD PROCESSOR a a Small Food Pusher b Large Food Pusher b c Food Chute Lid d Slice Disc c e Shred Disc f Disc Stem d g Dough Blade e h Accessory Storage Bowl i Multi-purpose Blade f g j Bowl k Spatula h l Base m Control panel i j k l m 4 www.oster.com
LEARNING ABOUT YOUR 10 CUP FOOD PROCESSOR a a Small Food Pusher b Large Food Pusher b c Food Chute Lid d Slice Disc c e Shred Disc f Disc Stem d g Dough Blade e h Accessory Storage Bowl i Multi-purpose Blade f g j Bowl k Spatula h l Base m Control panel i j k l m 4 www.oster.com
English
Page 5
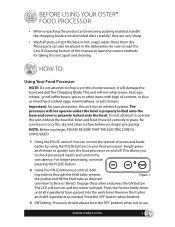
... button. Press the Pusher firmly down until all parts except the Base in place. Be sure base is properly locked onto the bowl. www.oster.com 5 Be sure to read the Care & Cleaning Section of processed foods better by using the PULSE button on and off. Important: For... your food processor. BEFORE USING YOUR OSTER® FOOD PROCESSOR • When unpacking the product and removing packing material, handle the chopping blade and slice/shred discs carefully: they are very...
... button. Press the Pusher firmly down until all parts except the Base in place. Be sure base is properly locked onto the bowl. www.oster.com 5 Be sure to read the Care & Cleaning Section of processed foods better by using the PULSE button on and off. Important: For... your food processor. BEFORE USING YOUR OSTER® FOOD PROCESSOR • When unpacking the product and removing packing material, handle the chopping blade and slice/shred discs carefully: they are very...

English
Page 6
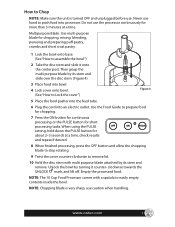
... attachment and assemble onto food processor as directed in the chopping, kneading or slicing/shredding sections. To stop before removing the lid or bowl. 6 www.oster.com The handle should be aligned with the pusher. Your food processor features a safety interlock system. Figure 3 NOTE: BOWL MUST BE LOCKED INTO BASE BEFORE...
... attachment and assemble onto food processor as directed in the chopping, kneading or slicing/shredding sections. To stop before removing the lid or bowl. 6 www.oster.com The handle should be aligned with the pusher. Your food processor features a safety interlock system. Figure 3 NOTE: BOWL MUST BE LOCKED INTO BASE BEFORE...
English
Page 7
... and slide over the disc stem. (Figure 4) 3 Place food into bowl. 4 Lock cover onto bowl. (See "How to easily empty contents inside the bowl. www.oster.com 7 Multipurpose Blade: Use multi purpose blade for short processing tasks. NOTE: Chopping Blade is turned OFF and unplugged before use the processor continuously for...
... and slide over the disc stem. (Figure 4) 3 Place food into bowl. 4 Lock cover onto bowl. (See "How to easily empty contents inside the bowl. www.oster.com 7 Multipurpose Blade: Use multi purpose blade for short processing tasks. NOTE: Chopping Blade is turned OFF and unplugged before use the processor continuously for...
English
Page 8
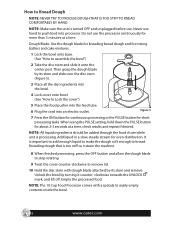
... disc stem (Figure 5). 3 Place all the dry ingredients into the bowl. 4 Lock cover onto bowl. (See "How to easily empty contents inside the bowl. 8 www.oster.com
... disc stem (Figure 5). 3 Place all the dry ingredients into the bowl. 4 Lock cover onto bowl. (See "How to easily empty contents inside the bowl. 8 www.oster.com
English
Page 9
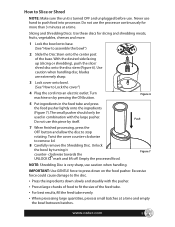
... disc stem (Figure 6). IMPORTANT: Use GENTLE force to Lock the cover") 4 Plug the cord into processor. Unlock the bowl by pressing the ON button. www.oster.com 9 Use caution when handling disc, blades are extremely sharp. 3 Lock cover onto bowl. (See "How to press down slowly and steadily with the large...
... disc stem (Figure 6). IMPORTANT: Use GENTLE force to Lock the cover") 4 Plug the cord into processor. Unlock the bowl by pressing the ON button. www.oster.com 9 Use caution when handling disc, blades are extremely sharp. 3 Lock cover onto bowl. (See "How to press down slowly and steadily with the large...
English
Page 10
... then 1/3 to 1/2 full when chopping. This will allow one full rotation of the blade before processing. Larger amounts may leak from the bowl. 10 www.oster.com Let the unit cool down for 10 to 15 minutes before processing. • Make sure uncooked meats and poultry are very dry before processing...
... then 1/3 to 1/2 full when chopping. This will allow one full rotation of the blade before processing. Larger amounts may leak from the bowl. 10 www.oster.com Let the unit cool down for 10 to 15 minutes before processing. • Make sure uncooked meats and poultry are very dry before processing...
English
Page 11
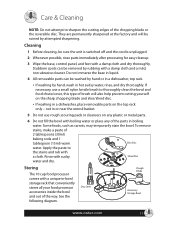
... to sharpen the cutting edges of 2 tablespoons (30ml) baking soda and 1 tablespoon (15ml) warm Slice Disc water. Disc Stem Dough Blade Accessory Storage Bowl www.oster.com 11 Care & Cleaning NOTE: Do not attempt to thoroughly clean the bowl and food chute/cover, this type of brush will be ruined by...
... to sharpen the cutting edges of 2 tablespoons (30ml) baking soda and 1 tablespoon (15ml) warm Slice Disc water. Disc Stem Dough Blade Accessory Storage Bowl www.oster.com 11 Care & Cleaning NOTE: Do not attempt to thoroughly clean the bowl and food chute/cover, this type of brush will be ruined by...
English
Page 12
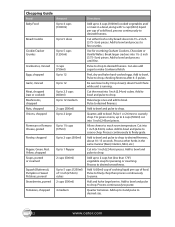
... to chop to bowl. Add up to 4 and pulse to puree. Cut the meat into 1inch (2.54cm) cubes. Process continuously to desired size. 12 www.oster.com Quarter tomatoes. Process to fine crumbs. Add to bowl and process to desired smoothness. Pulse to chop to chop. Add to bowl and pulse...
... to chop to bowl. Add up to 4 and pulse to puree. Cut the meat into 1inch (2.54cm) cubes. Process continuously to desired size. 12 www.oster.com Quarter tomatoes. Process to fine crumbs. Add to bowl and process to desired smoothness. Pulse to chop to chop. Add to bowl and pulse...

English
Page 13
... ones to fit if necessary. Shred using moderate pressure. Cut to fit Chute if necessary. Slice using light pressure. Peel, cut to fit Chute. www.oster.com 13 Cheese must be chilled in Chute. Use firm pressure. Halve and core. Cut large ones into 3 inch (8cm) lengths. Cheese must be well...
... ones to fit if necessary. Shred using moderate pressure. Cut to fit Chute if necessary. Slice using light pressure. Peel, cut to fit Chute. www.oster.com 13 Cheese must be chilled in Chute. Use firm pressure. Halve and core. Cut large ones into 3 inch (8cm) lengths. Cheese must be well...
English
Page 14
..., please write our Consumer Service Department PLEASE DO NOT RETURN THIS PRODUCT TO ANY OF THESE ADDRESSES OR TO THE PLACE OF PURCHASE 14 www.oster.com JCS shall not be liable for a period of one year from the date of purchase, this product or any component of equal or greater...
..., please write our Consumer Service Department PLEASE DO NOT RETURN THIS PRODUCT TO ANY OF THESE ADDRESSES OR TO THE PLACE OF PURCHASE 14 www.oster.com JCS shall not be liable for a period of one year from the date of purchase, this product or any component of equal or greater...