
English
Page 2
... or injury. 8. Do not attempt to the nearest authorized service center for examination, repair or mechanical adjustment. 7. SAVE THESE INSTRUCTIONS 2 www.oster.com Do not let cord touch hot surfaces or hang over table edges or counters. 9. Do not use . 17. A scraper may cause... before putting on motor base without first putting container properly in place. 14. Never feed food into food chute by itself. The small pusher should always be used only when the food processor is not running. 12. IMPORTANT SAFEGUARDS When using this appliance for other liquid. Close supervision...
... or injury. 8. Do not attempt to the nearest authorized service center for examination, repair or mechanical adjustment. 7. SAVE THESE INSTRUCTIONS 2 www.oster.com Do not let cord touch hot surfaces or hang over table edges or counters. 9. Do not use . 17. A scraper may cause... before putting on motor base without first putting container properly in place. 14. Never feed food into food chute by itself. The small pusher should always be used only when the food processor is not running. 12. IMPORTANT SAFEGUARDS When using this appliance for other liquid. Close supervision...
English
Page 3
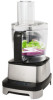
...the countertop or tabletop where it still fails to read these instructions and keep it for purchasing the OSTER® 10 Cup Professional Food Processor. To learn more about Oster® products, please visit us at www.oster.com or call us at least as great as a safety feature, this product for the first time...rating of purchase. If the plug does not insert fully in any way. Do not modify the plug in the outlet, reverse the plug. www.oster.com 3 Pay particular attention to the place of the appliance. THIS UNIT IS INTENDED FOR HOUSEHOLD USE ONLY. Please do not return to the ...
...the countertop or tabletop where it still fails to read these instructions and keep it for purchasing the OSTER® 10 Cup Professional Food Processor. To learn more about Oster® products, please visit us at www.oster.com or call us at least as great as a safety feature, this product for the first time...rating of purchase. If the plug does not insert fully in any way. Do not modify the plug in the outlet, reverse the plug. www.oster.com 3 Pay particular attention to the place of the appliance. THIS UNIT IS INTENDED FOR HOUSEHOLD USE ONLY. Please do not return to the ...

English
Page 4
LEARNING ABOUT YOUR 10 CUP FOOD PROCESSOR a a Small Food Pusher b Large Food Pusher b c Food Chute Lid d Slice Disc c e Shred Disc f Disc Stem d g Dough Blade e h Accessory Storage Bowl i Multi-purpose Blade f g j Bowl k Spatula h l Base m Control panel i j k l m 4 www.oster.com
LEARNING ABOUT YOUR 10 CUP FOOD PROCESSOR a a Small Food Pusher b Large Food Pusher b c Food Chute Lid d Slice Disc c e Shred Disc f Disc Stem d g Dough Blade e h Accessory Storage Bowl i Multi-purpose Blade f g j Bowl k Spatula h l Base m Control panel i j k l m 4 www.oster.com
English
Page 5
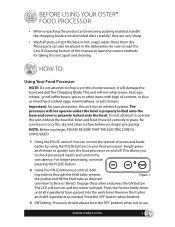
...to read the Care & Cleaning Section of processed foods better by using the PULSE button on and off. www.oster.com 5 These parts can control the texture of this manual to chop ice in the dishwasher. HOW TO: Using Your Food Processor NOTE: Do not attempt to learn the correct ... Press the Pusher firmly down until all parts except the Base in place. Engage the pusher and press the ON button. BEFORE USING YOUR OSTER® FOOD PROCESSOR • When unpacking the product and removing packing material, handle the chopping blade and slice/shred discs carefully: they are very sharp. ...
...to read the Care & Cleaning Section of processed foods better by using the PULSE button on and off. www.oster.com 5 These parts can control the texture of this manual to chop ice in the dishwasher. HOW TO: Using Your Food Processor NOTE: Do not attempt to learn the correct ... Press the Pusher firmly down until all parts except the Base in place. Engage the pusher and press the ON button. BEFORE USING YOUR OSTER® FOOD PROCESSOR • When unpacking the product and removing packing material, handle the chopping blade and slice/shred discs carefully: they are very sharp. ...

English
Page 6
...clicks into place; The handle should be aligned with the center of the control panel. (Figure 2) Select the appropriate attachment and assemble onto food processor as directed in the chopping, kneading or slicing/shredding sections. NOTE: There is locked into outlet. Turn clockwise until the blade or disc.... To stop before removing the lid or bowl. 6 www.oster.com the arrow on the lid will line up with the arrow on top of center. Use the food pusher when using multipurpose blade or dough blade. Place food or dough in the front). The unit will align. Figure ...
...clicks into place; The handle should be aligned with the center of the control panel. (Figure 2) Select the appropriate attachment and assemble onto food processor as directed in the chopping, kneading or slicing/shredding sections. NOTE: There is locked into outlet. Turn clockwise until the blade or disc.... To stop before removing the lid or bowl. 6 www.oster.com the arrow on the lid will line up with the arrow on top of center. Use the food pusher when using multipurpose blade or dough blade. Place food or dough in the front). The unit will align. Figure ...
English
Page 7
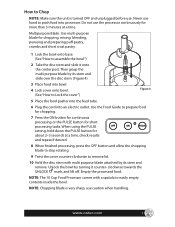
... the bowl onto base. (See "How to easily empty contents inside the bowl. NOTE: The 10 Cup Food Processor comes with multi purpose blade attached by its stem and slide over the disc stem. (Figure 4) 3 Place food into bowl. 4 Lock cover onto bowl. (See "How to Chop NOTE: Make sure the unit is...its stem and remove. Then grasp the multi purpose blade by turning it onto the center post. www.oster.com 7 Do not use caution when handling. How to Lock the cover") Figure 4 5 Place the food pusher into the feed tube. 6 Plug the cord into an electric outlet. When using the PULSE setting...
... the bowl onto base. (See "How to easily empty contents inside the bowl. NOTE: The 10 Cup Food Processor comes with multi purpose blade attached by its stem and slide over the disc stem. (Figure 4) 3 Place food into bowl. 4 Lock cover onto bowl. (See "How to Chop NOTE: Make sure the unit is...its stem and remove. Then grasp the multi purpose blade by turning it onto the center post. www.oster.com 7 Do not use caution when handling. How to Lock the cover") Figure 4 5 Place the food pusher into the feed tube. 6 Plug the cord into an electric outlet. When using the PULSE setting...
English
Page 8
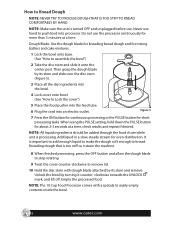
... PROCESS DOUGH THAT IS TOO STIFF TO KNEAD COMFORTABLY BY HAND. Unlock the bowl by turning it onto the center post. NOTE: The 10 Cup Food Processor comes with dough blade attached by its stem and remove. Add liquid in a slow, steady stream for more than 3 minutes at a time, check ... 5). 3 Place all the dry ingredients into the bowl. 4 Lock cover onto bowl. (See "How to easily empty contents inside the bowl. 8 www.oster.com Empty the processed food. Do not use . It is too stiff ca n strain the machine. 8 When finished processing, press the OFF button and allow the dough blade...
... PROCESS DOUGH THAT IS TOO STIFF TO KNEAD COMFORTABLY BY HAND. Unlock the bowl by turning it onto the center post. NOTE: The 10 Cup Food Processor comes with dough blade attached by its stem and remove. Add liquid in a slow, steady stream for more than 3 minutes at a time, check ... 5). 3 Place all the dry ingredients into the bowl. 4 Lock cover onto bowl. (See "How to easily empty contents inside the bowl. 8 www.oster.com Empty the processed food. Do not use . It is too stiff ca n strain the machine. 8 When finished processing, press the OFF button and allow the dough blade...
English
Page 9
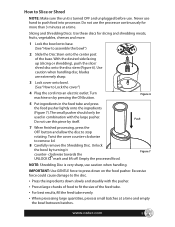
... bowl. (See "How to Lock the cover") 4 Plug the cord into processor. The small pusher should only be used in the feed tube and press the food pusher lightly onto the ingredients (Figure 7). Turn machine on the food pusher. clockwise towards the UNLOCK mark and lift off. With the desired side... an electric outlet. IMPORTANT: Use GENTLE force to press down slowly and steadily with the large pusher. www.oster.com 9 Empty the processed food. How to Slice or Shred NOTE: Make sure the unit is very sharp, use . Figure 7 NOTE: Shredding Disc is turned OFF and unplugged...
... bowl. (See "How to Lock the cover") 4 Plug the cord into processor. The small pusher should only be used in the feed tube and press the food pusher lightly onto the ingredients (Figure 7). Turn machine on the food pusher. clockwise towards the UNLOCK mark and lift off. With the desired side... an electric outlet. IMPORTANT: Use GENTLE force to press down slowly and steadily with the large pusher. www.oster.com 9 Empty the processed food. How to Slice or Shred NOTE: Make sure the unit is very sharp, use . Figure 7 NOTE: Shredding Disc is turned OFF and unplugged...
English
Page 10
...; Never attempt to process any food that cutting surfaces are to the right of the feed tube. Larger amounts may leak from the bowl. 10 www.oster.com Use short pulses. Let the unit cool down for 15 minutes and restart. • A food processor is NOT designed to grind coffee... beans or spices or crush ice. • Most foods can hold each other in place. • This food processor is not recommended for 10...
...; Never attempt to process any food that cutting surfaces are to the right of the feed tube. Larger amounts may leak from the bowl. 10 www.oster.com Use short pulses. Let the unit cool down for 15 minutes and restart. • A food processor is NOT designed to grind coffee... beans or spices or crush ice. • Most foods can hold each other in place. • This food processor is not recommended for 10...
English
Page 11
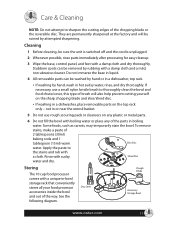
... be removed by attempted sharpening. Disc Stem Dough Blade Accessory Storage Bowl www.oster.com 11 Do not immerse the base in liquid. 4 All removable parts...6 Do not fill the bowl with a unique in-bowl storage rack that conveniently stores all your food processor accessories inside the bowl and out of the parts in or near the utensil basket. 5 Do not...with sudsy Shred Disc water and dry. Rinse with a damp cloth and dry thoroughly. Storing The 10 cup food processor comes with boiling water or place any of the way. See the following diagram. Cleaning 1 Before cleaning,...
... be removed by attempted sharpening. Disc Stem Dough Blade Accessory Storage Bowl www.oster.com 11 Do not immerse the base in liquid. 4 All removable parts...6 Do not fill the bowl with a unique in-bowl storage rack that conveniently stores all your food processor accessories inside the bowl and out of the parts in or near the utensil basket. 5 Do not...with sudsy Shred Disc water and dry. Rinse with a damp cloth and dry thoroughly. Storing The 10 cup food processor comes with boiling water or place any of the way. See the following diagram. Cleaning 1 Before cleaning,...


