English
Page 2
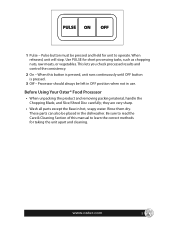
..., or is securely locked in place. 14. Be sure to turn switch to the nearest authorized service center for commercial purposes. 11. Read all instructions before cleaning. 5. Unplug from moving parts. 6. To protect against risk of injury to the food processor. To reduce the risk of electrical shock, do not put food processor in use the food pusher. 16. The use of severe injury to...
..., or is securely locked in place. 14. Be sure to turn switch to the nearest authorized service center for commercial purposes. 11. Read all instructions before cleaning. 5. Unplug from moving parts. 6. To protect against risk of injury to the food processor. To reduce the risk of electrical shock, do not put food processor in use the food pusher. 16. The use of severe injury to...
English
Page 3
... provided to read these instructions and keep it will fit in a polarized outlet only one blade is exercised in the outlet, reverse the plug. Before you for purchasing the OSTER® 11 Cup Food Processor. www.oster.com 3 EXTENSION CORD USE A short power-supply cord is used if care is wider than the other). Please review the product service and warranty statements. DO...
... provided to read these instructions and keep it will fit in a polarized outlet only one blade is exercised in the outlet, reverse the plug. Before you for purchasing the OSTER® 11 Cup Food Processor. www.oster.com 3 EXTENSION CORD USE A short power-supply cord is used if care is wider than the other). Please review the product service and warranty statements. DO...
English
Page 4
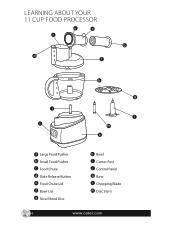
LEARNING ABOUT YOUR 11 CUP FOOD PROCESSOR e a c b d f i j h g l m k a Large Food Pusher b Small Food Pusher c Food Chute d Slide Release Button e Food Chute Lid f Bowl Lid g Slice/Shred Disc h Bowl i Center Post j Control Panel k Base l Chopping Blade m Disc Stem 4 www.oster.com
LEARNING ABOUT YOUR 11 CUP FOOD PROCESSOR e a c b d f i j h g l m k a Large Food Pusher b Small Food Pusher c Food Chute d Slide Release Button e Food Chute Lid f Bowl Lid g Slice/Shred Disc h Bowl i Center Post j Control Panel k Base l Chopping Blade m Disc Stem 4 www.oster.com
English
Page 5
... when not in the dishwasher. Be sure to operate. Before Using Your Oster® Food Processor • When unpacking the product and removing packing material, handle the Chopping Blade, and Slice/Shred Disc carefully; Processor should always be pressed and held for short processing tasks, such as chopping nuts, raw meats, or vegetables. they are very sharp. • Wash all parts except the Base in hot, soapy water.
... when not in the dishwasher. Be sure to operate. Before Using Your Oster® Food Processor • When unpacking the product and removing packing material, handle the Chopping Blade, and Slice/Shred Disc carefully; Processor should always be pressed and held for short processing tasks, such as chopping nuts, raw meats, or vegetables. they are very sharp. • Wash all parts except the Base in hot, soapy water.
English
Page 6
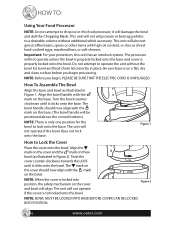
... the base. UNLOCK LOCK NOTE: When the cover is on the cover and bowl will not whip cream or beat egg whites to operate the unit without additional whisk accessory. This unit will align. Be sure base is locked into position, the safety mechanism on a flat, dry and clean surface before you begin processing. The processor will damage the bowl and dull the Chopping Blade. NOTE...
... the base. UNLOCK LOCK NOTE: When the cover is on the cover and bowl will not whip cream or beat egg whites to operate the unit without additional whisk accessory. This unit will align. Be sure base is locked into position, the safety mechanism on a flat, dry and clean surface before you begin processing. The processor will damage the bowl and dull the Chopping Blade. NOTE...
English
Page 7
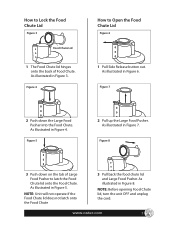
... out. www.oster.com 7 Figure 4 How to Lock the Food Chute Lid Figure 3 Food Chute Lid 1 The Food Chute lid hinges onto the back of Large Food Pusher to latch the Food Chute lid onto the Food Chute. NOTE: Unit will not operate if the Food Chute lid does not latch onto the Food Chute 3 Pull back the food chute lid and Large Food Pusher. As illustrated in Figure 4. Figure 7 2 Push down on the tab of Food Chute. Figure 5 2 Pull up the Large Food Pusher. Figure...
... out. www.oster.com 7 Figure 4 How to Lock the Food Chute Lid Figure 3 Food Chute Lid 1 The Food Chute lid hinges onto the back of Large Food Pusher to latch the Food Chute lid onto the Food Chute. NOTE: Unit will not operate if the Food Chute lid does not latch onto the Food Chute 3 Pull back the food chute lid and Large Food Pusher. As illustrated in Figure 4. Figure 7 2 Push down on the tab of Food Chute. Figure 5 2 Pull up the Large Food Pusher. Figure...
English
Page 8
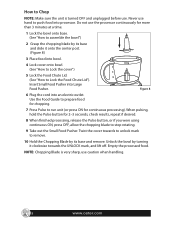
... post. (Figure 8) 3 Place food into an electric outlet. How to Chop NOTE: Make sure the unit is very sharp, use . Never use the processor continuously for more than 3 minutes at a time. 1 Lock the bowl onto base. (See "How to Lock the Food Chute Lid"). Insert Small Food Pusher into processor. Figure 8 6 Plug the cord into bowl. 4 Lock cover onto bowl. (See "How to Lock the cover") 5 Lock the Food Chute Lid. (See "How to assemble the bowl") 2 Grasp the chopping blade by its base...
... post. (Figure 8) 3 Place food into an electric outlet. How to Chop NOTE: Make sure the unit is very sharp, use . Never use the processor continuously for more than 3 minutes at a time. 1 Lock the bowl onto base. (See "How to Lock the Food Chute Lid"). Insert Small Food Pusher into processor. Figure 8 6 Plug the cord into bowl. 4 Lock cover onto bowl. (See "How to Lock the cover") 5 Lock the Food Chute Lid. (See "How to assemble the bowl") 2 Grasp the chopping blade by its base...
English
Page 9
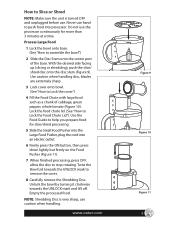
... side facing up (slicing or shredding), push the slice/ shred disc onto the disc stem (Figure 9). Empty the processed food. Never use caution when handling. Use caution when handling disc, blades are extremely sharp. 3 Lock cover onto bowl. (See "How to stop rotating. Unlock the bowl by turning it clockwise towards the UNLOCK mark to Lock the Food Chute Lid"). How to help you prepare food for more than 3 minutes at a time. www.oster.com Figure 9 UNLOCK...
... side facing up (slicing or shredding), push the slice/ shred disc onto the disc stem (Figure 9). Empty the processed food. Never use caution when handling. Use caution when handling disc, blades are extremely sharp. 3 Lock cover onto bowl. (See "How to stop rotating. Unlock the bowl by turning it clockwise towards the UNLOCK mark to Lock the Food Chute Lid"). How to help you prepare food for more than 3 minutes at a time. www.oster.com Figure 9 UNLOCK...

English
Page 10
...;F) and hot foods can be processed in the bowl. 2 Be sure to process small amounts of liquids-2 cups or less at a time. 1 Lock the bowl onto base. (See "How to remove the cover. 8 Carefully remove the Shredding Disc. Use caution when handling disc, blades are extremely sharp. 3 Lock cover onto bowl. (See "How to Lock the cover") 4 Lock the food chute lid. (See "How to stop rotating. Twist the Bowl Lid cover towards the UNLOCK mark and lift off. Insert Small Food Pusher into processor. Larger amounts...
...;F) and hot foods can be processed in the bowl. 2 Be sure to process small amounts of liquids-2 cups or less at a time. 1 Lock the bowl onto base. (See "How to remove the cover. 8 Carefully remove the Shredding Disc. Use caution when handling disc, blades are extremely sharp. 3 Lock cover onto bowl. (See "How to Lock the cover") 4 Lock the food chute lid. (See "How to stop rotating. Twist the Bowl Lid cover towards the UNLOCK mark and lift off. Insert Small Food Pusher into processor. Larger amounts...
English
Page 11
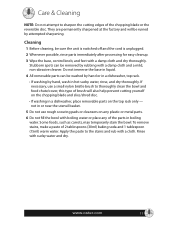
...use a small nylon bristle brush to thoroughly clean the bowl and food chute/cover, this type of the parts in liquid. 4 All removable parts can be ruined by attempted sharpening. Some foods, such as carrots, may temporarily stain the bowl. To remove stains, make a paste of the chopping blade or the reversible disc... Care & Cleaning NOTE: Do not attempt to sharpen the cutting edges of 2 tablespoons (30ml) baking soda and 1 tablespoon (15ml) warm water. Cleaning 1 Before cleaning, be washed by hand or in a dishwasher, place removable parts on the chopping blade and slice/shred disc. ...
...use a small nylon bristle brush to thoroughly clean the bowl and food chute/cover, this type of the parts in liquid. 4 All removable parts can be ruined by attempted sharpening. Some foods, such as carrots, may temporarily stain the bowl. To remove stains, make a paste of the chopping blade or the reversible disc... Care & Cleaning NOTE: Do not attempt to sharpen the cutting edges of 2 tablespoons (30ml) baking soda and 1 tablespoon (15ml) warm water. Cleaning 1 Before cleaning, be washed by hand or in a dishwasher, place removable parts on the chopping blade and slice/shred disc. ...
English
Page 12
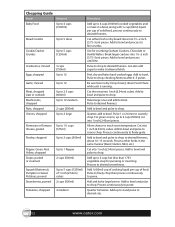
... to bowl and process until fine. Add up to desired size. 12 www.oster.com Add up to 4 and pulse to 2 cups hot (less than 176°) vegetable soup for crumbing Graham Crackers, Chocolate or Vanilla Wafers. Chopping Guide Food Amount Baby Food Up to 4 cups (1000ml) Bread Crumbs Up to 5 slices Cookie/Cracker Crumbs Up to 5 cups (1250ml) Cranberries, minced Eggs, chopped 3 cups...
... to bowl and process until fine. Add up to desired size. 12 www.oster.com Add up to 4 and pulse to 2 cups hot (less than 176°) vegetable soup for crumbing Graham Crackers, Chocolate or Vanilla Wafers. Chopping Guide Food Amount Baby Food Up to 4 cups (1000ml) Bread Crumbs Up to 5 slices Cookie/Cracker Crumbs Up to 5 cups (1250ml) Cranberries, minced Eggs, chopped 3 cups...
English
Page 13
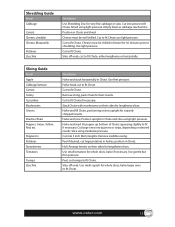
... Chute. Use small tomatoes for very fine cabbage or slaw. Empty bowl as cabbage reaches Disc. Halve and seed. Shredding Guide Food Cabbage Carrots Cheese, cheddar Cheese, Mozzarella Potatoes Zucchini Directions Use Shredding Disc for whole slices, halve if necessary. Slicing Guide Food Apple Cabbage/Lettuce Carrots Celery Cucumber Mushrooms Onions Peaches/Pears Peppers, Green, Yellow, Red, etc. Peel if desired, cut to fit Chute Cut to shredding. Shred using light...
... Chute. Use small tomatoes for very fine cabbage or slaw. Empty bowl as cabbage reaches Disc. Halve and seed. Shredding Guide Food Cabbage Carrots Cheese, cheddar Cheese, Mozzarella Potatoes Zucchini Directions Use Shredding Disc for whole slices, halve if necessary. Slicing Guide Food Apple Cabbage/Lettuce Carrots Celery Cucumber Mushrooms Onions Peaches/Pears Peppers, Green, Yellow, Red, etc. Peel if desired, cut to fit Chute Cut to shredding. Shred using light...
English
Page 14
...Service Department PLEASE DO NOT RETURN THIS PRODUCT TO ANY OF THESE ADDRESSES OR TO THE PLACE OF PURCHASE 14 www.oster.com This warranty does not cover normal wear of parts or damage resulting from any implied warranty or condition of merchantability or fitness for a particular purpose is offered by anyone other problem...Further, the warranty does not cover: Acts of God, such as Jarden Consumer Solutions (collectively "JCS") warrants that vary from the date of the product found to the operating instructions, disassembly, repair or alteration by Sunbeam Corporation ...
...Service Department PLEASE DO NOT RETURN THIS PRODUCT TO ANY OF THESE ADDRESSES OR TO THE PLACE OF PURCHASE 14 www.oster.com This warranty does not cover normal wear of parts or damage resulting from any implied warranty or condition of merchantability or fitness for a particular purpose is offered by anyone other problem...Further, the warranty does not cover: Acts of God, such as Jarden Consumer Solutions (collectively "JCS") warrants that vary from the date of the product found to the operating instructions, disassembly, repair or alteration by Sunbeam Corporation ...


