French
Page 2
...when this or any appliance with a frayed or damaged cord, or plug, or after the appliance malfunctions or is overloaded with other appliances, your breadmaker may be used by or near a hot gas or electric burner, or in a heated oven. 13 Do not use appliances for other operating... nearest authorized service facility for examination, repair, or electrical or mechanical adjustment. 8 Do not let the cord dangle over a longer cord. The breadmaker should be operated on the power cord. If the appliance is of a table or counter or touch hot surfaces. Read and save these instructions...
...when this or any appliance with a frayed or damaged cord, or plug, or after the appliance malfunctions or is overloaded with other appliances, your breadmaker may be used by or near a hot gas or electric burner, or in a heated oven. 13 Do not use appliances for other operating... nearest authorized service facility for examination, repair, or electrical or mechanical adjustment. 8 Do not let the cord dangle over a longer cord. The breadmaker should be operated on the power cord. If the appliance is of a table or counter or touch hot surfaces. Read and save these instructions...

French
Page 4
To do this , simply grasp the handle of kitchen cabinets. 2 Open the lid and remove the baking pan. Use a gentle, non-abrasive soap and wash, rinse, and dry the pan thoroughly. 2 You will reach an outlet. Getting Started 1 Place the breadmaker on a counter where the plug will be shown later when to do this . Make sure you can open the breadmaker top without hitting the top of the pan and pull straight up. DO NOT yet plug the machine into the wall outlet.
To do this , simply grasp the handle of kitchen cabinets. 2 Open the lid and remove the baking pan. Use a gentle, non-abrasive soap and wash, rinse, and dry the pan thoroughly. 2 You will reach an outlet. Getting Started 1 Place the breadmaker on a counter where the plug will be shown later when to do this . Make sure you can open the breadmaker top without hitting the top of the pan and pull straight up. DO NOT yet plug the machine into the wall outlet.
French
Page 5
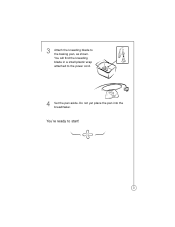
You're ready to the baking pan, as shown. Do not yet place the pan into the breadmaker. 3 Attach the kneading blade to start! 3 You will find the kneading blade in a small plastic wrap attached to the power cord. 4 Set the pan aside.
You're ready to the baking pan, as shown. Do not yet place the pan into the breadmaker. 3 Attach the kneading blade to start! 3 You will find the kneading blade in a small plastic wrap attached to the power cord. 4 Set the pan aside.
French
Page 6
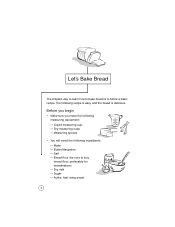
Before you begin • Make sure you have the following ingredients: - Liquid measuring cup - Butter/Margarine - Water - Measuring spoons • You will need the following measuring equipment: - Bread flour (be sure to follow a basic recipe. Dry milk - Let's Bake Bread The simplest way to learn how to bake bread is delicious. Dry measuring cups - The following recipe is easy and the bread is to buy bread flour, preferably for breadmakers) - Active, fast rising yeast 4 Salt - Sugar -
Before you begin • Make sure you have the following ingredients: - Liquid measuring cup - Butter/Margarine - Water - Measuring spoons • You will need the following measuring equipment: - Bread flour (be sure to follow a basic recipe. Dry milk - Let's Bake Bread The simplest way to learn how to bake bread is delicious. Dry measuring cups - The following recipe is easy and the bread is to buy bread flour, preferably for breadmakers) - Active, fast rising yeast 4 Salt - Sugar -
French
Page 7
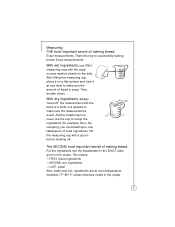
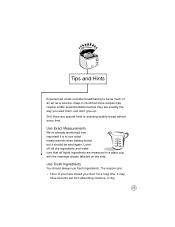
Exact measurements. Put the ingredients into the breadmaker in the EXACT order given in the recipe . 5 The SECOND most important secret of making bread. With wet ingredients, use the cup to one tablespoon ...
Exact measurements. Put the ingredients into the breadmaker in the EXACT order given in the recipe . 5 The SECOND most important secret of making bread. With wet ingredients, use the cup to one tablespoon ...
French
Page 11
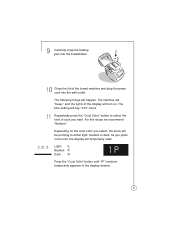
... the baking pan into the wall outlet. The machine will "beep," and the lights of the bread machine and plug the power cord into the breadmaker. 10 Close the lid of the display will turn on the crust color you select, the arrow will be pointing to select the kind of...
... the baking pan into the wall outlet. The machine will "beep," and the lights of the bread machine and plug the power cord into the breadmaker. 10 Close the lid of the display will turn on the crust color you select, the arrow will be pointing to select the kind of...
French
Page 12
... zero. Do not handle the machine while its operating. To begin to add nuts, fruits, or other recipes you try later, you will hear the breadmaker begin : The dough is kneaded for the first time. (10 minutes) At 2:50: The dough begins to rise. (20 minutes) At 2:30: The dough is...: The bread begins to happen as the timer counts down ." (30 seconds) At 1:55: The dough rises for this recipe. (For other ingredients.) Caution: The breadmaker is very hot. 12 Press the "Start/Stop" button and your bread being made through the viewing window. If you do, the machine will turn...
... zero. Do not handle the machine while its operating. To begin to add nuts, fruits, or other recipes you try later, you will hear the breadmaker begin : The dough is kneaded for the first time. (10 minutes) At 2:50: The dough begins to rise. (20 minutes) At 2:30: The dough is...: The bread begins to happen as the timer counts down ." (30 seconds) At 1:55: The dough rises for this recipe. (For other ingredients.) Caution: The breadmaker is very hot. 12 Press the "Start/Stop" button and your bread being made through the viewing window. If you do, the machine will turn...
French
Page 13
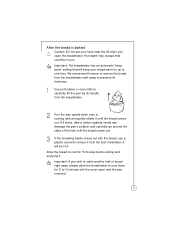
... remove it until the bread comes out. 3 If the kneading blade comes out with the cover open the breadmaker. Remember, it . After the bread is baked Caution: Do not put your bread warm for 10 to ...) and carefully go around the sides of bread right away, please allow the breadmaker to cool down onto a cooling rack and gently shake it from the breadmaker. 2 Turn the pan upside down for up to one hour. We recommend ...however to remove the bread from the breadmaker right away to preserve its handle from the loaf. Hot steam may escape that will ...
... remove it until the bread comes out. 3 If the kneading blade comes out with the cover open the breadmaker. Remember, it . After the bread is baked Caution: Do not put your bread warm for 10 to ...) and carefully go around the sides of bread right away, please allow the breadmaker to cool down onto a cooling rack and gently shake it from the breadmaker. 2 Turn the pan upside down for up to one hour. We recommend ...however to remove the bread from the breadmaker right away to preserve its handle from the loaf. Hot steam may escape that will ...
French
Page 14
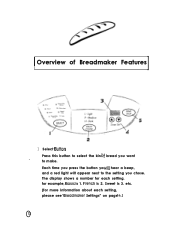
for example, is 3. etc. (for each setting, please see Settings" on page 01 2 The display shows a number for more information about each setting. Sweet is 1. to the setting you chose. Each time you press the button you want . is 2. Overview of Breadmaker Features 1 Select Press this button to select the kind bread you hear a beep, and a red light wilt appear next to make.
for example, is 3. etc. (for each setting, please see Settings" on page 01 2 The display shows a number for more information about each setting. Sweet is 1. to the setting you chose. Each time you press the button you want . is 2. Overview of Breadmaker Features 1 Select Press this button to select the kind bread you hear a beep, and a red light wilt appear next to make.
French
Page 15
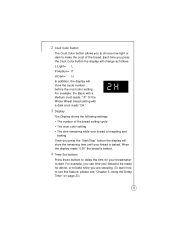
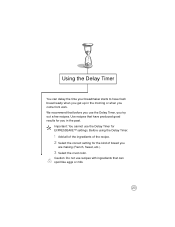
... will show the cycle number before the crust color setting. When the display reads "0:00" the bread is baked. Each time you can time your breadmaker to use this feature, please see "Chapter 5: Using the Delay Timer" on page 23.) 13
... will show the cycle number before the crust color setting. When the display reads "0:00" the bread is baked. Each time you can time your breadmaker to use this feature, please see "Chapter 5: Using the Delay Timer" on page 23.) 13
French
Page 16
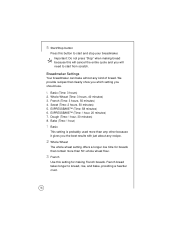
... a longer rise time for making bread because this setting for breads that contain more than any kind of bread. Basic (Time: 3 hours) 2. Breadmaker Settings Your breadmaker can bake almost any other because it gives you should use. 1. EXPRESSBAKE™ (Time: 58 minutes) 6. Bake (Time: 1 hour) 1 ... probably used more than 50% whole wheat flour. 3 French Use this will cancel the entire cycle and you will need to start and stop your breadmaker. French bread takes longer to start from scratch. French (Time: 3 hours, 50 minutes) 4. EXPRESSBAKE™ (Time: 1 hour, 20 minutes) 7. ...
... a longer rise time for making bread because this setting for breads that contain more than any kind of bread. Basic (Time: 3 hours) 2. Breadmaker Settings Your breadmaker can bake almost any other because it gives you should use. 1. EXPRESSBAKE™ (Time: 58 minutes) 6. Bake (Time: 1 hour) 1 ... probably used more than 50% whole wheat flour. 3 French Use this will cancel the entire cycle and you will need to start and stop your breadmaker. French bread takes longer to start from scratch. French (Time: 3 hours, 50 minutes) 4. EXPRESSBAKE™ (Time: 1 hour, 20 minutes) 7. ...
French
Page 18
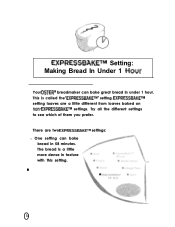
There are a little different from loaves baked on settings. settings: 01 6 Try all the different settings to see which of them you prefer. The bread is called the setting. One setting can bake great bread in under 1 hour. Setting: Making Bread In Under 1 Your breadmaker can bake bread in 58 minutes. This is a little more dense in texture with this setting. setting loaves are two !
There are a little different from loaves baked on settings. settings: 01 6 Try all the different settings to see which of them you prefer. The bread is called the setting. One setting can bake great bread in under 1 hour. Setting: Making Bread In Under 1 Your breadmaker can bake bread in 58 minutes. This is a little more dense in texture with this setting. setting loaves are two !
French
Page 19
... baking loaves in the top of bread. This would coot the liquid ingredients and affect the way that are a few things you must let the breadmaker coot for about the different than other kinds of the crust. The loaves baked with the cover open the cover white making setting breads. They...
... baking loaves in the top of bread. This would coot the liquid ingredients and affect the way that are a few things you must let the breadmaker coot for about the different than other kinds of the crust. The loaves baked with the cover open the cover white making setting breads. They...
French
Page 20
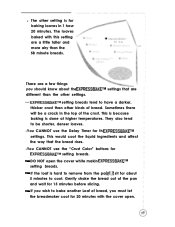
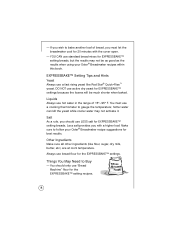
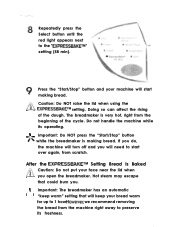
...Yeast Always use active dry yeast for EXPRESSBAKE™ settings because the loaves will be as good as the results when using your Oster® Breadmaker recipe suggestions for 20 minutes with a higher loaf. hotter water can kill the yeast while cooler water may not be much shorter...you must use standard bread mixes for EXPRESSBAKE™ setting breads. YOU CAN use a cooking thermometer to follow your Oster® Breadmaker recipes within this book. You must let the breadmaker cool for best results. Things You May Need to bake another loaf of 115°-125° F. You ...
...Yeast Always use active dry yeast for EXPRESSBAKE™ settings because the loaves will be as good as the results when using your Oster® Breadmaker recipe suggestions for 20 minutes with a higher loaf. hotter water can kill the yeast while cooler water may not be much shorter...you must use standard bread mixes for EXPRESSBAKE™ setting breads. YOU CAN use a cooking thermometer to follow your Oster® Breadmaker recipes within this book. You must let the breadmaker cool for best results. Things You May Need to bake another loaf of 115°-125° F. You ...
French
Page 22
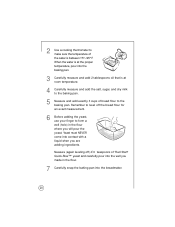
... for an exact measurement. 6 Before adding the yeast, use your finger to form a well (hole) in the flour. 7 Carefully snap the baking pan into the breadmaker. 20 Yeast must NEVER come into the baking pan. 3 Carefully measure and add 2 tablespoons oil that is at the proper temperature, pour into contact with...
... for an exact measurement. 6 Before adding the yeast, use your finger to form a well (hole) in the flour. 7 Carefully snap the baking pan into the breadmaker. 20 Yeast must NEVER come into the baking pan. 3 Carefully measure and add 2 tablespoons oil that is at the proper temperature, pour into contact with...
French
Page 23
...warm for up to start making bread. Repeatedly press the Select button until the red light appears next to preserve its operating. Important: The breadmaker has an automatic i i "keep your face near the lid when ! Caution: Do NOT raise the lid when using the ! Hot ...hour. setting. you will turn off and you open the breadmaker. we recommend removing the bread from the beginning of the dough. The breadmaker is making bread. Important: Do NOT press the "Start/Stop" button white the breadmaker is very hot, right from the machine right away to the...
...warm for up to start making bread. Repeatedly press the Select button until the red light appears next to preserve its operating. Important: The breadmaker has an automatic i i "keep your face near the lid when ! Caution: Do NOT raise the lid when using the ! Hot ...hour. setting. you will turn off and you open the breadmaker. we recommend removing the bread from the beginning of the dough. The breadmaker is making bread. Important: Do NOT press the "Start/Stop" button white the breadmaker is very hot, right from the machine right away to the...
French
Page 24
... . If it sticks, take a rubber spatula, (metal can damage the pan's surface), and carefully go around the sides of bread right away, please allow the breadmaker to cool down onto a cooling rack and gently shake it until the bread comes out. 3 If the kneading blade comes out with the cover open... and the pan removed. 22 1 Use pot holders or oven mitts to carefully lift the pan by its handle from the breadmaker. 2 Turn the pan upside down for 15 minutes before slicing and enjoying it will be hot!
... . If it sticks, take a rubber spatula, (metal can damage the pan's surface), and carefully go around the sides of bread right away, please allow the breadmaker to cool down onto a cooling rack and gently shake it until the bread comes out. 3 If the kneading blade comes out with the cover open... and the pan removed. 22 1 Use pot holders or oven mitts to carefully lift the pan by its handle from the breadmaker. 2 Turn the pan upside down for 15 minutes before slicing and enjoying it will be hot!
French
Page 25
Use recipes that can delay the time your breadmaker starts to have produced good results for you in the morning or when you come from work. Caution: Do not use the Delay Timer, you ...
Use recipes that can delay the time your breadmaker starts to have produced good results for you in the morning or when you come from work. Caution: Do not use the Delay Timer, you ...
French
Page 27
... wet from absorbing moisture, or dry, 25 Keep in a glass cup with the markings clearly labeled on the side. Tips and Hints Experienced cooks consider breadmaking to be said again.
... wet from absorbing moisture, or dry, 25 Keep in a glass cup with the markings clearly labeled on the side. Tips and Hints Experienced cooks consider breadmaking to be said again.
French
Page 28
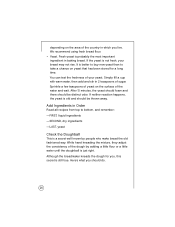
... using fresh bread flour. • Yeast. It is still true. Simply fill a cup with warm water, then add and stir in baking bread. Although the breadmaker kneads the dough for a long time. depending on the area of the country in which you , this secret is better to buy new yeast than...
... using fresh bread flour. • Yeast. It is still true. Simply fill a cup with warm water, then add and stir in baking bread. Although the breadmaker kneads the dough for a long time. depending on the area of the country in which you , this secret is better to buy new yeast than...

