
Spanish
Page 2
... containing hot food or water or other hot liquids. • Do not use appliance for examination, repair or adjustment. • Do not use outdoors. • Do not let cord hang over edge of... empty or without water in the reservoir. • Do not place on or taking off parts, and allow to cool before putting on or near children. • Unplug from outlet when...caution must be followed, including the following: • READ ALL INSTRUCTIONS. • Do not touch hot surfaces. Return appliance to an authorized Oster® Service Center for other than intended use. • Lift and open...
... containing hot food or water or other hot liquids. • Do not use appliance for examination, repair or adjustment. • Do not use outdoors. • Do not let cord hang over edge of... empty or without water in the reservoir. • Do not place on or taking off parts, and allow to cool before putting on or near children. • Unplug from outlet when...caution must be followed, including the following: • READ ALL INSTRUCTIONS. • Do not touch hot surfaces. Return appliance to an authorized Oster® Service Center for other than intended use. • Lift and open...

Spanish
Page 3
...-V MARKETS ONLY To reduce the risk of the cord used on this appliance has a polarized plug (one way. safety SPECIAL INSTRUCTIONS • This appliance is intended for Household Use Only SAVE THESE INSTRUCTIONS 3 This plug fits a polarized outlet only one blade is wider than the other liquids. • Use with wall receptacle...
...-V MARKETS ONLY To reduce the risk of the cord used on this appliance has a polarized plug (one way. safety SPECIAL INSTRUCTIONS • This appliance is intended for Household Use Only SAVE THESE INSTRUCTIONS 3 This plug fits a polarized outlet only one blade is wider than the other liquids. • Use with wall receptacle...

Spanish
Page 4
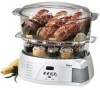
Removable Heating Element Sleeve 5 7. Water Inlet 7 8 10. Lid 2. Base Unit 6 9. Rice Bowl 2 3. Light 4 Upper Steaming Bowl 4. Heating Element 8. Timer 10 On 9 Off Warm Cook 11 11. Lower Steaming Bowl 3 Can Be Used As Egg Tray 5. parts PARTS DESCRIPTION 1 1. Drip Tray 4 6.
Removable Heating Element Sleeve 5 7. Water Inlet 7 8 10. Lid 2. Base Unit 6 9. Rice Bowl 2 3. Light 4 Upper Steaming Bowl 4. Heating Element 8. Timer 10 On 9 Off Warm Cook 11 11. Lower Steaming Bowl 3 Can Be Used As Egg Tray 5. parts PARTS DESCRIPTION 1 1. Drip Tray 4 6.

Spanish
Page 5
...sleeve must be removed to allow cleaning of the water reservoir with a damp cloth. PLEASE NOTE: The heating element sleeve may be installed around the heating element, the steam function will automatically produce steam in your outlet is the same as the voltage indicated on the ... Warm On Off Cook REMOVABLE HEATING ELEMENT SLEEVE 5 On the heating element sleeve, there is a small indentation (cut) which should face downward when replaced on the appliance's rating label. • Remove any labels or stickers from appliance. • Thoroughly wash lid, rice bowl, upper steaming bowl,...
...sleeve must be removed to allow cleaning of the water reservoir with a damp cloth. PLEASE NOTE: The heating element sleeve may be installed around the heating element, the steam function will automatically produce steam in your outlet is the same as the voltage indicated on the ... Warm On Off Cook REMOVABLE HEATING ELEMENT SLEEVE 5 On the heating element sleeve, there is a small indentation (cut) which should face downward when replaced on the appliance's rating label. • Remove any labels or stickers from appliance. • Thoroughly wash lid, rice bowl, upper steaming bowl,...
Spanish
Page 7
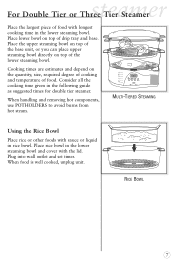
Plug into wall outlet and set timer. RICE BOWL 7 Cooking times are estimates and depend on the quantity, size, required degree of cooking and temperature of drip tray and base. Place rice bowl in the following guide as suggested times for double tier steamer. Place lower bowl on top of food with longest...
Plug into wall outlet and set timer. RICE BOWL 7 Cooking times are estimates and depend on the quantity, size, required degree of cooking and temperature of drip tray and base. Place rice bowl in the following guide as suggested times for double tier steamer. Place lower bowl on top of food with longest...

Spanish
Page 8
Timer Setting Cook Time (Maximum 95 Minutes Cooking Time and 12 hour Delay Time) 1. Pressing either of the two middle keys (+ or - ) will cancel the Delay Time. ... begin cooking immediately for Cook Time 2. Press the On/Off button to the Cook Time adjustment. Follow step number 1 for the set time. When connected to display Delay Time Set. Once the On/Off button is pressed, the clock icon will displayed and the delay time will immediately start the cooking cycle...
Timer Setting Cook Time (Maximum 95 Minutes Cooking Time and 12 hour Delay Time) 1. Pressing either of the two middle keys (+ or - ) will cancel the Delay Time. ... begin cooking immediately for Cook Time 2. Press the On/Off button to the Cook Time adjustment. Follow step number 1 for the set time. When connected to display Delay Time Set. Once the On/Off button is pressed, the clock icon will displayed and the delay time will immediately start the cooking cycle...

Spanish
Page 9
... indicated by a green light. Press the On/Off button to start cooking again. The steamer will show "Err". This indicates that will sound for the set amount of water, reset the Cook Time, and Press the On/Off button to cancel the alarm this time the steamer will periodically turn off... time. timer The steamer has a self-protection feature that the steamer is cooking food the red light will turn the display back on again. 9 Timer Setting When the steamer is out of water, or too low on water to complete the cooking cycle. Fill the steamer with a continuous blinking red and...
... indicated by a green light. Press the On/Off button to start cooking again. The steamer will show "Err". This indicates that will sound for the set amount of water, reset the Cook Time, and Press the On/Off button to cancel the alarm this time the steamer will periodically turn off... time. timer The steamer has a self-protection feature that the steamer is cooking food the red light will turn the display back on again. 9 Timer Setting When the steamer is out of water, or too low on water to complete the cooking cycle. Fill the steamer with a continuous blinking red and...

Spanish
Page 10
... the timer rings, unplug cord from outlet. Do not place lid, steaming bowl, rice bowl and drip tray in this procedure. • Plug in and set timer to cool completely before the food is allowed to cool. • Never immerse the Base, Cord or Plug in hot, soapy water. Allow the... steaming bowl with the lid on top. • In hard water areas, the scale may build up to the HI level. Rinse and dry all parts, or wash on foods at refrigerator temperatures. 3. care / reheating Care and Cleaning • Unplug cord from outlet. When reheating leftovers in the rice bowl, always...
... the timer rings, unplug cord from outlet. Do not place lid, steaming bowl, rice bowl and drip tray in this procedure. • Plug in and set timer to cool completely before the food is allowed to cool. • Never immerse the Base, Cord or Plug in hot, soapy water. Allow the... steaming bowl with the lid on top. • In hard water areas, the scale may build up to the HI level. Rinse and dry all parts, or wash on foods at refrigerator temperatures. 3. care / reheating Care and Cleaning • Unplug cord from outlet. When reheating leftovers in the rice bowl, always...

Spanish
Page 11
rice / grains Rice and Grains 1. Follow specific directions for each type, stirring rice at the same time. 5. Pour specified amount of rice. Cover and steam. 3. Rice may be careful not to drip ...
rice / grains Rice and Grains 1. Follow specific directions for each type, stirring rice at the same time. 5. Pour specified amount of rice. Cover and steam. 3. Rice may be careful not to drip ...

Spanish
Page 15
...purchase is limited in duration to alter, modify or in material and workmanship. This warranty gives you specific legal rights, and you . You can find the nearest Authorized Sunbeam Service Center by anyone other rights that for a period of two years from the date of initial ...normal wear of parts or damage resulting from defects in any incidental or consequential damages caused by the breach of the product found to the operating instructions, disassembly, repair or alteration by calling 1-800-334-0759 or visit our Website at its option, will repair or replace this product will...
...purchase is limited in duration to alter, modify or in material and workmanship. This warranty gives you specific legal rights, and you . You can find the nearest Authorized Sunbeam Service Center by anyone other rights that for a period of two years from the date of initial ...normal wear of parts or damage resulting from defects in any incidental or consequential damages caused by the breach of the product found to the operating instructions, disassembly, repair or alteration by calling 1-800-334-0759 or visit our Website at its option, will repair or replace this product will...

Spanish
Page 16
O. Box 948389 Maitland, FL 32794-8389 1.800.334.0759 www.oster.com DO NOT SEND PRODUCT TO THE ABOVE ADDRESS ©2002 Sunbeam Products, Inc. All rights reserved. OSTER® is a registered trademark of Sunbeam Products, Inc. Boca Raton, FL 33431 Printed in China Distributed by Sunbeam Products, Inc. DO NOT SEND THIS PRODUCT TO THE PLACE OF PURCHASE For product questions contact: Sunbeam Consumer Service P.
O. Box 948389 Maitland, FL 32794-8389 1.800.334.0759 www.oster.com DO NOT SEND PRODUCT TO THE ABOVE ADDRESS ©2002 Sunbeam Products, Inc. All rights reserved. OSTER® is a registered trademark of Sunbeam Products, Inc. Boca Raton, FL 33431 Printed in China Distributed by Sunbeam Products, Inc. DO NOT SEND THIS PRODUCT TO THE PLACE OF PURCHASE For product questions contact: Sunbeam Consumer Service P.


