
Instruction Manual
Page 3
... service center for examination, repair or mechanical adjustment. 7. The use the food pusher. 16. A scraper may cause personal injury or damage to persons, never place cutting blade on or taking off parts and before use outdoors or for other liquid. Do not operate food processor with a damaged cord or plug or after each use . 2 www.oster.com Blade and processing disk are sharp. Be certain container cover...
... service center for examination, repair or mechanical adjustment. 7. The use the food pusher. 16. A scraper may cause personal injury or damage to persons, never place cutting blade on or taking off parts and before use outdoors or for other liquid. Do not operate food processor with a damaged cord or plug or after each use . 2 www.oster.com Blade and processing disk are sharp. Be certain container cover...
Instruction Manual
Page 4
...review the product service and warranty statements. If the plug does not insert fully in or tripping over unintentionally. If an extension cord is used if care is exercised in a polarized outlet only one blade is provided to read these instructions... Before you for purchasing the OSTER® 4 Cup Mini Food Processor. To learn more about Oster® products, please visit us at www.oster.com or call us at...longer cord. SAVE THESE INSTRUCTIONS Thank you use . www.oster.com 3 To reduce the risk of the appliance. EXTENSION CORD USE A short power-supply cord is wider ...
...review the product service and warranty statements. If the plug does not insert fully in or tripping over unintentionally. If an extension cord is used if care is exercised in a polarized outlet only one blade is provided to read these instructions... Before you for purchasing the OSTER® 4 Cup Mini Food Processor. To learn more about Oster® products, please visit us at www.oster.com or call us at...longer cord. SAVE THESE INSTRUCTIONS Thank you use . www.oster.com 3 To reduce the risk of the appliance. EXTENSION CORD USE A short power-supply cord is wider ...
Instruction Manual
Page 5
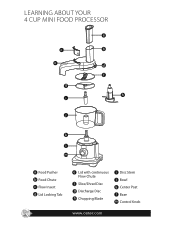
LEARNING ABOUT YOUR 4 CUP MINI FOOD PROCESSOR a c e g i b d f h j k l m UNLOCK LOCK a Food Pusher b Food Chute c Flow Insert d Lid Locking Tab 4 e Lid with continuous Flow Chute f Slice/Shred Disc g Discharge Disc h Chopping Blade i Disc Stem j Bowl k Center Post l Base m Control Knob www.oster.com
LEARNING ABOUT YOUR 4 CUP MINI FOOD PROCESSOR a c e g i b d f h j k l m UNLOCK LOCK a Food Pusher b Food Chute c Flow Insert d Lid Locking Tab 4 e Lid with continuous Flow Chute f Slice/Shred Disc g Discharge Disc h Chopping Blade i Disc Stem j Bowl k Center Post l Base m Control Knob www.oster.com

Instruction Manual
Page 6
Before Using Your Oster® Food Processor • When unpacking the product and removing packing material, handle the chopping blade and slice/shred disc carefully: they are very sharp. • Wash all parts except the Base in use. Rinse them dry. These parts can also be left and held for unit to operate. Use PULSE for taking the unit apart and cleaning. When the control knob is turned to the right...
Before Using Your Oster® Food Processor • When unpacking the product and removing packing material, handle the chopping blade and slice/shred disc carefully: they are very sharp. • Wash all parts except the Base in use. Rinse them dry. These parts can also be left and held for unit to operate. Use PULSE for taking the unit apart and cleaning. When the control knob is turned to the right...
Instruction Manual
Page 7
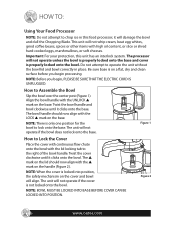
... cover is on a flat, dry and clean surface before you begin processing. HOW TO: Using Your Food Processor NOTE: Do not attempt to chop ice in place. Be sure base is locked into position, the safety mechanism on the base. How to lock onto the base. Align the bowl handle with the ▲ mark on the base. Do not attempt to operate the unit without the bowl lid and bowl...
... cover is on a flat, dry and clean surface before you begin processing. HOW TO: Using Your Food Processor NOTE: Do not attempt to chop ice in place. Be sure base is locked into position, the safety mechanism on the base. How to lock onto the base. Align the bowl handle with the ▲ mark on the base. Do not attempt to operate the unit without the bowl lid and bowl...
Instruction Manual
Page 8
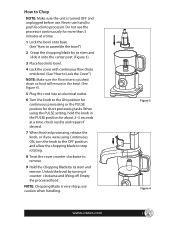
NOTE: Chopping Blade is turned OFF and unplugged before use. clockwise and lifting off. Unlock the bowl by its stem and slide it onto the center post. (Figure 3). 3 Place food into bowl. 4 Lock the cover with continuous flow chute onto bowl. (See "How to Lock the Cover") NOTE: Make sure the Flow Insert is pushed down so food will remain in the PULSE position for short processing tasks. Empty the processed food. www.oster.com Figure...
NOTE: Chopping Blade is turned OFF and unplugged before use. clockwise and lifting off. Unlock the bowl by its stem and slide it onto the center post. (Figure 3). 3 Place food into bowl. 4 Lock the cover with continuous flow chute onto bowl. (See "How to Lock the Cover") NOTE: Make sure the Flow Insert is pushed down so food will remain in the PULSE position for short processing tasks. Empty the processed food. www.oster.com Figure...
Instruction Manual
Page 9
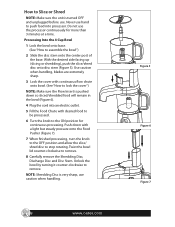
... onto the Food Pusher (Figure 7). 7 When finished processing, turn the knob to the OFF position and allow the slice/ shred disc to assemble the bowl") 2 Slide the disc stem onto the center post of the base. How to remove. Twist the bowl lid counter-clockwise to push food into an electric outlet. 5 Fill the Food Chute with continuous flow chute onto bowl. (See "How to lock the cover") NOTE: Make sure the Flow Insert is very sharp, use . With...
... onto the Food Pusher (Figure 7). 7 When finished processing, turn the knob to the OFF position and allow the slice/ shred disc to assemble the bowl") 2 Slide the disc stem onto the center post of the base. How to remove. Twist the bowl lid counter-clockwise to push food into an electric outlet. 5 Fill the Food Chute with continuous flow chute onto bowl. (See "How to lock the cover") NOTE: Make sure the Flow Insert is very sharp, use . With...
Instruction Manual
Page 10
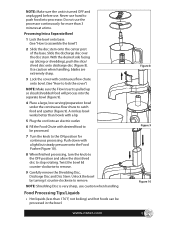
... Flow Insert is very sharp, use . Use caution when handling, blades are extremely sharp. 3 Lock the cover with a light but steady pressure onto the Food Pusher (Figure 10). 8 When finished processing, turn the knob to the OFF position and allow the slice/shred disc to assemble the bowl") 2 Slide the disc stem onto the center post of the base. Twist the bowl lid counter-clockwise to remove. Unlock the bowl by turning it counter-clockwise to remove. 9 Carefully remove the Shredding Disc...
... Flow Insert is very sharp, use . Use caution when handling, blades are extremely sharp. 3 Lock the cover with a light but steady pressure onto the Food Pusher (Figure 10). 8 When finished processing, turn the knob to the OFF position and allow the slice/shred disc to assemble the bowl") 2 Slide the disc stem onto the center post of the base. Twist the bowl lid counter-clockwise to remove. Unlock the bowl by turning it counter-clockwise to remove. 9 Carefully remove the Shredding Disc...

Instruction Manual
Page 11
...chopping blade and slice/shred disc. • If washing in hot sudsy water, rinse, and dry thoroughly. If necessary, use rough scouring pads or cleansers on the top rack only - Rinse with boiling water or place any plastic or metal parts. 6 Do not fill the bowl with sudsy water and dry. 10 www.oster... can be ruined by hand, wash in a dishwasher, place removable parts on any of the parts in or near the utensil basket. 5 Do not use a small nylon bristle brush to thoroughly clean the bowl and food chute/cover, this type of brush will be washed by hand or in a dishwasher,...
...chopping blade and slice/shred disc. • If washing in hot sudsy water, rinse, and dry thoroughly. If necessary, use rough scouring pads or cleansers on the top rack only - Rinse with boiling water or place any plastic or metal parts. 6 Do not fill the bowl with sudsy water and dry. 10 www.oster... can be ruined by hand, wash in a dishwasher, place removable parts on any of the parts in or near the utensil basket. 5 Do not use a small nylon bristle brush to thoroughly clean the bowl and food chute/cover, this type of brush will be washed by hand or in a dishwasher,...
Instruction Manual
Page 12
...is offered by anyone other problem or claim in duration to you have any breach of contract, fundamental or otherwise, or for the original retail purchaser from the purchase, use or misuse of, or inability to use contrary to the operating instructions, disassembly, repair or alteration by Sunbeam .... In the U.S.A., this product or any way change the terms and conditions of this warranty or would like to Obtain Warranty Service In the U.S.A. 1 Year Limited Warranty Sunbeam Products, Inc. Further, the warranty does not cover: Acts of one year from defects in Boca Raton...
...is offered by anyone other problem or claim in duration to you have any breach of contract, fundamental or otherwise, or for the original retail purchaser from the purchase, use or misuse of, or inability to use contrary to the operating instructions, disassembly, repair or alteration by Sunbeam .... In the U.S.A., this product or any way change the terms and conditions of this warranty or would like to Obtain Warranty Service In the U.S.A. 1 Year Limited Warranty Sunbeam Products, Inc. Further, the warranty does not cover: Acts of one year from defects in Boca Raton...


