

User Manual
Page 1
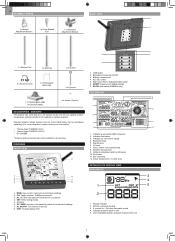
...1 x Solar panel connector 1 x Filter 1 x Rain Collector 4 x Screws (Type C) 2 x UM-3 / AA 6 x Washers 1 Sensors 2 Overview...2 Front View ...2 Back View ...2 LCD Display ...2 Detailed LCD Display View 2 Barometer ...2 Rainfall ...3 UV ...3 Clock / Moon Phase 3 Outdoor Temperature / Humidity 3 Indoor Temperature / Humidity 3 Wind Speed / Direction / Wind Chill 3 Bar Chart...3 Wind Sensor ...4 Rain... with this manual handy as technical specifications and warnings you for selecting the Oregon Scientific™ Professional Weather Center (WMR200 / WMR200A).
...1 x Solar panel connector 1 x Filter 1 x Rain Collector 4 x Screws (Type C) 2 x UM-3 / AA 6 x Washers 1 Sensors 2 Overview...2 Front View ...2 Back View ...2 LCD Display ...2 Detailed LCD Display View 2 Barometer ...2 Rainfall ...3 UV ...3 Clock / Moon Phase 3 Outdoor Temperature / Humidity 3 Indoor Temperature / Humidity 3 Wind Speed / Direction / Wind Chill 3 Bar Chart...3 Wind Sensor ...4 Rain... with this manual handy as technical specifications and warnings you for selecting the Oregon Scientific™ Professional Weather Center (WMR200 / WMR200A).
User Manual
Page 2
...Outdoor temperature and humidity area 10. Wind area 11. Altitude indicator 2. Backlight (continuous) On/Off 3. Bar chart area 12. UNIT: Change display units 3 1. Indicates a successful USB connection 2. UV area 7. CH: Toggle between 10 different channels 3. AC / DC socket 5. Weather ...-Ch) • UV UVN800 * Features and accessories will not be purchased separately. SET: Enter setting modes 5. EU/UK slide switch (WMR200 only) LCD DISPLAY 1 2 3 USB 4 FEET M 5 6 MIN 7 1. AL: Set and view status of the selected readings 7. Clock / alarm / moon phase area...
...Outdoor temperature and humidity area 10. Wind area 11. Altitude indicator 2. Backlight (continuous) On/Off 3. Bar chart area 12. UNIT: Change display units 3 1. Indicates a successful USB connection 2. UV area 7. CH: Toggle between 10 different channels 3. AC / DC socket 5. Weather ...-Ch) • UV UVN800 * Features and accessories will not be purchased separately. SET: Enter setting modes 5. EU/UK slide switch (WMR200 only) LCD DISPLAY 1 2 3 USB 4 FEET M 5 6 MIN 7 1. AL: Set and view status of the selected readings 7. Clock / alarm / moon phase area...
User Manual
Page 3
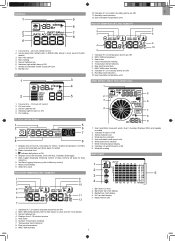
...12. Rain reading 5. Dew point temperature 7. User selectable measured winds: Gust / Average; Wind chill temperature display 8. Bar chart icon area 2. Outdoor Temperature readings 7. Temperature trend indicators 8. Sensor batteries low 6. Indicates high .... 2. UVI reading CLOCK / MOON PHASE 1 5 2 DATA LOGGER MIN 6 7 3 4 8 1. Heat index 4. Indoor temperature reading 5. Displays Clock with seconds, Clock with day, Calendar, Data logger 5. Temperature trend indicators 6. Indicates high UV alarm is ON 9. Sensor batteries low 4. ...
...12. Rain reading 5. Dew point temperature 7. User selectable measured winds: Gust / Average; Wind chill temperature display 8. Bar chart icon area 2. Outdoor Temperature readings 7. Temperature trend indicators 8. Sensor batteries low 6. Indicates high .... 2. UVI reading CLOCK / MOON PHASE 1 5 2 DATA LOGGER MIN 6 7 3 4 8 1. Heat index 4. Indoor temperature reading 5. Displays Clock with seconds, Clock with day, Calendar, Data logger 5. Temperature trend indicators 6. Indicates high UV alarm is ON 9. Sensor batteries low 4. ...
User Manual
Page 8
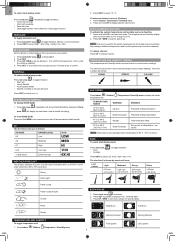
... or touch panel area (except tool bar / forecast area) to select FEET / M or inHg / mmHg / mb / hPA. RAINFALL To select rainfall display mode: Press rain area to toggle between: • Rain rate • Hourly Rainfall • Accumulated rainfall • Rainfall recorded in the past 24 hours... reflect distance from -100 m (-328 ft) to 2500 m (8202 ft). 4. Press SET repeatedly to change channel. EN To select clock display mode: Press clock area repeatedly to toggle between: • Clock with seconds • Clock with weekday • Date with a 75% accuracy). The ...
... or touch panel area (except tool bar / forecast area) to select FEET / M or inHg / mmHg / mb / hPA. RAINFALL To select rainfall display mode: Press rain area to toggle between: • Rain rate • Hourly Rainfall • Accumulated rainfall • Rainfall recorded in the past 24 hours... reflect distance from -100 m (-328 ft) to 2500 m (8202 ft). 4. Press SET repeatedly to change channel. EN To select clock display mode: Press clock area repeatedly to toggle between: • Clock with seconds • Clock with weekday • Date with a 75% accuracy). The ...
User Manual
Page 9
... • AL to confirm and continue to next setting OR • touch anywhere on , the channel of the software is complete when display shows current reading. Press desired area to activate. 2. Delete process is : • Operating system: Microsoft Windows XP SP2 or Vista • Processor...and select Control Panel. 3. Once activated, the alarm will flash. Area Type of days available for use of triggered alarm will be displayed in step 2, skip this option for at least 2 minutes or until DATA LOGGER mode is different from the base station. To enable /...
... • AL to confirm and continue to next setting OR • touch anywhere on , the channel of the software is complete when display shows current reading. Press desired area to activate. 2. Delete process is : • Operating system: Microsoft Windows XP SP2 or Vista • Processor...and select Control Panel. 3. Once activated, the alarm will flash. Area Type of days available for use of triggered alarm will be displayed in step 2, skip this option for at least 2 minutes or until DATA LOGGER mode is different from the base station. To enable /...

User Manual
Page 10
...box. This invalidates the warranty. • Only use . Remove the strip from the software webpage. NOTE The technical specifications for which Oregon Scientific will be prompted to select model number. NOTE Features and accessories will appear. SPECIFICATIONS BASE STATION Dimensions (L x W x H) ... of window. 5. After successful installation, double click on Personalize. 3. Click Run. 3. Follow steps 3 - 7 from the actual display. • When disposing of the manufacturer. • Do not dispose old batteries as unsorted municipal waste. PRECAUTIONS • Do not...
...box. This invalidates the warranty. • Only use . Remove the strip from the software webpage. NOTE The technical specifications for which Oregon Scientific will be prompted to select model number. NOTE Features and accessories will appear. SPECIFICATIONS BASE STATION Dimensions (L x W x H) ... of window. 5. After successful installation, double click on Personalize. 3. Click Run. 3. Follow steps 3 - 7 from the actual display. • When disposing of the manufacturer. • Do not dispose old batteries as unsorted municipal waste. PRECAUTIONS • Do not...
User Manual
Page 11
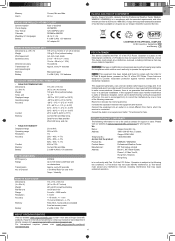
...1 mm 15 mm to 9999 mm: +/- 7% Past 24hrs, hourly and accumulated from that the product 1-800-853-8883 Product No.: WMR200 / WMR200A Product Name: Professional Weather Center Manufacturer: IDT Technology Limited Address: Block C, 9/F, Kaiser Estate, Phase 1,41 Man Yue St., Hung Hom, Kowloon, ...UM-3 (AA) 1.5V ABOUT OREGON SCIENTIFIC Visit our website (www.oregonscientific.com) to learn more of Directive 1999/5/EC. EN Memory Alarm Current, Min and Max Hi / Lo RADIO-CONTROLLED / ATOMIC CLOCK Synchronization Auto or disabled Clock display HH:MM:SS Hour format 12hr...
...1 mm 15 mm to 9999 mm: +/- 7% Past 24hrs, hourly and accumulated from that the product 1-800-853-8883 Product No.: WMR200 / WMR200A Product Name: Professional Weather Center Manufacturer: IDT Technology Limited Address: Block C, 9/F, Kaiser Estate, Phase 1,41 Man Yue St., Hung Hom, Kowloon, ...UM-3 (AA) 1.5V ABOUT OREGON SCIENTIFIC Visit our website (www.oregonscientific.com) to learn more of Directive 1999/5/EC. EN Memory Alarm Current, Min and Max Hi / Lo RADIO-CONTROLLED / ATOMIC CLOCK Synchronization Auto or disabled Clock display HH:MM:SS Hour format 12hr...


