
User Manual
Page 8
Home theaters using HTPC are possible with previous generation DLP™ projectors. • The 250W high-output lamp gives high color purity and brightness. All-digital projection does not suffer the data loss of a DVI/HDCP terminal enables all processes from input to ...
Home theaters using HTPC are possible with previous generation DLP™ projectors. • The 250W high-output lamp gives high color purity and brightness. All-digital projection does not suffer the data loss of a DVI/HDCP terminal enables all processes from input to ...
User Manual
Page 12
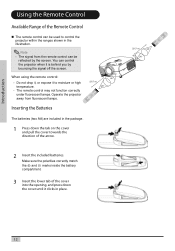
Note • The signal from fluorescent lamps. When using the remote control: • Do not drop it, or expose it is behind you by the screen. Operate the projector away from the ...remote control can be used to moisture or high temperature. • The remote control may not function correctly under fluorescent lamps. Inserting the Batteries 45° 23'(7 m) 30° The batteries (two AA) are included in place. 23'(7 m) 30° 45° 30° 12 You...
Note • The signal from fluorescent lamps. When using the remote control: • Do not drop it, or expose it is behind you by the screen. Operate the projector away from the ...remote control can be used to moisture or high temperature. • The remote control may not function correctly under fluorescent lamps. Inserting the Batteries 45° 23'(7 m) 30° The batteries (two AA) are included in place. 23'(7 m) 30° 45° 30° 12 You...
User Manual
Page 15
... Made in Taiwan WARNING v v v v v DDDeooeoennnepoooratttitntudoslsiesueeaacrssththstaie0snem.ynu3btnoiflliboeat jotenaitocen(tnaysr0sctwlhoocrammtostpeu), orgolanhofmersnpipentasnacatneieldxraacbtoiieeonbptnywjtemhetchoetoselniesnlstae.emexnntptitliocarhottianhosmensmeissnluotc.ntostilaetnrhdweynheihlaear r e e pl s a u cing fficie est object the ntly lamp. Notes • The INPUT 3 (S-VIDEO) terminal uses a video signal system in Taiwan WARNING v v v v v DDDoeoeoennnepooortattitndtuosilsseueeaacrshstthstaie0snem.ynu3btnoilflieboatjotenaitocen(tnyasr0sctwlohocmramtostpeu...
... Made in Taiwan WARNING v v v v v DDDeooeoennnepoooratttitntudoslsiesueeaacrssththstaie0snem.ynu3btnoiflliboeat jotenaitocen(tnaysr0sctwlhoocrammtostpeu), orgolanhofmersnpipentasnacatneieldxraacbtoiieeonbptnywjtemhetchoetoselniesnlstae.emexnntptitliocarhottianhosmensmeissnluotc.ntostilaetnrhdweynheihlaear r e e pl s a u cing fficie est object the ntly lamp. Notes • The INPUT 3 (S-VIDEO) terminal uses a video signal system in Taiwan WARNING v v v v v DDDoeoeoennnepooortattitndtuosilsseueeaacrshstthstaie0snem.ynu3btnoilflieboatjotenaitocen(tnyasr0sctwlohocmramtostpeu...
User Manual
Page 16
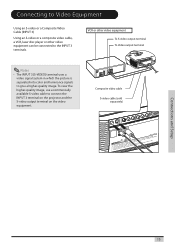
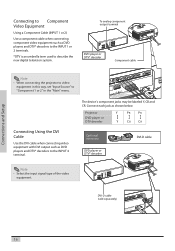
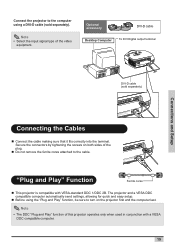
... in Taiwan WARNING v v v v v DDDeooeoennnepoooratttitnutdoslisesueeaacrsstthhstaie0snem.ynu3btnoiflliboeat jotenaitocen(tnaysr0sctwlhoocrammtostpeu), orgolanhofmersnpipentasnacatneieldxraacbtoiieeonbptnyjwtemhetchoetoselniesnlstae.emexnntptitloicarhottianhosmensmeissnluotc.ntost i er wh l they ile ha and near r ee psl ua fcfiincgi e est object the ntly lamp. Connections and Setup Connecting to Component Video Equipment Using a Component Cable (INPUT 1 or 2) Use a component cable when connecting component video equipment such as DVD players...
... in Taiwan WARNING v v v v v DDDeooeoennnepoooratttitnutdoslisesueeaacrsstthhstaie0snem.ynu3btnoiflliboeat jotenaitocen(tnaysr0sctwlhoocrammtostpeu), orgolanhofmersnpipentasnacatneieldxraacbtoiieeonbptnyjwtemhetchoetoselniesnlstae.emexnntptitloicarhottianhosmensmeissnluotc.ntost i er wh l they ile ha and near r ee psl ua fcfiincgi e est object the ntly lamp. Connections and Setup Connecting to Component Video Equipment Using a Component Cable (INPUT 1 or 2) Use a component cable when connecting component video equipment such as DVD players...
User Manual
Page 17
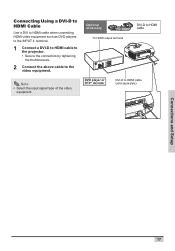
...-D to HDMI cable (sold separately) DVI PC Y Pr/Cr Pb/Cb Made in Taiwan WARNING DDNDKeoeooevnnnepoooratttitndutoslisesueeaacrsstthhstaive0snem.ynu3btnoiflilboeat jotenaitocen(tnay1sr0sctwlhoocrammtostpeu), orgolanhofmersvnpipentasnacatneieldxraacbtoiieeonbptnyjwte/mhetchoetoselniesnlsvtae.emexnntptvitliocarhottianhosmensmeissnluotc.ntostvilaetnrhdweynheihlaearvereesptslouabfcfjiienccgiet the ntly lamp. cooled or wall. or wall. Connections and Setup 17 Connecting Using a DVI-D to HDMI Cable Use a DVI to HDMI cable when connecting HDMI video equipment...
...-D to HDMI cable (sold separately) DVI PC Y Pr/Cr Pb/Cb Made in Taiwan WARNING DDNDKeoeooevnnnepoooratttitndutoslisesueeaacrsstthhstaive0snem.ynu3btnoiflilboeat jotenaitocen(tnay1sr0sctwlhoocrammtostpeu), orgolanhofmersvnpipentasnacatneieldxraacbtoiieeonbptnyjwte/mhetchoetoselniesnlsvtae.emexnntptvitliocarhottianhosmensmeissnluotc.ntostvilaetnrhdweynheihlaearvereesptslouabfcfjiienccgiet the ntly lamp. cooled or wall. or wall. Connections and Setup 17 Connecting Using a DVI-D to HDMI Cable Use a DVI to HDMI cable when connecting HDMI video equipment...
User Manual
Page 19
... . Note • Select the input signal type of this projector operates only when used in Taiwan mexnntptvitloicarhottianhosmensmeissnluotc.ntostvi laetnrhdwe ynheihlaearver eesptslouabfcfjiienccgi et th nt e ly lamp. Optional accessory DVI-D cable Desktop Computer To DVI Digital output terminal DVI PC VIDEO S-VIDEO Y Pr/Cr Pb/Cb Y Pr/Cr Pb/Cb RS-232...
... . Note • Select the input signal type of this projector operates only when used in Taiwan mexnntptvitloicarhottianhosmensmeissnluotc.ntostvi laetnrhdwe ynheihlaearver eesptslouabfcfjiienccgi et th nt e ly lamp. Optional accessory DVI-D cable Desktop Computer To DVI Digital output terminal DVI PC VIDEO S-VIDEO Y Pr/Cr Pb/Cb Y Pr/Cr Pb/Cb RS-232...

User Manual
Page 28
... • The preset language is cooling. Blue blinking: The fan is English. Power button Note • The power indicator illuminates, indicating the status of the lamp. To change the on-screen display to another language, reset the language according to the projector before following these procedures. EXIT Power ECO indicator! (Blue...
... • The preset language is cooling. Blue blinking: The fan is English. Power button Note • The power indicator illuminates, indicating the status of the lamp. To change the on-screen display to another language, reset the language according to the projector before following these procedures. EXIT Power ECO indicator! (Blue...
User Manual
Page 31
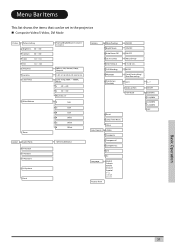
.../OFF ON/OFF ON/OFF Manual/Auto 5. 15. 60 secs ON/OFF Front/Front ceiling/ Rear/Rear ceiling DCTI Video on film Film Mode Reset Lamp Timer Reset Status Input Source S-Video Composite Component 1 Component 2 DVI Language Factory Reset PC English Français Italiano Deutsch Español 0~7 ON/OFF...
.../OFF ON/OFF ON/OFF Manual/Auto 5. 15. 60 secs ON/OFF Front/Front ceiling/ Rear/Rear ceiling DCTI Video on film Film Mode Reset Lamp Timer Reset Status Input Source S-Video Composite Component 1 Component 2 DVI Language Factory Reset PC English Français Italiano Deutsch Español 0~7 ON/OFF...
User Manual
Page 32
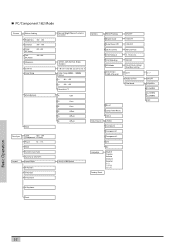
... B Offset 16:9/4:3/LBX/Native Options White Peaking Bright mode Auto Power Off Source Select OSD Timeout OSD Blending PRJ Mode Deinterlace (480i, 576i only) Reset Lamp Timer Reset Status Input Source S-Video Composite Component 1 Component 2 DVI Language Factory Reset PC English Français Italiano Deutsch Español ON/OFF...
... B Offset 16:9/4:3/LBX/Native Options White Peaking Bright mode Auto Power Off Source Select OSD Timeout OSD Blending PRJ Mode Deinterlace (480i, 576i only) Reset Lamp Timer Reset Status Input Source S-Video Composite Component 1 Component 2 DVI Language Factory Reset PC English Français Italiano Deutsch Español ON/OFF...
User Manual
Page 50
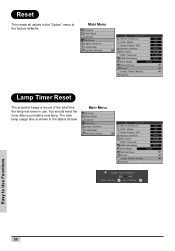
You should reset the timer after you install a new lamp. Reset This resets all values in the "Option" menu to Use Functions 50 Main Menu Easy to the factory defaults. The total lamp usage time is shown in use. Main Menu Lamp Timer Reset The projector keeps a record of the total time the lamp has been in the Status Screen.
You should reset the timer after you install a new lamp. Reset This resets all values in the "Option" menu to Use Functions 50 Main Menu Easy to the factory defaults. The total lamp usage time is shown in use. Main Menu Lamp Timer Reset The projector keeps a record of the total time the lamp has been in the Status Screen.

User Manual
Page 55
... the intake and exhaust ventilative holes. Clean the ventilative holes more often when the projector is used in Taiwan mp chassis cover while replacing the lamp. Cleaning the Ventilative Holes 1 Turn off the power. nvironment. 3 Clean the dust off by vacuuming it off with a vacuum cleaner. • The ventilative holes should...
... the intake and exhaust ventilative holes. Clean the ventilative holes more often when the projector is used in Taiwan mp chassis cover while replacing the lamp. Cleaning the Ventilative Holes 1 Turn off the power. nvironment. 3 Clean the dust off by vacuuming it off with a vacuum cleaner. • The ventilative holes should...
User Manual
Page 56
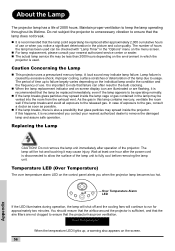
... that the airflow around the projector is disconnected to allow the surface of use or when you when the projector lamp becomes too hot. About the Lamp The projector lamp has a life of the projector. Maintain proper ventilation to failure largely varies depending on the menu screen. „... be less than 2000 hours depending on the control panel alerts you notice a significant deterioration in which the projector is recommended that the lamp (sold separately) be hot and touching it is used. Temperature LED (Over Temperature) The over temperature alarm LED on the environment in...
... that the airflow around the projector is disconnected to allow the surface of use or when you when the projector lamp becomes too hot. About the Lamp The projector lamp has a life of the projector. Maintain proper ventilation to failure largely varies depending on the menu screen. „... be less than 2000 hours depending on the control panel alerts you notice a significant deterioration in which the projector is recommended that the lamp (sold separately) be hot and touching it is used. Temperature LED (Over Temperature) The over temperature alarm LED on the environment in...
User Manual
Page 57
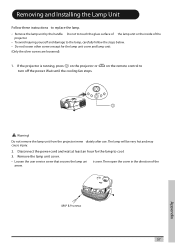
... follow the steps below. • Do not loosen other screws except for the lamp to touch the glass surface of the lamp unit or the inside of the arrow. Removing and Installing the Lamp Unit Follow these instructions to ENTER EXIT ECO STATUS INPUT MENU Warning! Disconnect the power ...cord and wait at least an hour for the lamp unit cover and lamp unit. (Only the silver screws are loosened). 1. Appendix M4* 8.9 screws 57 If the projector is running, press on the remote ...
... follow the steps below. • Do not loosen other screws except for the lamp to touch the glass surface of the lamp unit or the inside of the arrow. Removing and Installing the Lamp Unit Follow these instructions to ENTER EXIT ECO STATUS INPUT MENU Warning! Disconnect the power ...cord and wait at least an hour for the lamp unit cover and lamp unit. (Only the silver screws are loosened). 1. Appendix M4* 8.9 screws 57 If the projector is running, press on the remote ...
User Manual
Page 58
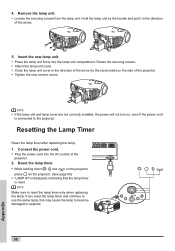
...4. Connect the power cord. • Plug the power cord into the lamp unit compartment. Reset the lamp timer. Info Make sure to become damaged or explode. Resetting the Lamp Timer Reset the lamp timer after replacing the lamp. 1. xt to the projector. ENTER ENTER EXIT ECO STATUS INPUT MENU ...Appendix 58 If you reset the lamp timer and continue to use the same lamp, this may cause the lamp to reset the lamp timer only when replacing the lamp. Insert the new lamp unit. • Press the lamp unit firmly into the AC socket of the projector....
...4. Connect the power cord. • Plug the power cord into the lamp unit compartment. Reset the lamp timer. Info Make sure to become damaged or explode. Resetting the Lamp Timer Reset the lamp timer after replacing the lamp. 1. xt to the projector. ENTER ENTER EXIT ECO STATUS INPUT MENU ...Appendix 58 If you reset the lamp timer and continue to use the same lamp, this may cause the lamp to reset the lamp timer only when replacing the lamp. Insert the new lamp unit. • Press the lamp unit firmly into the AC socket of the projector....


