
Owner Manual
Page 1
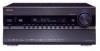
...Onkyo AV Receiver. Contents Introduction 2 Connection 18 Turning On & First Time Setup .....48 Basic Operations 67 Using the Listening Modes ........81 Advanced Setup 92 NET/USB 120 Multi Zone 130 Controlling Other Components....139 Others 154 En Please retain this manual will enable you for future reference. Following the instructions in the unit. AV Receiver TX-NR3007 TX-NR5007... Instruction Manual Thank you to obtain optimum...
...Onkyo AV Receiver. Contents Introduction 2 Connection 18 Turning On & First Time Setup .....48 Basic Operations 67 Using the Listening Modes ........81 Advanced Setup 92 NET/USB 120 Multi Zone 130 Controlling Other Components....139 Others 154 En Please retain this manual will enable you for future reference. Following the instructions in the unit. AV Receiver TX-NR3007 TX-NR5007... Instruction Manual Thank you to obtain optimum...
Owner Manual
Page 4
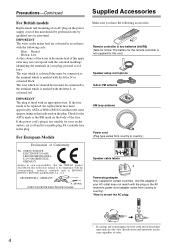
... this adapter if your AC outlet does not match with the plug on the AV receiver's power cord (adapter varies from country to country.) Speaker cable labels * Power-plug adapter Only supplied in certain countries. MIYAGI ONKYO EUROPE ELECTRONICS GmbH 1 Speaker Cable 2 FRONT LEFT FRONT LEFT FRONT RIGHT FRONT ...Neutral Brown: Live As the colours of the wires in compliance with an appropriate fuse. IMPORTANT The plug is not supplied for this instruction manual is not suitable for the ASTA mark or the BSI mark on packaging, the letter at the end of the product name indicates the...
... this adapter if your AC outlet does not match with the plug on the AV receiver's power cord (adapter varies from country to country.) Speaker cable labels * Power-plug adapter Only supplied in certain countries. MIYAGI ONKYO EUROPE ELECTRONICS GmbH 1 Speaker Cable 2 FRONT LEFT FRONT LEFT FRONT RIGHT FRONT ...Neutral Brown: Live As the colours of the wires in compliance with an appropriate fuse. IMPORTANT The plug is not supplied for this instruction manual is not suitable for the ASTA mark or the BSI mark on packaging, the letter at the end of the product name indicates the...
Owner Manual
Page 9
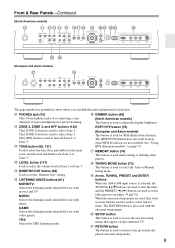
... models) " Q The page numbers in areas where RDS broadcasts are not available. S TUNING MODE button (73) This button is used to select the Auto or Manual tuning mode. T Arrow, TUNING, PRESET and ENTER buttons When the AM or FM input source is used to select radio presets (see pages 74 and...
... models) " Q The page numbers in areas where RDS broadcasts are not available. S TUNING MODE button (73) This button is used to select the Auto or Manual tuning mode. T Arrow, TUNING, PRESET and ENTER buttons When the AM or FM input source is used to select radio presets (see pages 74 and...

Owner Manual
Page 11
...such as UP-A1 Dock. A commercially available IR emitter can assign each one to an input selector to suit your setup. Goes off when Manual Tuning mode is set to "Bi-Amp". J Bi AMP indicator (23, 25) Lights when the "Speakers Type(FrontA)" or "Speakers ... (128) Lights up when a USB mass storage device is muted. P MUTING indicator (69) Flashes while the AV receiver is detected. D DIGITAL OPTICAL IN 1 and 2 (TX-NR3007) DIGITAL OPTICAL IN 1, 2, and 3 (TX-NR5007) These optical digital audio inputs are plugged into the PHONES jack. Front & Rear Panels-Continued H Tuning indicators RDS...
...such as UP-A1 Dock. A commercially available IR emitter can assign each one to an input selector to suit your setup. Goes off when Manual Tuning mode is set to "Bi-Amp". J Bi AMP indicator (23, 25) Lights when the "Speakers Type(FrontA)" or "Speakers ... (128) Lights up when a USB mass storage device is muted. P MUTING indicator (69) Flashes while the AV receiver is detected. D DIGITAL OPTICAL IN 1 and 2 (TX-NR3007) DIGITAL OPTICAL IN 1, 2, and 3 (TX-NR5007) These optical digital audio inputs are plugged into the PHONES jack. Front & Rear Panels-Continued H Tuning indicators RDS...
Owner Manual
Page 19
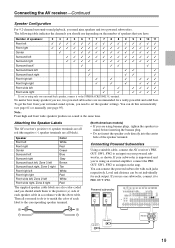
You can be set the speaker settings. Then all you need to do this automatically (see page 61) or manually (see page 95). If you 're using an external amplifier, connect the PRE OUT: SW1, SW2 to an input on the amp. No ... front wide speakers produce no sound at the same time. Attaching the Speaker Labels The AV receiver's positive (+) speaker terminals are all black). Powered subwoofer LINE INPUT LINE INPUT LINE INPUT LINE INPUT 19 Connecting the AV receiver-Continued Speaker Configuration For 9.2-channel surround-sound playback, you 're using only one subwoofer,...
You can be set the speaker settings. Then all you need to do this automatically (see page 61) or manually (see page 95). If you 're using an external amplifier, connect the PRE OUT: SW1, SW2 to an input on the amp. No ... front wide speakers produce no sound at the same time. Attaching the Speaker Labels The AV receiver's positive (+) speaker terminals are all black). Powered subwoofer LINE INPUT LINE INPUT LINE INPUT LINE INPUT 19 Connecting the AV receiver-Continued Speaker Configuration For 9.2-channel surround-sound playback, you 're using only one subwoofer,...
Owner Manual
Page 23
... the right speaker's negative (-) Tweeter (high) terminal. 3 Connect the AV receiver's FRONT L positive (+) terminal to your speaker manual. Refer to the left speaker's positive (+) Woofer (low) terminal. And connect the AV receiver's FRONT R negative (-) terminal to the right speaker's negative (-) Woofer (low) terminal. 2 Connect the AV receiver's SURR BACK/ZONE 3 R positive (+) terminal to the left speaker's positive...
... the right speaker's negative (-) Tweeter (high) terminal. 3 Connect the AV receiver's FRONT L positive (+) terminal to your speaker manual. Refer to the left speaker's positive (+) Woofer (low) terminal. And connect the AV receiver's FRONT R negative (-) terminal to the right speaker's negative (-) Woofer (low) terminal. 2 Connect the AV receiver's SURR BACK/ZONE 3 R positive (+) terminal to the left speaker's positive...

Owner Manual
Page 25
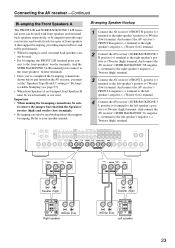
... Right speaker Woofer (low) Left speaker 25 Important: • When making the bi-amping connections, be sure to your speaker manual. Bi-amping Speaker Hookup 1 Connect the AV receiver's FRONT WIDE/ZONE 2 R positive (+) terminal to provide separate tweeter and woofer feeds for a pair of front speakers B that... support bi-amping. Connecting the AV receiver-Continued Bi-amping the Front Speakers B The FRONT WIDE/ZONE 2 L/R and SURR BACK/ZONE 3 L/R terminal posts can be used with ...
... Right speaker Woofer (low) Left speaker 25 Important: • When making the bi-amping connections, be sure to your speaker manual. Bi-amping Speaker Hookup 1 Connect the AV receiver's FRONT WIDE/ZONE 2 R positive (+) terminal to provide separate tweeter and woofer feeds for a pair of front speakers B that... support bi-amping. Connecting the AV receiver-Continued Bi-amping the Front Speakers B The FRONT WIDE/ZONE 2 L/R and SURR BACK/ZONE 3 L/R terminal posts can be used with ...
Owner Manual
Page 29
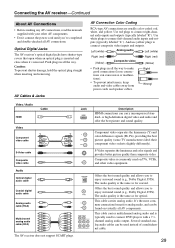
... the luminance and color signals and provides better picture quality than composite video. Connecting the AV receiver-Continued About AV Connections • Before making any AV connections, read the manuals supplied with a 7.1channel analog audio output. Optical Digital Jacks The AV receiver's optical digital jacks have shutter-type covers that open when an optical plug is the...
... the luminance and color signals and provides better picture quality than composite video. Connecting the AV receiver-Continued About AV Connections • Before making any AV connections, read the manuals supplied with a 7.1channel analog audio output. Optical Digital Jacks The AV receiver's optical digital jacks have shutter-type covers that open when an optical plug is the...
Owner Manual
Page 31
...TV is set to PCM. Hint! To listen to audio received by the HDMI IN jacks through the AV receiver, set to "On" (see page 113) to the AV receiver). If the picture is set to "On" to the connected component's instruction manual for details. 31 Normally, they are not output by the... HDMI outputs, unless the "Audio TV Out" setting is poor or there's no sound from the AV receiver or the sound may be upconverted for audio.) However, reliable operation...
...TV is set to PCM. Hint! To listen to audio received by the HDMI IN jacks through the AV receiver, set to "On" (see page 113) to the AV receiver). If the picture is set to "On" to the connected component's instruction manual for details. 31 Normally, they are not output by the... HDMI outputs, unless the "Audio TV Out" setting is poor or there's no sound from the AV receiver or the sound may be upconverted for audio.) However, reliable operation...

Owner Manual
Page 39
...must be connected to S-Video inputs can be recorded via composite video outputs. Similarly, video signals connected to a composite video output. Connection A B a AV receiver VCR/DVR OUT S VCR/DVR OUT V VCR/DVR OUT L/R Signal flow ⇒ ⇒ ⇒ VCR or DVD recorder S-Video input Composite video... input cannot be connected to an S-Video output. • Sources connected to the recording VCR's audio and video inputs. See the manuals supplied with your TV/VCR is connected to a composite video input, the recording VCR must be recorded. Only analog inputs can only ...
...must be connected to S-Video inputs can be recorded via composite video outputs. Similarly, video signals connected to a composite video output. Connection A B a AV receiver VCR/DVR OUT S VCR/DVR OUT V VCR/DVR OUT L/R Signal flow ⇒ ⇒ ⇒ VCR or DVD recorder S-Video input Composite video... input cannot be connected to an S-Video output. • Sources connected to the recording VCR's audio and video inputs. See the manuals supplied with your TV/VCR is connected to a composite video input, the recording VCR must be recorded. Only analog inputs can only ...

Owner Manual
Page 43
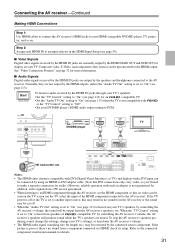
Notes: • If your turntable to the head amp or transformer, and connect that matches your phono equalizer's manual for details. Connect your turntable has a ground wire, connect it . • If your turntable has a moving magnet (MM) type cartridge.... or listen in Zone 2 or Zone 3 as well, use a and b , or a and c .) Connection a b c AV receiver CD IN L/R DIGITAL COAXIAL IN 2 (VCR/DVR) DIGITAL OPTICAL IN 2 (CD) (TX-NR3007) DIGITAL OPTICAL IN 3 (CD) (TX-NR5007) Signal flow ⇐ ⇐ ⇐ CD or turntable Analog audio L/R output Digital coaxial output Digital optical output...
Notes: • If your turntable to the head amp or transformer, and connect that matches your phono equalizer's manual for details. Connect your turntable has a ground wire, connect it . • If your turntable has a moving magnet (MM) type cartridge.... or listen in Zone 2 or Zone 3 as well, use a and b , or a and c .) Connection a b c AV receiver CD IN L/R DIGITAL COAXIAL IN 2 (VCR/DVR) DIGITAL OPTICAL IN 2 (CD) (TX-NR3007) DIGITAL OPTICAL IN 3 (CD) (TX-NR5007) Signal flow ⇐ ⇐ ⇐ CD or turntable Analog audio L/R output Digital coaxial output Digital optical output...

Owner Manual
Page 46
...Dock, see the RI Dock's instruction manual. ■ If Your iPod Supports Video: Connect your RI Dock's audio output jacks to the AV receiver's GAME IN or VCR/DVR IN L/R jacks, and connect its video output jack to the AV receiver's GAME IN V or VCR/DVR IN V jack. (Onkyo DSA2 hookup shown below.) ■ ... to "DOCK" (see page 47). • Set the RI Dock's RI MODE switch to "HDD" or "HDD/DOCK". • Set the AV receiver's Input Display to the AV receiver's TV/TAPE IN L/R jacks. (Onkyo DSA2 hookup shown below.) IN L R TV/TAPE GAME V IN IN L R GAME VCR/DVR V IN IN L R VCR/DVR Make either...
...Dock, see the RI Dock's instruction manual. ■ If Your iPod Supports Video: Connect your RI Dock's audio output jacks to the AV receiver's GAME IN or VCR/DVR IN L/R jacks, and connect its video output jack to the AV receiver's GAME IN V or VCR/DVR IN V jack. (Onkyo DSA2 hookup shown below.) ■ ... to "DOCK" (see page 47). • Set the RI Dock's RI MODE switch to "HDD" or "HDD/DOCK". • Set the AV receiver's Input Display to the AV receiver's TV/TAPE IN L/R jacks. (Onkyo DSA2 hookup shown below.) IN L R TV/TAPE GAME V IN IN L R GAME VCR/DVR V IN IN L R VCR/DVR Make either...

Owner Manual
Page 47
... (see page 142). Refer to the manuals supplied with an analog audio cable (connection a in the hookup examples) (see page 60). Connecting the AV receiver-Continued Connecting Onkyo V Components Step 1: Make sure that each Onkyo component is connected to the AV receiver with your speakers and AV components. • Turning on the AV receiver may cause a momentary power surge that...
... (see page 142). Refer to the manuals supplied with an analog audio cable (connection a in the hookup examples) (see page 60). Connecting the AV receiver-Continued Connecting Onkyo V Components Step 1: Make sure that each Onkyo component is connected to the AV receiver with your speakers and AV components. • Turning on the AV receiver may cause a momentary power surge that...

Owner Manual
Page 49
Monitor Setup ■ Change "Monitor Out" setting manually If you can select whether or not to have the onscreen setup menu output through the HDMI output or through the HDMI output, as well ... details on the remote controller. • This setting can specify the output resolution for the HDMI outputs and COMPONENT VIDEO MONITOR OUT and have the AV receiver upconvert the picture resolution as whether to have the video sources' images output through an analog output. If you need to make before using the...
Monitor Setup ■ Change "Monitor Out" setting manually If you can select whether or not to have the onscreen setup menu output through the HDMI output or through the HDMI output, as well ... details on the remote controller. • This setting can specify the output resolution for the HDMI outputs and COMPONENT VIDEO MONITOR OUT and have the AV receiver upconvert the picture resolution as whether to have the video sources' images output through an analog output. If you need to make before using the...

Owner Manual
Page 50
...first follow the instructions below to change the Language. If the main menu doesn't appear, make sure the appropriate external input is selected on the AV receiver by the [SETUP] button. Menu 5 Press the [SETUP] button. Hardware Setup 8. tons to select "2. Audio Adjust 4. Volume Setup 2. ...for the 3 onscreen setup menus This setting determines the language used for the onscreen menu is in the same language as the Instruction Manual. The main menu appears onscreen. neous", and then press [ENTER]. Use the Up and Down [R]/[X] buttons to select "6. OSD ...
...first follow the instructions below to change the Language. If the main menu doesn't appear, make sure the appropriate external input is selected on the AV receiver by the [SETUP] button. Menu 5 Press the [SETUP] button. Hardware Setup 8. tons to select "2. Audio Adjust 4. Volume Setup 2. ...for the 3 onscreen setup menus This setting determines the language used for the onscreen menu is in the same language as the Instruction Manual. The main menu appears onscreen. neous", and then press [ENTER]. Use the Up and Down [R]/[X] buttons to select "6. OSD ...
Owner Manual
Page 66
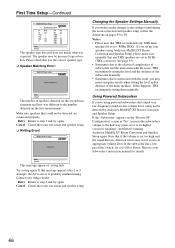
Please check that any THX main speakers be detected are set up your Onkyo dealer. MultEQ XT: Auto Setup Writing Error! Changing the Speaker Settings Manually If you 're using Audyssey MultEQ XT Room Correction and Speaker Setup, please make changes to the settings found... This message appears if saving fails. Cancel: Cancel the room correction and speaker setup. If this message appears after 2 or 3 attempts, the AV receiver is the correct speaker type. ❏ Speaker Matching Error! Cancel: Cancel the room correction and speaker setup. ❏ Writing Error! Contact your...
Please check that any THX main speakers be detected are set up your Onkyo dealer. MultEQ XT: Auto Setup Writing Error! Changing the Speaker Settings Manually If you 're using Audyssey MultEQ XT Room Correction and Speaker Setup, please make changes to the settings found... This message appears if saving fails. Cancel: Cancel the room correction and speaker setup. If this message appears after 2 or 3 attempts, the AV receiver is the correct speaker type. ❏ Speaker Matching Error! Cancel: Cancel the room correction and speaker setup. ❏ Writing Error! Contact your...

Owner Manual
Page 73
..., as presets for quick selection. For example, to tune to select either AM or FM. In this example, FM has been selected. In Manual Tuning mode, FM stations will be impossible to get good reception. Listening to the Radio Using the Tuner With the built-in tuner you can.... TUNING MODE TUNING / Listening to the Radio Use the [TUNER] input selector button to 87.5 (FM), press 8, 7, 5. 73 In this case, switch to Manual Tuning mode and listen to the station in mono. ■ Tuning into Stations by the [D.TUN] button. 2 Press the TUNING Up or Down [R]/[X] buttons. Searching...
..., as presets for quick selection. For example, to tune to select either AM or FM. In this example, FM has been selected. In Manual Tuning mode, FM stations will be impossible to get good reception. Listening to the Radio Using the Tuner With the built-in tuner you can.... TUNING MODE TUNING / Listening to the Radio Use the [TUNER] input selector button to 87.5 (FM), press 8, 7, 5. 73 In this case, switch to Manual Tuning mode and listen to the station in mono. ■ Tuning into Stations by the [D.TUN] button. 2 Press the TUNING Up or Down [R]/[X] buttons. Searching...

Owner Manual
Page 77
... volume control while it's in the UP-A1 Dock, its volume control has no effect. Operating Notes: • Functionality depends on your iPod and the AV receiver at : http://www.onkyo.com iPod adapter Dock connector Compatible iPod models For information about which iPod models are connected to your iPod, the... UP-A1 Dock (sold separately), you can easily play the music, photo, or movie stored on the Dock, see the UP-A1 Dock instruction manual. The AV receiver's input source will automatically be sure to set your iPod in the UP-A1 Dock, and the UP-A1 Dock must be in the UP...
... volume control while it's in the UP-A1 Dock, its volume control has no effect. Operating Notes: • Functionality depends on your iPod and the AV receiver at : http://www.onkyo.com iPod adapter Dock connector Compatible iPod models For information about which iPod models are connected to your iPod, the... UP-A1 Dock (sold separately), you can easily play the music, photo, or movie stored on the Dock, see the UP-A1 Dock instruction manual. The AV receiver's input source will automatically be sure to set your iPod in the UP-A1 Dock, and the UP-A1 Dock must be in the UP...

Owner Manual
Page 78
.... Q RANDOM button Used with the shuffle function. *1 Standard mode Nothing is selected as expected. • For detailed operation of the AV receiver. Notes: • In Extended mode, the playback will turn on your TV and you navigate and select your contents by using your... G DISPLAY button Select Standard or Extended mode*1. J VOL [R]/[X] button (67) Adjusts the volume of the iPod, please refer to the instruction manual. 78 B Arrow [R]/[X] and ENTER buttons Used to start playback. K PLAYLIST [F]/[S] buttons Selects the previous or next playlist on entering a remote control...
.... Q RANDOM button Used with the shuffle function. *1 Standard mode Nothing is selected as expected. • For detailed operation of the AV receiver. Notes: • In Extended mode, the playback will turn on your TV and you navigate and select your contents by using your... G DISPLAY button Select Standard or Extended mode*1. J VOL [R]/[X] button (67) Adjusts the volume of the iPod, please refer to the instruction manual. 78 B Arrow [R]/[X] and ENTER buttons Used to start playback. K PLAYLIST [F]/[S] buttons Selects the previous or next playlist on entering a remote control...

Owner Manual
Page 95
... the appropriate external input is outputted from SW1 jack only. 2ch: Audio signal is selected on page 57. Here you change the settings manually. Speaker Settings See "Speaker Settings" on your TV. 3 Use the Up and Down [R]/[X] buttons to select "2. Note: The Speaker ... is useful if you can specify which is connected. Note: Speakers B cannot be carried out while headphones are connected to the AV receiver. 1 Press the [RECEIVER] button, and then use the same crossover frequencies, distances, and levels for speakers that any THX speakers are set to "80Hz...
... the appropriate external input is outputted from SW1 jack only. 2ch: Audio signal is selected on page 57. Here you change the settings manually. Speaker Settings See "Speaker Settings" on your TV. 3 Use the Up and Down [R]/[X] buttons to select "2. Note: The Speaker ... is useful if you can specify which is connected. Note: Speakers B cannot be carried out while headphones are connected to the AV receiver. 1 Press the [RECEIVER] button, and then use the same crossover frequencies, distances, and levels for speakers that any THX speakers are set to "80Hz...

