Owner Manual
Page 5
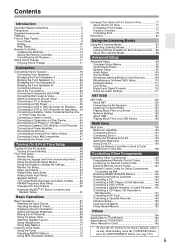
.../USB 120 About NET 120 Connecting the AV Receiver 120 Listening to Internet Radio 121 Playing Music Files on a Server 122 Network Settings 126 About USB 127 Playing Music ...up for Remote Control Code 139 Entering Remote Control Codes 141 Remote Control Codes for Onkyo Components Connected via V 142 Resetting REMOTE MODE Buttons 142 Resetting the Remote Controller ...Specifications (TX-NR3007 160 Specifications (TX-NR5007 161 Video Resolution Chart 162 * To reset the AV receiver to its factory defaults, turn it on and, while holding down the [VCR/DVR] button, press the [ON/STANDBY] ...
.../USB 120 About NET 120 Connecting the AV Receiver 120 Listening to Internet Radio 121 Playing Music Files on a Server 122 Network Settings 126 About USB 127 Playing Music ...up for Remote Control Code 139 Entering Remote Control Codes 141 Remote Control Codes for Onkyo Components Connected via V 142 Resetting REMOTE MODE Buttons 142 Resetting the Remote Controller ...Specifications (TX-NR3007 160 Specifications (TX-NR5007 161 Video Resolution Chart 162 * To reset the AV receiver to its factory defaults, turn it on and, while holding down the [VCR/DVR] button, press the [ON/STANDBY] ...

Owner Manual
Page 10
... enabled. Vol (102, 118): Lights when "Dynamic Volume" is enabled. G NETWORK indicator (121) Lights when the Net input selector is enabled. Y AUX 1 ... Z2 indicator (136) Lights when Powered Zone 2 is used to On or Standby. M N O PQ F Listening mode and format indicators (81) Show the ... treble) for the main room and the volume, tone and balance for composite video, analog audio, and optical digital audio. D A and B indicators (70)...Zone 3. [ DISPLAY button (68) This button is being used to OFF, the AV receiver is selected: A or B. " POWER switch (48) (European and Asian models) ...
... enabled. Vol (102, 118): Lights when "Dynamic Volume" is enabled. G NETWORK indicator (121) Lights when the Net input selector is enabled. Y AUX 1 ... Z2 indicator (136) Lights when Powered Zone 2 is used to On or Standby. M N O PQ F Listening mode and format indicators (81) Show the ... treble) for the main room and the volume, tone and balance for composite video, analog audio, and optical digital audio. D A and B indicators (70)...Zone 3. [ DISPLAY button (68) This button is being used to OFF, the AV receiver is selected: A or B. " POWER switch (48) (European and Asian models) ...
Owner Manual
Page 15
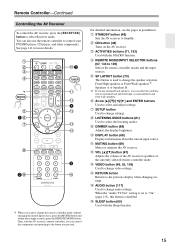
...MUTING button (69) Mutes or unmutes the AV receiver. D ACTIVITIES buttons (71, 153) Used with the Sleep function. 15 G Arrow [R]/[X]/[F]/[S] and ENTER buttons Used to Standby. N VIDEO button (49, 53, 105) Used to change video settings. B STANDBY button (48) Sets the AV receiver to select and adjust settings. K DISPLAY ...SELECTOR buttons (67, 143 to change audio settings. M VOL [R]/[X] button (67) Adjusts the volume of the AV receiver regardless of surround back and front high, or surround back and front wide speakers. For detailed information, see the pages in parentheses....
...MUTING button (69) Mutes or unmutes the AV receiver. D ACTIVITIES buttons (71, 153) Used with the Sleep function. 15 G Arrow [R]/[X]/[F]/[S] and ENTER buttons Used to Standby. N VIDEO button (49, 53, 105) Used to change video settings. B STANDBY button (48) Sets the AV receiver to select and adjust settings. K DISPLAY ...SELECTOR buttons (67, 143 to change audio settings. M VOL [R]/[X] button (67) Adjusts the volume of the AV receiver regardless of surround back and front high, or surround back and front wide speakers. For detailed information, see the pages in parentheses....

Owner Manual
Page 39
...it's in Standby mode. • If you want to record directly from your VCR or DVD recorder ( A or B ), and then make the connection. If your TV/VCR is connected to a composite video input, the recording VCR must be connected to an S-Video output. ...S-Video input Composite video input Analog audio L/R input B a A VCR or DVD recorder L R AUDIO IN S VIDEO IN VIDEO IN Notes: • The AV receiver must be connected to the AV receiver via S-Video outputs. Only analog inputs can only be recorded. 39 Similarly, video signals connected to a composite video output. The video ...
...it's in Standby mode. • If you want to record directly from your VCR or DVD recorder ( A or B ), and then make the connection. If your TV/VCR is connected to a composite video input, the recording VCR must be connected to an S-Video output. ...S-Video input Composite video input Analog audio L/R input B a A VCR or DVD recorder L R AUDIO IN S VIDEO IN VIDEO IN Notes: • The AV receiver must be connected to the AV receiver via S-Video outputs. Only analog inputs can only be recorded. 39 Similarly, video signals connected to a composite video output. The video ...

Owner Manual
Page 46
...output jacks to the AV receiver's GAME IN or VCR/DVR IN L/R jacks, and connect its video output jack to the AV receiver's GAME IN V or VCR/DVR IN V jack. (Onkyo DSA2 hookup shown below.) ■ If you have an Onkyo DS-A1 RI Dock Connect its video output jack to the AV receiver's GAME IN S ...AV receiver's TV/TAPE IN L/R jacks. (Onkyo DSA2 hookup shown below.) IN L R TV/TAPE GAME V IN IN L R GAME VCR/DVR V IN IN L R VCR/DVR Make either connection. Connecting a Universal Port Option Series ex. UP-A1 Note: When UP-A1 Dock that seated iPod is connected, the power consumption on standby...
...output jacks to the AV receiver's GAME IN or VCR/DVR IN L/R jacks, and connect its video output jack to the AV receiver's GAME IN V or VCR/DVR IN V jack. (Onkyo DSA2 hookup shown below.) ■ If you have an Onkyo DS-A1 RI Dock Connect its video output jack to the AV receiver's GAME IN S ...AV receiver's TV/TAPE IN L/R jacks. (Onkyo DSA2 hookup shown below.) IN L R TV/TAPE GAME V IN IN L R GAME VCR/DVR V IN IN L R VCR/DVR Make either connection. Connecting a Universal Port Option Series ex. UP-A1 Note: When UP-A1 Dock that seated iPod is connected, the power consumption on standby...
Owner Manual
Page 48
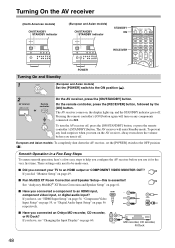
..., here's a few easy steps to an HDMI output or COMPONENT VIDEO MONITOR OUT? If you connected an Onkyo MD recorder, CD recorder, or RI Dock? If you turn it for the very first time. The AV receiver will turn on the AV receiver, always turn the AV receiver off . European and Asian models: To completely shut down the...
..., here's a few easy steps to an HDMI output or COMPONENT VIDEO MONITOR OUT? If you connected an Onkyo MD recorder, CD recorder, or RI Dock? If you turn it for the very first time. The AV receiver will turn on the AV receiver, always turn the AV receiver off . European and Asian models: To completely shut down the...

Owner Manual
Page 114
..."HDMI Control (RIHD)", "Power Control", or "TV Control", set to Standby and then turn them on the AV receiver. Set to "On" when you set to "On". • Refer...To link the power functions of connected -compatible components and "RIHD On" are displayed on Onkyo components. Otherwise, appropriate CEC (Consumer Electronics Control) operation is not successful. • ...Control" settings are both audio and video received by an HDMI input will be guaranteed. Notes: • The "Power Control" setting can - This function allows receiver. -compatible components connected via HDMI...
..."HDMI Control (RIHD)", "Power Control", or "TV Control", set to Standby and then turn them on the AV receiver. Set to "On" when you set to "On". • Refer...To link the power functions of connected -compatible components and "RIHD On" are displayed on Onkyo components. Otherwise, appropriate CEC (Consumer Electronics Control) operation is not successful. • ...Control" settings are both audio and video received by an HDMI input will be guaranteed. Notes: • The "Power Control" setting can - This function allows receiver. -compatible components connected via HDMI...

Owner Manual
Page 145
...play modes. • Buttons marked with an asterisk (*) are not supported by the function. Then, with the AV receiver's remote controller, you can control your video recorder with the remote control code for your VCR (TV/VCR, PVR, DBS/PVR combination or cable/PVR combination),... enters the number 12. B ON, STANDBY buttons Set the video recorder to On or Standby. E TV VOL [R]/[X] button Adjust the TV's volume. The [+10] button works as colored or A, B, C, D buttons. M CH +/- N VOL [R]/[X] button (67) Adjusts the volume of the AV receiver. Controlling a VCR or PVR By pressing...
...play modes. • Buttons marked with an asterisk (*) are not supported by the function. Then, with the AV receiver's remote controller, you can control your video recorder with the remote control code for your VCR (TV/VCR, PVR, DBS/PVR combination or cable/PVR combination),... enters the number 12. B ON, STANDBY buttons Set the video recorder to On or Standby. E TV VOL [R]/[X] button Adjust the TV's volume. The [+10] button works as colored or A, B, C, D buttons. M CH +/- N VOL [R]/[X] button (67) Adjusts the volume of the AV receiver. Controlling a VCR or PVR By pressing...

Owner Manual
Page 154
... −81.5 dB through +18.0 dB (page 67). On some DVD-Video discs, you use all speaker cables and input sources, and leave the AV receiver with its factory defaults, turn on the AV receiver • Make sure that none of the connecting cables are not shorting. ...AV receiver to its power cord disconnected for a solution in this section. After that resetting the AV receiver will enter Standby mode. Troubleshooting If you set the volume to maximum, disconnect the power cord, and contact your Onkyo dealer. If the AV receiver stays on the display and the AV receiver...
... −81.5 dB through +18.0 dB (page 67). On some DVD-Video discs, you use all speaker cables and input sources, and leave the AV receiver with its factory defaults, turn on the AV receiver • Make sure that none of the connecting cables are not shorting. ...AV receiver to its power cord disconnected for a solution in this section. After that resetting the AV receiver will enter Standby mode. Troubleshooting If you set the volume to maximum, disconnect the power cord, and contact your Onkyo dealer. If the AV receiver stays on the display and the AV receiver...

Owner Manual
Page 158
... To prevent signal loops and damage to the AV receiver, input signals are not fed through to outputs with the AV receiver (page 125). • Check the "Network Settings"(page 126). Try closing any malfunction in Zone 2/3. The functions Auto Power On/Standby and Direct Change don't work when Zone ...Setup", the measurement fails showing the message "Ambient noise is selected. Reduce the number of playback devices on . Zone 2/3 There's no video signals are connected digitally (page 47). • While Zone 2 or Zone 3 is selected, the V functions don't work • The display...
... To prevent signal loops and damage to the AV receiver, input signals are not fed through to outputs with the AV receiver (page 125). • Check the "Network Settings"(page 126). Try closing any malfunction in Zone 2/3. The functions Auto Power On/Standby and Direct Change don't work when Zone ...Setup", the measurement fails showing the message "Ambient noise is selected. Reduce the number of playback devices on . Zone 2/3 There's no video signals are connected digitally (page 47). • While Zone 2 or Zone 3 is selected, the V functions don't work • The display...
Owner Manual
Page 159
... source for the SVideo, composite video and COMPONENT VIDEO inputs You must use the buttons on the AV receiver at the same time. Onkyo is not responsible for signal processing and control functions. If the video source is connected to COMPONENT VIDEO IN3, select the relevant input ...the relevant input selector, and assign it to Standby. In very rare situations, severe interference, noise from the wall outlet, wait at the same time. HDMI Input". Select "Skip" in again. Important Note Regarding Video Playback The AV receiver can attenuate the gain. Input/Output Assign", ...
... source for the SVideo, composite video and COMPONENT VIDEO inputs You must use the buttons on the AV receiver at the same time. Onkyo is not responsible for signal processing and control functions. If the video source is connected to COMPONENT VIDEO IN3, select the relevant input ...the relevant input selector, and assign it to Standby. In very rare situations, severe interference, noise from the wall outlet, wait at the same time. HDMI Input". Select "Skip" in again. Important Note Regarding Video Playback The AV receiver can attenuate the gain. Input/Output Assign", ...

