

User Manual English
Page 2
... antenna or cable system is connected to the appliance, be cleaned only as a in installation such as recom- Read Instructions - Cleaning - Power-Cord Protection - Power-supply cords should be sure the -for with them . PORTABLE CART WARNING long periods of important operating and maintenance (servicing) instructions in a fire or electric 11. Ventilation - lines or circuits as contact with the appliance. Power Sources - The exclamation point within the product...
... antenna or cable system is connected to the appliance, be cleaned only as a in installation such as recom- Read Instructions - Cleaning - Power-Cord Protection - Power-supply cords should be sure the -for with them . PORTABLE CART WARNING long periods of important operating and maintenance (servicing) instructions in a fire or electric 11. Ventilation - lines or circuits as contact with the appliance. Power Sources - The exclamation point within the product...
User Manual English
Page 3
... user-serviceable. If water or any trouble, please contact the store where you should be exposed to determine that have fallen into the appliance C. Location of the available power supply differs according to time you purchased the unit. Never place it on its normal operation. For heavier dirt, unplug the power cord from the speakers. When the power-supply cord or plug is a CLASS 1 LASER PRODUCT...
... user-serviceable. If water or any trouble, please contact the store where you should be exposed to determine that have fallen into the appliance C. Location of the available power supply differs according to time you purchased the unit. Never place it on its normal operation. For heavier dirt, unplug the power cord from the speakers. When the power-supply cord or plug is a CLASS 1 LASER PRODUCT...

User Manual English
Page 4
... memory preservation batteries. adapter [1] ual (this unit. This period is shorter when the unit is exposed to charge the back-up system. Main features Supplied accessories • DLA Link (Digital Rec Level Adjustment) function automatically adjusts the recording level of CD-toMD dubbing. • Adjustable digital recording volume level. • Supports MDLP long hour recording mode (2X/4X). • Double-speed CD-to-MD dubbing function • Sampling...
... memory preservation batteries. adapter [1] ual (this unit. This period is shorter when the unit is exposed to charge the back-up system. Main features Supplied accessories • DLA Link (Digital Rec Level Adjustment) function automatically adjusts the recording level of CD-toMD dubbing. • Adjustable digital recording volume level. • Supports MDLP long hour recording mode (2X/4X). • Double-speed CD-to-MD dubbing function • Sampling...

User Manual English
Page 5
... MiniDiscs (MDs 12 Preparing the remote controller 13 Part names and functions...14 Understanding preparatory and common operations 16 Setting the day of contents Before Using Important Safeguards/Precautions/Main features/Supplied accessories 2-4 Connecting Antenna (aerial) and speakers ...6 Audio/video equipment ...9 Connecting the power cord...11 Preparations Precautions for handling Compact Discs (CDs 12 Precautions for digital recording...67 System limitations...68 Troubleshooting ...69 Specifications ...71 5 Auto Preset 18 Programming AM/FM stations one by one -
... MiniDiscs (MDs 12 Preparing the remote controller 13 Part names and functions...14 Understanding preparatory and common operations 16 Setting the day of contents Before Using Important Safeguards/Precautions/Main features/Supplied accessories 2-4 Connecting Antenna (aerial) and speakers ...6 Audio/video equipment ...9 Connecting the power cord...11 Preparations Precautions for handling Compact Discs (CDs 12 Precautions for digital recording...67 System limitations...68 Troubleshooting ...69 Specifications ...71 5 Auto Preset 18 Programming AM/FM stations one by one -

User Manual English
Page 8
... can cause unnatural or distorted sound. • The load impedance of each speaker must be between 4 and 16 ohms. Connecting speakers with a built-in amplifier) FR-N3X Subwoofer (without a built-in amplifier) Amplifier : Signal flow 8 N Connecting a subwoofer The FR-N3X has a SUBWOOFER PRE OUT jack. Insert the tip of the core wire. 2 Twist the core wire. Release the lever to replace it. -+ -+ Peel the insulation to...
... can cause unnatural or distorted sound. • The load impedance of each speaker must be between 4 and 16 ohms. Connecting speakers with a built-in amplifier) FR-N3X Subwoofer (without a built-in amplifier) Amplifier : Signal flow 8 N Connecting a subwoofer The FR-N3X has a SUBWOOFER PRE OUT jack. Insert the tip of the core wire. 2 Twist the core wire. Release the lever to replace it. -+ -+ Peel the insulation to...
User Manual English
Page 9
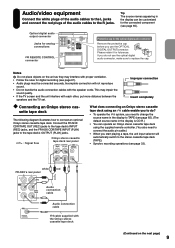
...FR-N3X CDR/TAPE INPUT (PLAY) jacks to the tape deck's OUTPUT (PLAY) jacks. : Signal flow Onkyo stereo cassette tape deck rear panel INPUT OUTPUT (REC) (PLAY) L REMOTE CONTROL What does connecting an Onkyo stereo cassette tape deck using an cable enable you to do not use the OPTICAL DIGITAL OUTPUTconnector. Tip The source names appearing in the display can operate an Onkyo stereo cassette tape deck using the supplied remote controller. (You also need to connect the audio pin cable.) • When you do ? • To operate the system, you need to replace the cap. Optical digital audio...
...FR-N3X CDR/TAPE INPUT (PLAY) jacks to the tape deck's OUTPUT (PLAY) jacks. : Signal flow Onkyo stereo cassette tape deck rear panel INPUT OUTPUT (REC) (PLAY) L REMOTE CONTROL What does connecting an Onkyo stereo cassette tape deck using an cable enable you to do not use the OPTICAL DIGITAL OUTPUTconnector. Tip The source names appearing in the display can operate an Onkyo stereo cassette tape deck using the supplied remote controller. (You also need to connect the audio pin cable.) • When you do ? • To operate the system, you need to replace the cap. Optical digital audio...

User Manual English
Page 10
... disc ANALOG recorder's rear panel INPUT OUTPUT REMOTE (REC) (PLAY) CONTROL DIGITAL OPTICAL L L INPUT1 INPUT2 OUTPUT R K R L FR-N3X's rear panel red white Audio connection cable Optical fiber audio cable An cable that has an optical digital audio input to CD-R. 10 FR-N3X's rear panel red Audio connection cable white 5.1 CH CENTER SURR FRONT Onkyo DVD player rear panel 2 CH L ANALOG OUTPUT R BWOOFER cable supplied with the compact disc recorder The jack connection enables you to use the following functions: • To operate the system, the source name in the display...
... disc ANALOG recorder's rear panel INPUT OUTPUT REMOTE (REC) (PLAY) CONTROL DIGITAL OPTICAL L L INPUT1 INPUT2 OUTPUT R K R L FR-N3X's rear panel red white Audio connection cable Optical fiber audio cable An cable that has an optical digital audio input to CD-R. 10 FR-N3X's rear panel red Audio connection cable white 5.1 CH CENTER SURR FRONT Onkyo DVD player rear panel 2 CH L ANALOG OUTPUT R BWOOFER cable supplied with the compact disc recorder The jack connection enables you to use the following functions: • To operate the system, the source name in the display...

User Manual English
Page 14
... input characters, and tune a broadcast station. DISPLAY button Each time you to skip tracks forward or backward. PHONES jack Connect a headphone mini plug here. This button also enables you press this button, the input source switches between CD-R and LINE. When you press this button, the information on the power to confirm the settings. Press the button again to enable the Timer function. CD button Stops playback. / buttons Fast-forward or backward the track being played. MD / button Starts playback or recording. Remote control...
... input characters, and tune a broadcast station. DISPLAY button Each time you to skip tracks forward or backward. PHONES jack Connect a headphone mini plug here. This button also enables you press this button, the input source switches between CD-R and LINE. When you press this button, the information on the power to confirm the settings. Press the button again to enable the Timer function. CD button Stops playback. / buttons Fast-forward or backward the track being played. MD / button Starts playback or recording. Remote control...

User Manual English
Page 15
.../symbol buttons Used to select a group. / buttons Selects the previous or next track. Operation buttons for Memory playback. SLEEP button Activates the sleep timer that turns off the power at a specified time. S.BASS button Adjusts the tonal quality and the low end bass range. N Display CD indicator MD/CD setting indicators MD indicator CH (channel) indicator S.BASS indicator Recording level indicator TIMER indicator MUTING indicator L.SYNC indicator DIGITAL indicator N Remote controller Multi-purpose display CD/MD indicator Playback mode...
.../symbol buttons Used to select a group. / buttons Selects the previous or next track. Operation buttons for Memory playback. SLEEP button Activates the sleep timer that turns off the power at a specified time. S.BASS button Adjusts the tonal quality and the low end bass range. N Display CD indicator MD/CD setting indicators MD indicator CH (channel) indicator S.BASS indicator Recording level indicator TIMER indicator MUTING indicator L.SYNC indicator DIGITAL indicator N Remote controller Multi-purpose display CD/MD indicator Playback mode...
User Manual English
Page 16
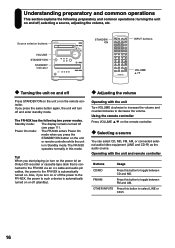
... INPUTS Press this button to the FR-N3X is connected to the FR-N3X via an cable and audio pin cables, the power to select LINE or CD-R. 16 Source selector buttons VOLUME STANDBY/ON STANDBY indicator STANDBY/ ON INPUT buttons VOLUME / N Turning the unit on and off (see page 11). Standby mode: The display remains turned off Press STANDBY/ON on the unit or on the remote controller. Power On mode: The FR-N3X enters Power On mode when...
... INPUTS Press this button to the FR-N3X is connected to the FR-N3X via an cable and audio pin cables, the power to select LINE or CD-R. 16 Source selector buttons VOLUME STANDBY/ON STANDBY indicator STANDBY/ ON INPUT buttons VOLUME / N Turning the unit on and off (see page 11). Standby mode: The display remains turned off Press STANDBY/ON on the unit or on the remote controller. Power On mode: The FR-N3X enters Power On mode when...

User Manual English
Page 21
... ). N Using the remote controller Press the number buttons as follows: While the CD is stopped During playback or pause Total number Total playing of the playing track is displayed. Press to locate a particular point in order, press repeatedly. Press to switch the source to stop playback. Playback track name (Only when the CD TEXT is included) "TRACK NAME" Lights up when the track name is in the unit. Adjust the volume level. Press to CD...
... ). N Using the remote controller Press the number buttons as follows: While the CD is stopped During playback or pause Total number Total playing of the playing track is displayed. Press to locate a particular point in order, press repeatedly. Press to switch the source to stop playback. Playback track name (Only when the CD TEXT is included) "TRACK NAME" Lights up when the track name is in the unit. Adjust the volume level. Press to CD...

User Manual English
Page 23
... preset channels" on automatically. Press to stop playback. Press repeatedly to play back the desired track. Press VOLUME to raise the level and VOLUME to MD. N Using the remote controller Press the number buttons as follows: While the MD is stopped Total number of tracks Total playing time During playback or pause The elapsed time of the playing track is displayed. The unit in the unit, playback starts. "TRACK" is lit while the elapsed time of the playing track "DISC...
... preset channels" on automatically. Press to stop playback. Press repeatedly to play back the desired track. Press VOLUME to raise the level and VOLUME to MD. N Using the remote controller Press the number buttons as follows: While the MD is stopped Total number of tracks Total playing time During playback or pause The elapsed time of the playing track is displayed. The unit in the unit, playback starts. "TRACK" is lit while the elapsed time of the playing track "DISC...
User Manual English
Page 25
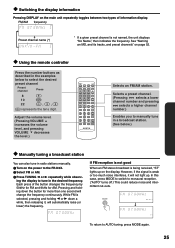
... case, press MODE to switch to AUTO tuning, press MODE again. 25 See "Naming an MD, and its tracks, and preset channels" on the power to the FR-N3X. 2 Select FM or AM. 3 Press TUNING or repeatedly while observing the display to select the desired preset channel Preset channel Press 8 8 10 10/0 22 --/--- , 2 , 2 --/--- N Using the remote controller Press the number buttons as described in the examples below .) N Manually tuning a broadcast station You can also tune in the...
... case, press MODE to switch to AUTO tuning, press MODE again. 25 See "Naming an MD, and its tracks, and preset channels" on the power to the FR-N3X. 2 Select FM or AM. 3 Press TUNING or repeatedly while observing the display to select the desired preset channel Preset channel Press 8 8 10 10/0 22 --/--- , 2 , 2 --/--- N Using the remote controller Press the number buttons as described in the examples below .) N Manually tuning a broadcast station You can also tune in the...
User Manual English
Page 27
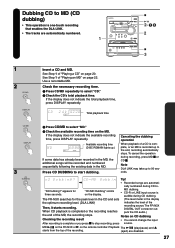
... dubbing. Use a recordable MD. 2 Check the necessary recording time. 1 Press CD/MD repeatedly to select "MD." 4 Check the available recording time on page 22. The FR-N3X DIGITAL OUT connector outputs the CD audio.) the end of "Playing an MD" on the MD. Total playback time 3 Press CD/MD to select "CD." 2 Check the CD's total playback time. To cancel the operation during CD-to stop recording, press source. onds. MD dubbing. • CD-R or LINE input source is...
... dubbing. Use a recordable MD. 2 Check the necessary recording time. 1 Press CD/MD repeatedly to select "MD." 4 Check the available recording time on page 22. The FR-N3X DIGITAL OUT connector outputs the CD audio.) the end of "Playing an MD" on the MD. Total playback time 3 Press CD/MD to select "CD." 2 Check the CD's total playback time. To cancel the operation during CD-to stop recording, press source. onds. MD dubbing. • CD-R or LINE input source is...
User Manual English
Page 33
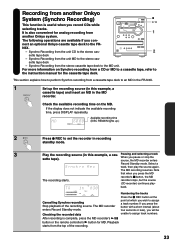
... a cassette tape deck to an MD in the FR-N3X. 1 Set up .) 2 Press REC to the stereo cas- nect an optional Onkyo casette tape deck to the MD unit. Synchro Recording from the unit MD to set the recorder in recording standby mode. 3 Play the recording source (in this example, a cassette tape) and insert an MD in this example, a cas- Synchro Recording from the unit CD to assign track numbers. Available recording time (DISC...
... a cassette tape deck to an MD in the FR-N3X. 1 Set up .) 2 Press REC to the stereo cas- nect an optional Onkyo casette tape deck to the MD unit. Synchro Recording from the unit MD to set the recorder in recording standby mode. 3 Play the recording source (in this example, a cassette tape) and insert an MD in this example, a cas- Synchro Recording from the unit CD to assign track numbers. Available recording time (DISC...

User Manual English
Page 40
... the remote controller repeatedly during MEMORY playback.) / / 1 CLEAR 3 Press on the remote controller. Insert a CD or MD before you try to program more tracks, the unit displays "Memory Full." The MEMORY indicator lights. 2 Turn MULTI JOG to select the first track you want to play CDs and MDs Five different playback modes are retained. 2 Number buttons (See pages 21 and 23.) (These buttons do not operate during MEMORY playback. If...
... the remote controller repeatedly during MEMORY playback.) / / 1 CLEAR 3 Press on the remote controller. Insert a CD or MD before you try to program more tracks, the unit displays "Memory Full." The MEMORY indicator lights. 2 Turn MULTI JOG to select the first track you want to play CDs and MDs Five different playback modes are retained. 2 Number buttons (See pages 21 and 23.) (These buttons do not operate during MEMORY playback. If...
User Manual English
Page 60
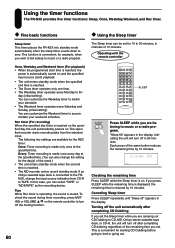
... time is displayed, the remaining time is on the remote controller to music or a radio program. If you are listening to match your weekend schedule. Turning off the unit automatically after completing CD dubbing regardless of the same button reduces the remaining time by 10 minutes. Rec timer (For recording) When the specified start time is reached, the power is automatically turned on . If an Onkyo cassette tape...
... time is displayed, the remaining time is on the remote controller to music or a radio program. If you are listening to match your weekend schedule. Turning off the unit automatically after completing CD dubbing regardless of the same button reduces the remaining time by 10 minutes. Rec timer (For recording) When the specified start time is reached, the power is automatically turned on . If an Onkyo cassette tape...

User Manual English
Page 68
... Tuner CD player DAT deck Cassette deck Microphone amplifier Playing MD recorder Audio connecting cable Line (analog) output terminal Line (analog) input terminal Recording MD recorder 68 MD MD recorded via analog-to-digital connection Playing MD recorder Optical cable or coaxial digital connecting cable Digital output terminal Digital input terminal Recording MD recorder First-generation MD MD recorded via digital-to-digital connection Playing MD recorder Digital output terminal Optical cable or coaxial digital connecting cable Digital input terminal Recording...
... Tuner CD player DAT deck Cassette deck Microphone amplifier Playing MD recorder Audio connecting cable Line (analog) output terminal Line (analog) input terminal Recording MD recorder 68 MD MD recorded via analog-to-digital connection Playing MD recorder Optical cable or coaxial digital connecting cable Digital output terminal Digital input terminal Recording MD recorder First-generation MD MD recorded via digital-to-digital connection Playing MD recorder Digital output terminal Optical cable or coaxial digital connecting cable Digital input terminal Recording...

User Manual English
Page 69
...; Input only the track numbers on . the other components. The disc skips. • Vibrations are being transmitted to the • Adjust the volume level. CD • Clean the disc. 12 Track numbers cannot be stored when setting MEMORY playback. • No disc is inserted in the unit. • A track number not on the disc. • Check the connections and insert the audio connection cable plugs firmly. • Adjust the recording level properly. • Replace...
...; Input only the track numbers on . the other components. The disc skips. • Vibrations are being transmitted to the • Adjust the volume level. CD • Clean the disc. 12 Track numbers cannot be stored when setting MEMORY playback. • No disc is inserted in the unit. • A track number not on the disc. • Check the connections and insert the audio connection cable plugs firmly. • Adjust the recording level properly. • Replace...
User Manual English
Page 70
... CD recorder instruction manual. • Connect the unit and stereo cassette tape deck and CD recorder correctly using the cable and the audio pin cable. 25 6 6 - - - - 62 62 62 62 13 13 13 9 9, 10 Timer Remote control This unit contains a sensitive microcomputer, which under certain circumstances might fail to operate due to operate the remote control from the FR-N3X. The AM indoor antenna is an obstruction between the remote control and the unit. • Replace the batteries...
... CD recorder instruction manual. • Connect the unit and stereo cassette tape deck and CD recorder correctly using the cable and the audio pin cable. 25 6 6 - - - - 62 62 62 62 13 13 13 9 9, 10 Timer Remote control This unit contains a sensitive microcomputer, which under certain circumstances might fail to operate due to operate the remote control from the FR-N3X. The AM indoor antenna is an obstruction between the remote control and the unit. • Replace the batteries...


