FE-230 Advanced Manual (English)
Page 3
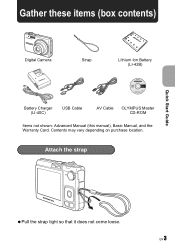
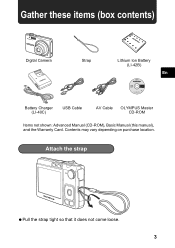
Quick Start Guide Gather these items (box contents) Digital Camera Strap Lithium Ion Battery (LI-42B) Battery Charger (LI-40C) USB Cable AV Cable OLYMPUS Master CD-ROM Items not shown: Advanced Manual (this manual), Basic Manual, and the Warranty Card. Attach the strap Quick Start Guide Pull the strap tight so that it does not come loose. EN 3 Contents may vary depending on purchase location.
Quick Start Guide Gather these items (box contents) Digital Camera Strap Lithium Ion Battery (LI-42B) Battery Charger (LI-40C) USB Cable AV Cable OLYMPUS Master CD-ROM Items not shown: Advanced Manual (this manual), Basic Manual, and the Warranty Card. Attach the strap Quick Start Guide Pull the strap tight so that it does not come loose. EN 3 Contents may vary depending on purchase location.
FE-230 Advanced Manual (English)
Page 4
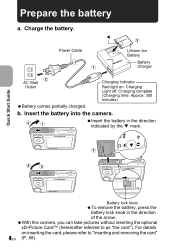
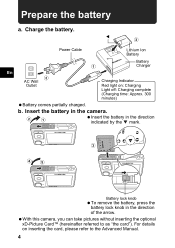
... Cable 1 Lithium Ion Battery Battery Charger 2 AC Wall Outlet Charging Indicator Red light on inserting the card, please refer to as "the card"). For details on : Charging Light off: Charging complete (Charging time: Approx. 300 minutes) Battery comes partially charged. Insert the battery into the camera....45 Quick Start Guide Battery lock knob To remove the battery, press the battery lock knob in the direction of the arrow. With this camera, you can take pictures without inserting the optional xD-Picture Card™ (hereinafter referred to "Inserting and removing the card" 4 EN...
... Cable 1 Lithium Ion Battery Battery Charger 2 AC Wall Outlet Charging Indicator Red light on inserting the card, please refer to as "the card"). For details on : Charging Light off: Charging complete (Charging time: Approx. 300 minutes) Battery comes partially charged. Insert the battery into the camera....45 Quick Start Guide Battery lock knob To remove the battery, press the battery lock knob in the direction of the arrow. With this camera, you can take pictures without inserting the optional xD-Picture Card™ (hereinafter referred to "Inserting and removing the card" 4 EN...
FE-230 Advanced Manual (English)
Page 29
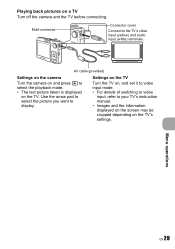
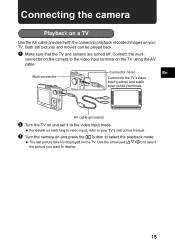
... switching to video input, refer to select the playback mode. • The last picture taken is displayed on the TV's settings. AV cable (provided) Settings on the camera Turn the camera on and press q to your TV's instruction manual. • Images and the information displayed on the screen may be cropped depending on... to select the picture you want to the TV's video input (yellow) and audio input (white) terminals. Playing back pictures on a TV Turn off the camera and the TV before connecting. Menu operations EN 29
... switching to video input, refer to select the playback mode. • The last picture taken is displayed on the TV's settings. AV cable (provided) Settings on the camera Turn the camera on and press q to your TV's instruction manual. • Images and the information displayed on the screen may be cropped depending on... to select the picture you want to the TV's video input (yellow) and audio input (white) terminals. Playing back pictures on a TV Turn off the camera and the TV before connecting. Menu operations EN 29
FE-230 Advanced Manual (English)
Page 31
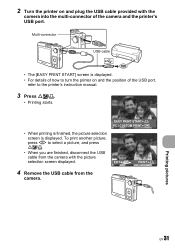
2 Turn the printer on and the position of the USB port, refer to turn the printer on and plug the USB cable provided with the camera into the multi-connector of how to the printer's instruction manual. 3 Press OF/ Multi-connector USB cable • The [EASY PRINT START] screen is displayed. • For details of the camera and the printer's USB port.
2 Turn the printer on and the position of the USB port, refer to turn the printer on and plug the USB cable provided with the camera into the multi-connector of how to the printer's instruction manual. 3 Press OF/ Multi-connector USB cable • The [EASY PRINT START] screen is displayed. • For details of the camera and the printer's USB port.
FE-230 Advanced Manual (English)
Page 32
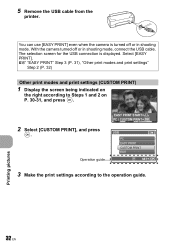
... the print settings according to Steps 1 and 2 on the right according to the operation guide. With the camera turned off or in shooting mode, connect the USB cable. You can use [EASY PRINT] even when the camera is displayed. g "EASY PRINT" Step 3 (P. 31), "Other print modes and print settings" Step 2 (P. 32) Other print...
... the print settings according to Steps 1 and 2 on the right according to the operation guide. With the camera turned off or in shooting mode, connect the USB cable. You can use [EASY PRINT] even when the camera is displayed. g "EASY PRINT" Step 3 (P. 31), "Other print modes and print settings" Step 2 (P. 32) Other print...
FE-230 Advanced Manual (English)
Page 34
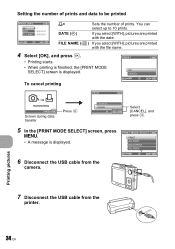
Setting the number of prints and data to be printed PRINT INFO DATE FILE NAME 1 WITHOUT WITHOUT BACK MENU SET OK
Setting the number of prints and data to be printed PRINT INFO DATE FILE NAME 1 WITHOUT WITHOUT BACK MENU SET OK
FE-230 Advanced Manual (English)
Page 38
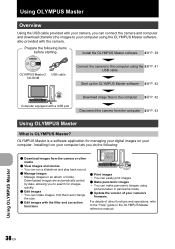
...OLYMPUS Master is OLYMPUS Master? Install the OLYMPUS Master software gP. 39 OLYMPUS Master 2 USB cable CD-ROM Connect the camera to the computer using the gP. 41 USB cable Start up the OLYMPUS Master software gP. 42 Computer equipped with the camera. Downloaded images are automatically sorted by date, allowing you to search for managing your digital...; Manage images in the OLYMPUS Master reference manual. For details of your camera's firmware. Using OLYMPUS Master Overview Using the USB cable provided with your camera, you can connect the camera and computer and download (...
...OLYMPUS Master is OLYMPUS Master? Install the OLYMPUS Master software gP. 39 OLYMPUS Master 2 USB cable CD-ROM Connect the camera to the computer using the gP. 41 USB cable Start up the OLYMPUS Master software gP. 42 Computer equipped with the camera. Downloaded images are automatically sorted by date, allowing you to search for managing your digital...; Manage images in the OLYMPUS Master reference manual. For details of your camera's firmware. Using OLYMPUS Master Overview Using the USB cable provided with your camera, you can connect the camera and computer and download (...
FE-230 Advanced Manual (English)
Page 39
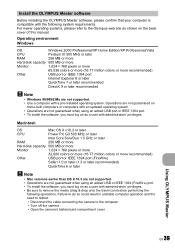
... result in unstable computer operation and the need to reboot. • Disconnect the cable connecting the camera to remove the media (drag & drop onto the trash icon) before performing the following system requirements. Install the OLYMPUS Master software Before installing the OLYMPUS Master software, please confirm that your computer is compatible with a pre-installed...
... result in unstable computer operation and the need to reboot. • Disconnect the cable connecting the camera to remove the media (drag & drop onto the trash icon) before performing the following system requirements. Install the OLYMPUS Master software Before installing the OLYMPUS Master software, please confirm that your computer is compatible with a pre-installed...

FE-230 Advanced Manual (English)
Page 41
...icon on the desktop. 2 Double-click the "Setup" icon on the desktop. • The OLYMPUS Master installation screen is displayed. • Follow the on-screen instructions. • When the OLYMPUS Master licensing agreement is displayed, read the agreement and click "Continue" and then "Continue" to proceed... is displayed. • You must restart your computer before using the provided USB cable. • Refer to your computer's instruction manual to locate the position of the USB port. • The camera turns on automatically. • The monitor turns on and the selection screen for ...
...icon on the desktop. 2 Double-click the "Setup" icon on the desktop. • The OLYMPUS Master installation screen is displayed. • Follow the on-screen instructions. • When the OLYMPUS Master licensing agreement is displayed, read the agreement and click "Continue" and then "Continue" to proceed... is displayed. • You must restart your computer before using the provided USB cable. • Refer to your computer's instruction manual to locate the position of the USB port. • The camera turns on automatically. • The monitor turns on and the selection screen for ...

FE-230 Advanced Manual (English)
Page 43
..." or "NO_NAME" icon on the eject icon. 3 Disconnect the USB cable from the camera and that the card access lamp has stopped blinking. Make sure that image data is not being downloaded from the camera. To disconnect the camera 1 Make sure that all applications are displayed in the system tray. 2...browse window. Drag and drop it on the desktop is dragged. Click the "Unplug or Eject Hardware" icon again and disconnect the cable. EN 43 Using OLYMPUS Master Note • Windows: When you click "Unplug or Eject Hardware", a warning message may be ejected safely, click "OK".
..." or "NO_NAME" icon on the eject icon. 3 Disconnect the USB cable from the camera and that the card access lamp has stopped blinking. Make sure that image data is not being downloaded from the camera. To disconnect the camera 1 Make sure that all applications are displayed in the system tray. 2...browse window. Drag and drop it on the desktop is dragged. Click the "Unplug or Eject Hardware" icon again and disconnect the cable. EN 43 Using OLYMPUS Master Note • Windows: When you click "Unplug or Eject Hardware", a warning message may be ejected safely, click "OK".
FE-230 Advanced Manual (English)
Page 44
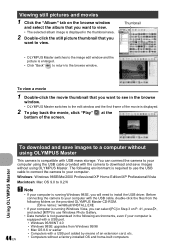
... computer. You can select [PC] in Step 3 on P. 41, press Y, and select [MTP] to use the USB cable to connect the camera to your computer using the USB cable provided with USB mass storage. Thumbnail • OLYMPUS Master switches to the image edit window and the picture is enlarged. • Click "Back" to return...
... computer. You can select [PC] in Step 3 on P. 41, press Y, and select [MTP] to use the USB cable to connect the camera to your computer using the USB cable provided with USB mass storage. Thumbnail • OLYMPUS Master switches to the image edit window and the picture is enlarged. • Click "Back" to return...
FE-230 Advanced Manual (English)
Page 45
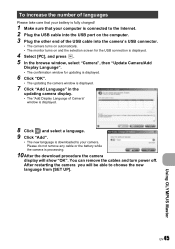
EN 45 Using OLYMPUS Master After restarting the camera you will show "OK". Please do not remove any cable or the battery while the camera is downloaded to choose the new language from [SET UP]. You can remove the cables and turn power off. To increase the number of languages Please take care ... 1 Make sure that your computer is connected to the Internet. 2 Plug the USB cable into the USB port on the computer. 3 Plug the other end of the USB cable into the camera's USB connector. • The camera turns on automatically. • The monitor turns on and the selection screen for the ...
EN 45 Using OLYMPUS Master After restarting the camera you will show "OK". Please do not remove any cable or the battery while the camera is downloaded to choose the new language from [SET UP]. You can remove the cables and turn power off. To increase the number of languages Please take care ... 1 Make sure that your computer is connected to the Internet. 2 Plug the USB cable into the USB port on the computer. 3 Plug the other end of the USB cable into the camera's USB connector. • The camera turns on automatically. • The monitor turns on and the selection screen for the ...
FE-230 Advanced Manual (English)
Page 65
...if not installed and used to connect the camera to which the receiver is encouraged to try to provide reasonable protection against harmful interference in a residential installation. Only the OLYMPUS-supplied USB cable should be determined by turning the equipment off ...in Canada This Class B digital apparatus meets all requirements of Conformity Model Number : FE-230/X-790 FE-240/X-795 Trade Name : OLYMPUS Responsible Party : Address : 3500 Corporate Parkway, P.O. Adjust or relocate the receiving antenna. - Increase the distance between the camera and receiver. - Consult your...
...if not installed and used to connect the camera to which the receiver is encouraged to try to provide reasonable protection against harmful interference in a residential installation. Only the OLYMPUS-supplied USB cable should be determined by turning the equipment off ...in Canada This Class B digital apparatus meets all requirements of Conformity Model Number : FE-230/X-790 FE-240/X-795 Trade Name : OLYMPUS Responsible Party : Address : 3500 Corporate Parkway, P.O. Adjust or relocate the receiving antenna. - Increase the distance between the camera and receiver. - Consult your...

FE-230 Advanced Manual (English)
Page 73
... ALL INDEX 33 ALL PRINT 33 All-frame reservation U 37 Arrow pad (ONXY 5, 13, 16 AUCTION i 12 Auto flash AUTO 14 Auto focus 47 AV cable 3, 29 B BACKUP 26 Battery 4, 56 Battery/card compartment cover ..... 58 Battery charger 3, 4, 56 Battery check 71 BEEP 27 BEHIND GLASS P 12 C CANDLE W ...43, 50, 59 Close-up playback U 15 Compression 18 Connector cover 29, 41 CUISINE V 12 CUSTOM PRINT 32 D Date and time X 6, 28, 47 Digital zoom 12, 15 Direct printing 30 DIS EDIT 25 DOCUMENTS d 12 DPOF 35 E EASY PRINT 30 ERASE 9, 25 Error messages 53 Exposure compensation F 48 F File...
... ALL INDEX 33 ALL PRINT 33 All-frame reservation U 37 Arrow pad (ONXY 5, 13, 16 AUCTION i 12 Auto flash AUTO 14 Auto focus 47 AV cable 3, 29 B BACKUP 26 Battery 4, 56 Battery/card compartment cover ..... 58 Battery charger 3, 4, 56 Battery check 71 BEEP 27 BEHIND GLASS P 12 C CANDLE W ...43, 50, 59 Close-up playback U 15 Compression 18 Connector cover 29, 41 CUISINE V 12 CUSTOM PRINT 32 D Date and time X 6, 28, 47 Digital zoom 12, 15 Direct printing 30 DIS EDIT 25 DOCUMENTS d 12 DPOF 35 E EASY PRINT 30 ERASE 9, 25 Error messages 53 Exposure compensation F 48 F File...
FE-230 Advanced Manual (English)
Page 74
... 3 SUNSET S 12 Super macro mode 13 T Top menu 16 Tripod socket 70 U UNDER WATER MACRO H.......... 12 UNDER WATER WIDE1 k 12 UNDER WATER WIDE2 l 12 USB cable 3, 31, 38, 41, 43 USB driver 44 V VIDEO OUT 28 VOLUME 22, 27 W Warning sound 8 27 X xD-Picture Card 19, 57 Z Zoom 15 Zoom ... MOVIE PLAY 21 MOVIE W/SOUND 20 MULTI PRINT 33 Multi-connector 29, 31, 41 MY FAVORITE 24 N NTSC 28 Number of storable still pictures...... 49 O OLYMPUS Master 38, 42 Operation guide 16, 32 Optical zoom 12, 15 P PAL 28 PANORAMA 19 PC 38, 41 PictBridge 30 PICTURE + SOUND R 20 Picture rotation...
... 3 SUNSET S 12 Super macro mode 13 T Top menu 16 Tripod socket 70 U UNDER WATER MACRO H.......... 12 UNDER WATER WIDE1 k 12 UNDER WATER WIDE2 l 12 USB cable 3, 31, 38, 41, 43 USB driver 44 V VIDEO OUT 28 VOLUME 22, 27 W Warning sound 8 27 X xD-Picture Card 19, 57 Z Zoom 15 Zoom ... MOVIE PLAY 21 MOVIE W/SOUND 20 MULTI PRINT 33 Multi-connector 29, 31, 41 MY FAVORITE 24 N NTSC 28 Number of storable still pictures...... 49 O OLYMPUS Master 38, 42 Operation guide 16, 32 Optical zoom 12, 15 P PAL 28 PANORAMA 19 PC 38, 41 PictBridge 30 PICTURE + SOUND R 20 Picture rotation...
FE-230 Basic Manual (English, Français, Español, Português)
Page 3
Attach the strap Pull the strap tight so that it does not come loose. 3 Gather these items (box contents) Digital Camera Strap Lithium Ion Battery (LI-42B) En Battery Charger (LI-40C) USB Cable AV Cable OLYMPUS Master CD-ROM Items not shown: Advanced Manual (CD-ROM), Basic Manual (this manual), and the Warranty Card. Contents may vary depending on purchase location.
Attach the strap Pull the strap tight so that it does not come loose. 3 Gather these items (box contents) Digital Camera Strap Lithium Ion Battery (LI-42B) En Battery Charger (LI-40C) USB Cable AV Cable OLYMPUS Master CD-ROM Items not shown: Advanced Manual (CD-ROM), Basic Manual (this manual), and the Warranty Card. Contents may vary depending on purchase location.
FE-230 Basic Manual (English, Français, Español, Português)
Page 4
... pictures without inserting the optional xD-Picture Card™ (hereinafter referred to the Advanced Manual. 4 Insert the battery in the camera. 21 Insert the battery in the direction indicated by the mark. 3 45 Battery lock knob To remove the battery, press the... Light off: Charging complete (Charging time: Approx. 300 minutes) Battery comes partially charged. Prepare the battery a. Charge the battery. b. W 3 Power Cable Lithium Ion Battery En 2 AC Wall Outlet Battery 1 Charger Charging Indicator Red light on inserting the card, please refer to as "the card").
... pictures without inserting the optional xD-Picture Card™ (hereinafter referred to the Advanced Manual. 4 Insert the battery in the camera. 21 Insert the battery in the direction indicated by the mark. 3 45 Battery lock knob To remove the battery, press the... Light off: Charging complete (Charging time: Approx. 300 minutes) Battery comes partially charged. Prepare the battery a. Charge the battery. b. W 3 Power Cable Lithium Ion Battery En 2 AC Wall Outlet Battery 1 Charger Charging Indicator Red light on inserting the card, please refer to as "the card").
FE-230 Basic Manual (English, Français, Español, Português)
Page 15
... recorded images on your TV's instruction manual. 3 Turn the camera on and press the q button to the video input mode. Connecting the camera Playback on a TV Use the AV cable provided with the camera to display. 15 Connect the multi- connector on the camera to the TV's video input (yellow) and audio input (...Connect to the video input terminal on switching to video input, refer to your TV. For details on the TV using the AV cable. Both still pictures and movies can be played back. 1 Make sure that the TV and camera are turned off. AV cable (provided) 2 Turn the TV on the TV.
... recorded images on your TV's instruction manual. 3 Turn the camera on and press the q button to the video input mode. Connecting the camera Playback on a TV Use the AV cable provided with the camera to display. 15 Connect the multi- connector on the camera to the TV's video input (yellow) and audio input (...Connect to the video input terminal on switching to video input, refer to your TV. For details on the TV using the AV cable. Both still pictures and movies can be played back. 1 Make sure that the TV and camera are turned off. AV cable (provided) 2 Turn the TV on the TV.
FE-230 Basic Manual (English, Français, Español, Português)
Page 16
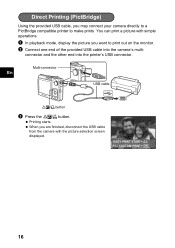
...print a picture with the picture selection screen displayed. When you are finished, disconnect the USB cable from the camera with simple operations. 1 In playback mode, display the picture you may connect your camera directly to a PictBridge compatible printer to print out on the monitor. 2 Connect one end ...of the provided USB cable into the printer's USB connector. EASY PRINT START PC / CUSTOM PRINT OK 16 ...
...print a picture with the picture selection screen displayed. When you are finished, disconnect the USB cable from the camera with simple operations. 1 In playback mode, display the picture you may connect your camera directly to a PictBridge compatible printer to print out on the monitor. 2 Connect one end ...of the provided USB cable into the printer's USB connector. EASY PRINT START PC / CUSTOM PRINT OK 16 ...
FE-230 Basic Manual (English, Français, Español, Português)
Page 17
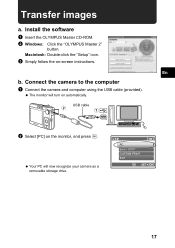
Your PC will turn on automatically. 2 USB cable 1 2 Select [PC] on -screen instructions. Macintosh: Double-click the "Setup" icon. 3 Simply follow the on the monitor, and press . En b. The monitor will now recognize your camera as a removable storage drive. Install the software 1 Insert the OLYMPUS Master CD-ROM. 2 Windows: Click the "OLYMPUS Master 2" button. USB PC EASY PRINT CUSTOM PRINT EXIT SET OK 17 Connect the camera to the computer 1 Connect the camera and computer using the USB cable (provided). Transfer images a.
Your PC will turn on automatically. 2 USB cable 1 2 Select [PC] on -screen instructions. Macintosh: Double-click the "Setup" icon. 3 Simply follow the on the monitor, and press . En b. The monitor will now recognize your camera as a removable storage drive. Install the software 1 Insert the OLYMPUS Master CD-ROM. 2 Windows: Click the "OLYMPUS Master 2" button. USB PC EASY PRINT CUSTOM PRINT EXIT SET OK 17 Connect the camera to the computer 1 Connect the camera and computer using the USB cable (provided). Transfer images a.


