

DS-5000iD Detailed Instructions (English)
Page 1
To ensure successful recordings, we recommend that you for purchasing an Olympus Digital Voice Recorder. EN Please read these instructions for future reference. Keep the instructions handy for information about using the product correctly and safely. DIGITAL VOICE RECORDER DS-5000 DS-5000iD DETAILED INSTRUCTIONS Thank you test the record function and volume before use.
To ensure successful recordings, we recommend that you for purchasing an Olympus Digital Voice Recorder. EN Please read these instructions for future reference. Keep the instructions handy for information about using the product correctly and safely. DIGITAL VOICE RECORDER DS-5000 DS-5000iD DETAILED INSTRUCTIONS Thank you test the record function and volume before use.

DS-5000iD Detailed Instructions (English)
Page 4
...Parts 14 Installing Batteries 16 Charging Battery Pack 18 Using the Battery Pack 20 Using the AC Adapter 21 Turning ON the Recorder 22 Power Save Mode (Power Save 22 Inserting and Ejecting a SD card .......... 23 Setting Time and Date (Time & Date) ... 24 ... card .... 63 Formatting the Card (Format 64 Check System Information (System info.) .. 66 Changing the USB Class (USB Class) .... 67 Customizing the Recorder 68 4 Managing Files on Your PC DSS Player Software 69 Installing DSS Player Software 71 Uninstalling DSS Player Software ......... 72 Using Online Help 73 Connecting...
...Parts 14 Installing Batteries 16 Charging Battery Pack 18 Using the Battery Pack 20 Using the AC Adapter 21 Turning ON the Recorder 22 Power Save Mode (Power Save 22 Inserting and Ejecting a SD card .......... 23 Setting Time and Date (Time & Date) ... 24 ... card .... 63 Formatting the Card (Format 64 Check System Information (System info.) .. 66 Changing the USB Class (USB Class) .... 67 Customizing the Recorder 68 4 Managing Files on Your PC DSS Player Software 69 Installing DSS Player Software 71 Uninstalling DSS Player Software ......... 72 Using Online Help 73 Connecting...

DS-5000iD Detailed Instructions (English)
Page 6
... actions which may result in serious Danger injury or death. Important Safety Precautions Certain symbols are used in the user's manual and on the recorder. 6 Signifies danger which may result in Caution damage or personal injury. Safe and Proper Usage Before using your new... recorder, read this manual in an easily accessible location for future reference. Symbols prohibiting a specific action Prohibited Do not disassemble Symbols requiring a specific action Mandatory ...
... actions which may result in serious Danger injury or death. Important Safety Precautions Certain symbols are used in the user's manual and on the recorder. 6 Signifies danger which may result in Caution damage or personal injury. Safe and Proper Usage Before using your new... recorder, read this manual in an easily accessible location for future reference. Symbols prohibiting a specific action Prohibited Do not disassemble Symbols requiring a specific action Mandatory ...

DS-5000iD Detailed Instructions (English)
Page 7
... non-rechargeable batteries. • Never use organic solvents such as alcohol and lacquer thinner to clean the unit. ● Do not place the recorder on the = terminal. If this warning is a hole from which gas escapes on top of or near electric appliances such as TVs or refrigerators.... ● Avoid recording or playing back near cellular phones or other wireless equipment, as they may occur. • Do not connect the batteries directly to a power outlet...
... non-rechargeable batteries. • Never use organic solvents such as alcohol and lacquer thinner to clean the unit. ● Do not place the recorder on the = terminal. If this warning is a hole from which gas escapes on top of or near electric appliances such as TVs or refrigerators.... ● Avoid recording or playing back near cellular phones or other wireless equipment, as they may occur. • Do not connect the batteries directly to a power outlet...

DS-5000iD Detailed Instructions (English)
Page 8
...anything unusual when using this product without adult supervision. 8 Getting the recorder wet may cause fire, electric shock, or Do not injury. Do not let children use with Olympus digital voice recorder DS5000/5000iD. Caution • Rechargeable batteries are charged at the same ...or electric shock. • Do not insert metal wires or similar objects. Warning • Never disassemble, modify, or repair the recorder yourself. This may cause overheating, fire, or malfunction. disassemble • Never use the included AC adapter with the cradle. General Precautions...
...anything unusual when using this product without adult supervision. 8 Getting the recorder wet may cause fire, electric shock, or Do not injury. Do not let children use with Olympus digital voice recorder DS5000/5000iD. Caution • Rechargeable batteries are charged at the same ...or electric shock. • Do not insert metal wires or similar objects. Warning • Never disassemble, modify, or repair the recorder yourself. This may cause overheating, fire, or malfunction. disassemble • Never use the included AC adapter with the cradle. General Precautions...
DS-5000iD Detailed Instructions (English)
Page 11
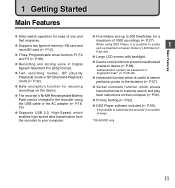
... and play back instructions on the device. ● The recorder's Ni-MH Rechargeable Battery Pack can be charged in a number of ways. *DS-5000iD only 11 High-Speed, which enables high-speed data transmission from the recorder to your computer. ● Five folders and up to... 200 files/folder, for securing recordings on their computer (☞ P.56). ● Priority Setting (&#...
... and play back instructions on the device. ● The recorder's Ni-MH Rechargeable Battery Pack can be charged in a number of ways. *DS-5000iD only 11 High-Speed, which enables high-speed data transmission from the recorder to your computer. ● Five folders and up to... 200 files/folder, for securing recordings on their computer (☞ P.56). ● Priority Setting (&#...

DS-5000iD Detailed Instructions (English)
Page 12
... the card. • Inserting and Ejecting a SD card (☞ P.23) • Inserting and Ejecting a microSD card (☞ P.63) • Setting Recording Destination (Card Select) (☞ P.26) • Formatting the Card (Format) (☞ P.64) SD card 1 3 2 microSD card 1 12 SD card...on the Olympus homepage (http://www.olympus.com) when using cards other than the included card. microSD card 1 Contact area Comes into contact with the recorder's signal read contacts. Compatible Cards The recorder supports cards with a lock function. Memory Card This recorder uses dual...
... the card. • Inserting and Ejecting a SD card (☞ P.23) • Inserting and Ejecting a microSD card (☞ P.63) • Setting Recording Destination (Card Select) (☞ P.26) • Formatting the Card (Format) (☞ P.64) SD card 1 3 2 microSD card 1 12 SD card...on the Olympus homepage (http://www.olympus.com) when using cards other than the included card. microSD card 1 Contact area Comes into contact with the recorder's signal read contacts. Compatible Cards The recorder supports cards with a lock function. Memory Card This recorder uses dual...

DS-5000iD Detailed Instructions (English)
Page 13
...Information such as a computer, cannot be disabled. To recover the original recording time, initialize/format the card in a location that no necessary data is...EXIT Notes • When initializing (formatting) a card, confirm that is stored on the recorder (☞ P.42). In this recorder before using. • The card has a service life. Initialization completely erases the existing data... on the card. • In some data on the card, the maximum recording time on the card may damage the card. • Do not place the card in locations with...
...Information such as a computer, cannot be disabled. To recover the original recording time, initialize/format the card in a location that no necessary data is...EXIT Notes • When initializing (formatting) a card, confirm that is stored on the recorder (☞ P.42). In this recorder before using. • The card has a service life. Initialization completely erases the existing data... on the card. • In some data on the card, the maximum recording time on the card may damage the card. • Do not place the card in locations with...
DS-5000iD Detailed Instructions (English)
Page 14
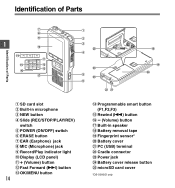
... card slot 2 Built-in microphone 3 NEW button 4 Slide (REC/STOP/PLAY/REV) switch 5 POWER (ON/OFF) switch 6 ERASE button 7 EAR (Earphone) jack 8 MIC (Microphone) jack 9 Record/Play indicator light 0 Display (LCD panel) ! + (Volume) button @ Fast Forward (9) button # OK/MENU button 14 $ Programmable smart button (F1,F2,F3) % Rewind (0) button ^ - (Volume) button... & Built-in speaker * Battery removal tape ( Fingerprint sensor* ) Battery cover - PC (USB) terminal = Cradle connector q Power jack w Battery cover release button e microSD card cover *DS-5000iD only
... card slot 2 Built-in microphone 3 NEW button 4 Slide (REC/STOP/PLAY/REV) switch 5 POWER (ON/OFF) switch 6 ERASE button 7 EAR (Earphone) jack 8 MIC (Microphone) jack 9 Record/Play indicator light 0 Display (LCD panel) ! + (Volume) button @ Fast Forward (9) button # OK/MENU button 14 $ Programmable smart button (F1,F2,F3) % Rewind (0) button ^ - (Volume) button... & Built-in speaker * Battery removal tape ( Fingerprint sensor* ) Battery cover - PC (USB) terminal = Cradle connector q Power jack w Battery cover release button e microSD card cover *DS-5000iD only

DS-5000iD Detailed Instructions (English)
Page 15
... switch guide by using "Slide Switch Guide settings" (P.68) of the customize functions of files in the playback mode 1 Record mode indicator 2 Current folder 3 Memory remaining indicator (E/F bar) 4 Recording elapsed time 5 Remaining recording time 6 Level meter indicator 7 Button guide display 8 Microphone sensitivity indicator 9 Current file number 0 Total number of DSS Player...! 00M 10S @ 025 5 /030 / 030 F $ 02 M 50 S 0 M 00 S 5 15H 22M30S # 12M 05S H 00 M 00S 6 7 VERBAL DISPLY INDEX INSERT SPEED INDEX SPLY INDEX Display in the recording mode Display in the folder !
... switch guide by using "Slide Switch Guide settings" (P.68) of the customize functions of files in the playback mode 1 Record mode indicator 2 Current folder 3 Memory remaining indicator (E/F bar) 4 Recording elapsed time 5 Remaining recording time 6 Level meter indicator 7 Button guide display 8 Microphone sensitivity indicator 9 Current file number 0 Total number of DSS Player...! 00M 10S @ 025 5 /030 / 030 F $ 02 M 50 S 0 M 00 S 5 15H 22M30S # 12M 05S H 00 M 00S 6 7 VERBAL DISPLY INDEX INSERT SPEED INDEX SPLY INDEX Display in the recording mode Display in the folder !

DS-5000iD Detailed Instructions (English)
Page 16
...illustration below. 2 Insert the Ni-MH Rechargeable Battery Pack, observing the correct polarity as possible. Projection part The flat surface is low, the recorder shuts down lightly the battery pack with your finger while pulling. Notes • Removing the battery pack while the... The battery indicator on the display changes as the directions inscribed inside the battery compartment apply to be fully charged in the recorder before initial use the recorder for an extended period of time. 16 Battery removal tape The battery pack needs to AAA batteries only. When the battery ...
...illustration below. 2 Insert the Ni-MH Rechargeable Battery Pack, observing the correct polarity as possible. Projection part The flat surface is low, the recorder shuts down lightly the battery pack with your finger while pulling. Notes • Removing the battery pack while the... The battery indicator on the display changes as the directions inscribed inside the battery compartment apply to be fully charged in the recorder before initial use the recorder for an extended period of time. 16 Battery removal tape The battery pack needs to AAA batteries only. When the battery ...

DS-5000iD Detailed Instructions (English)
Page 17
...on the tape the batteries may suddenly pop out, so be used . • Commercially available batteries for which part or all of the recorder's battery compartment. The battery indicator on the display changes as possible. When the batteries are not going to replace both batteries at the ...has been peeled off (naked batteries), or those where it takes longer than 1 minute to press down lightly the batteries with your currently recorded file since the file header will not be removed easily by pulling up the tape. The batteries can then be written. Installing Batteries ...
...on the tape the batteries may suddenly pop out, so be used . • Commercially available batteries for which part or all of the recorder's battery compartment. The battery indicator on the display changes as possible. When the batteries are not going to replace both batteries at the ...has been peeled off (naked batteries), or those where it takes longer than 1 minute to press down lightly the batteries with your currently recorded file since the file header will not be removed easily by pulling up the tape. The batteries can then be written. Installing Batteries ...
DS-5000iD Detailed Instructions (English)
Page 18
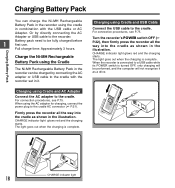
... cable to the cradle AC connector (☞ P.21). Firmly press the recorder all the way into the cradle as shown in the illustration. Turn the recorder's POWER switch OFF (☞ P.22), then firmly press the recorder all the way into the cradle as shown in the illustration. Battery pack...CHARGE indicator light glows red and the charging starts. CHARGE indicator light glows red and the charging starts. CHARGE indicator light 18 When the recorder is connected to be performed, and the computer will not recognize it . The light goes out when the charging is complete. Or by...
... cable to the cradle AC connector (☞ P.21). Firmly press the recorder all the way into the cradle as shown in the illustration. Turn the recorder's POWER switch OFF (☞ P.22), then firmly press the recorder all the way into the cradle as shown in the illustration. Battery pack...CHARGE indicator light glows red and the charging starts. CHARGE indicator light glows red and the charging starts. CHARGE indicator light 18 When the recorder is connected to be performed, and the computer will not recognize it . The light goes out when the charging is complete. Or by...
DS-5000iD Detailed Instructions (English)
Page 19
...POWER switch is turned OFF, only charging will be performed, and the computer will take only few uses. Charging using AC Adapter (no cradle) While recorder's POWER switch is turned OFF, connect the USB cable to charge the battery pack. For connection procedures, see P.21. Use the AC adapter instead.... • Do not set or remove the recorder from the cradle while it as a drive. 19 Charging Battery Pack • The PC must be ON when charging battery pack via the USB ...
...POWER switch is turned OFF, only charging will be performed, and the computer will take only few uses. Charging using AC Adapter (no cradle) While recorder's POWER switch is turned OFF, connect the USB cable to charge the battery pack. For connection procedures, see P.21. Use the AC adapter instead.... • Do not set or remove the recorder from the cradle while it as a drive. 19 Charging Battery Pack • The PC must be ON when charging battery pack via the USB ...

DS-5000iD Detailed Instructions (English)
Page 20
...use them regularly before disposing. Battery life Over time, rechargeable battery packs gradually wear down. Notes • This recorder is designed to prevent battery leakage or rust, remove the battery pack from the products when you local recycling center...battery life. This is not in use . In order to fully charge battery pack regardless of such products. For customers in Germany Olympus has a contract with Olympus voice recorder DS-5000/DS-5000iD. by taping the contacts) before use . Contact you will not be using appliance): 0°C - 42°C/32°F ...
...use them regularly before disposing. Battery life Over time, rechargeable battery packs gradually wear down. Notes • This recorder is designed to prevent battery leakage or rust, remove the battery pack from the products when you local recycling center...battery life. This is not in use . In order to fully charge battery pack regardless of such products. For customers in Germany Olympus has a contract with Olympus voice recorder DS-5000/DS-5000iD. by taping the contacts) before use . Contact you will not be using appliance): 0°C - 42°C/32°F ...

DS-5000iD Detailed Instructions (English)
Page 21
...such as indicated on the country where sold. Plug the AC adapter (included) into a household power outlet and connect the power plug to the recorder and cradle with the aim of charging the Ni-MH Rechargeable Battery Pack (☞ P.16). AC adapter Warning • Always stop . AC ...connector AC cable The plug type varies depending on the adapter. The recorder will stop recording before you connect power. Use the included AC adapter. Using the AC Adapter Use the AC adapter (included) in use, disconnect the ...
...such as indicated on the country where sold. Plug the AC adapter (included) into a household power outlet and connect the power plug to the recorder and cradle with the aim of charging the Ni-MH Rechargeable Battery Pack (☞ P.16). AC adapter Warning • Always stop . AC ...connector AC cable The plug type varies depending on the adapter. The recorder will stop recording before you connect power. Use the included AC adapter. Using the AC Adapter Use the AC adapter (included) in use, disconnect the ...

DS-5000iD Detailed Instructions (English)
Page 22
... exit power save mode automatically. For more details, refer to "Menu List" (☞ P.41) and "Learning to activate the recorder. When the recorder is ON but not in the OFF position, none of the recorder is ready to work. 1 While the POWER switch on the side of the buttons or switch on the... any button or the slide switch. The [Power Save] setting can set the time to enter Power Save mode from the Menu. To reactivate the recorder again, operate any button. Move the POWER switch to the ON position to Use the Menu" (☞ P.43). Turning ON the...
... exit power save mode automatically. For more details, refer to "Menu List" (☞ P.41) and "Learning to activate the recorder. When the recorder is ON but not in the OFF position, none of the recorder is ready to work. 1 While the POWER switch on the side of the buttons or switch on the... any button or the slide switch. The [Power Save] setting can set the time to enter Power Save mode from the Menu. To reactivate the recorder again, operate any button. Move the POWER switch to the ON position to Use the Menu" (☞ P.43). Turning ON the...

DS-5000iD Detailed Instructions (English)
Page 23
...the card inward may not be the default 1 location selected from the recorder, the recorder will automatically change over to the other card. The microSD card has been preloaded. Recorder Card Selection When inserting SD card into the card slot in the direction...available. When SD card selected from the menu [Card Select] option is not available, the recorder will automatically change over the recording destination to the other card. The recorder recording destination will be written to P.63 when removing or inserting the card during emergencies. Inserting and...
...the card inward may not be the default 1 location selected from the recorder, the recorder will automatically change over to the other card. The microSD card has been preloaded. Recorder Card Selection When inserting SD card into the card slot in the direction...available. When SD card selected from the menu [Card Select] option is not available, the recorder will automatically change over the recording destination to the other card. The recorder recording destination will be written to P.63 when removing or inserting the card during emergencies. Inserting and...

DS-5000iD Detailed Instructions (English)
Page 24
...time and date information as the device lock function (☞ P.46), the recorder will flash automatically when you load batteries before using the recorder for the first time, or after verification (unlocking). However, when a Password or Fingerprint (DS-5000iD only) has been set as part of the file header. Follow the...the 9 or 0 button to set. Setting Time and Date (Time & Date) Setting Time and Date Setting the correct time and date on the recorder is very important since every file recorded on . 1 The hour indicator will go to the time and date set screen after the...
...time and date information as the device lock function (☞ P.46), the recorder will flash automatically when you load batteries before using the recorder for the first time, or after verification (unlocking). However, when a Password or Fingerprint (DS-5000iD only) has been set as part of the file header. Follow the...the 9 or 0 button to set. Setting Time and Date (Time & Date) Setting Time and Date Setting the correct time and date on the recorder is very important since every file recorded on . 1 The hour indicator will go to the time and date set screen after the...

DS-5000iD Detailed Instructions (English)
Page 25
... Info. The time and date screen appears. Press the OK/MENU button according to complete the setup screen. Changing the Time and Date When the recorder's POWER switch is not correct, set it will vary depending on the status of the year, month, day by pressing the F2(D/M/Y or Y/M/D or M/ D/Y)* button...
... Info. The time and date screen appears. Press the OK/MENU button according to complete the setup screen. Changing the Time and Date When the recorder's POWER switch is not correct, set it will vary depending on the status of the year, month, day by pressing the F2(D/M/Y or Y/M/D or M/ D/Y)* button...


