
DS-40 Instructions (English)
Page 1
Please read these instructions for future reference. Keep the instructions handy for information about using the product correctly and safely. DIGITAL VOICE RECORDER DS-50 DS-40 DS-30 INSTRUCTIONS EN INSTRUCTIONS ES Thank you test the record function and volume before use. To ensure successful recordings, we recommend that you for purchasing an Olympus Digital Voice Recorder.
Please read these instructions for future reference. Keep the instructions handy for information about using the product correctly and safely. DIGITAL VOICE RECORDER DS-50 DS-40 DS-30 INSTRUCTIONS EN INSTRUCTIONS ES Thank you test the record function and volume before use. To ensure successful recordings, we recommend that you for purchasing an Olympus Digital Voice Recorder.

DS-40 Instructions (English)
Page 4
... Supply 15 HOLD 16 Setting Time/Date (Time&Date 17 Notes on the Folders 19 2 About Recording Before recording 23 Recording 25 Using the Variable Control Voice Actuator (VCVA 28 Recording Modes (Rec Mode 30 Microphone Sensitivity 31 Set the Low Cut Filter (LowCut Filter) ..... 32 ...Cancel Function (Noise Cancel) ... 43 Set the Voice Filter (Voice Filter 45 4 Erase and other functions Erasing 47 Index Marks and Temp Marks 50 Formatting the Recorder (Format 52 5 Display and Sound Functions LCD Display Information 55 Guidance (Voice Guide 57 6 Menu Setting Menu Setting Method 60...
... Supply 15 HOLD 16 Setting Time/Date (Time&Date 17 Notes on the Folders 19 2 About Recording Before recording 23 Recording 25 Using the Variable Control Voice Actuator (VCVA 28 Recording Modes (Rec Mode 30 Microphone Sensitivity 31 Set the Low Cut Filter (LowCut Filter) ..... 32 ...Cancel Function (Noise Cancel) ... 43 Set the Voice Filter (Voice Filter 45 4 Erase and other functions Erasing 47 Index Marks and Temp Marks 50 Formatting the Recorder (Format 52 5 Display and Sound Functions LCD Display Information 55 Guidance (Voice Guide 57 6 Menu Setting Menu Setting Method 60...

DS-40 Instructions (English)
Page 5
Table of Contents 7 Using the Recorder on Your PC Saving Files in Your PC 65 Using DSS Player Software 67 Installing Software 69 Using Online Help 72 Connecting to Your PC 73 Running DSS Player 75 8 Managing Files on Your PC Copying Voice Guide Data 76 9 DSS Player Expanded Functions... Upgrade Function 77 10 Importing Content for Listening on the Recorder Importing Content for Listening on the Recorder 79 11 Other Practical Use Methods Using as External Memory of the ...
Table of Contents 7 Using the Recorder on Your PC Saving Files in Your PC 65 Using DSS Player Software 67 Installing Software 69 Using Online Help 72 Connecting to Your PC 73 Running DSS Player 75 8 Managing Files on Your PC Copying Voice Guide Data 76 9 DSS Player Expanded Functions... Upgrade Function 77 10 Importing Content for Listening on the Recorder Importing Content for Listening on the Recorder 79 11 Other Practical Use Methods Using as External Memory of the ...

DS-40 Instructions (English)
Page 6
... the DSS Player on [DS-50/40/30 ONLINE INSTRUCTIONS]. If the DSS Player is essential that you to the Recorder .... 139 Importing Podcast Content...; The warning symbols indicate important safety related information. Recording from CD 138 Transferring Music File to learn more about the digital voice recorder. Input) ... 79 Viewing system information (System Info...Voice Files from the Recorder .. 109 Play a Voice File 111 Upload Voice Files to operate it is installed, click on the [Start] button, select [All Programs], then [OLYMPUS DSS Player], then click on your new recorder...
... the DSS Player on [DS-50/40/30 ONLINE INSTRUCTIONS]. If the DSS Player is essential that you to the Recorder .... 139 Importing Podcast Content...; The warning symbols indicate important safety related information. Recording from CD 138 Transferring Music File to learn more about the digital voice recorder. Input) ... 79 Viewing system information (System Info...Voice Files from the Recorder .. 109 Play a Voice File 111 Upload Voice Files to operate it is installed, click on the [Start] button, select [All Programs], then [OLYMPUS DSS Player], then click on your new recorder...

DS-40 Instructions (English)
Page 9
... ST HQ (Stereo High Quality Recording), and three types of monaural recording modes including HQ (High Quality), SP (Standard Recording), and LP (Long-tern Recording). (☞ P30) Recording time DS-50 (1GB) ST XQ mode: 17hours30minutes 1 ST HQ mode: 35hours10minutes HQ mode: 70hours20minutes SP mode: 138hours30minutes LP mode: 275hours20minutes Main Features DS-40 (512MB) ST XQ mode: ST...
... ST HQ (Stereo High Quality Recording), and three types of monaural recording modes including HQ (High Quality), SP (Standard Recording), and LP (Long-tern Recording). (☞ P30) Recording time DS-50 (1GB) ST XQ mode: 17hours30minutes 1 ST HQ mode: 35hours10minutes HQ mode: 70hours20minutes SP mode: 138hours30minutes LP mode: 275hours20minutes Main Features DS-40 (512MB) ST XQ mode: ST...

DS-40 Instructions (English)
Page 10
...controlled as preferred. ● It features various repeat functions. (☞ P39,41) ● A Noise Cancel Function (☞P43) and a Voice Filter Function (☞P45) cut noise and enable clear audio playback. ● Fast forward and rewind are registered in the DSS Player, the ...It uses a high-contrast monochrome LCD (liquid crystal display) panel with a backlight with a background color whiter than conventional Olympus models. Press the Podcast button on the recorder to quickly listen to the program (file) transferred from the DSS Player to read and save the data. (☞ ...
...controlled as preferred. ● It features various repeat functions. (☞ P39,41) ● A Noise Cancel Function (☞P43) and a Voice Filter Function (☞P45) cut noise and enable clear audio playback. ● Fast forward and rewind are registered in the DSS Player, the ...It uses a high-contrast monochrome LCD (liquid crystal display) panel with a backlight with a background color whiter than conventional Olympus models. Press the Podcast button on the recorder to quickly listen to the program (file) transferred from the DSS Player to read and save the data. (☞ ...

DS-40 Instructions (English)
Page 12
Identification of recorded files in the folder 6 Record mode indicator 7 Character information display y 8 Icon display Noise Cancel indicator Voice Filter indicator F. Play indicator S. Play indicator VCVA (Variable Control Voice Actuator) indicator Microphone sensitivity indicator Battery indicator Timer indicator ... Panel) Identification of Parts r t r MIC (Microphone) jack t REC/STOP switch y Clip 12 Display in the stereo recording mode Display in the playback mode 1 Folder name indicator 2 Erase lock indicator 3 Current file number 4 Play position bar indicator...
Identification of recorded files in the folder 6 Record mode indicator 7 Character information display y 8 Icon display Noise Cancel indicator Voice Filter indicator F. Play indicator S. Play indicator VCVA (Variable Control Voice Actuator) indicator Microphone sensitivity indicator Battery indicator Timer indicator ... Panel) Identification of Parts r t r MIC (Microphone) jack t REC/STOP switch y Clip 12 Display in the stereo recording mode Display in the playback mode 1 Folder name indicator 2 Erase lock indicator 3 Current file number 4 Play position bar indicator...

DS-40 Instructions (English)
Page 14
...sure to stop the recorder before connection or disconnection. • When the AC adapter is in use, disconnect the power supply plug from Olympus can be possible to play back the voice data being recorded. Unloading the batteries while the recorder is not in use the recorder for an extended period ...of time. Plug the optional AC adapter (Olympus Model A321 or A322) into a file ...
...sure to stop the recorder before connection or disconnection. • When the AC adapter is in use, disconnect the power supply plug from Olympus can be possible to play back the voice data being recorded. Unloading the batteries while the recorder is not in use the recorder for an extended period ...of time. Plug the optional AC adapter (Olympus Model A321 or A322) into a file ...

DS-40 Instructions (English)
Page 18
... don't want the guidance feature, select "Off". Setting Time/Date Changing the Time/Date Press the STOP button while the recorder has stopped recording to complete the setup screen. The hour indicator flashes, indicating the start from the set it using the procedure below. 1... 1 Press the + or - See P60, 62 regarding the menu. 2 Press the OK or 9 button. If the "Time & Date" is not required, select "Off", and the screen goes into "Voice...
... don't want the guidance feature, select "Off". Setting Time/Date Changing the Time/Date Press the STOP button while the recorder has stopped recording to complete the setup screen. The hour indicator flashes, indicating the start from the set it using the procedure below. 1... 1 Press the + or - See P60, 62 regarding the menu. 2 Press the OK or 9 button. If the "Time & Date" is not required, select "Off", and the screen goes into "Voice...

DS-40 Instructions (English)
Page 19
... "Music" and "Podcast". • When using the "Audible Manager", and files 1 transferred to create a folder in "Folder A" through "Folder E" are voice-recording folders, so choose one of these five folders when recording on this folder (in ACELP/MP3 format). "Folder A" through "Folder E" can be saved as "files". Notes on the Folders Each folder...
... "Music" and "Podcast". • When using the "Audible Manager", and files 1 transferred to create a folder in "Folder A" through "Folder E" are voice-recording folders, so choose one of these five folders when recording on this folder (in ACELP/MP3 format). "Folder A" through "Folder E" can be saved as "files". Notes on the Folders Each folder...

DS-40 Instructions (English)
Page 22
Notes on the Folders Notes on the Folders File names will be modified with DSS Player. 22 DS50 0001.WMA Extension 1 File number : A serial number automatically assigned by this recorder. The default name on the Digital Voice Recorder. The user ID can be automatically created for files recorded by a Digital Voice Recorder. User ID : The name that has been set on the Digital Voice Recorder is "DS-50" , "DS-40" or "DS-30" .
Notes on the Folders Notes on the Folders File names will be modified with DSS Player. 22 DS50 0001.WMA Extension 1 File number : A serial number automatically assigned by this recorder. The default name on the Digital Voice Recorder. The user ID can be automatically created for files recorded by a Digital Voice Recorder. User ID : The name that has been set on the Digital Voice Recorder is "DS-50" , "DS-40" or "DS-30" .

DS-40 Instructions (English)
Page 28
...If the 0 button is pressed, the setting will be canceled and it returns to the menu screen during recording, press the 0 button to close the menu screen. Using the Variable Control Voice Actuator 4 28 3 Press the OK or 9 button. The VCVA setup process begins. 4 Press the...If it will be more efficient. 22 1 While the recorder is selected, a VCVA indication will return to the menu. 5 6 Press the STOP button to close the menu. On: Will start recording in Variable Control Voice Actuator (VCVA) starts recording automatically, and stops when the volume drops below the ...
...If the 0 button is pressed, the setting will be canceled and it returns to the menu screen during recording, press the 0 button to close the menu screen. Using the Variable Control Voice Actuator 4 28 3 Press the OK or 9 button. The VCVA setup process begins. 4 Press the...If it will be more efficient. 22 1 While the recorder is selected, a VCVA indication will return to the menu. 5 6 Press the STOP button to close the menu. On: Will start recording in Variable Control Voice Actuator (VCVA) starts recording automatically, and stops when the volume drops below the ...
DS-40 Instructions (English)
Page 29
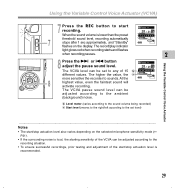
... testing and adjustment of 15 different values. At the 8 highest value, even the faintest sound will activate recording. Using the Variable Control Voice Actuator (VCVA) 7 Press the REC button to sounds. The record/play indicator light glows red when recording starts and flashes when recording pauses. 2 8 Press the 9 or 0 button adjust the pause sound level.
... testing and adjustment of 15 different values. At the 8 highest value, even the faintest sound will activate recording. Using the Variable Control Voice Actuator (VCVA) 7 Press the REC button to sounds. The record/play indicator light glows red when recording starts and flashes when recording pauses. 2 8 Press the 9 or 0 button adjust the pause sound level.

DS-40 Instructions (English)
Page 31
...'s microphone sensitivities. CONF( ): Suitable for conferences with a small number of people. DICT( ): Lowest recording sensitivity suitable for dictation. Microphone Sensitivity Microphone sensitivity is switched, it to DICT (dictation) mode. a Microphone sensitivity display ...Notes • When the speaker's voice is to be noisy, so keep the microphone a little lower than the speaker's mouth...
...'s microphone sensitivities. CONF( ): Suitable for conferences with a small number of people. DICT( ): Lowest recording sensitivity suitable for dictation. Microphone Sensitivity Microphone sensitivity is switched, it to DICT (dictation) mode. a Microphone sensitivity display ...Notes • When the speaker's voice is to be noisy, so keep the microphone a little lower than the speaker's mouth...

DS-40 Instructions (English)
Page 32
... opens. (☞ P60, 62) 1 2 Press the + or - Off: Low Cut Filter will appear on . Set the Low Cut Filter (LowCut Filter) The recorder has a Low Cut Filter function to choose "LowCut Filter". Set the Low Cut Filter 3 Press the OK or 9 button. button to the menu screen during... cursor and the Low Cut Filter will be turned on the display. If it is stopped or during recording, press the MENU button for 1 second or longer. button to minimize low-frequency sounds and record voices more clearly. The Low Cut Filter setup process begins. 4 Press the + or - a Low Cut...
... opens. (☞ P60, 62) 1 2 Press the + or - Off: Low Cut Filter will appear on . Set the Low Cut Filter (LowCut Filter) The recorder has a Low Cut Filter function to choose "LowCut Filter". Set the Low Cut Filter 3 Press the OK or 9 button. button to the menu screen during... cursor and the Low Cut Filter will be turned on the display. If it is stopped or during recording, press the MENU button for 1 second or longer. button to minimize low-frequency sounds and record voices more clearly. The Low Cut Filter setup process begins. 4 Press the + or - a Low Cut...

DS-40 Instructions (English)
Page 44
a Noise Cancel indicator 3 ...Notes • If you set Noise Cancel to "Low" or "High", the setting remains valid until it's set . If the recorder goes to close the menu 6 screen. Noise Cancel Function (Noise Cancel) 6 Press the STOP button to the menu screen during fast playback/slow playback. • Noise Cancel is not available while the Voice Filter (☞ P45) is set to "Off". • Noise cancel cannot be used during playback, press the 0 button to close the menu. The will appear on the display. Noise Cancel Function 44
a Noise Cancel indicator 3 ...Notes • If you set Noise Cancel to "Low" or "High", the setting remains valid until it's set . If the recorder goes to close the menu 6 screen. Noise Cancel Function (Noise Cancel) 6 Press the STOP button to the menu screen during fast playback/slow playback. • Noise Cancel is not available while the Voice Filter (☞ P45) is set to "Off". • Noise cancel cannot be used during playback, press the 0 button to close the menu. The will appear on the display. Noise Cancel Function 44

DS-40 Instructions (English)
Page 45
.... (☞ P60, 62) 1 2 Press the + or - If the 0 button is stopped or during playback, press the MENU button for 1 second or longer. Set the Voice Filter (Voice Filter) The recorder has a Voice Filter Function to cut low and high frequency tones during normal, fast, or slow playback, and enable clear audio playback. 2 1 While the...
.... (☞ P60, 62) 1 2 Press the + or - If the 0 button is stopped or during playback, press the MENU button for 1 second or longer. Set the Voice Filter (Voice Filter) The recorder has a Voice Filter Function to cut low and high frequency tones during normal, fast, or slow playback, and enable clear audio playback. 2 1 While the...

DS-40 Instructions (English)
Page 46
Set the Voice Filter 46 a Voice Filter indicator 3 ...Note • Voice Filter is not available while Noise Cancel is set . If it is set to "On", will appear on the display. Set the Voice Filter (Voice Filter) 6 Press the STOP button to close the menu screen. If the recorder goes to the menu screen 6 during playback, press the 0 button to close the menu.
Set the Voice Filter 46 a Voice Filter indicator 3 ...Note • Voice Filter is not available while Noise Cancel is set . If it is set to "On", will appear on the display. Set the Voice Filter (Voice Filter) 6 Press the STOP button to close the menu screen. If the recorder goes to the menu screen 6 during playback, press the 0 button to close the menu.

DS-40 Instructions (English)
Page 57
...Press the OK or 9 button to move to set. Guidance (Voice Guide) This feature gives audio announcements of guidance announcements. 2 1 While the recorder is stopped, press the MENU button for each setting, please see P58. 57 The voice guide setup process begins. 5 Guidance 4 Press the + or ...- button to select the item to the respective setting. 5 For procedures for 1 second or longer. Adjust the speed and the volume of recorder operating conditions. The menu opens. (☞...
...Press the OK or 9 button to move to set. Guidance (Voice Guide) This feature gives audio announcements of guidance announcements. 2 1 While the recorder is stopped, press the MENU button for each setting, please see P58. 57 The voice guide setup process begins. 5 Guidance 4 Press the + or ...- button to select the item to the respective setting. 5 For procedures for 1 second or longer. Adjust the speed and the volume of recorder operating conditions. The menu opens. (☞...
DS-40 Instructions (English)
Page 59
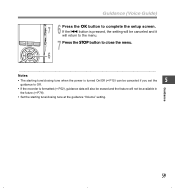
... erased and the feature will not be canceled and it will return to the menu. 7 Press the STOP button to complete the setup screen. Guidance (Voice Guide) 7 6 Press the OK button to close the menu. 6 ... Notes • The starting tune/closing tune when the power is turned On/Off (☞...;P15) can be canceled if you set the 5 guidance to Off. • If the recorder is pressed, the setting will be available in the future (☞P76). • Set the starting tune/closing tune at the guidance "Volume" setting. ...
... erased and the feature will not be canceled and it will return to the menu. 7 Press the STOP button to complete the setup screen. Guidance (Voice Guide) 7 6 Press the OK button to close the menu. 6 ... Notes • The starting tune/closing tune when the power is turned On/Off (☞...;P15) can be canceled if you set the 5 guidance to Off. • If the recorder is pressed, the setting will be available in the future (☞P76). • Set the starting tune/closing tune at the guidance "Volume" setting. ...


